OMN Camunda Integration
Here you can find instructions about how to use the Apollon Camunda Modeler, its human function templates in Camunda processes, as well as how to integrate these processes in OMN. Please note that this documentation does not cover details about process definitions with custom implementation.
Server Configuration
-
property to de/activate camunda
-
property to de/activate xwe
-
tokens
-
components — wfl docker — wfl api docker
Resources
-
Download Apollon Camunda Modeler
-
Download OMN Camunda Templates and install the templates in element-templates (full path in the repository readme file).
Apollon Camunda Modeler
The Camunda Modeler is a platform that enables the design, automation, and improvement of business processes. Such processes can be deployed and used in OMN.
In order to simplify the usage of OMN Human Functions in Camunda Processes, the Apollon Camunda Modeler was made. Templates for the execution of user tasks can now be used without the need for programming skills or learning variable names by heart. With them, only the properties for each function are showed and filled with their corresponding values. However, templates can only be used with the Apollon Camunda Modeler, not the regular one.
Modeling Processes with the Camunda Modeler
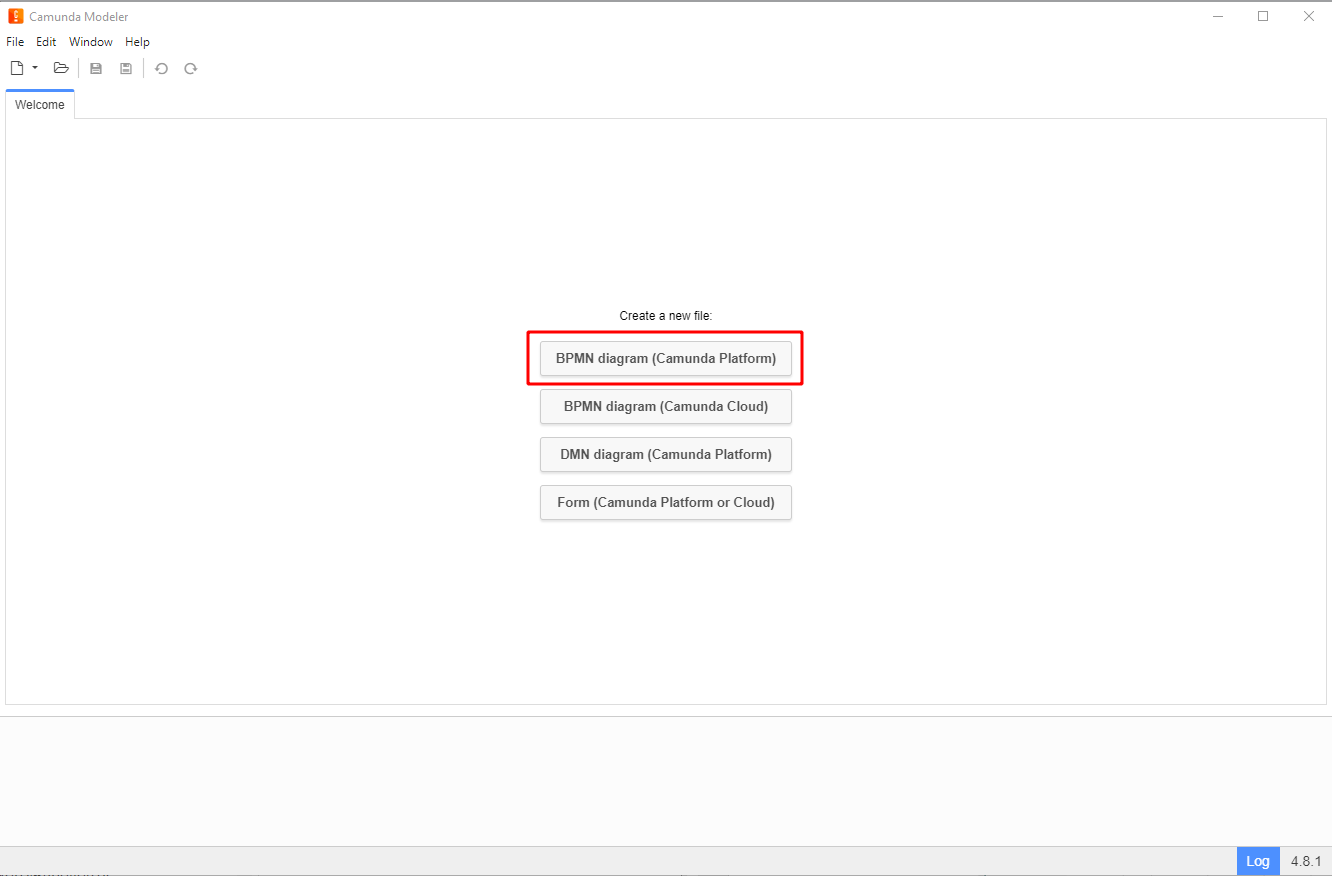
First of all, download and install the Apollon Camunda Modeler.

Create a new BPMN diagram by clicking on BPMN diagram under Create a new file or by navigation to File > New File > BPMN Diagram.
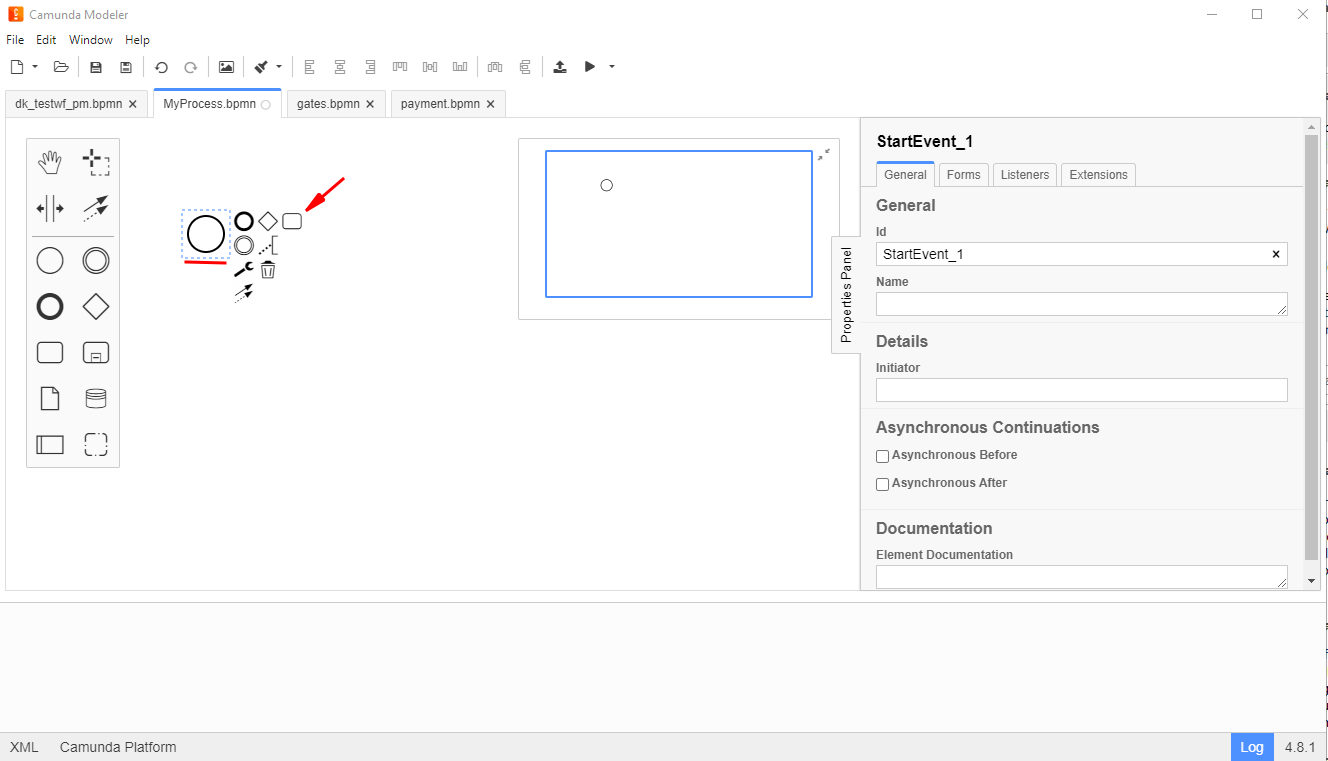
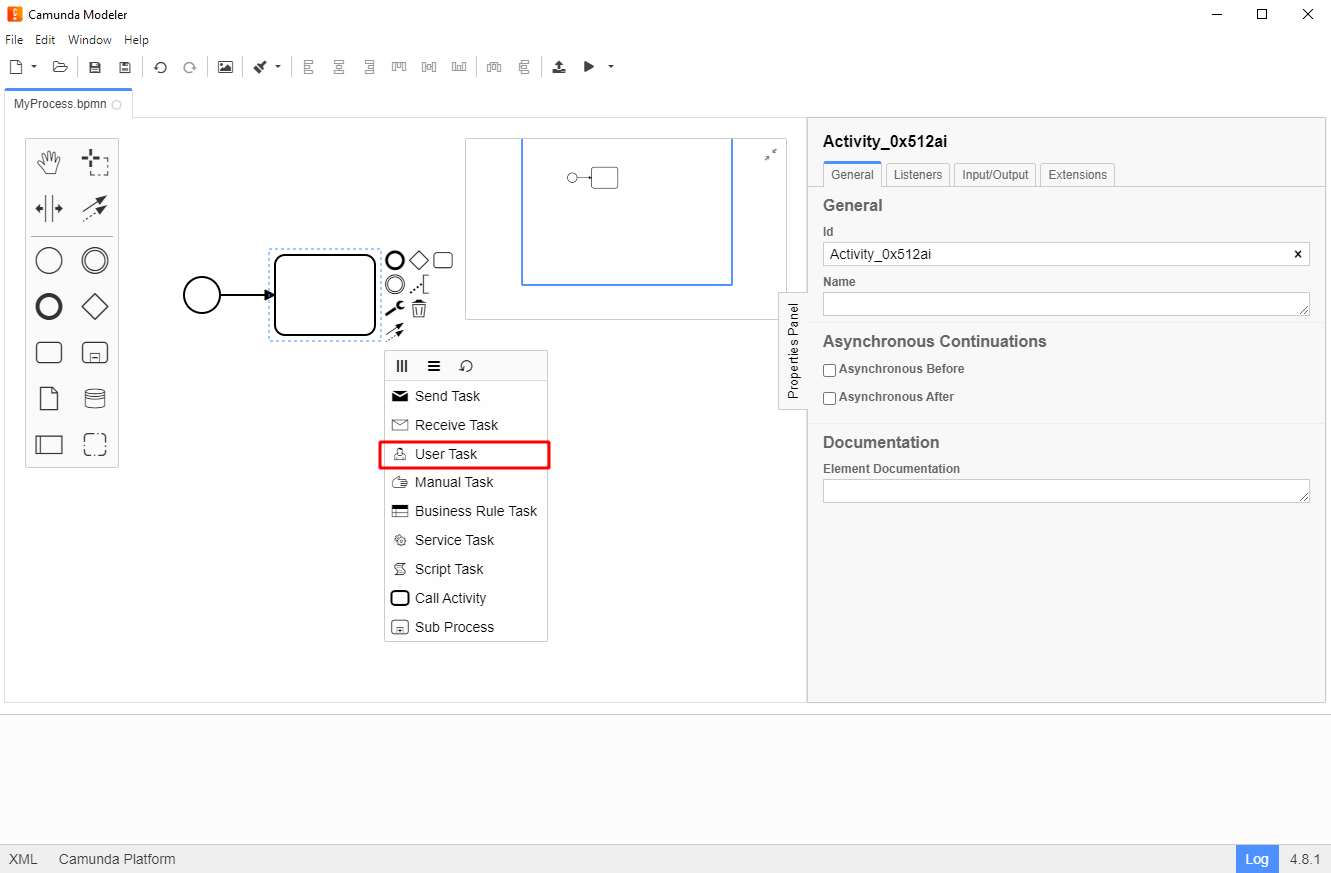
Start by modeling a simple process. Click on the start event. From its context menu, select the activity shape (rounded rectangle). It will be placed automatically on the canvas, and you can drag it to your preferred position.
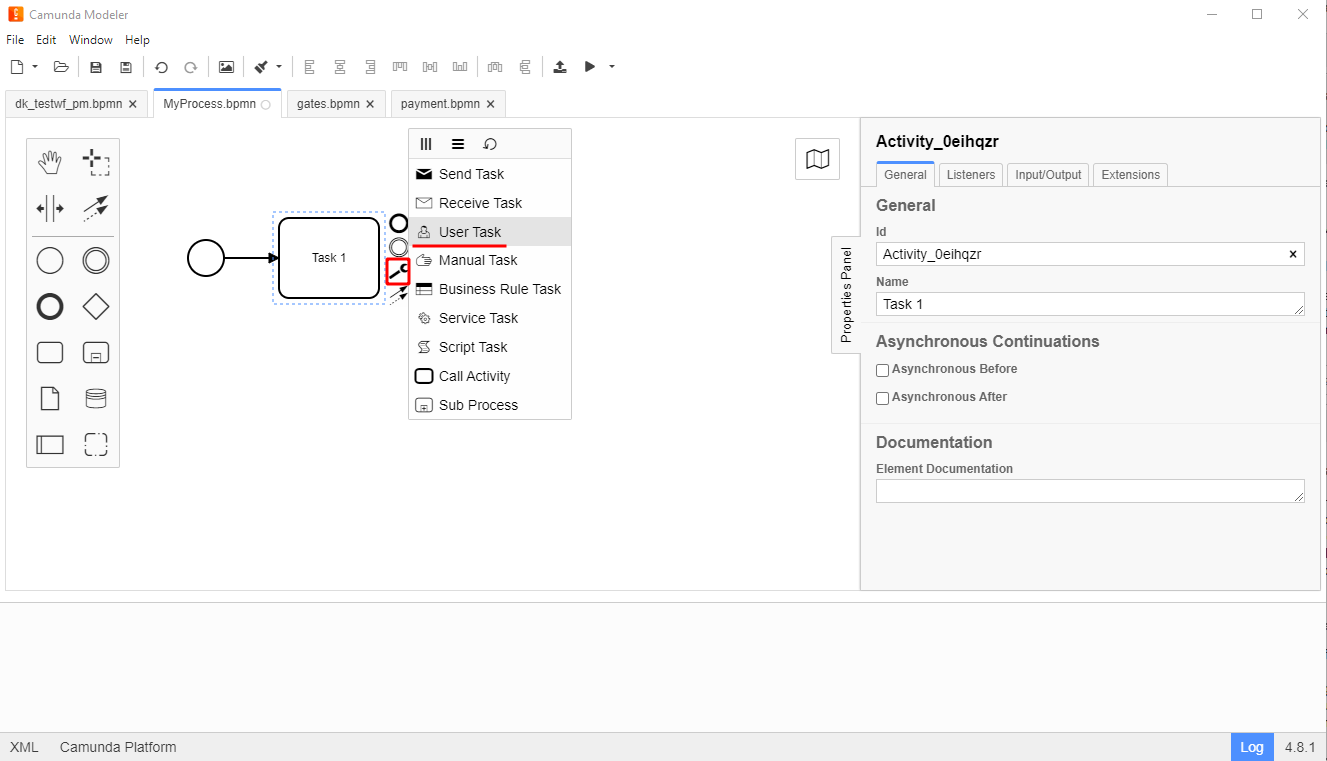
Name the activity e.g. Task 1. Change the activity type to User Task by clicking on the activity shape and using the wrench button.
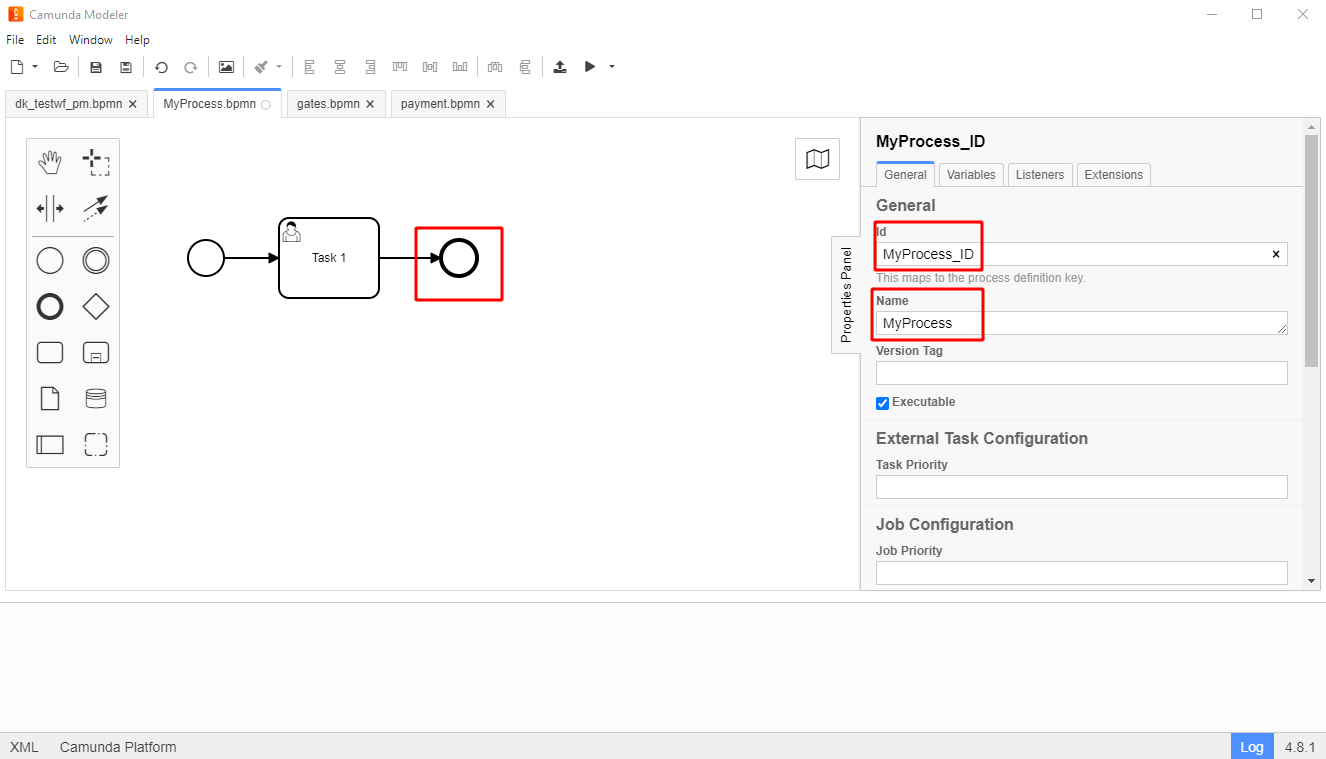
Add an End Event and make sure the workflow and its tasks have a unique name and IDs.
Notes:
-
Start and End Events can be renamed by double-clicking them and entering a name in the newly opened text box
-
When editing Labels, you can add line breaks using Shift + Enter
-
It is possible to model processes in a way that the user can choose which next action should be made. That is made with gates. For more information, go to Gates - Choices in Camunda Processes
How to Use Templates
Before using templates, it is required to:
-
Adjust Back End Configuration
-
Clone the OMN Camunda Templates repository, then install the templates in your local
element-templatesfolder (full path in the repository readme file).
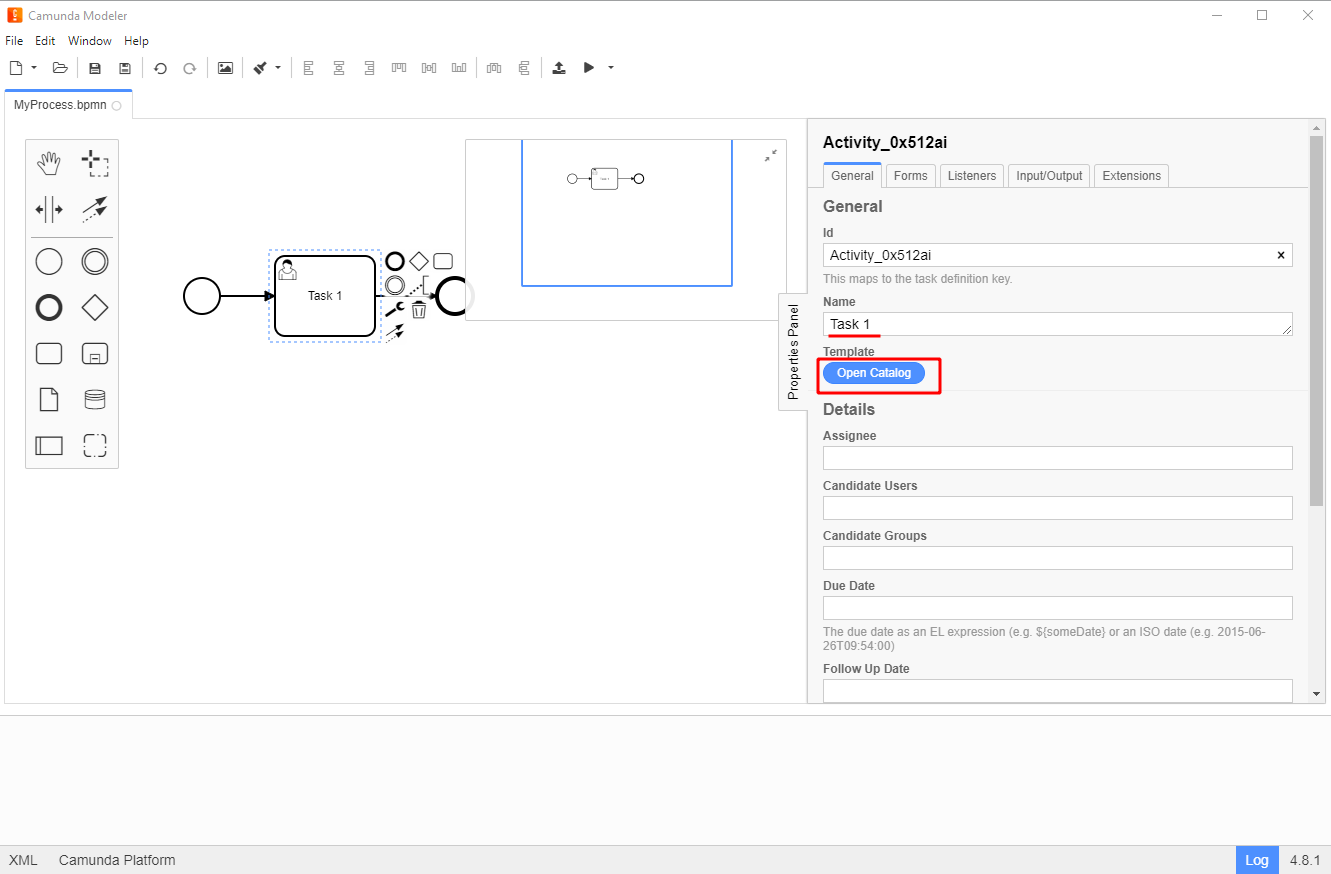
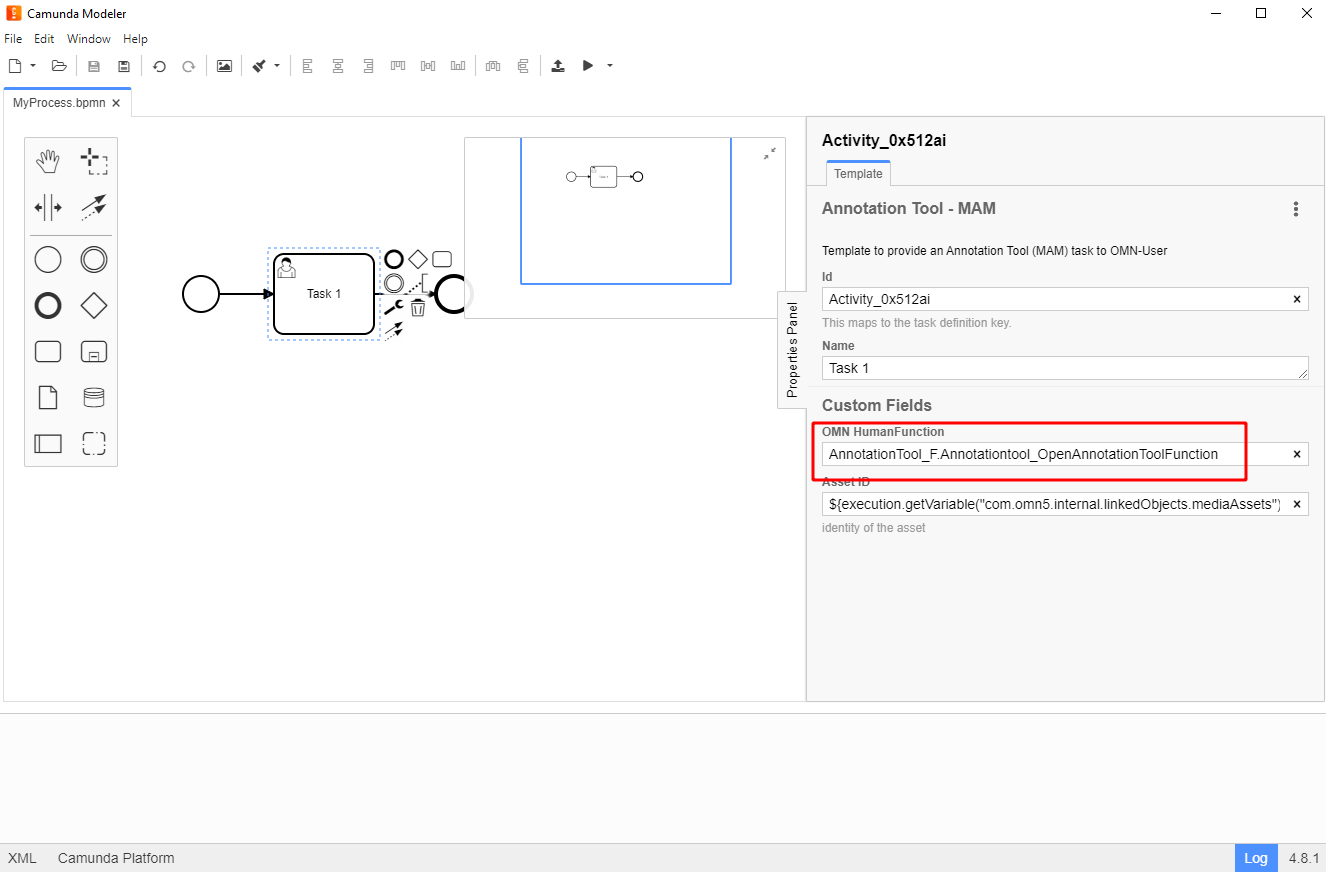
Then, open the Apollon Camunda Modeler and the already configured workflow. Click on a user task or, if there are no user tasks, append a new one. The properties panel should appear on the right side of the screen.
In the properties panel, name the task and click on the button “Open Catalog”.
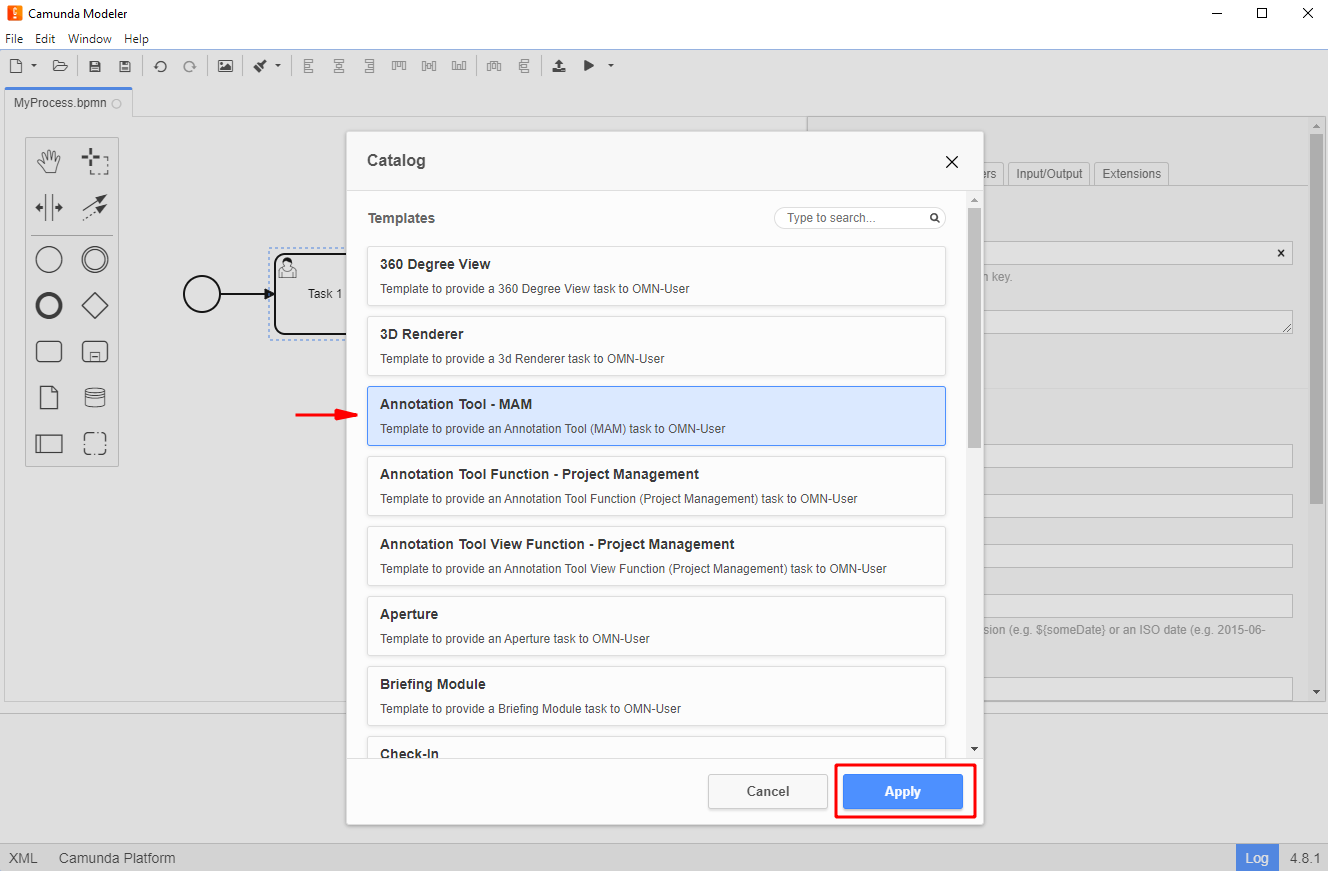
Select the template you want to use and click on "Apply".
Save and deploy the workflow.
Notes:
-
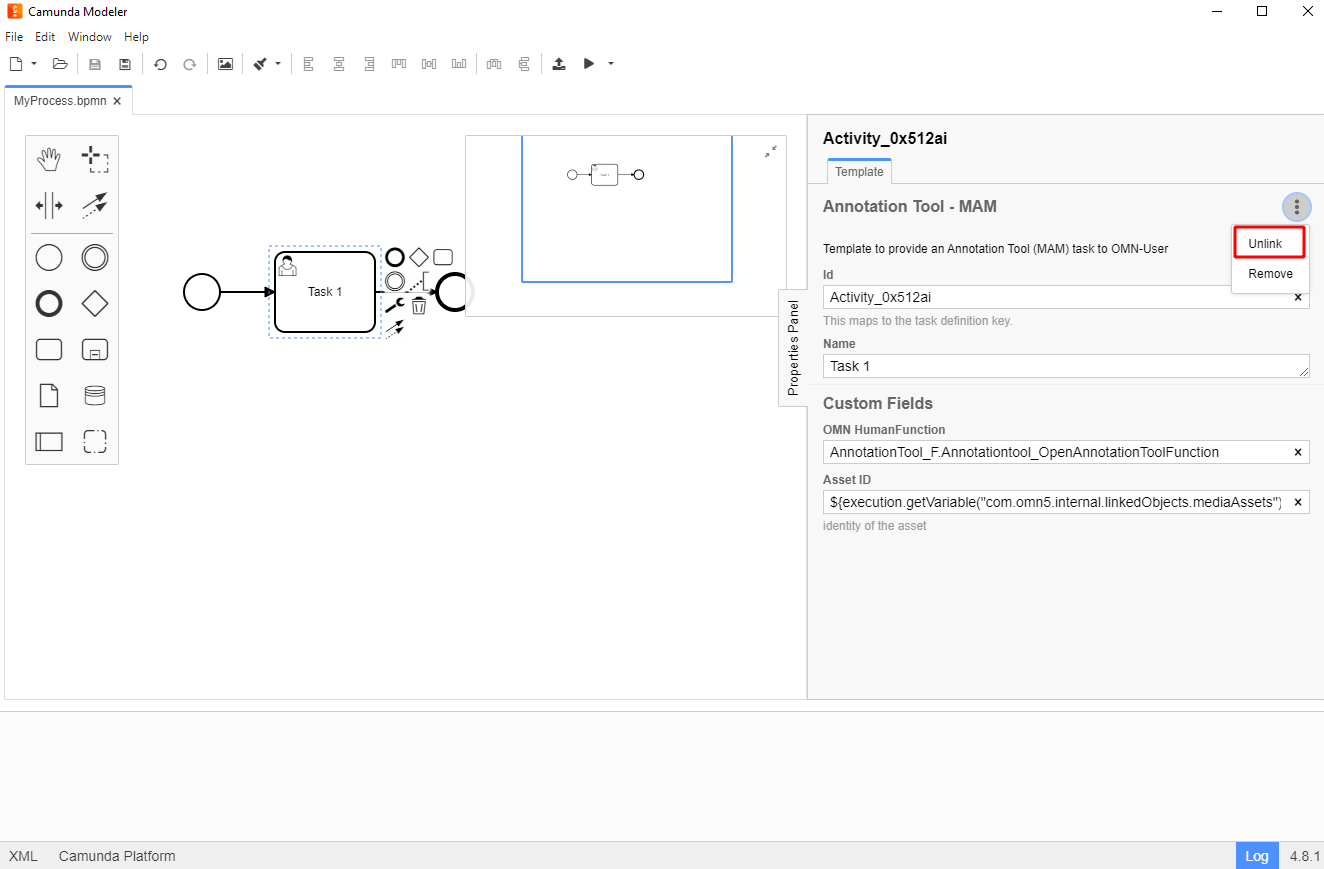
Templates can be removed from tasks by clicking on the action menu on the upper right side of the properties panel and selecting the option "Unlink".
-
If anything else is changed in the workflow, it must be saved, deployed again, and the OMN Client must be reloaded (if currently being used).
-
In order to create and customize templates, see Camunda Templates in Depth.
Executing processes in OMN Client
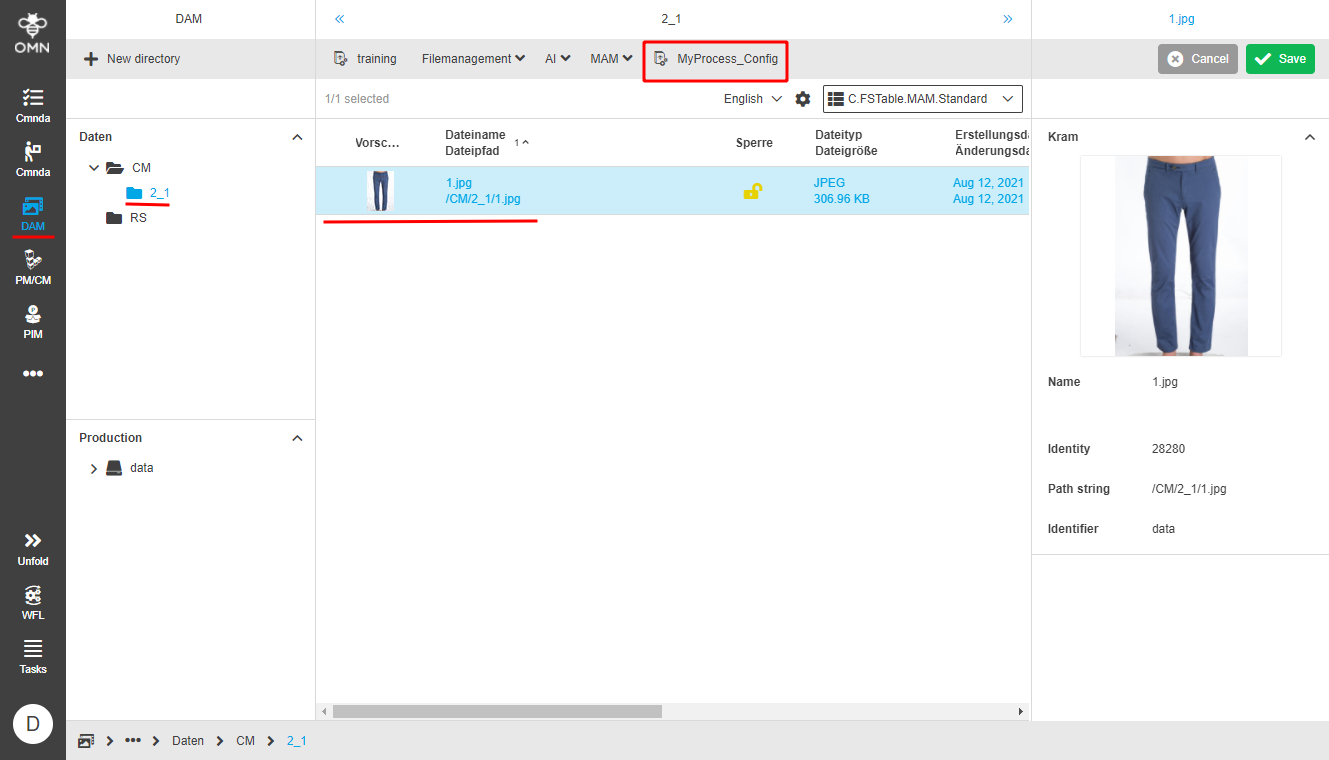
Open the OMN Client, then navigate to the menu item that matches the configuration made in the OMN config client (in this case, DAM). Select the object that should be used for the corresponding workflow. A button with the name of configuration should appear on the upper middle panel.
Execute the process by clicking on the button with the name of the process assigned by you. Check if the status of the workflow is available in the menu item “Status Camunda”.
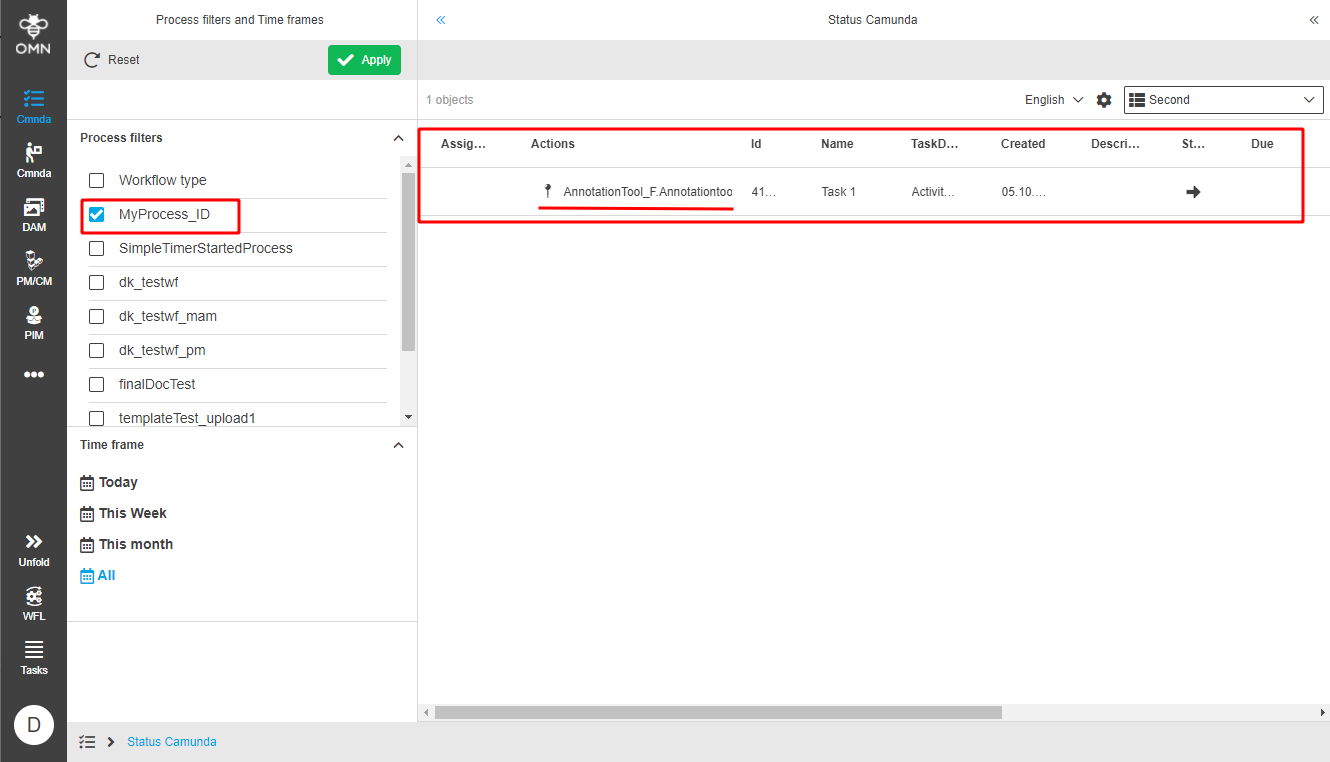
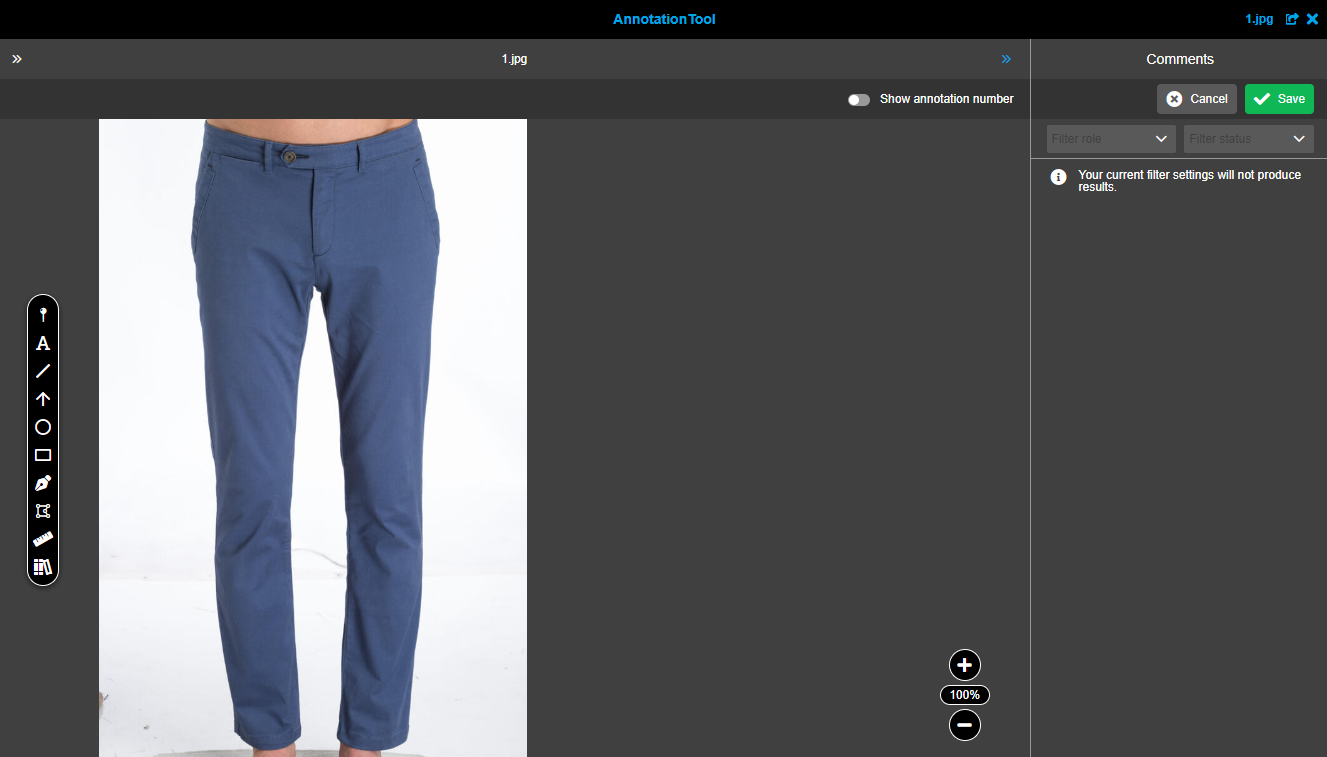
Click on the action generated by your workflow (in this case, the Annotation Tool task). The action should be executed successfully.
Camunda Process Deployment to OMN
Deployment Using the Camunda Modeler
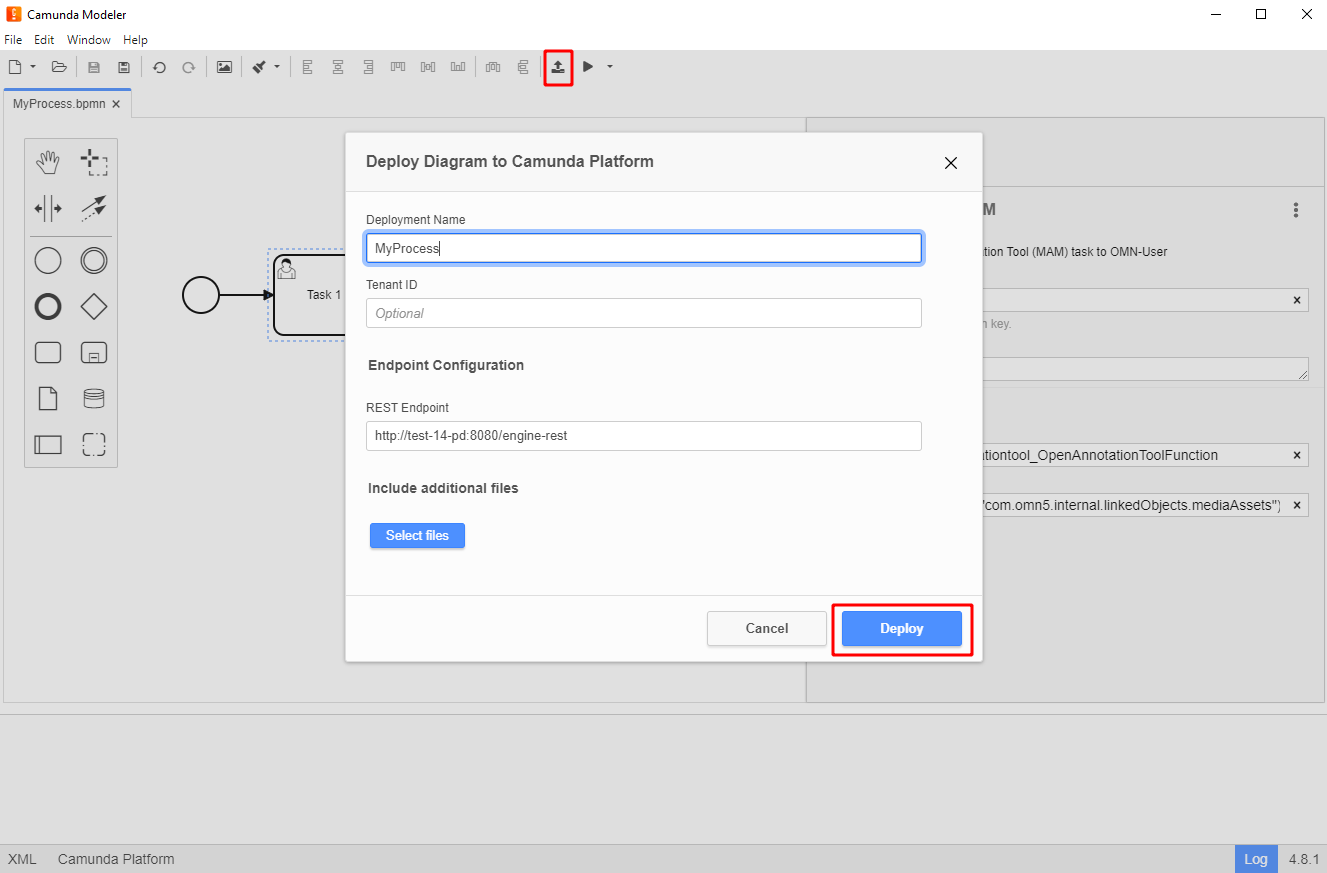
In order to deploy a Model, open the file with the modeler, press the deployment button on the right side of the toolbar
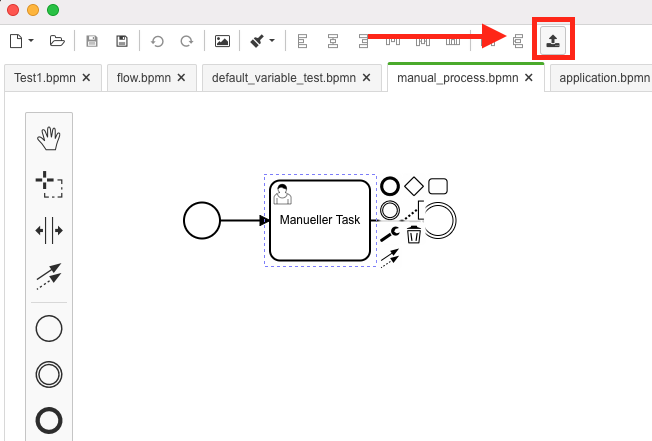
In the upcoming popup, at least the name of the deployment and the URL configuration of the Camunda instance have to be filled in.
Authentication is optional and not necessary in our default Camunda deployment.
The name should be expressive, to identify it later. It is however not used in the OMN context.
The endpoint URL is usually http(s)://camunda-host:PORT/engine-rest
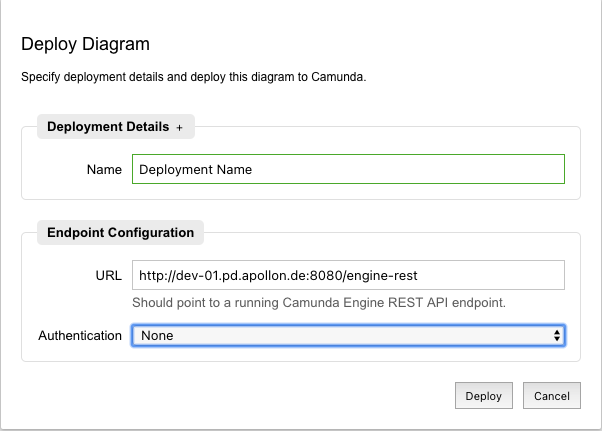
Execute "Deploy" will upload the BPMN to the Camunda engine.
If the model contains any structural errors, like unconnected elements, the deployment will fail and display an error. However, logical issues like script or parameter errors can only be found during runtime execution. Otherwise, the modeler will display a success message in the popup. The popup can be closed.
Checking Deployments in Camunda
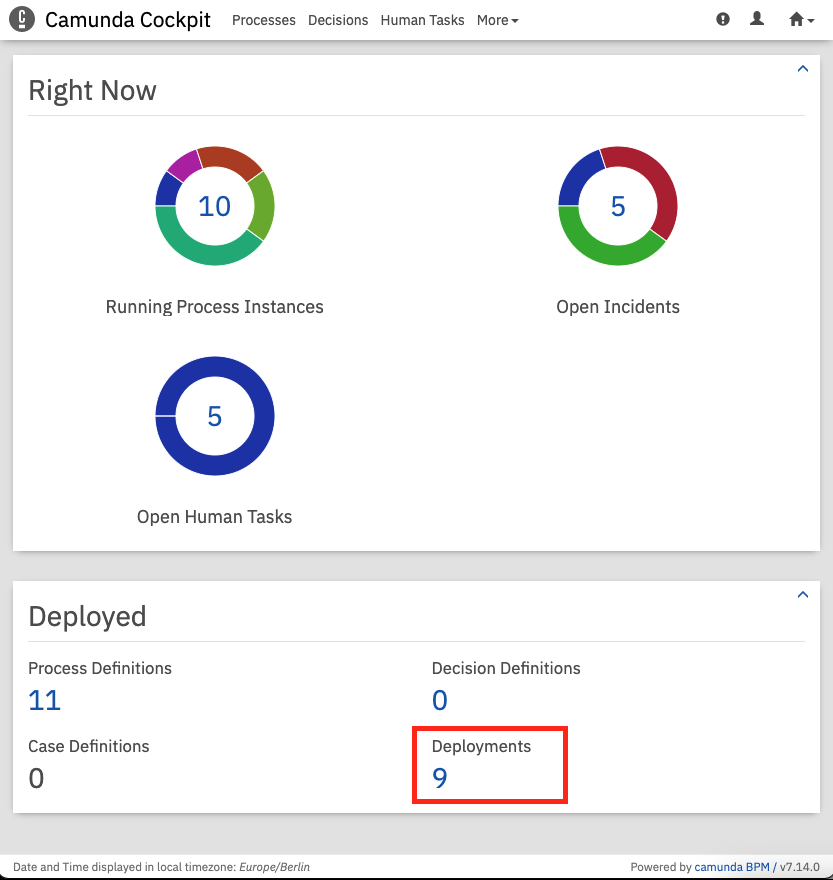
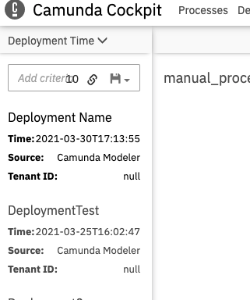
After a successful deployment, it is best to verify the success in Camunda, too.
To do this, it is easiest to go to the Camunda Cockpit and click on the number of deployments:
The URL is usually http(s)://camunda-host:PORT/camunda
Note:
Please beware that the deployment of service task delegating to Java code can only be done inside a ProcessApplication where both Java-Code and BPMN model are bundled together (inside a war). This cannot be done using the "modeler deploment".
The current built-in workflow deployments all contain the "complete" OMN Camunda context, which allows the usage of OMN Api, which wouldn’t be accessible by a plain "modeler deployment".
Configuration with Camunda and BPMN
Confluence Documentation for steps/gates
Rules
In order to mimic XWE behaviour and let the UI show transitions, we have to specifically configure BPMN diagrams.
Tasks will have transitions to next steps only if the form defined on this task will have exactly one field of type enum. The values in the enumeration are the transitions.
If there are no fields of type enum, it means that there are no transitions defined. Two or more fields of type enum mean the configuration is ambiguous and is considered to be broken.
Fields of other types besides enum have no restrictions.
The number of arrows must exactly match number of values in the enumeration. Each arrow must have condition type set to expression and expression must check (evaluate to true) that form field is equal to one specific value of enumeration. Every expression has to check different value.
In this context there are two main gateway types that are used.
Exclusive gateway: Exactly one sequence flow is taken - the first one with a matching condition. The other ones are ignored even if the condition is met.
Inclusive gateway: All sequence flows are taken where the condition is met.
Example
flow.bpmn contains example for steps configuration.
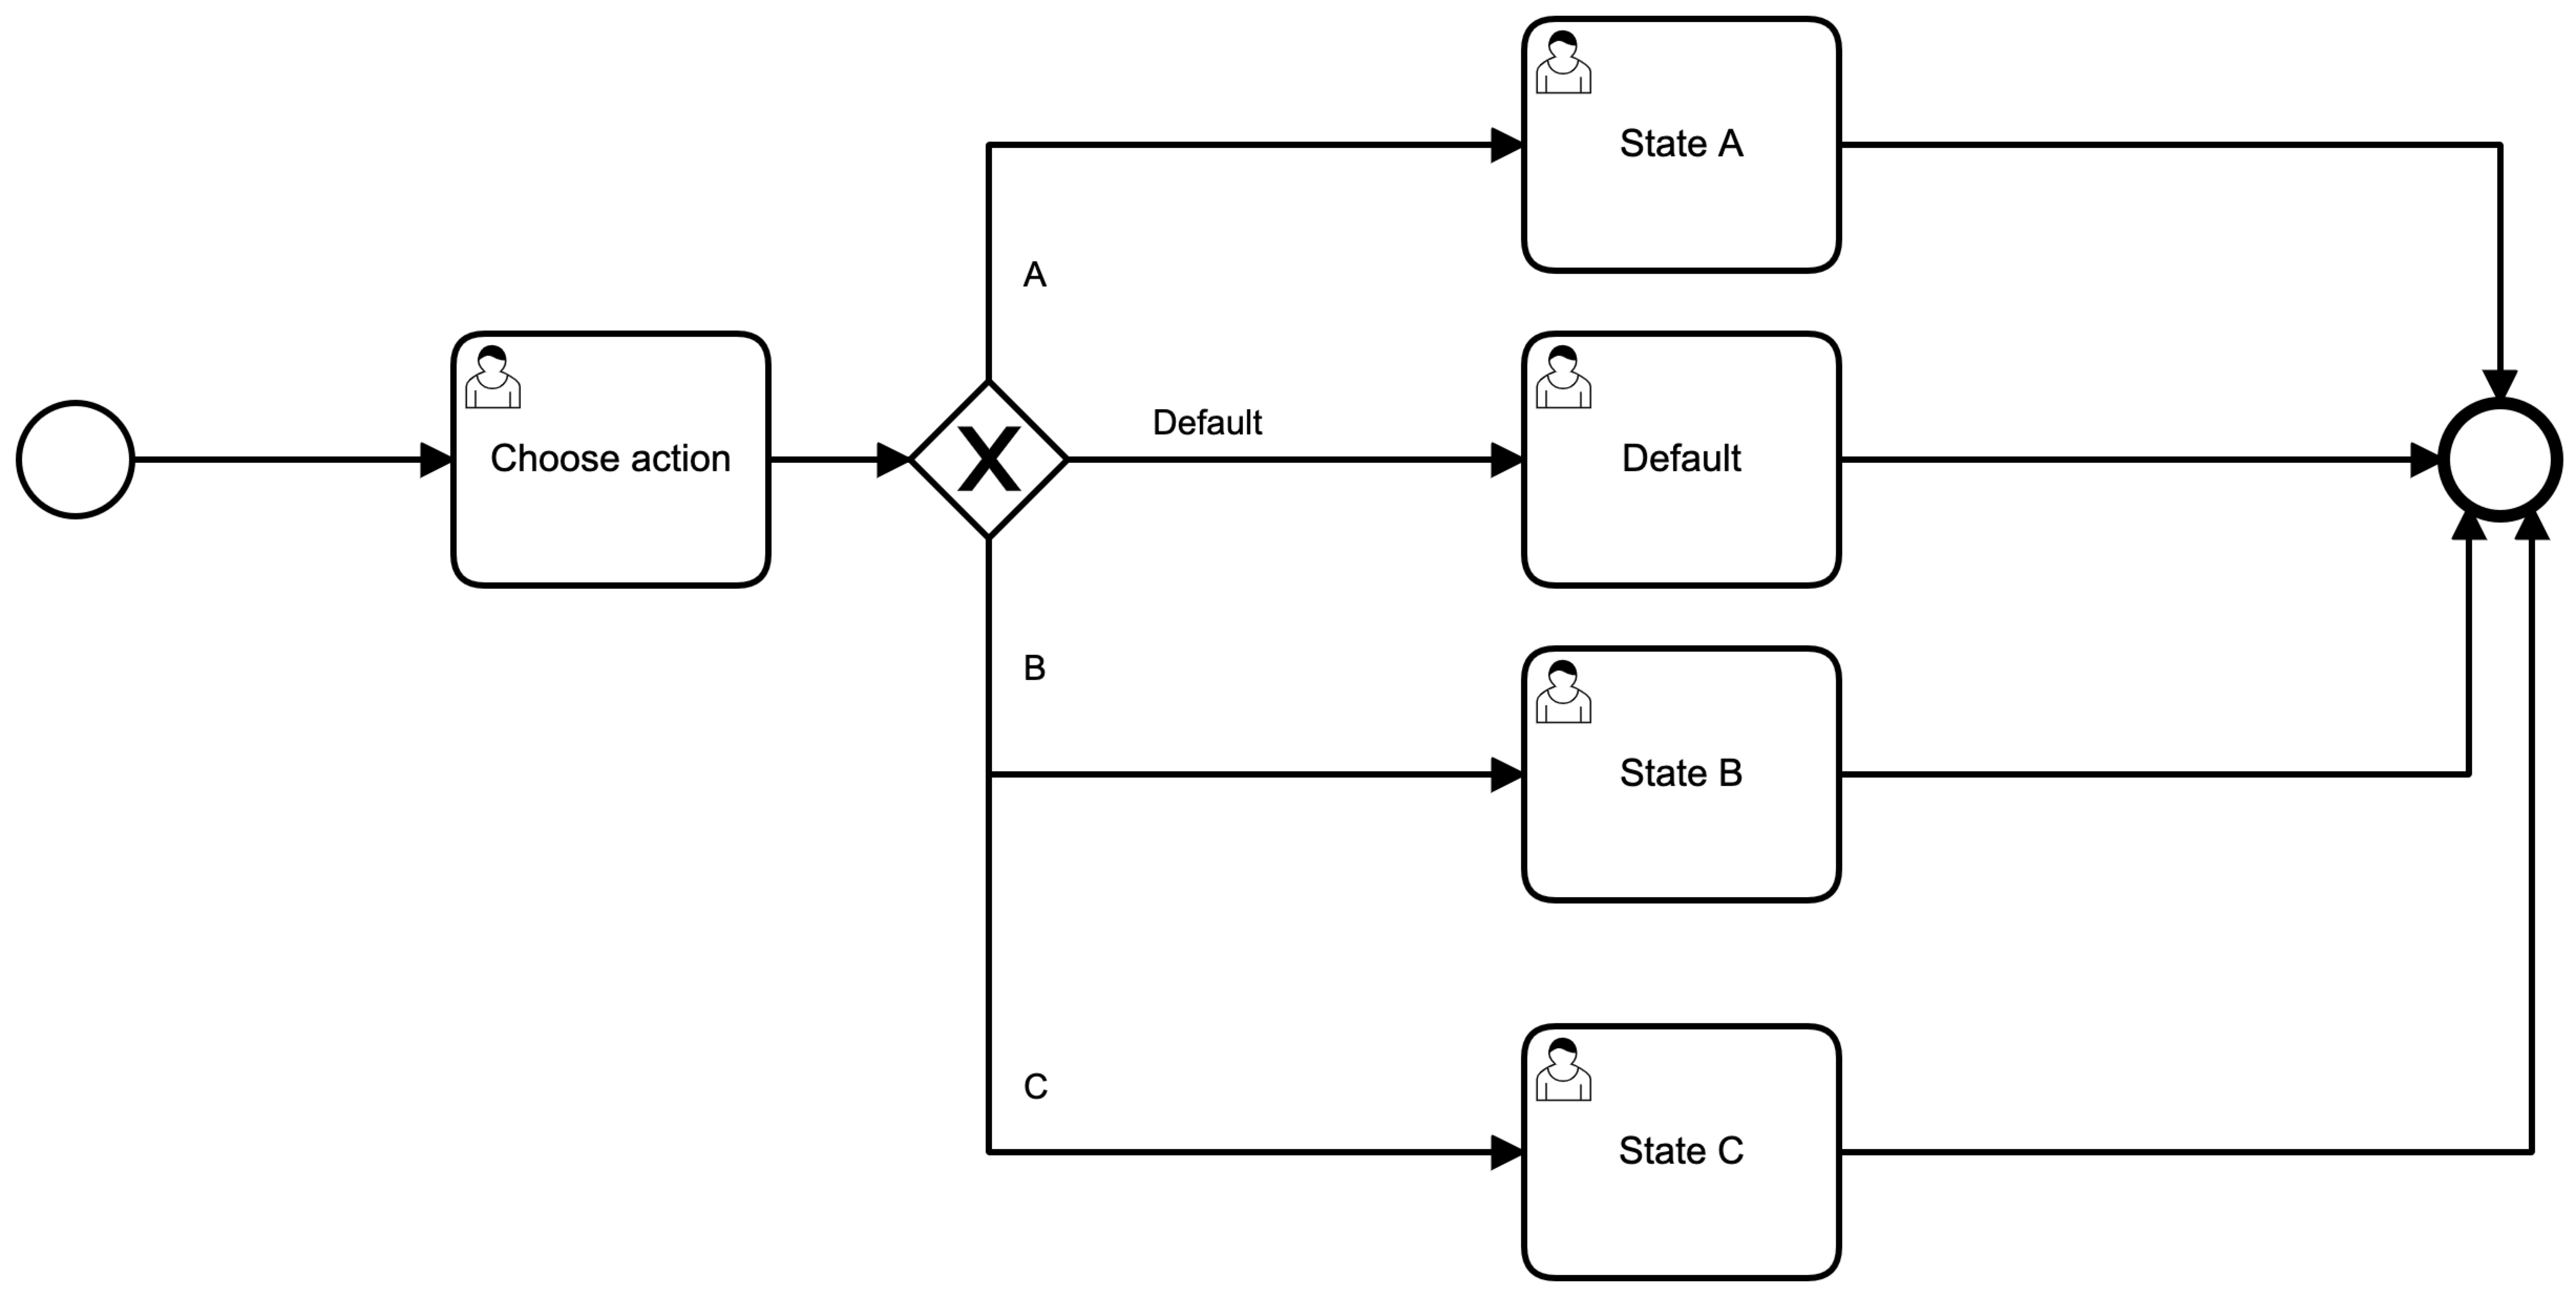
"Choose action" has form field action of type enum with values
default-step, step-a, step-b and step-c. There are 4 arrows
which go from gateway X to different tasks. UI must show 4 buttons. A
button per transition, in other words per enumeration value. Each arrow
has own expression that evaluates to true exactly in one case. Example
for State A: $\{action == 'step-a'} . If the user sets the field to step-a,
then the process will select the first arrow after the gateway
and will only switch to State A. Because the gateway is exclusive, the default step will not be executed.
Camunda Templates
Here you can find an overview about the templates used in the Apollon Camunda Modeler, such as how to make your own templates, what their properties and parameters stand for, to which categories they belong, and how to expand already created templates.
How to Make Own Templates
Camunda templates are built in the JSON format. Here is an example of it with the Direct Download Template:
[
  {
    "$schema": "https://unpkg.com/@camunda/element-templates-json-schema@0.3.0/resources/schema.json",
    "name": "Direct Download",
    "id": "de.apollon.workflow.Humantask.DirectDownload",
    "description": "Template to provide a Direct Download task to OMN-User",
    "appliesTo": [
      "bpmn:UserTask"
    ],
    "properties": [
      {
        "label": "OMN HumanFunction",
        "type": "String",
        "value": "F.DirectDownload",
        "editable": true,
        "binding": {
          "type": "camunda:inputParameter",
          "name": "humanFunction.DirectDownload"
        }
      },
      {
        "label": "Document IDs",
        "description": "IDs of the documents that should be downloaded must be separated by ','",
        "type": "String",
        "value": "${execution.getVariable(\"com.omn5.internal.linkedObjects.mediaAssets\")}",
        "editable": true,
        "binding": {
          "type": "camunda:inputParameter",
          "name": "functionParam.DirectDownload.documentIds"
        },
        "constraints": {
          "notEmpty": true
        }
      },
      {
        "value": "import de.apollon.omn.wfl.ext.camunda.tooling.DefaultPropertyAccessor;\nimport de.apollon.omn.wfl.ext.camunda.tooling.ObjectAccessor;\nimport de.apollon.omn.wfl.ext.camunda.tooling.ApplicationAccessor;\nimport de.apollon.omn.wfl.ext.camunda.tooling.HumanFunction;\nimport java.time.OffsetDateTime;\nimport java.util.stream.Collectors;\nimport java.util.Objects;\nfor (fct in task.getVariables()){\nif(fct.key.startsWith(\"humanFunction.\")){\nhumanFunction = new HumanFunction(fct.value);\nval = fct.key.replace(\"humanFunction.\",\"functionParam.\")\nfor (entry in task.getVariables()){\nif(entry.key.startsWith(val)){\nval1 = entry.key.replace(val,\"\")\nhumanFunction.parameter(val1.replace(\".\",\"\"), entry.value);\n}\n}\napplicationAccessor = new ApplicationAccessor(task);\napplicationAccessor.setFunction(humanFunction);\n}\n}",
        "type": "Hidden",
        "binding": {
          "type": "camunda:taskListener",
          "event": "create",
          "scriptFormat": "groovy"
        }
      }
    ]
  }
]
JSON-File’s Head
-
$schema : String: must remain like the example -
name : String: Name of the template that will appear in the Catalog -
id : String: ID of the template. Should look like this:"de.apollon.workflow.Humantask.<nameOfThePlugIn>" -
description : String: Optional description of the template. Will be shown in the element template selection modal and in the properties panel (after having applied an element template) -
appliesTo : Array<String>: must remain like the example
Defining Template Properties
-
properties : Array<Object>: List of properties of the template. The first property of each template must be the OMN Human Function. Important: Its value must be the same as the defined identifier in the OMN Config Client (e.g., "F.DirectDownload") -
label: A descriptive text shown with the property -
type: Defining the visual appearance in the properties panel (Normally String or Dropdown for Boolean values) -
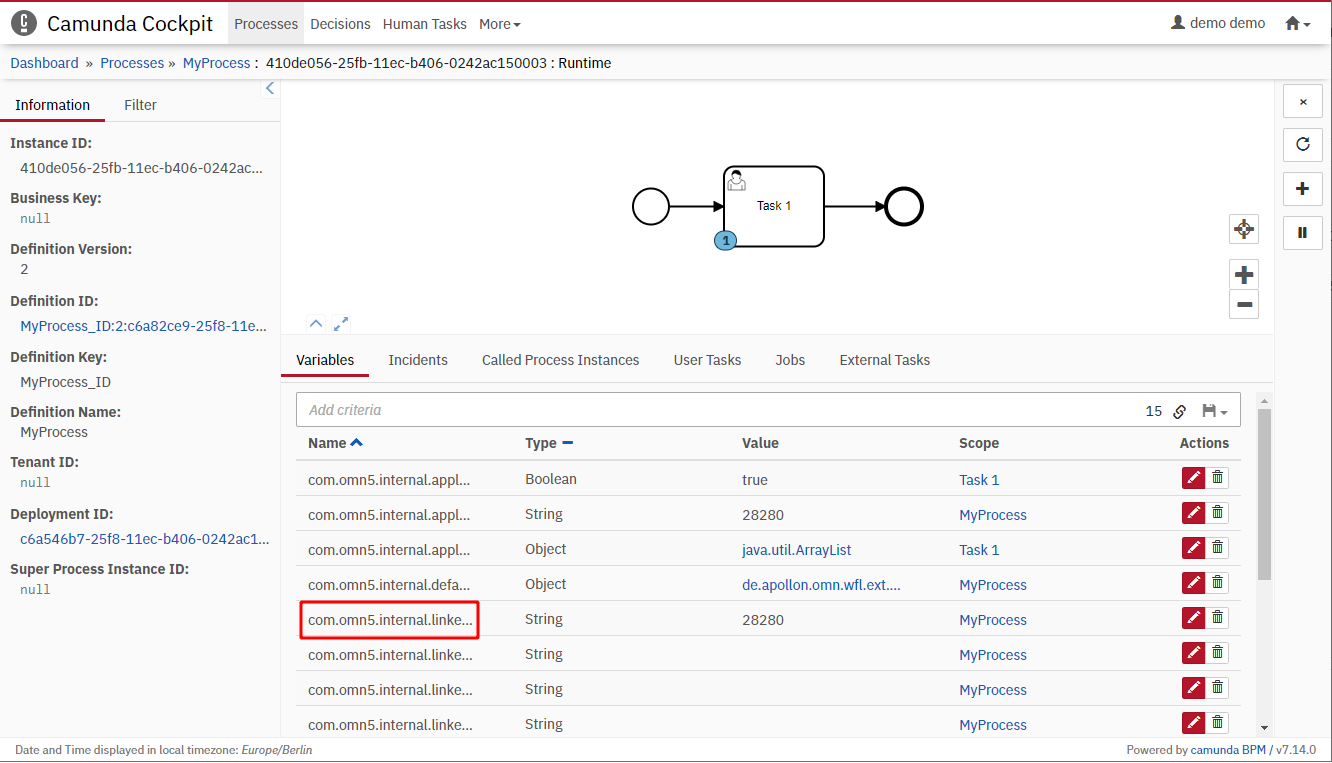
value: enter the command${execution.getVariable(\"<variableName>\")}. The variable name can be found inCamunda Cockpit\Dashboard\Processes\<currentWorkflow>\<currentActivity>\Variables\<correspondingVariableName>
Note: the last property of the template (without label or description) must be added as shown in the example to the end of the file, so that the template will work. Copy the given entries to your template:
{
    "value": "import de.apollon.omn.wfl.ext.camunda.tooling.DefaultPropertyAccessor;\nimport de.apollon.omn.wfl.ext.camunda.tooling.ObjectAccessor;\nimport de.apollon.omn.wfl.ext.camunda.tooling.ApplicationAccessor;\nimport de.apollon.omn.wfl.ext.camunda.tooling.HumanFunction;\nimport java.time.OffsetDateTime;\nimport java.util.stream.Collectors;\nimport java.util.Objects;\nfor (fct in task.getVariables()){\nif(fct.key.startsWith(\"humanFunction.\")){\nhumanFunction = new HumanFunction(fct.value);\nval = fct.key.replace(\"humanFunction.\",\"functionParam.\")\nfor (entry in task.getVariables()){\nif(entry.key.startsWith(val)){\nval1 = entry.key.replace(val,\"\")\nhumanFunction.parameter(val1.replace(\".\",\"\"), entry.value);\n}\n}\napplicationAccessor = new ApplicationAccessor(task);\napplicationAccessor.setFunction(humanFunction);\n}\n}",
    "type": "Hidden",
    "binding": {
      "type": "camunda:taskListener",
      "event": "create",
      "scriptFormat": "groovy"
    }
}
More Information
For more template examples, open the existing templates in the folder element-templates with an editor of your choice. A more detailed documentation about Camunda templates and properties can be found at the Camunda Templates Documentation under the topic “Defining Templates”.
Template Categories
Before using a template in the Camunda Modeler, it is very important to check if the identifier of the selected human function is defined as in the OMN Backend. All human function identifiers are stored in the OMN Config Client under Mandators/<mandatorName>/Application modules/Workflow/Functions config/Human functions.
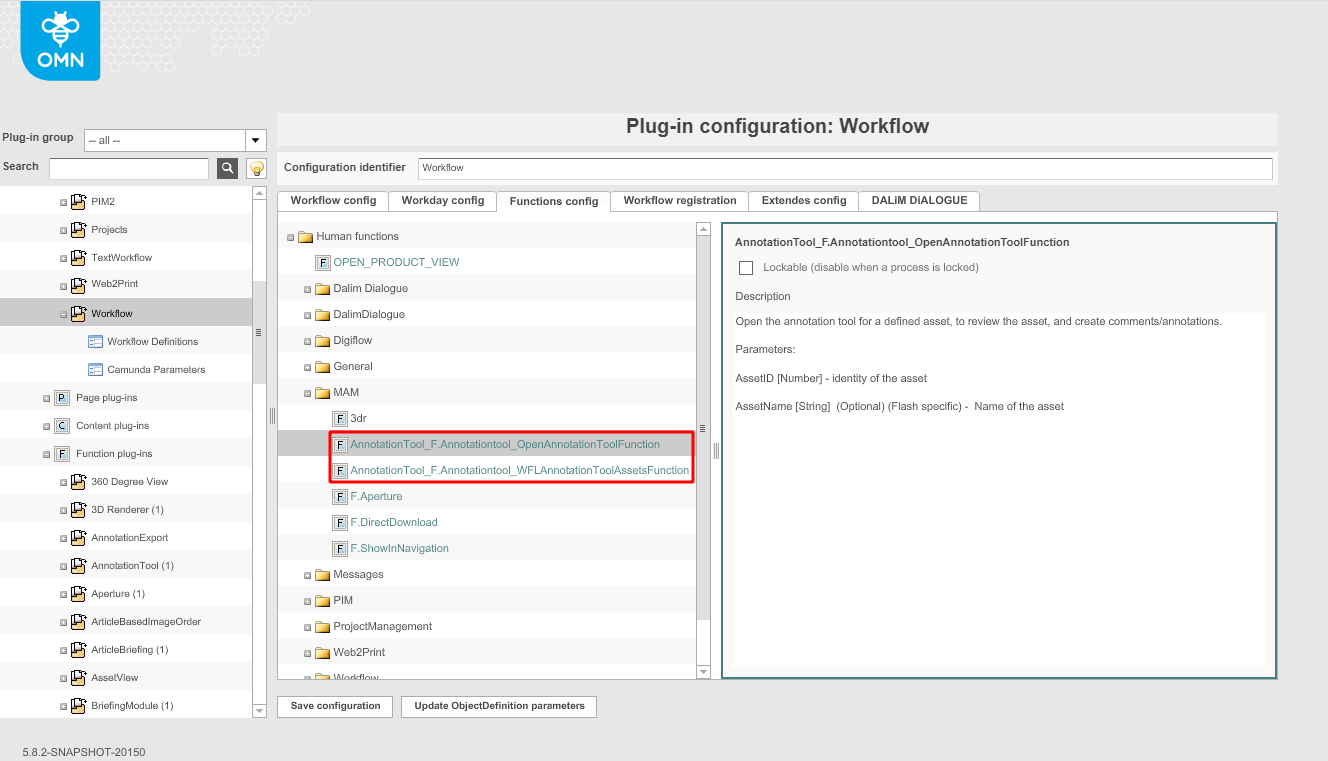
e.g. different types of Annotation Tool Human Functions
The Annotation Tool human function is an example of a dynamic function.
Its identifier is based on the function configuration and the function is bound to its configuration via identifier. That means, for example, that if the Annotation Tool task must have an open annotation tool function, that should be made clear in its identifier (see screenshots above). Dynamic functions must contain the string F.<functionName>.
Examples of Dynamic Functions
-
Annotation Tool
-
Aperture
-
Briefing Module
-
Check In
-
Direct Download
-
Product View
-
Show In Navigation
In contrast to that, there are also static functions. Their identifier is fixed and their functions are bound their configuration via parameter.
Examples of Static Functions
-
3D Renderer
-
(Open) 360 Degree Function
-
Edit Project Function
-
Open Classification View
-
Page Approval Function
-
Project Navigation Starter
-
Project Upload Function
-
WorkflowFSDetailsFunction
Custom Template Expansion
Through templates it is only possible to add one plugin to each task. But if multiple plugins are needed in one task, the user can expand the template manually.
How to Expand Templates
Open the Apollon Camunda Modeler and your workflow.
Create a new user task in your workflow.
Select the template with one of the plugins you want to work with and click on "Apply".
Remove the template by clicking on the action menu and selecting the option “Unlink”.
Go to the tab “Input/Output” in the properties panel. The input parameters should be filled with the parameters of the previous chosen template.
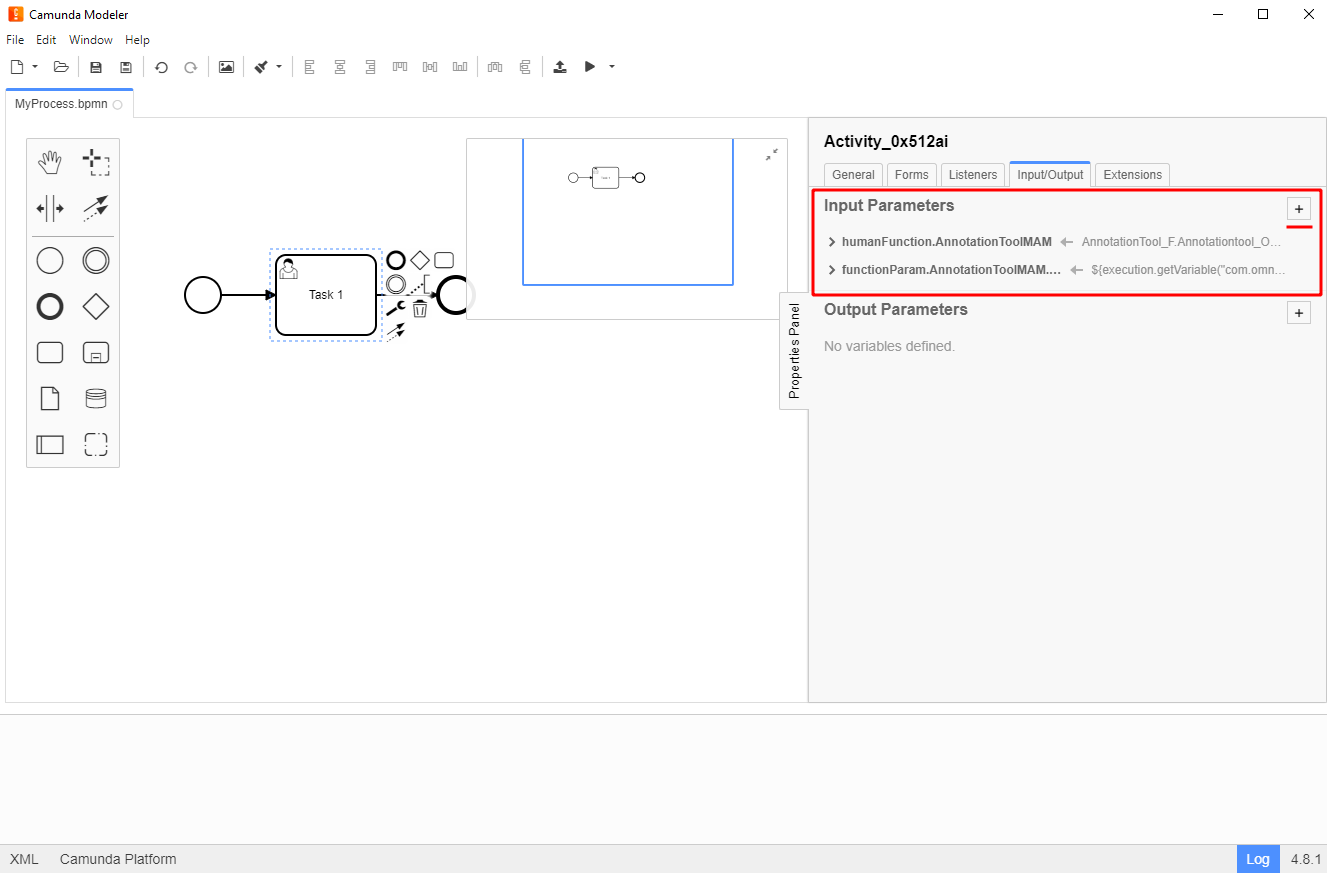
In this tab it is possible to add parameters for other plugins and have more functions in one task.
-
Click on the “+” button in the section “Input Parameters” and unfold the dropdown with the new input fields
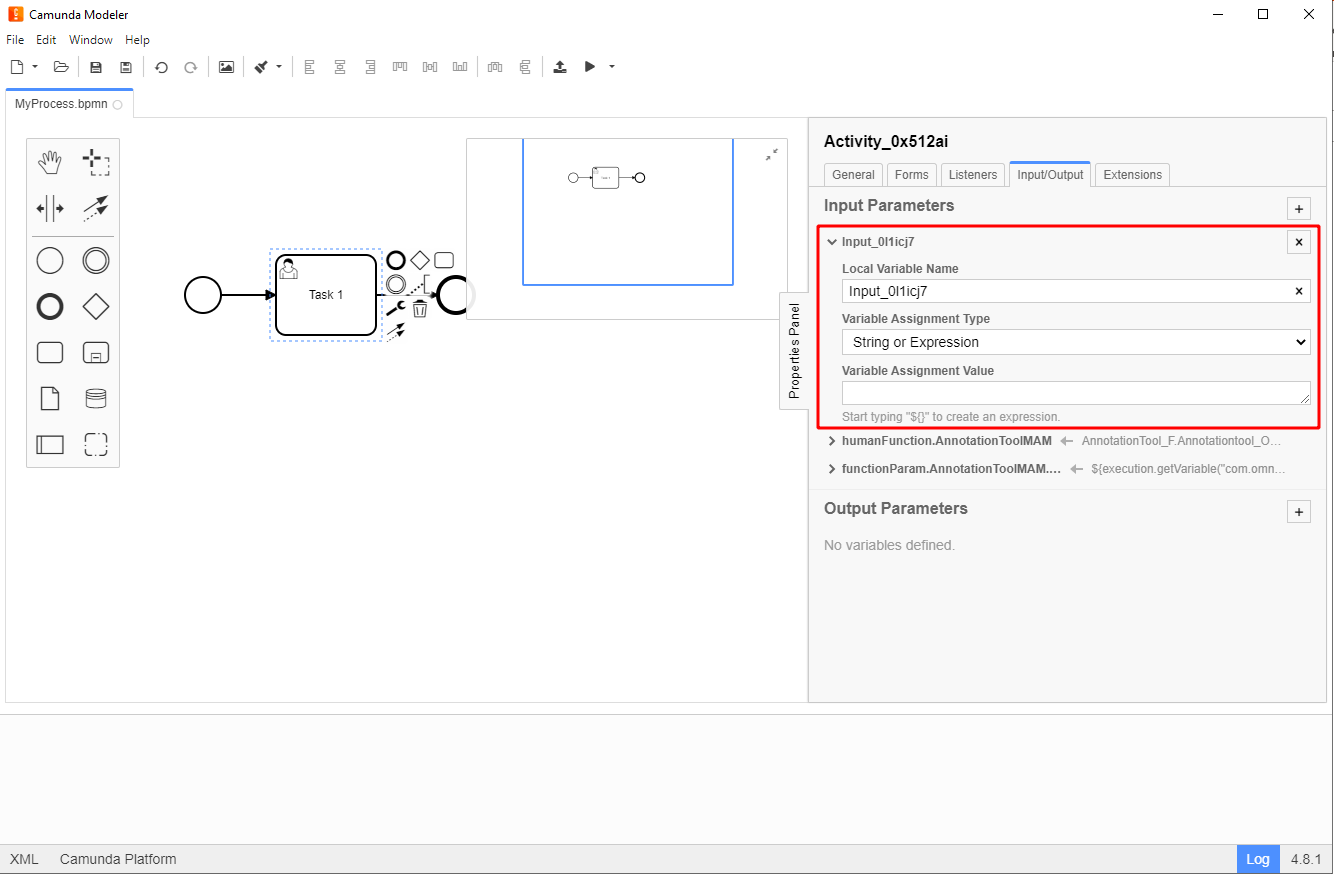
-
Fill the fields with the corresponding information of the desired plugin. Make sure you add all the necessary input parameters from the new human function (Note: if not known, create a new task and repeat the first steps until "Go to the tab Input/Output […]" with the second plugin, so you can see what values to add to the first task. Then, remove the example task)

Repeat steps "Click on the + button […]" and "Fill the fields […]", if needed to add other plugins.