Configuration View
Purpose of the plugin
The Configuration View is used to create attributes. These can be configured according to the desired maintenance options (e.g. inheritance rules, language dependency, etc.).
Introduction
Attributes of different types can be created and linked to a classification node using the configuration view.
Once the attribute has been created and linked, it can be managed via the "Linked attributes" view. All node-specific configuration options are provided here to make the settings relevant for maintenance, such as whether the field should later be mandatory.
Prerequisites and relations to other modules
The Configuration View is closely related to the Management View, in which the attributes can be maintained.
How to use
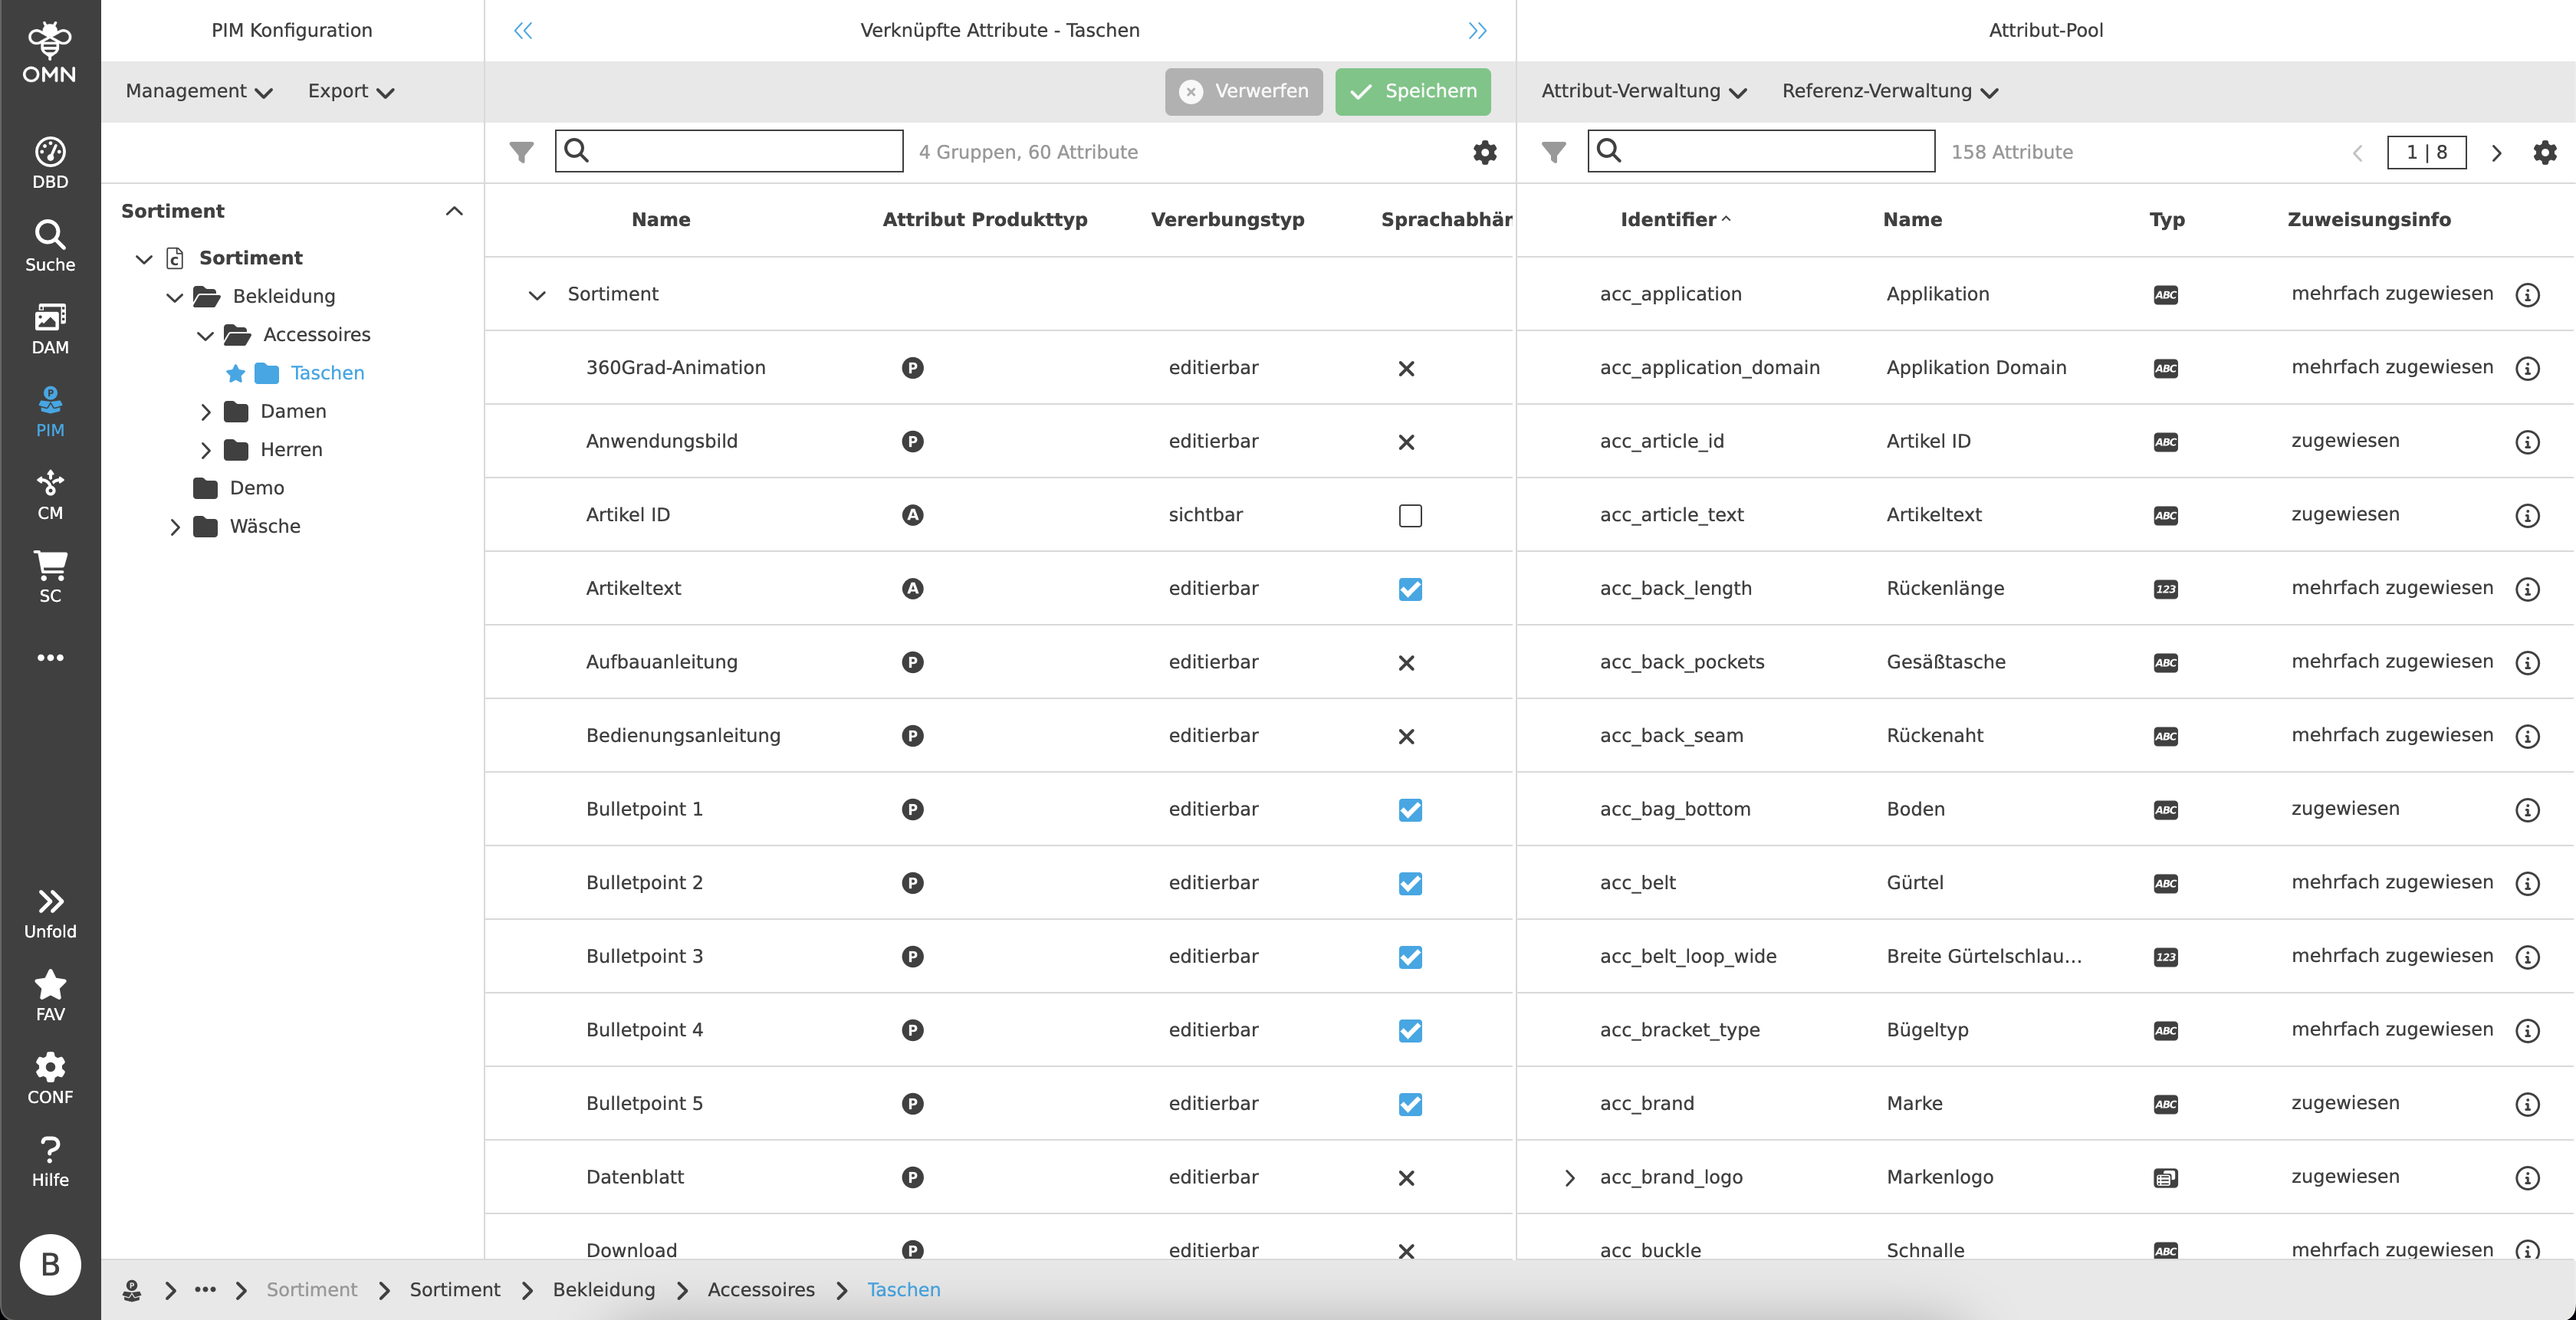
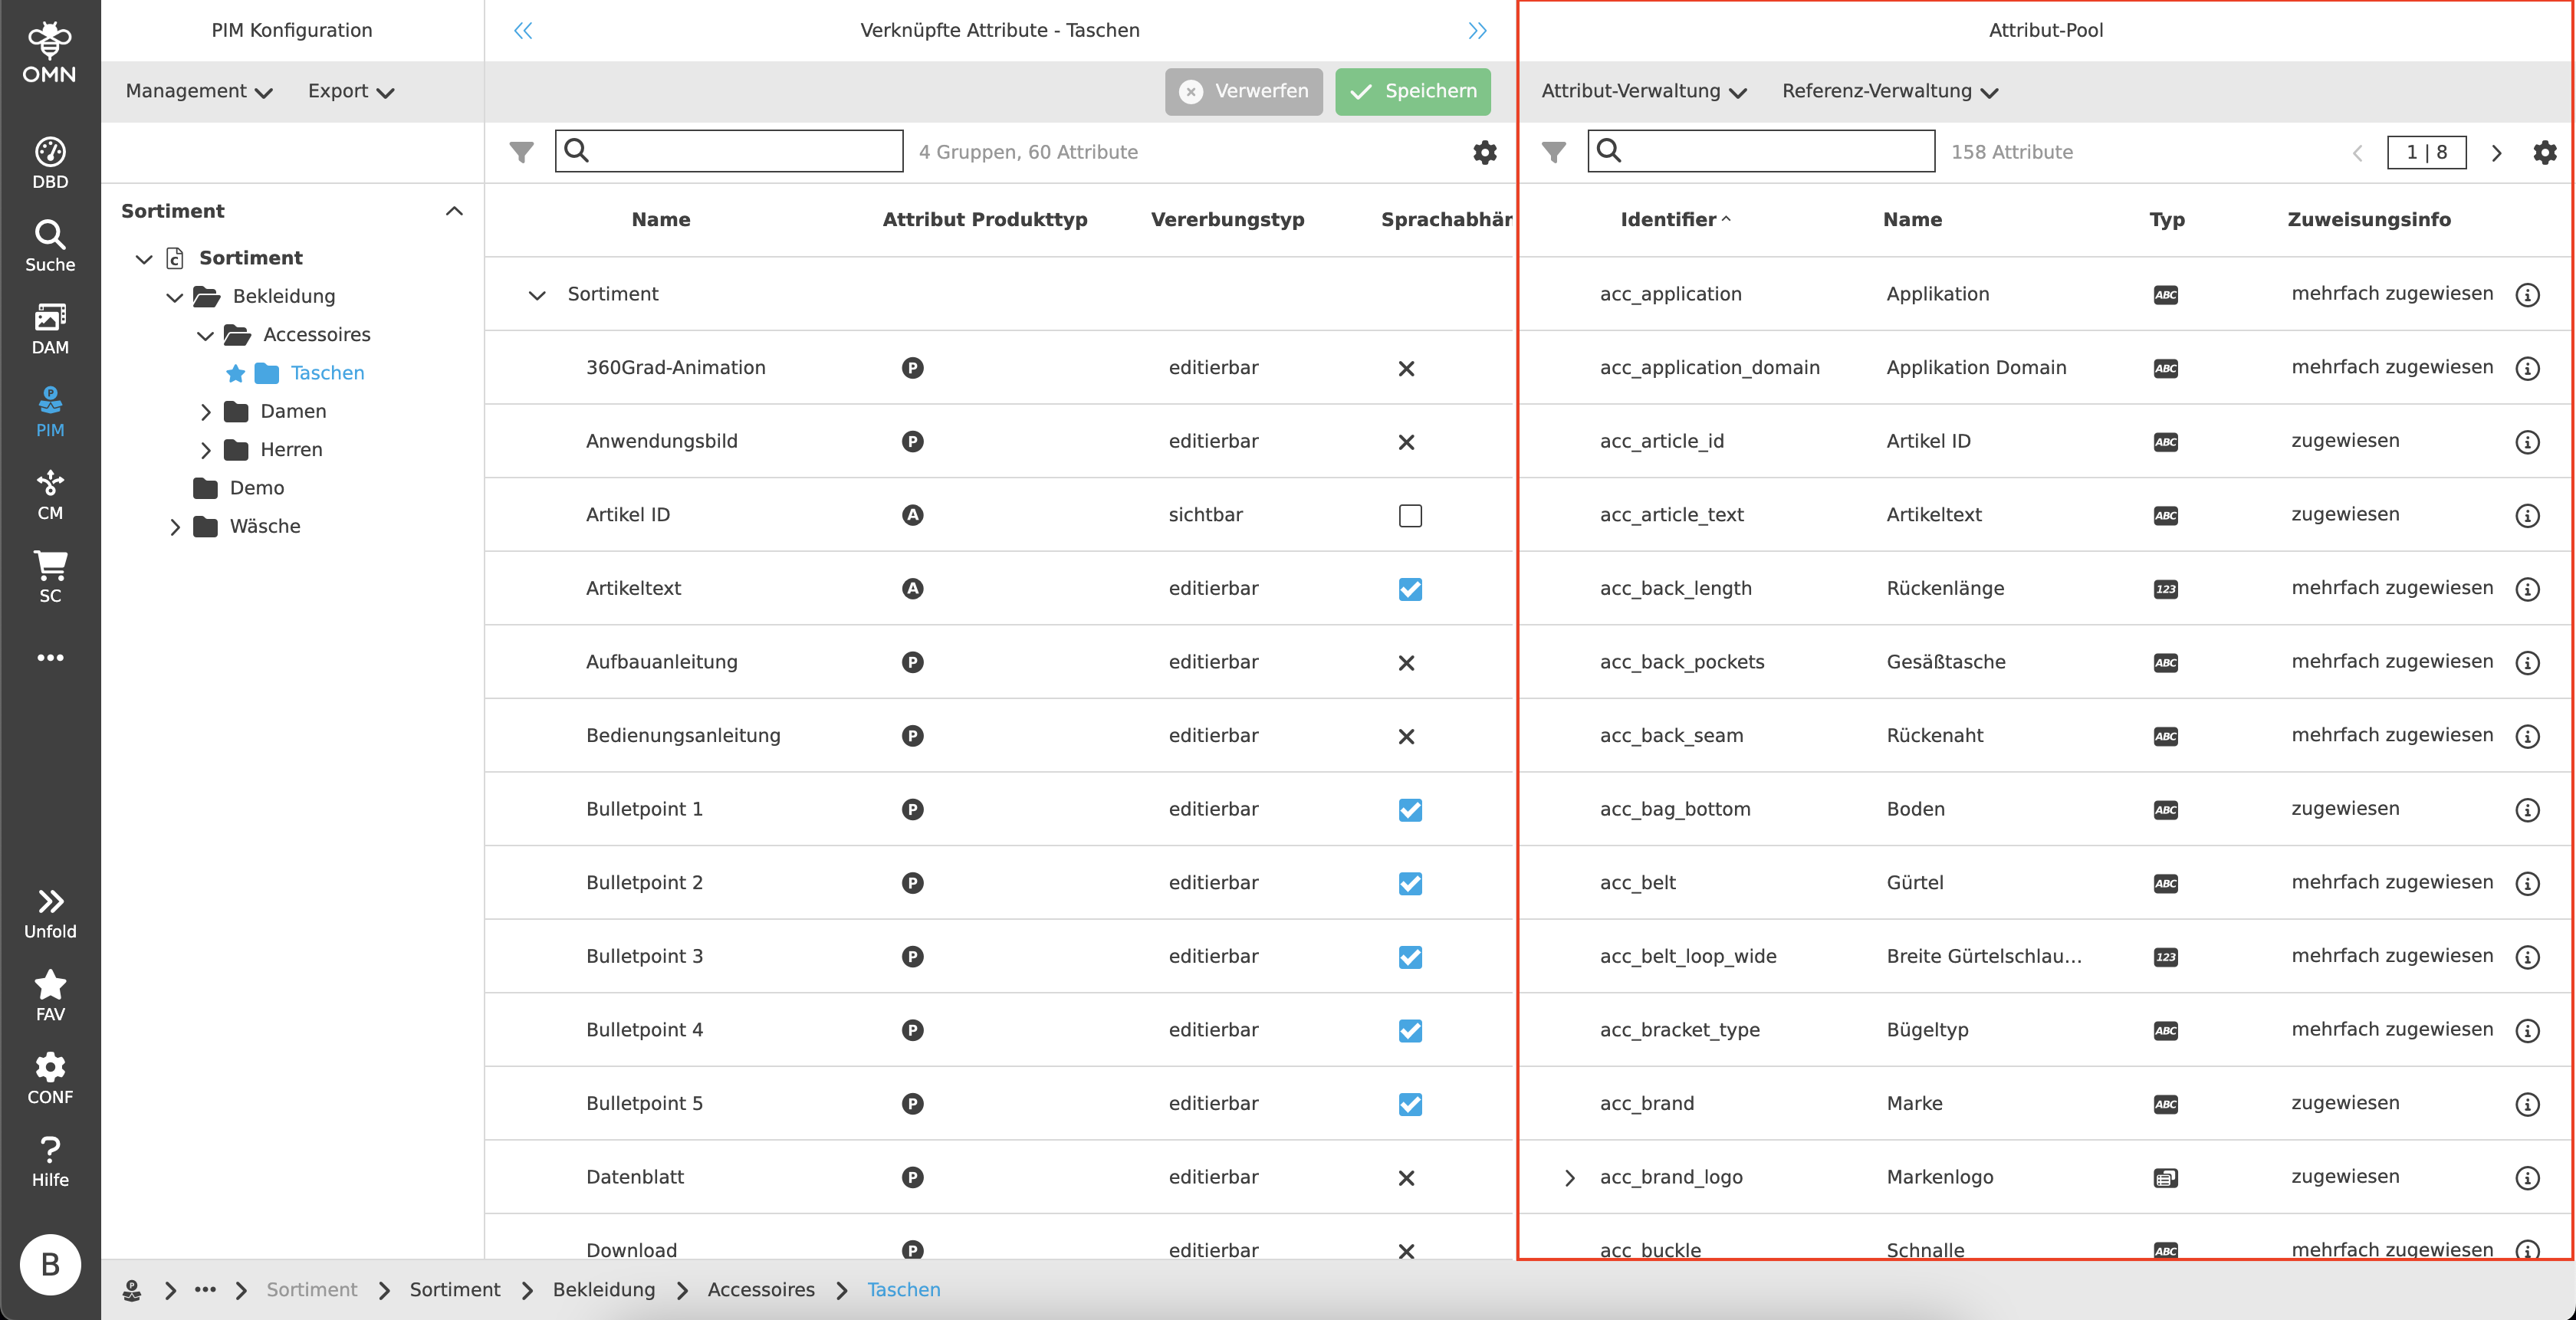
Like most plugins, the Configuration View consists of a left, center and right view.
-
Left View
Navigation area, display of classifications and underlying nodes -
Center View
Display of the linked attributes and editing of the various setting options -
Right View
Attribute pool, displaying existing and creating new attributes
Left View
The classifications are visible in the left view. These contain folders with various nodes that can be localized.
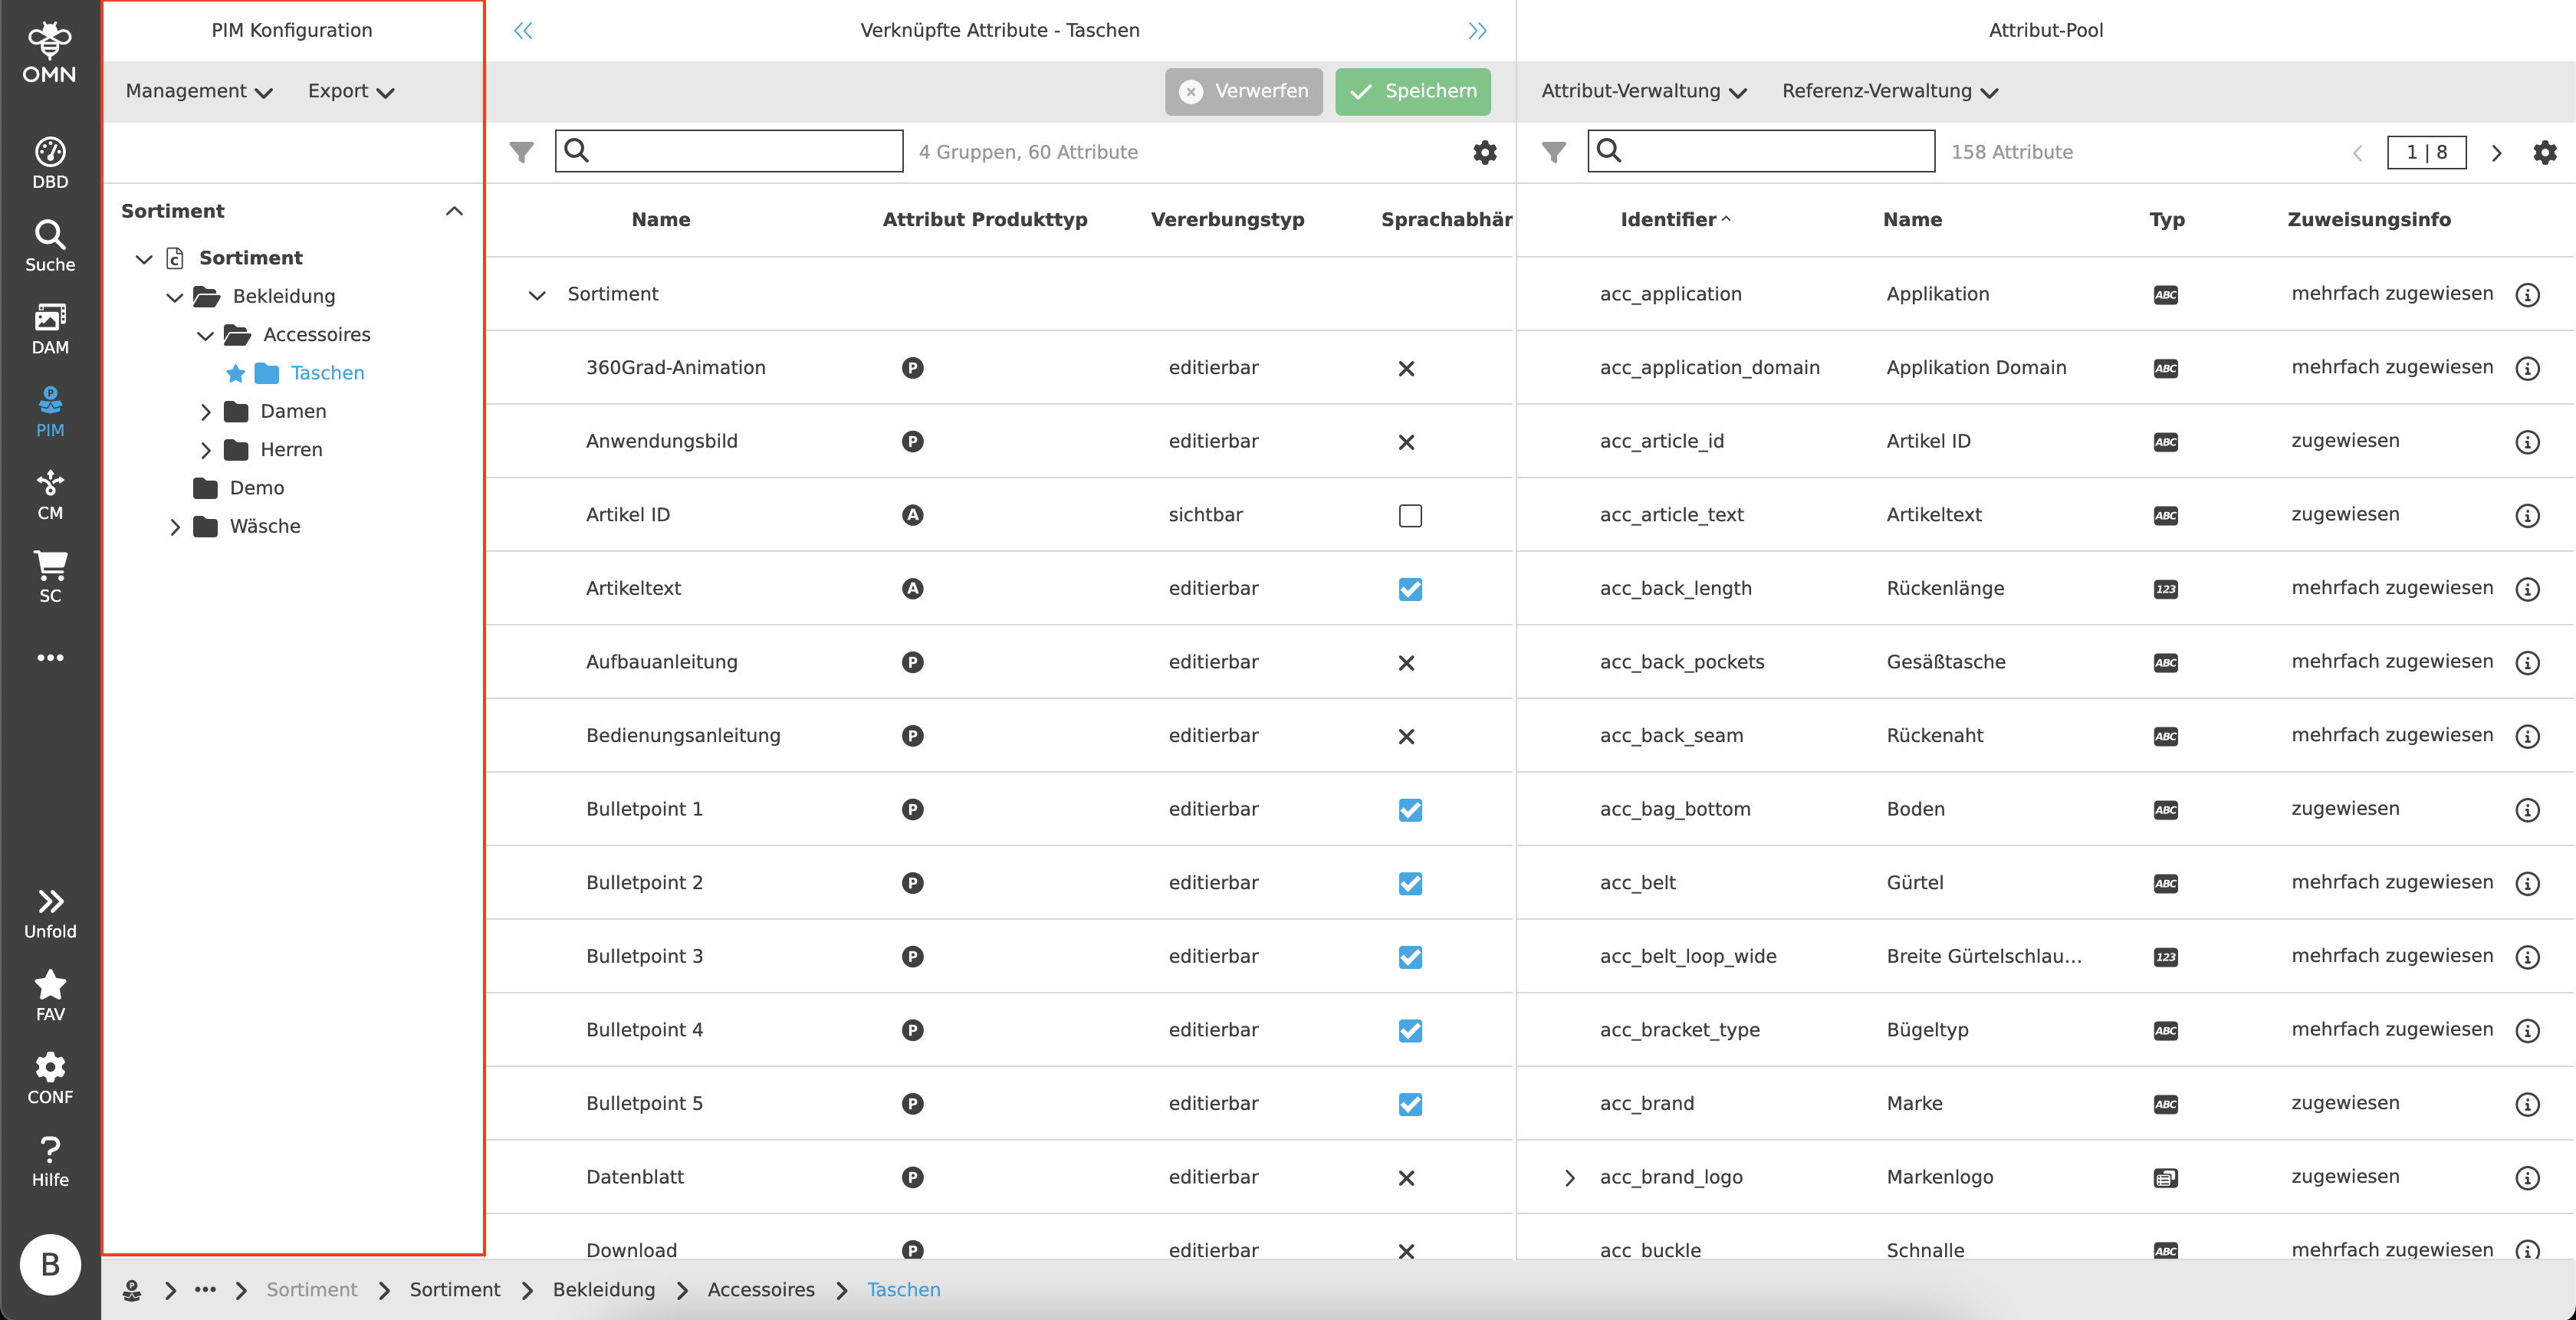
Functions
The functions are generally configurable. Depending on the user’s rights, the following options are available, for example:
-
Create, rename or remove nodes
-
Set favorite nodes and Go to favorite node
-
Assign product view to a node
-
Create, rename or remove classifications
-
Export nodes
-
Assign Product View
-
Assign tags
Center View
In the center view, attributes from the attribute pool can be assigned to a classification node via DnD.
The behavior of the attributes (e.g. language dependency or inheritance rules) can also be defined.
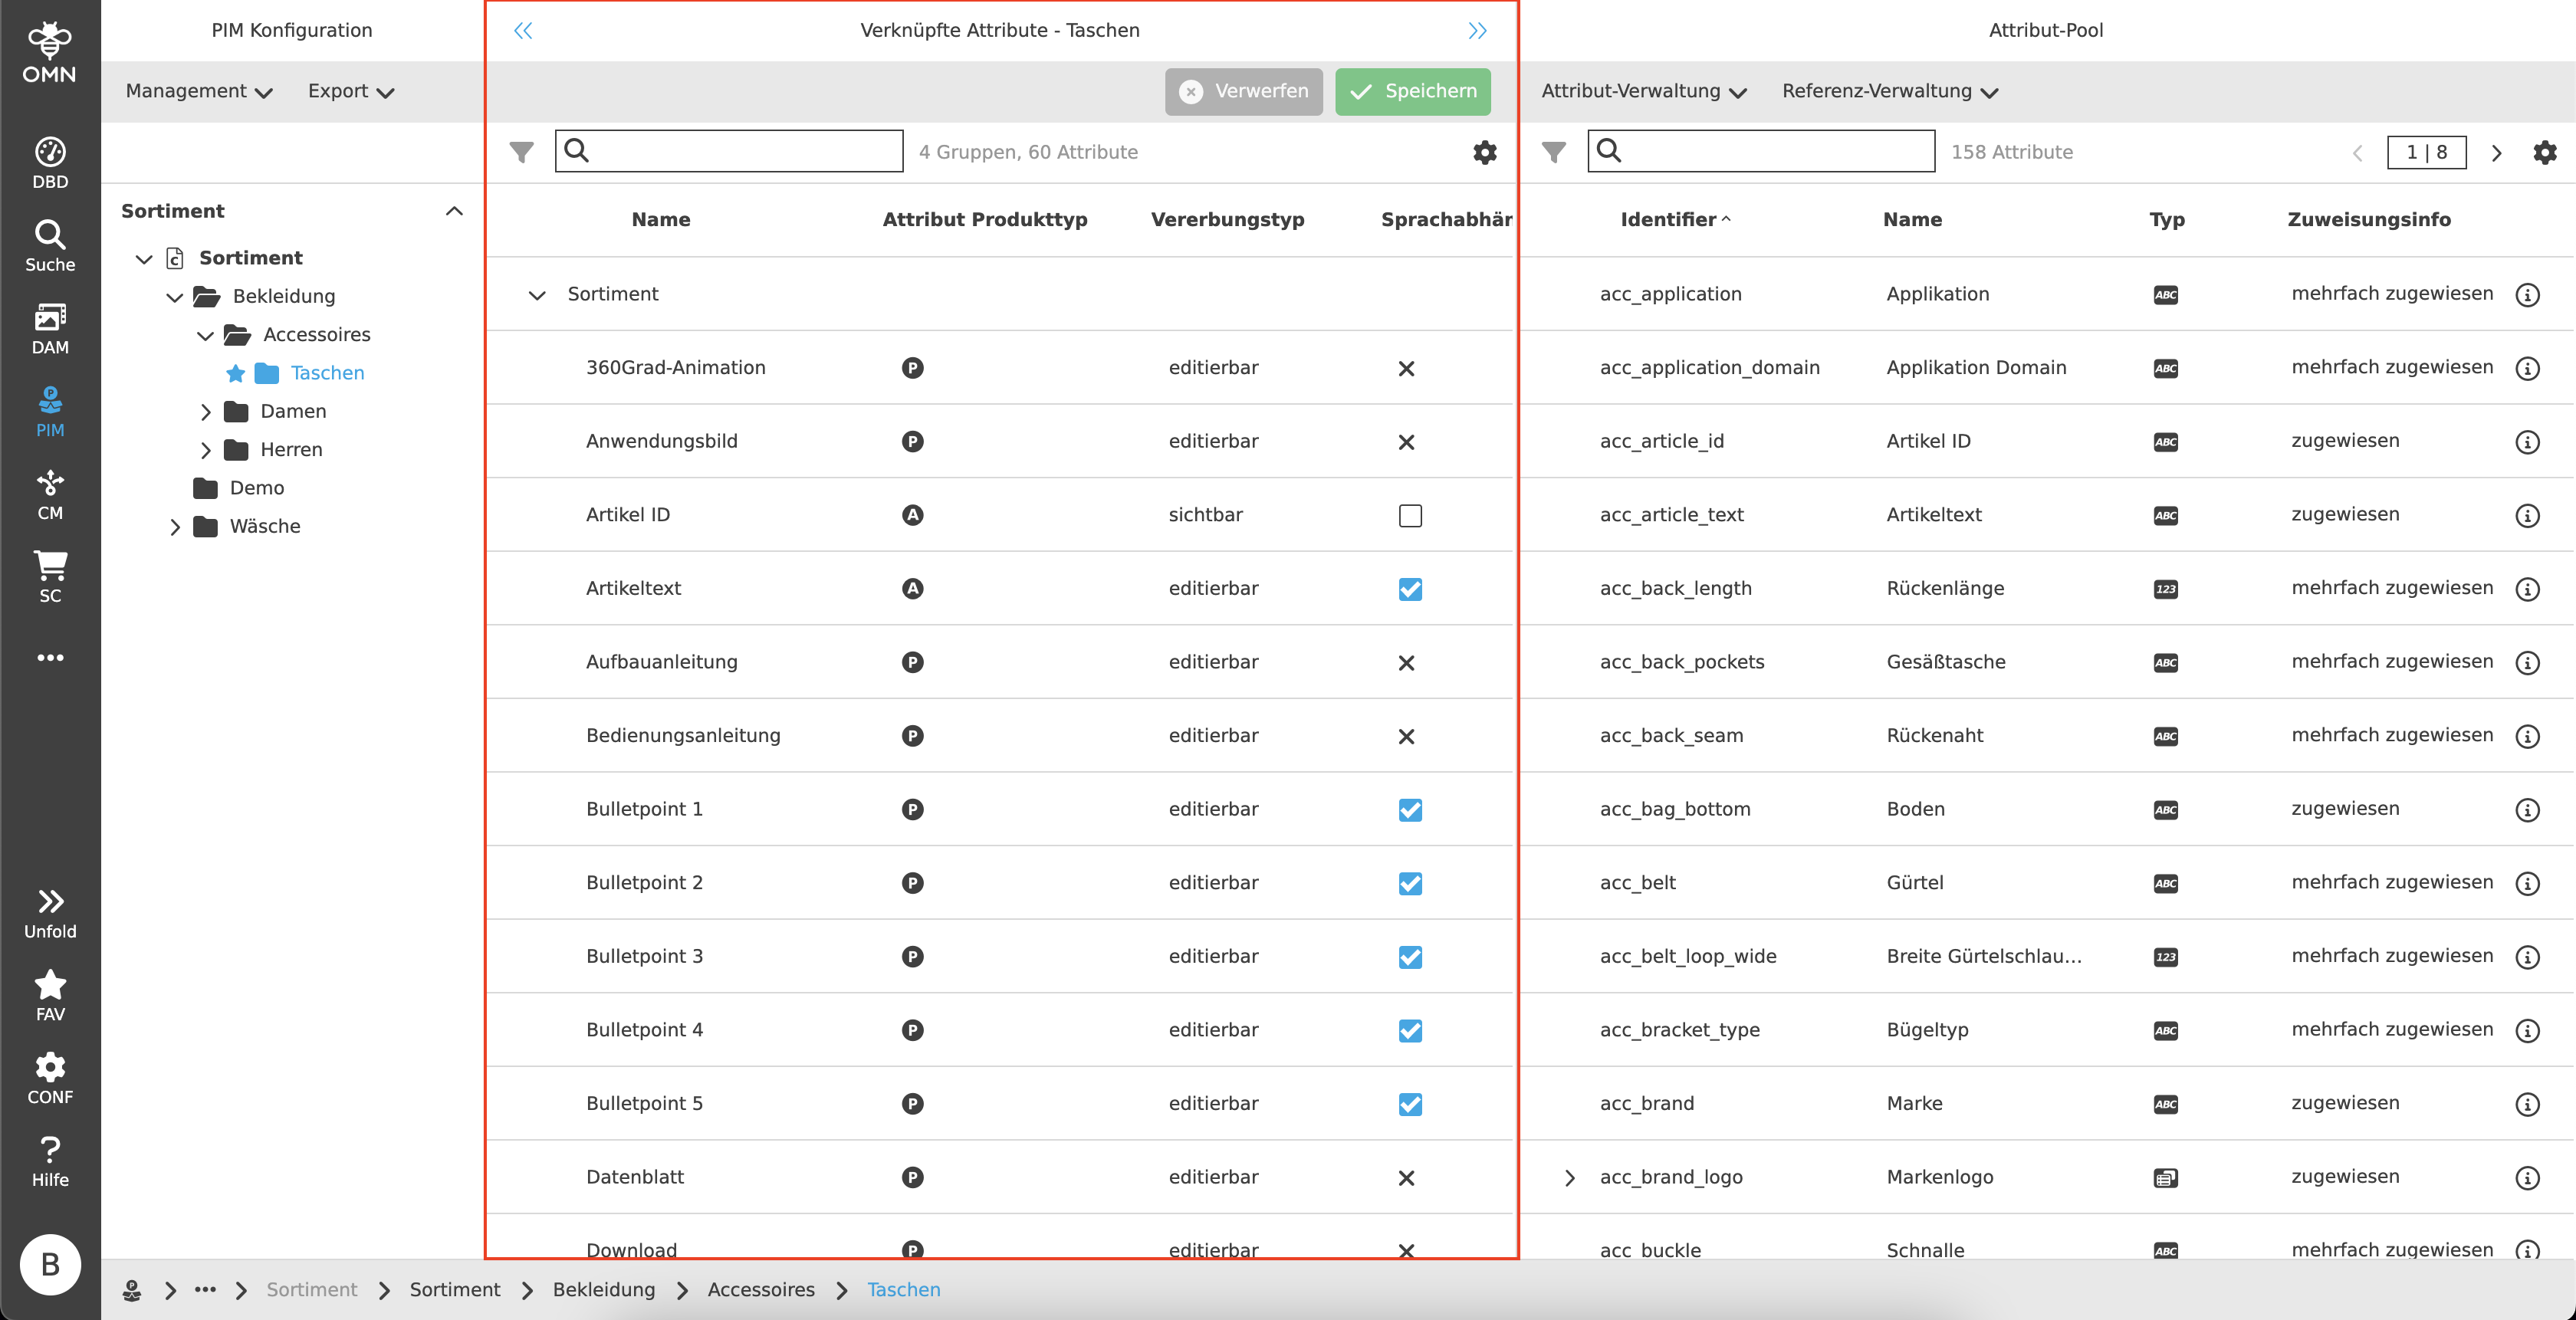
Toolbar
In addition to configurable functions, the toolbar also offers the option of saving and discarding changes.
Statusbar
The statusbar contains a quick search and settings.
Quick Search & Object Counter
A quick search function is available to users to reduce content and simplify the search for specific attributes.
One or more values can be entered here to find the desired attribute.
Next to the quick search is an "object counter", which displays the number of groups and attributes. In the case of selections, only the attributes are counted.
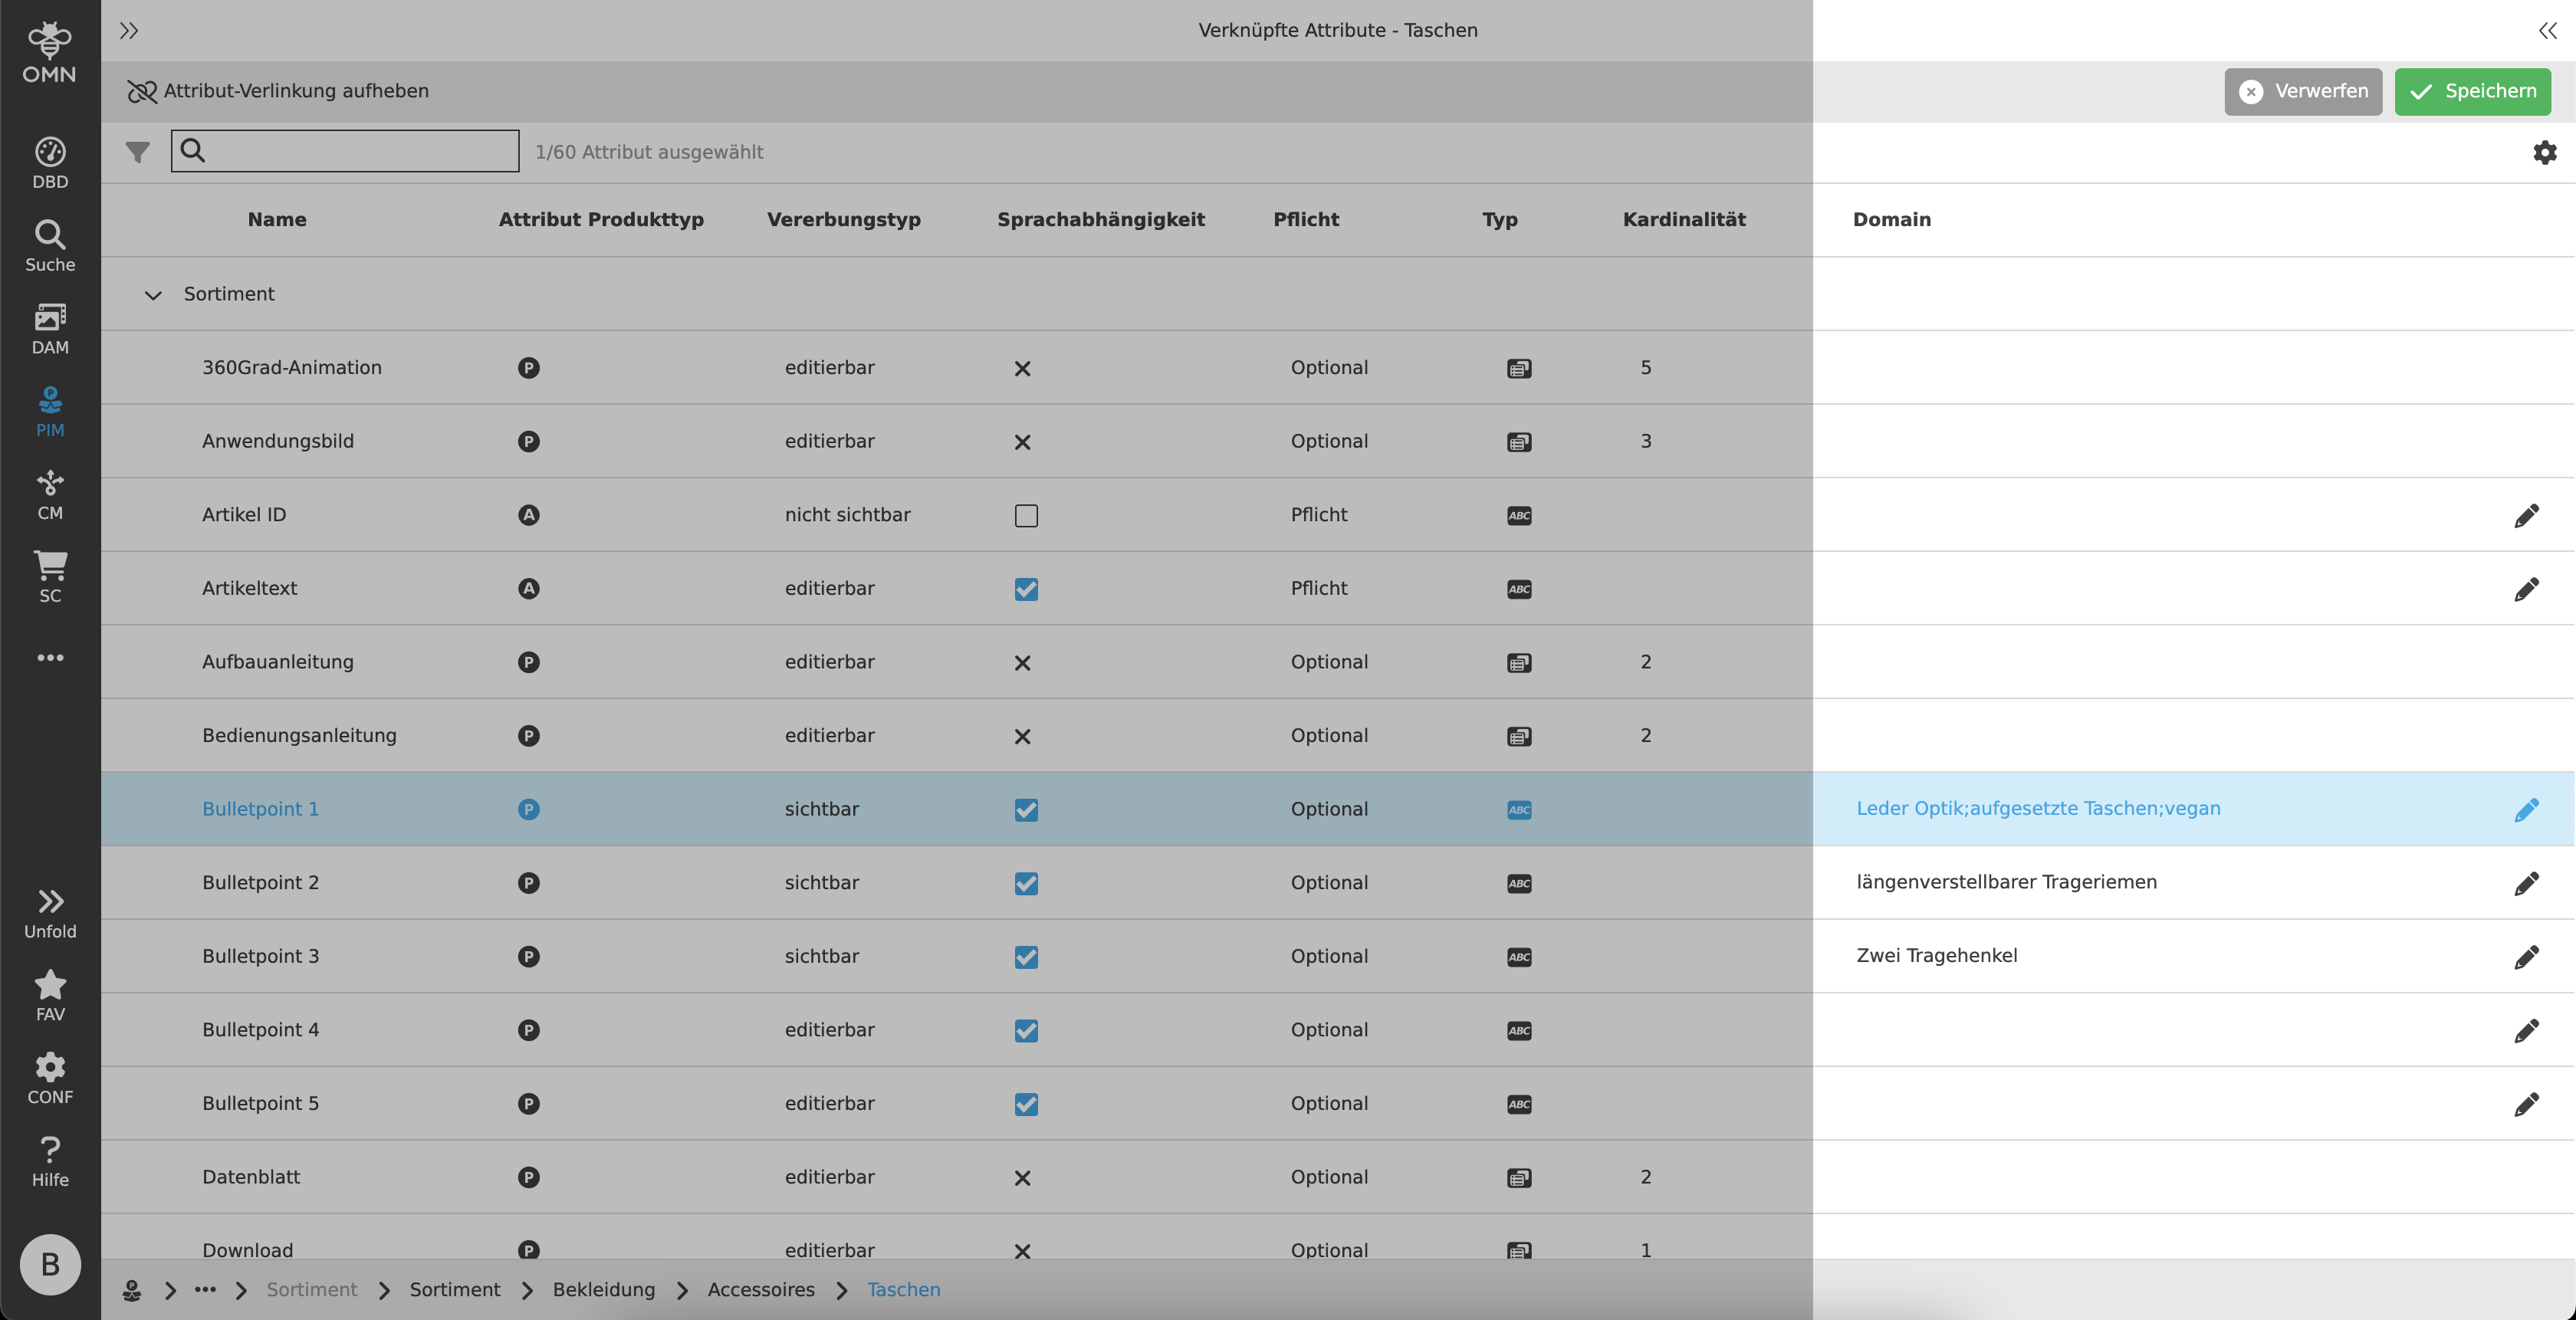
Canvas
For the later maintenance of the products and their attributes within the Management View, a configuration of the attributes is necessary.
For this purpose, the center view table contains various columns that can be edited specifically for each attribute.
In addition to the columns "Name" and "Type", which cannot be edited, there are the following configuration options:
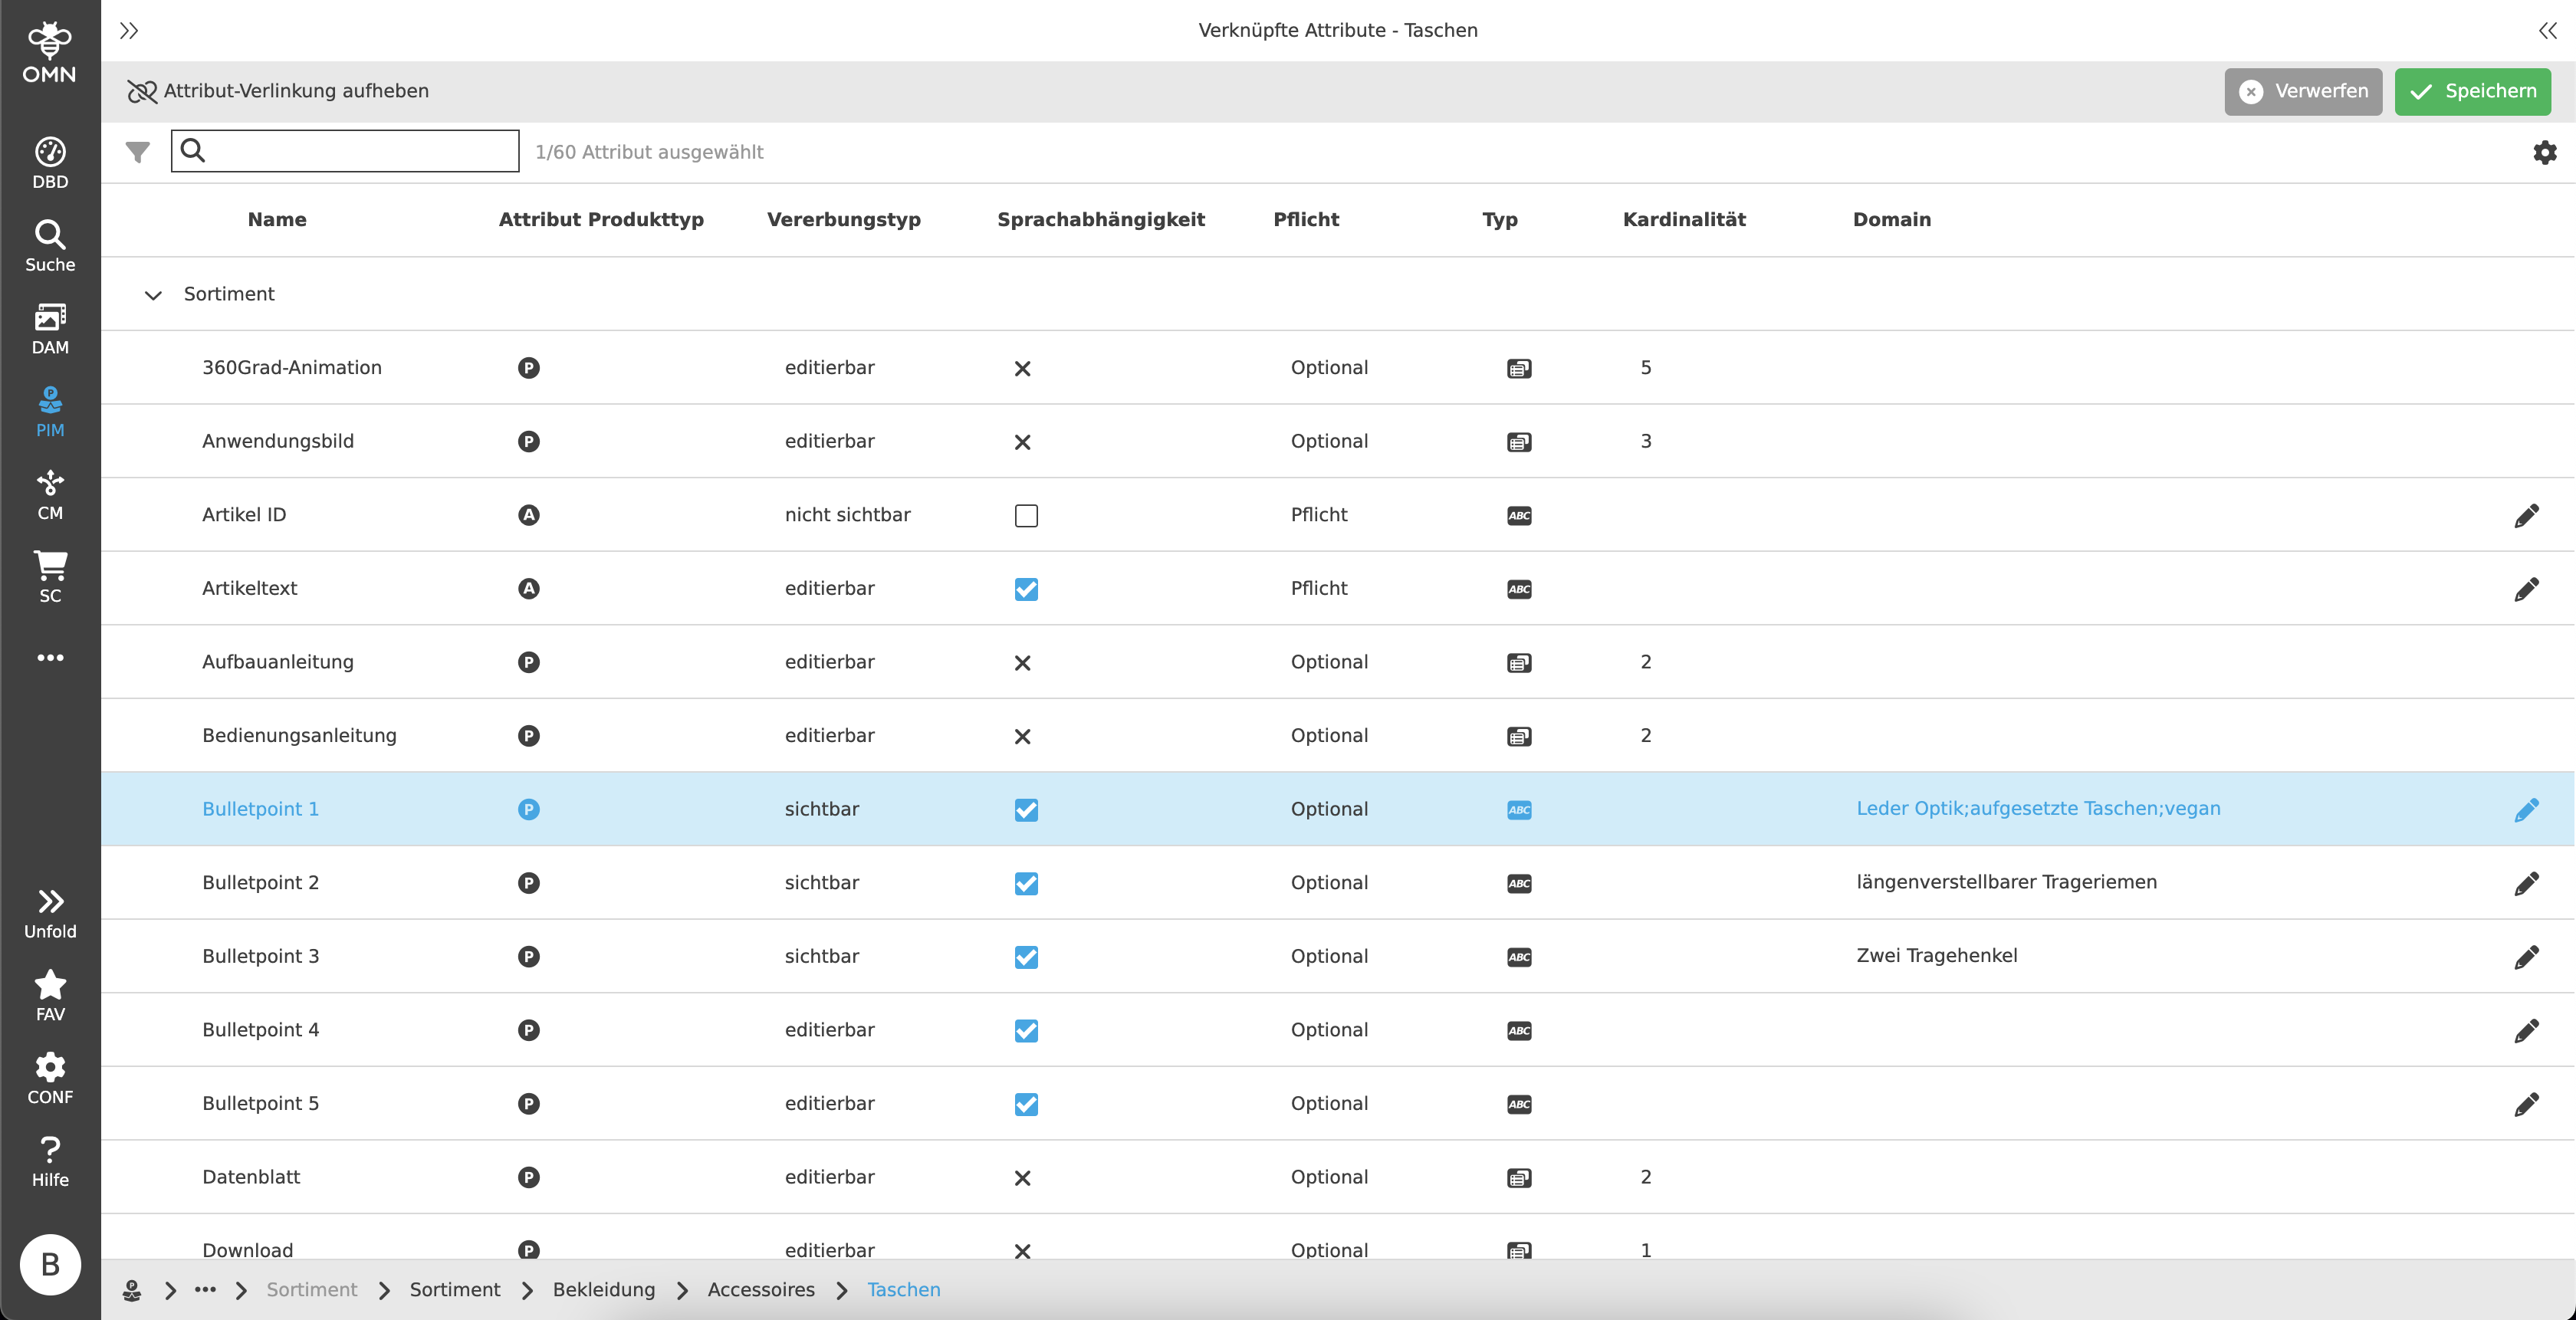
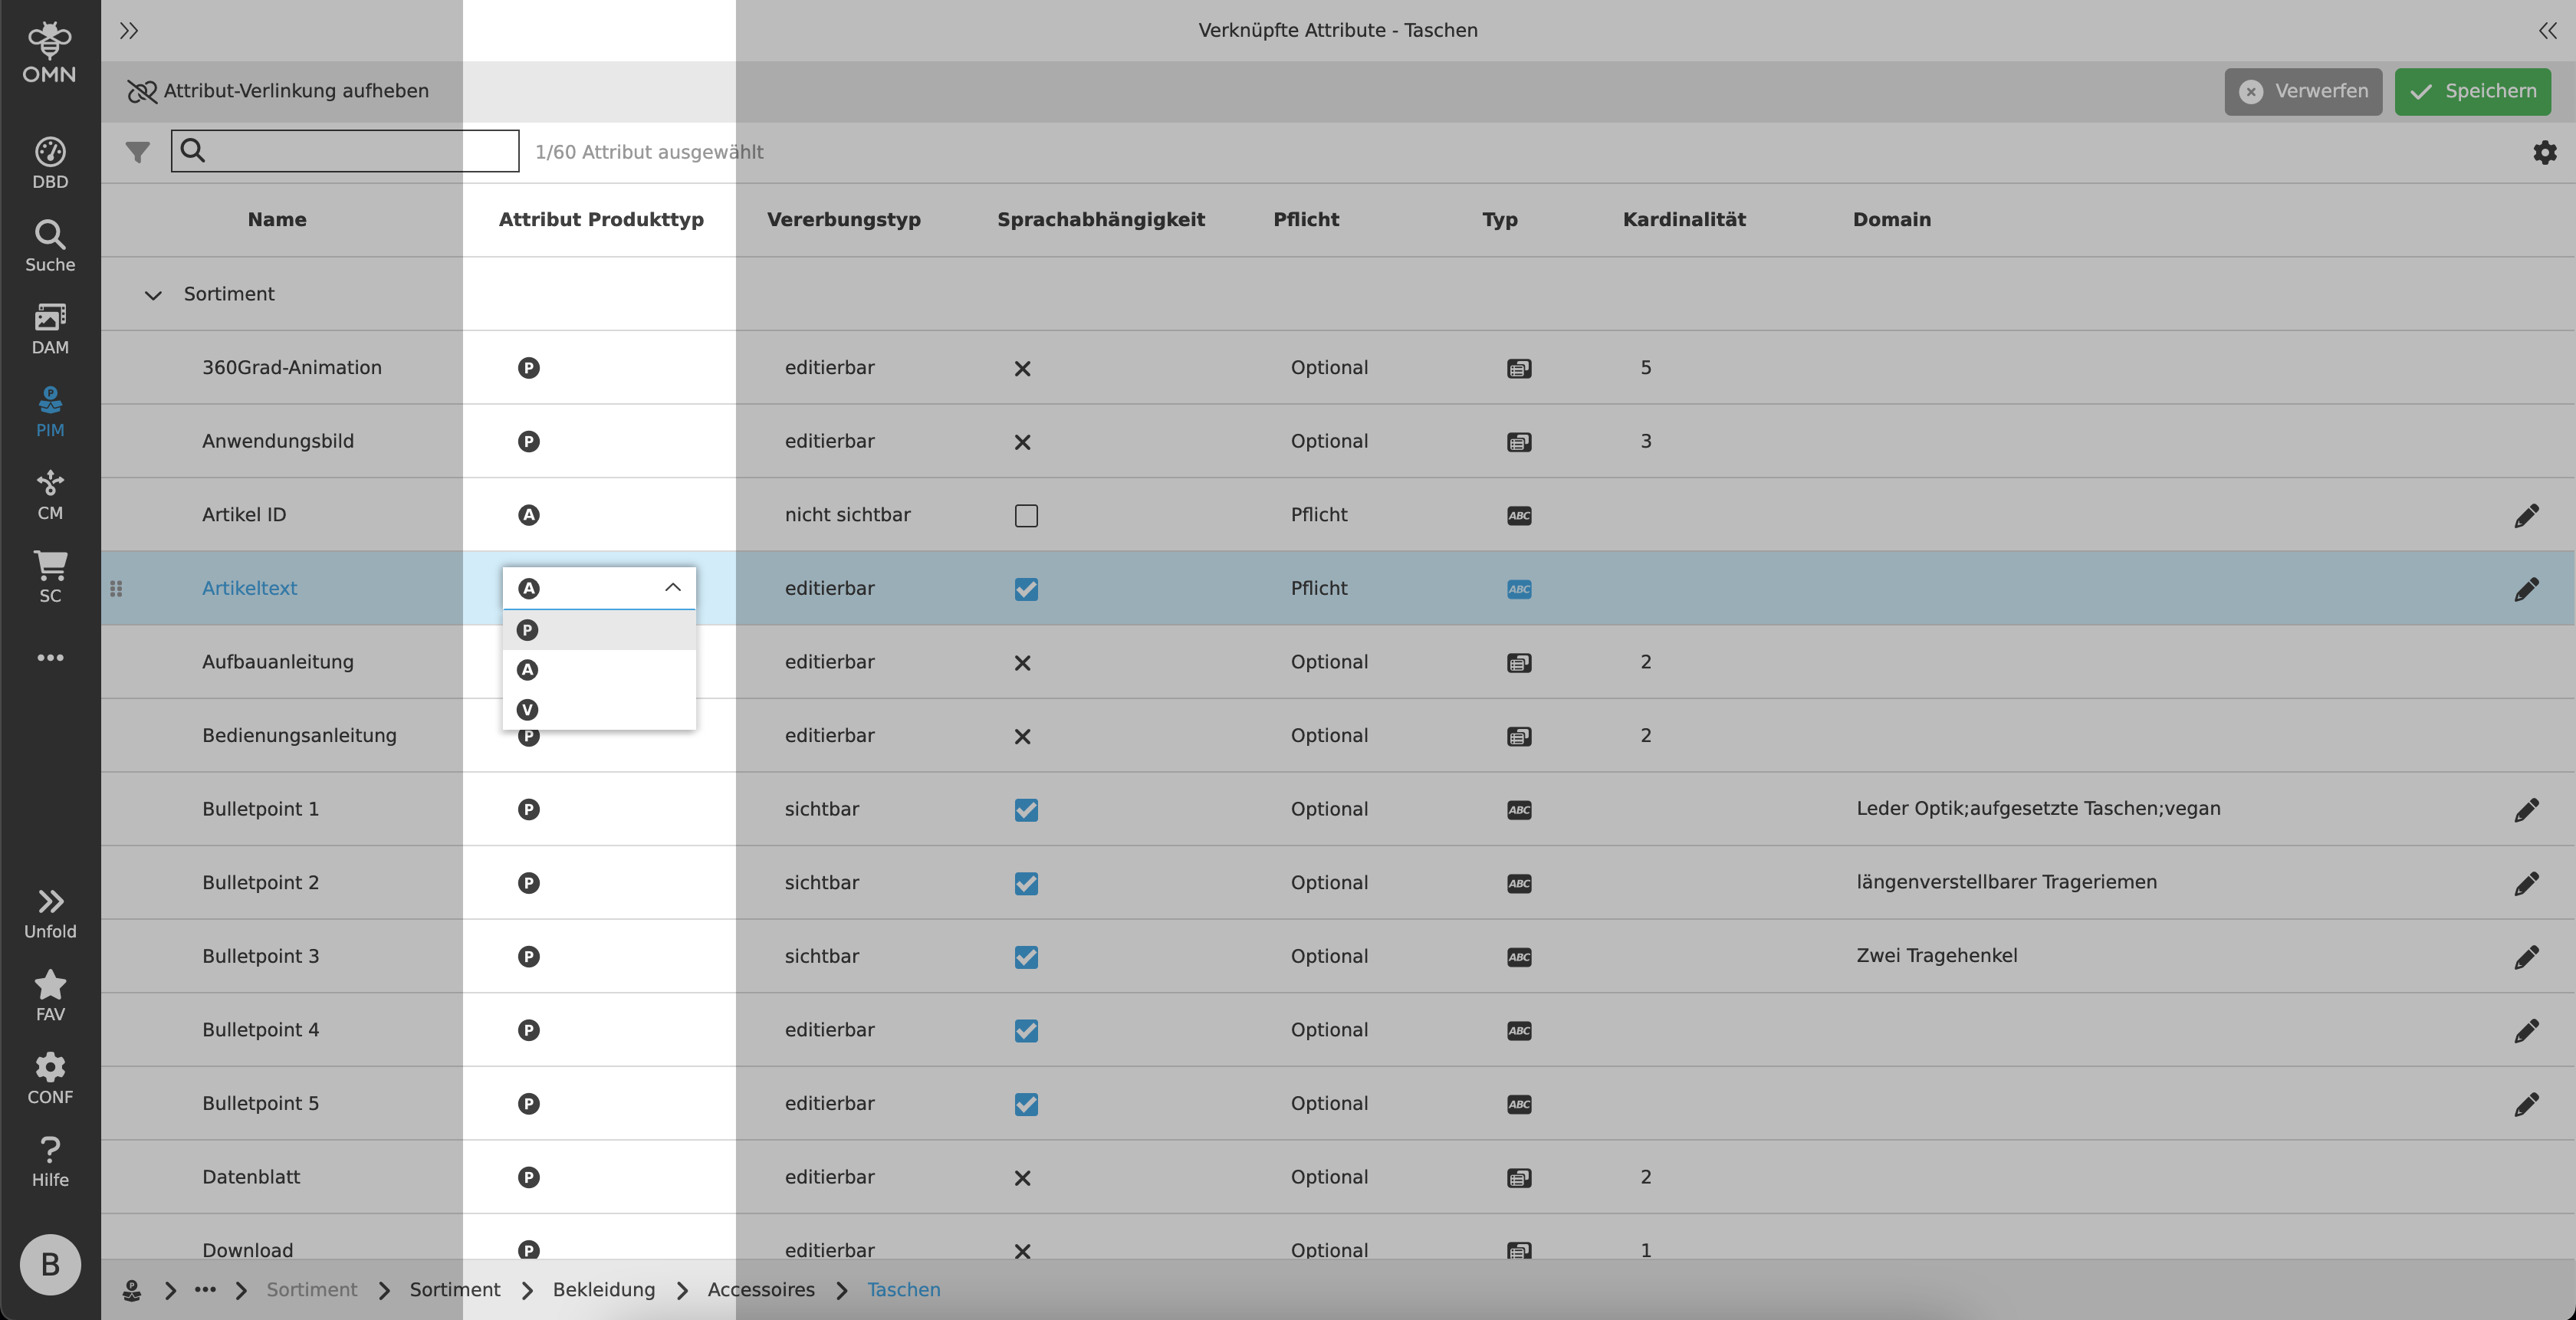
Attribute product type
The attribute product type specifies the hierarchy level at which the parent object is located or the level from which the attribute appears and is displayed.
A dropdown can be used to select between product, article or variant (displayed as symbols).
The product level is always selected by default.
-
P (Product)
The attributes and their values are maintained at product level. -
A (Article)
The attributes and their values are maintained at article level
Values can no longer be maintained at product level. -
V (Variant)
The attributes and their values are maintained at variant level
Values can no longer be maintained at product or article level.
| Depending on the inheritance type, the values are automatically inherited further down and displayed or hidden. |
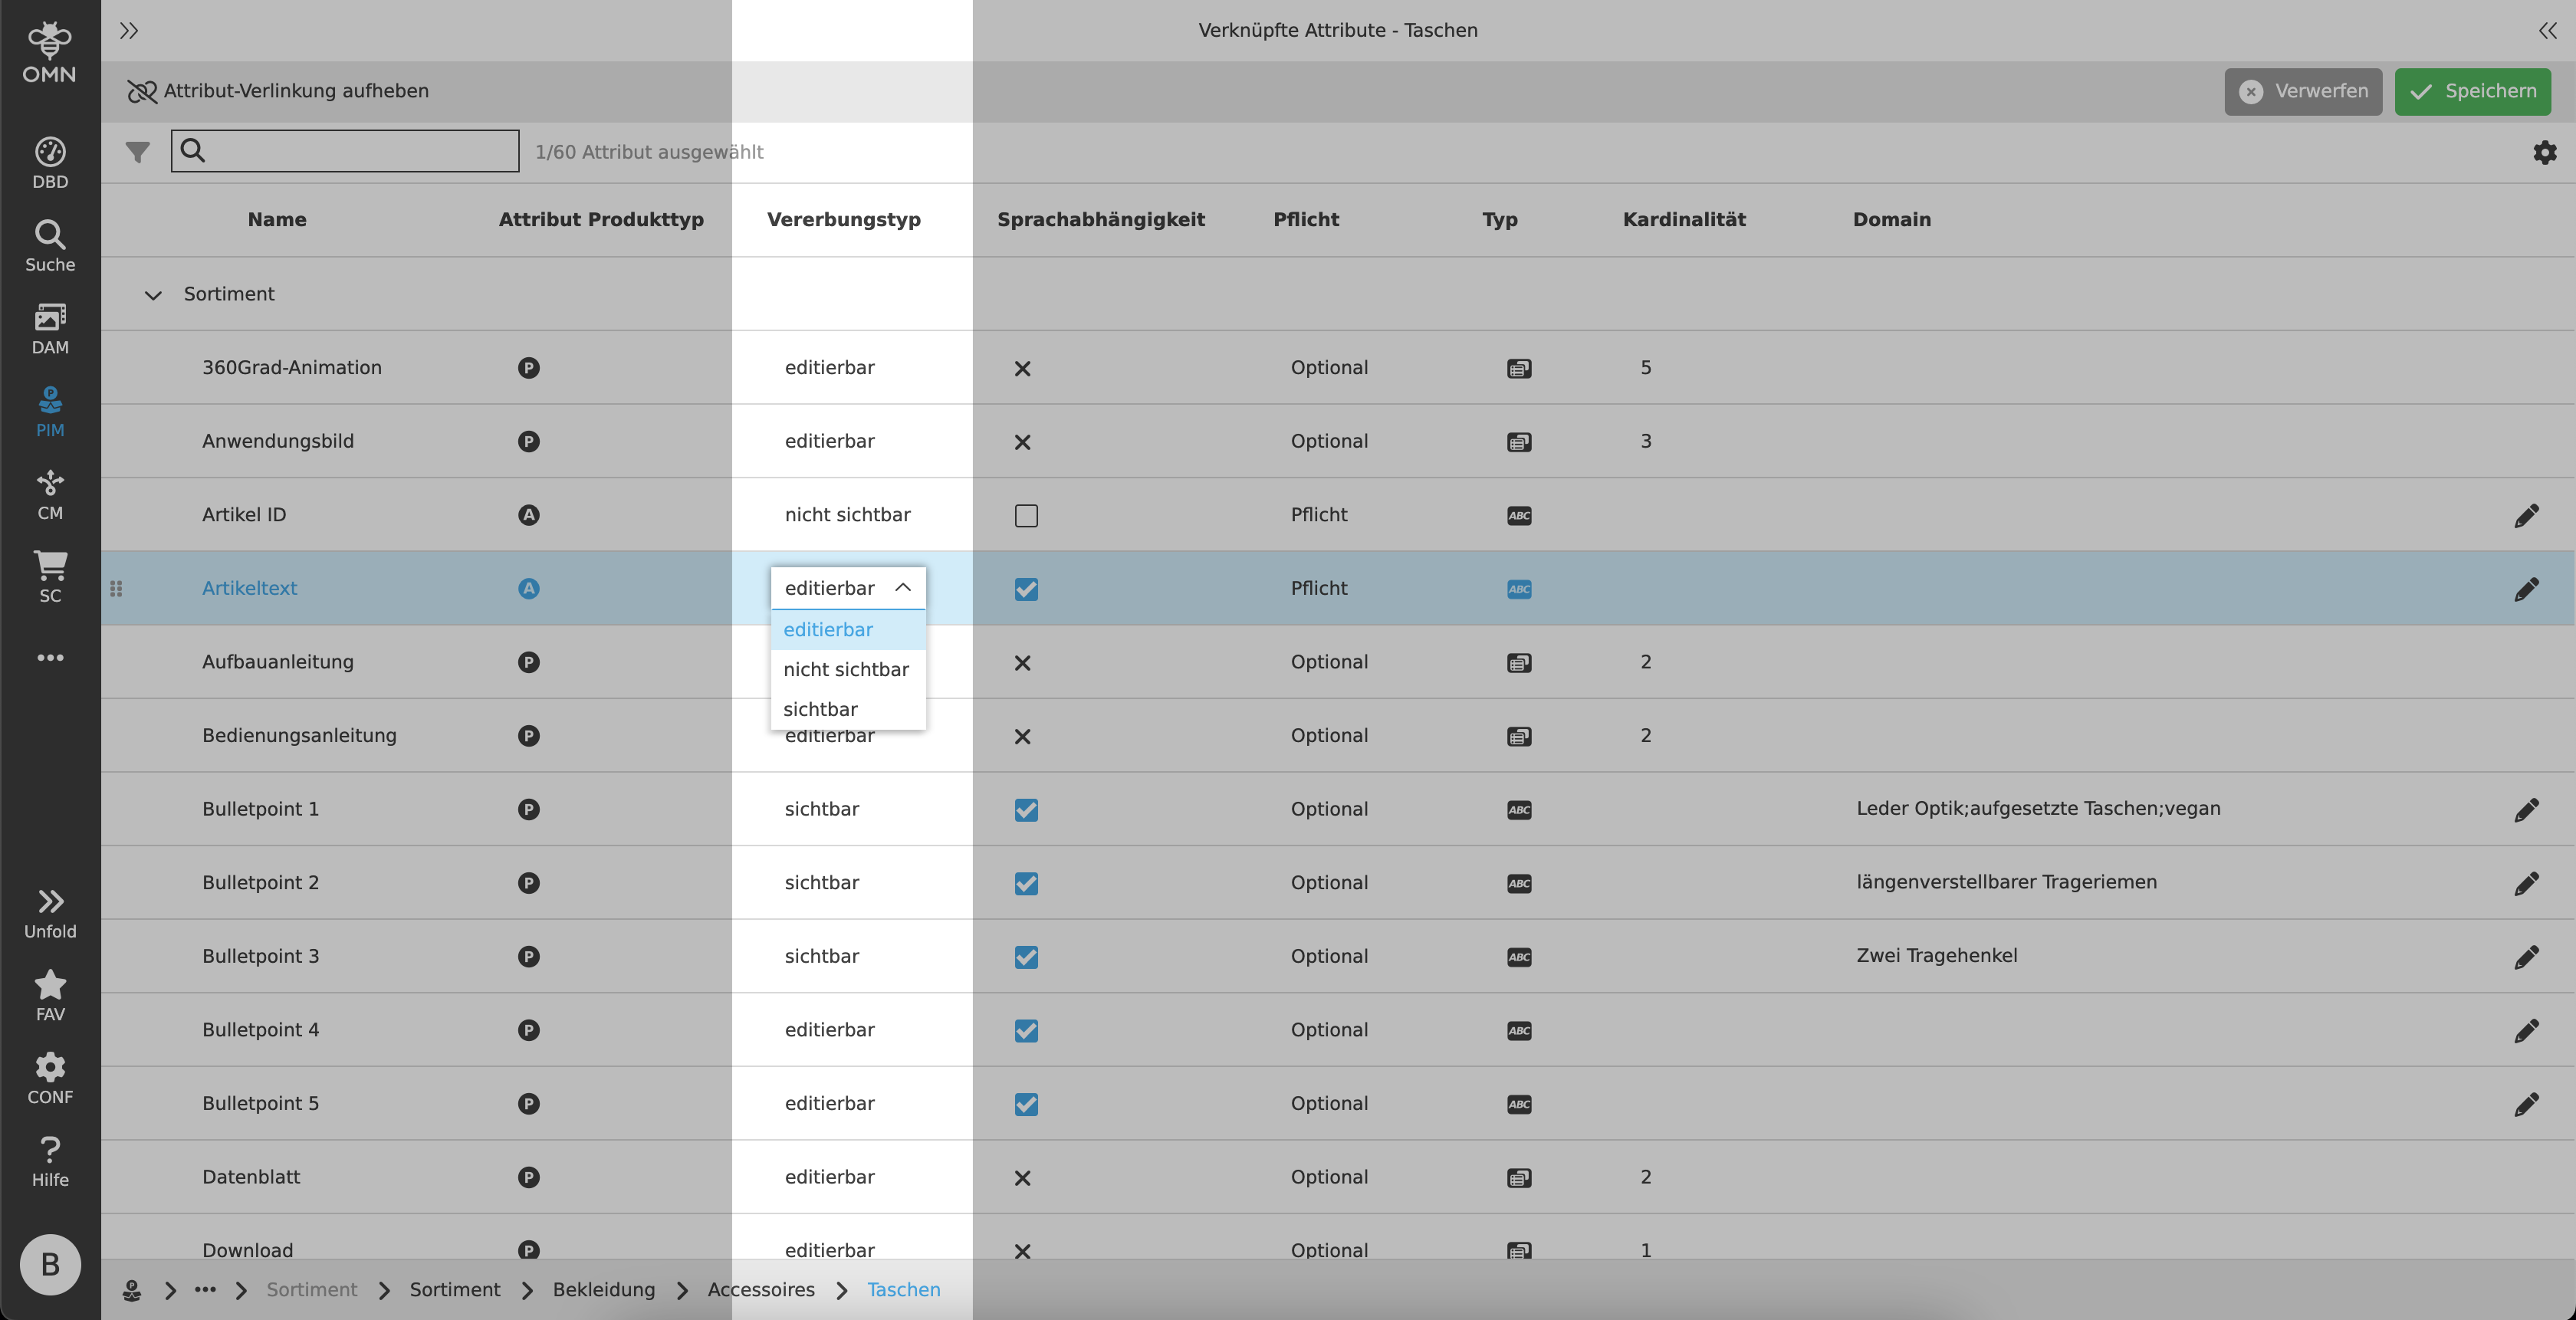
Inheritance type
The inheritance type is used to decide whether values on the respective levels (see Attribute product type) are editable, visible or not visible.
By default, "not visible" is selected in the dropdown.
-
Editable
The respective attribute is displayed on all levels below the parent object and the values can be edited. -
Visible
The attribute is displayed on all levels below the parent object. Only values on the selected product type level can be edited, all values below it are visible (labels). -
Not visible
The attribute and its value are only displayed on the selected product type level and can be edited there. The attribute is hidden on all levels above or below it.
Language dependence
In the "Language dependence" column, a checkbox can be used to specify whether an attribute and its value should be language-dependent or not.
If the checkbox is ticked, the attribute is language-dependent. By default, a value is not language-dependent.
-
Not language-dependent
The attribute and its values are displayed with the same value in all languages. -
Language-dependent
The attribute and its values are localized across all languages. This means that a separate value can be inserted for each available language.
Language-dependent values are displayed with a flag in the Management View.
| An attribute of the reference table type cannot be language-dependent and is therefore displayed with a non-editable "X". |

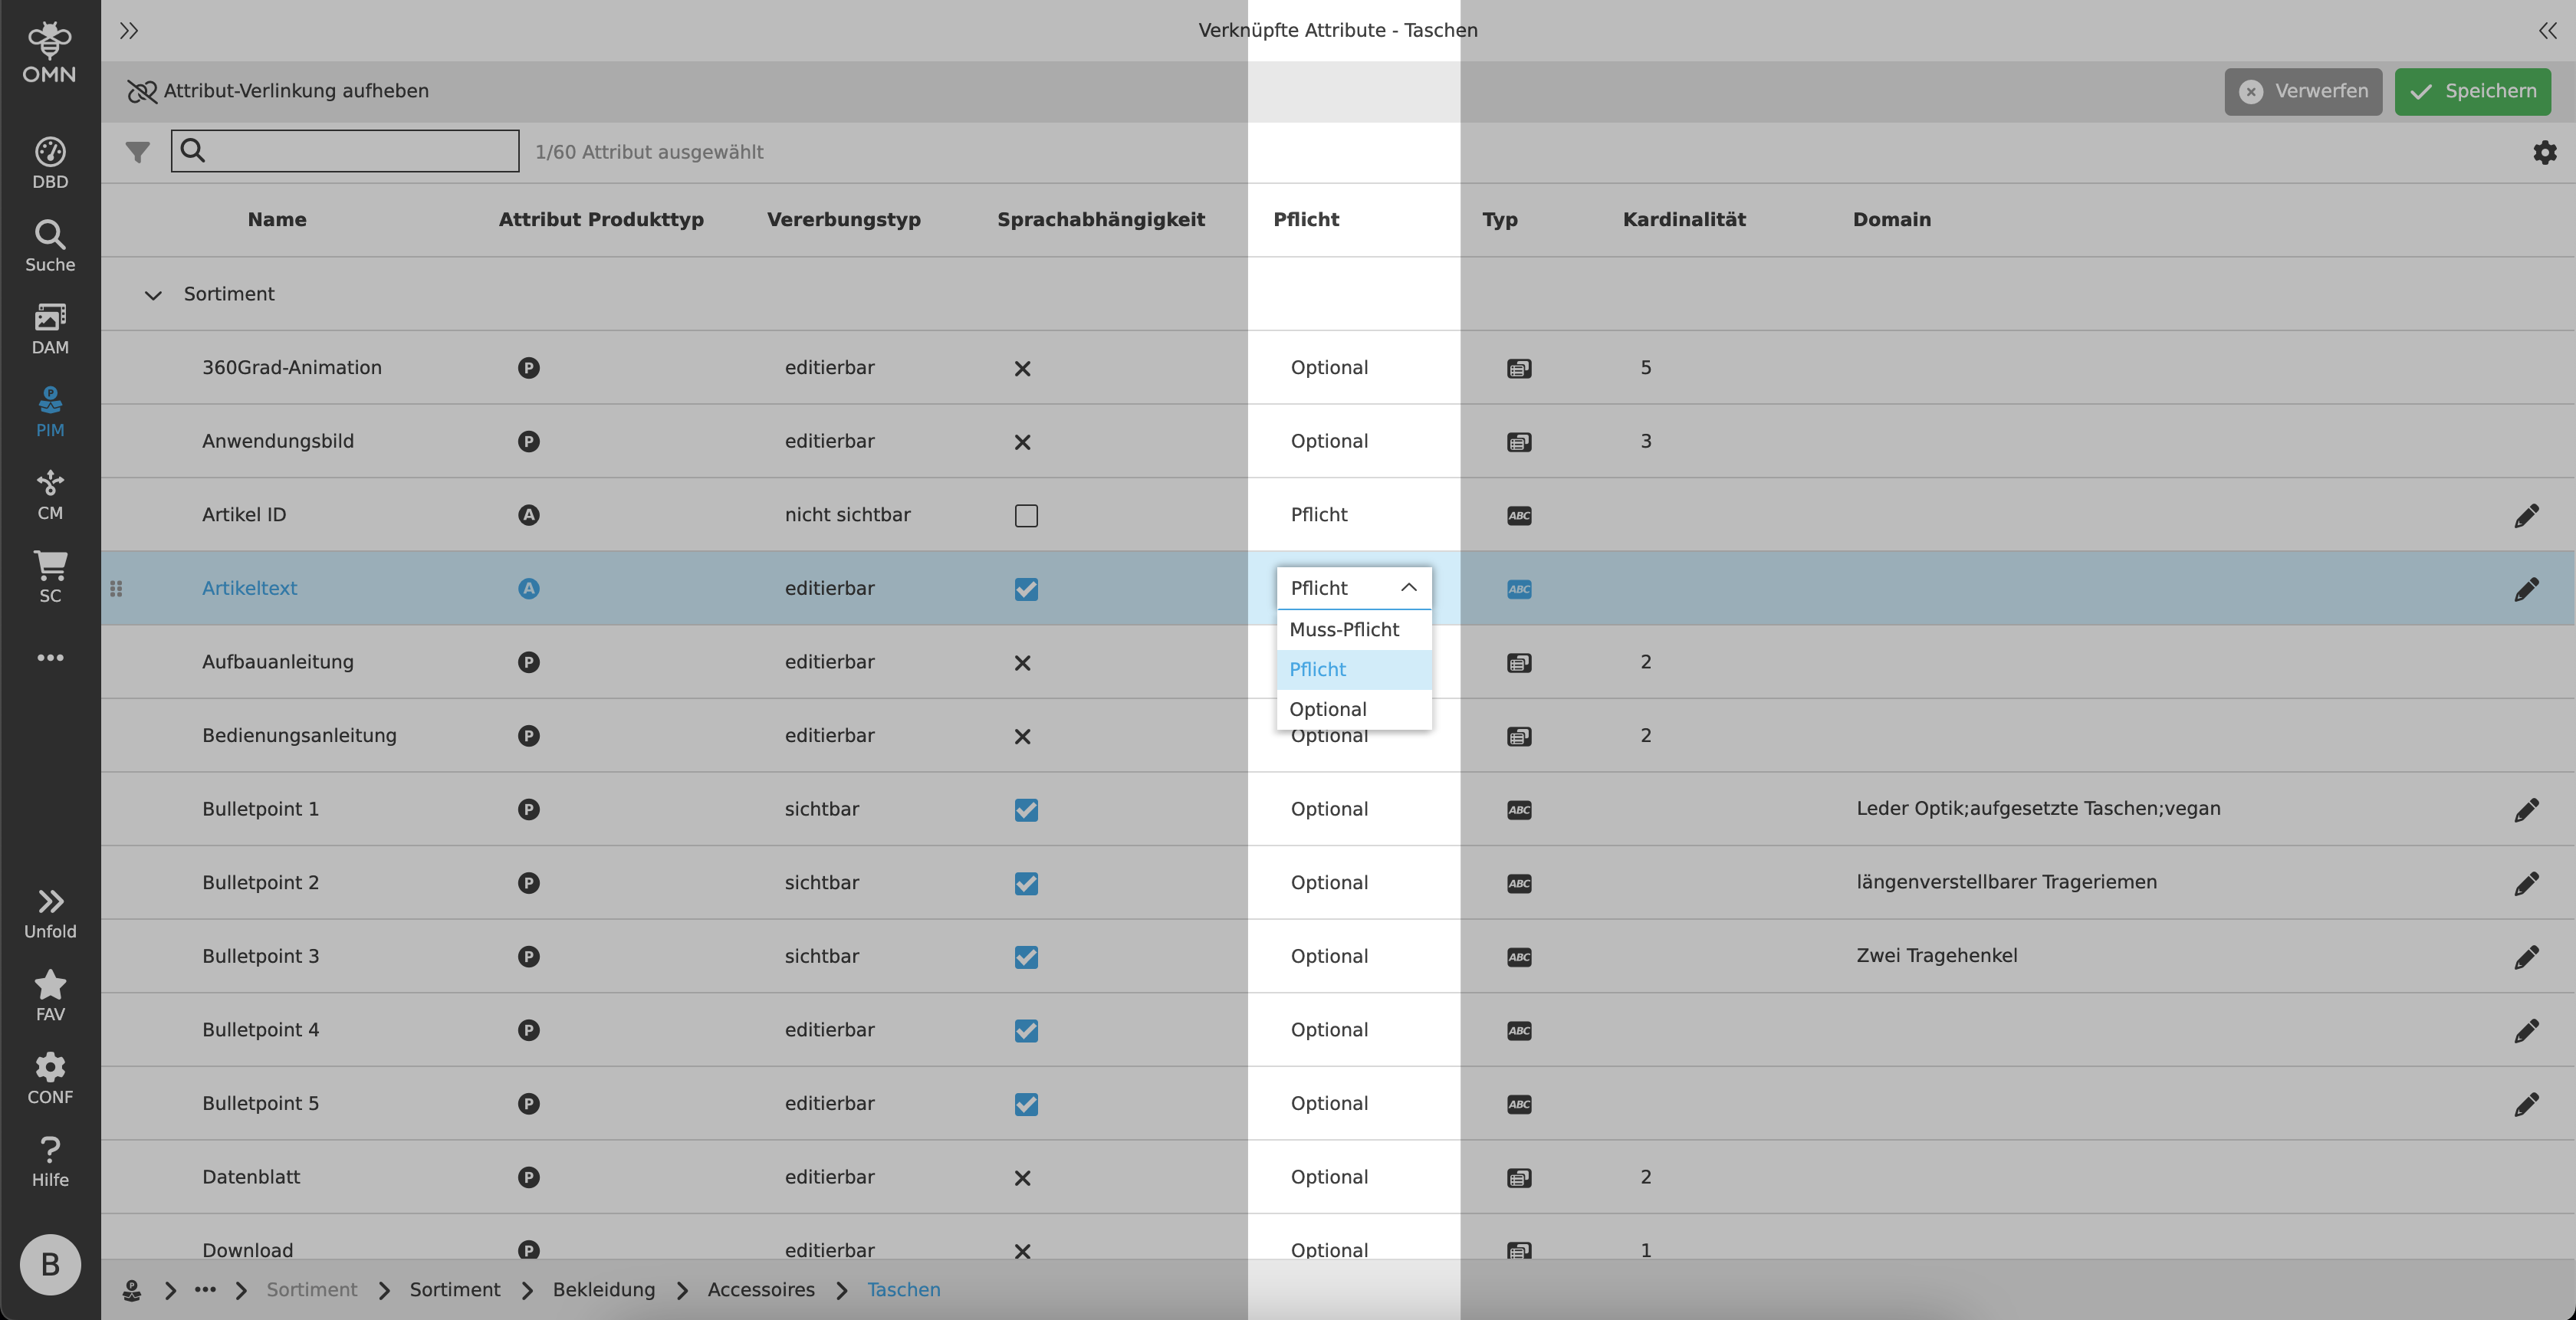
Required
All attributes can have one of three mandatory characters, which have the following effects on the Management View:
-
Optional - No labeling
The attribute can, but does not have to, be edited. There are no restrictions when saving empty fields with this character. -
Required - orange asterisk
The attribute should, but does not have to, be edited. When saving empty required fields, a message is displayed indicating that they have not been filled. -
Mandatory - red asterisk
The attribute must be edited. Saving is only possible if these fields have been filled in.
Cardinality
With the Cardinality column, users can assign a value for attributes of the type "Reference table" that specifies how many elements can be assigned to the attribute.
In the Management View, the number of files, e.g. linked images, cannot and must not be exceeded.
Example:
If a cardinality of 3 has been assigned, a maximum of three elements can be attached to the attribute. Otherwise, an error message is displayed.
If the cardinality is subsequently reduced and three elements have already been linked, this is possible, but an error message is also displayed in the Management View.

Domain
Domains are characteristics of a product or selection options for values that can be selected later in the Management View.
For example, an attribute "pattern" can be given various values, such as houndstooth, herringbone, stripes, pinstripes, etc., for selection.
The domains can either be assigned via the attribute creation in the attribute pool or adjusted using the pencil icon in the center view next to the domain column.
| If the domains in the center view are changed, this has no effect on the settings made for the attribute in the attribute pool. The same applies the other way around. |
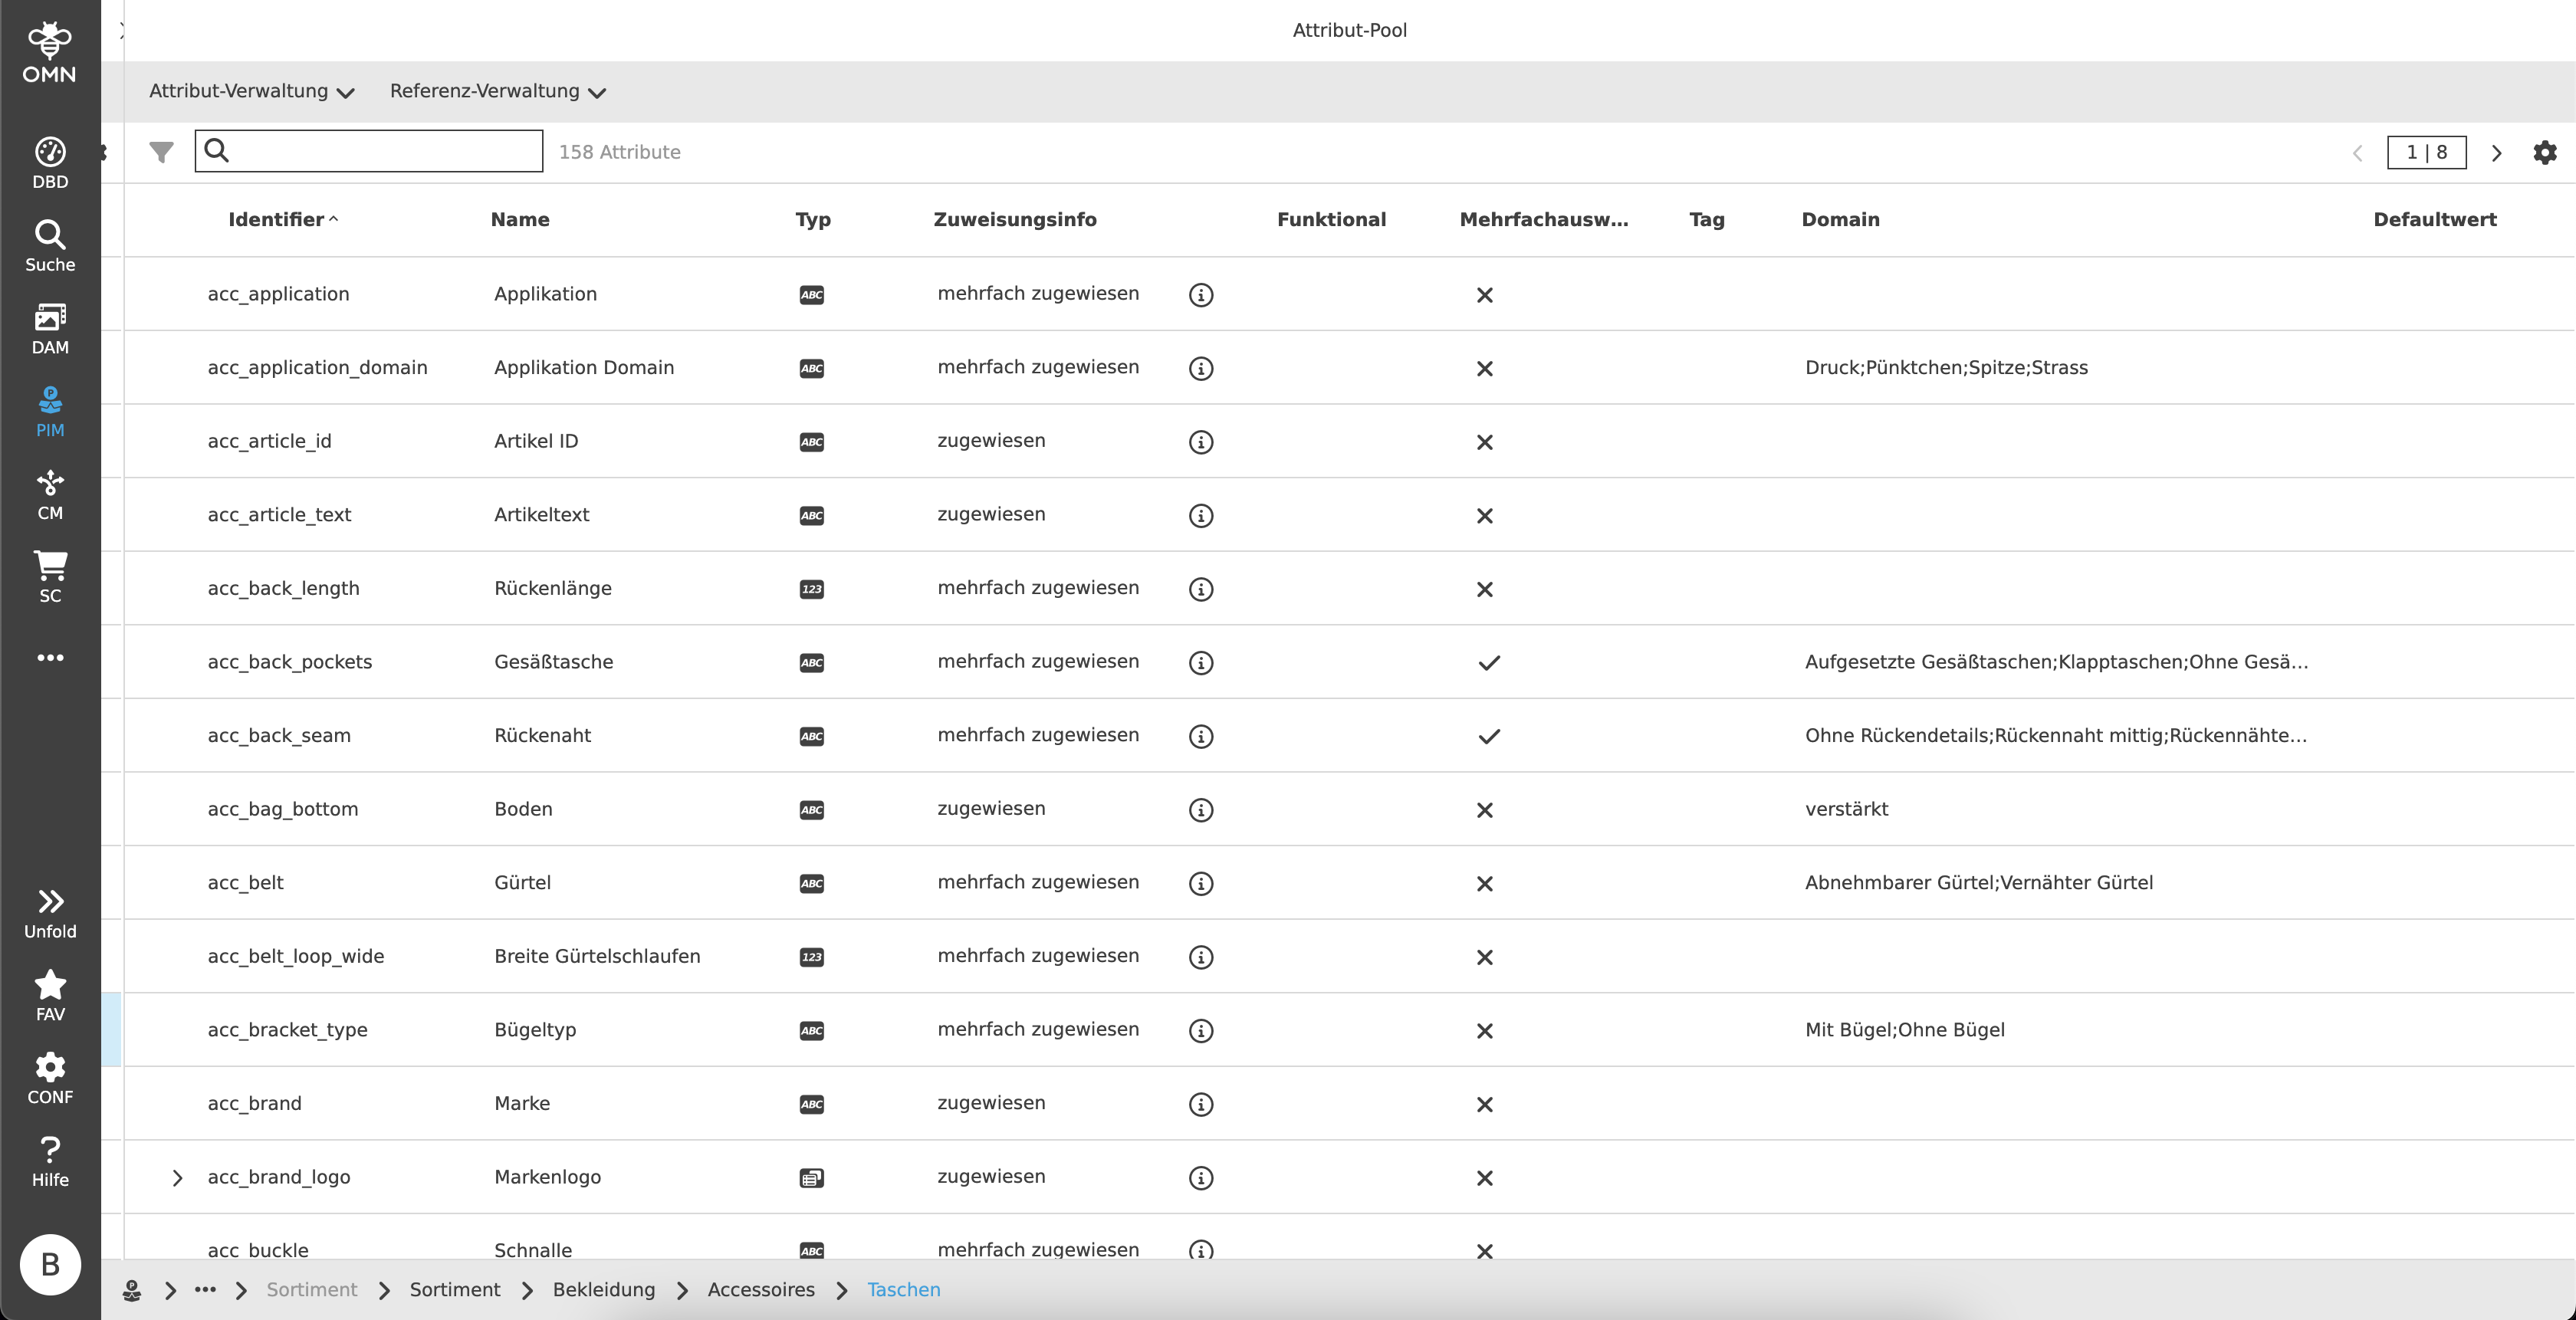
Right View
The attribute pool, which contains all existing attribute definitions, is located in the right view of the Configuration View.
Attributes can be created, edited or deleted here.
Toolbar & Functions
The functions of the toolbar are:
-
Add attribute definition
-
Change attribute
-
Delete attribute (only possible if the attribute is not linked)
-
Display the reference types as a table
Add attribute definition
The "Add attribute definition" function allows the user to create a new attribute.
A dialog opens which offers the option of opening an attribute of one of the following types (see dialog tabs).
| The attribute types can no longer be changed once they have been saved. |
See more details: Attribute configuration
Statusbar
The statusbar contains a quick search and settings.
Quick Search & Object Counter
A quick search function is available to users to reduce content and simplify the search for specific attributes.
One or more values can be entered here to find the desired attribute.
Next to the quick search is an "object counter", which displays the number of attributes.
Canvas
The right view workspace contains an overview of all available attributes, which is displayed in the form of a table with the following columns:
-
Identifier
-
Name
-
Type
-
Icon of the respective type
-
 String
 -
 Real
Real -
 Date
Date -
 Boolean
 -
 Table
Table -
 Reference table
-
-
-
Assignment info
-
Indicates whether the attribute has been assigned (multiple times) or not
-
-
Functional
-
Information on whether a script has been assigned to the attribute
-
-
Listable
-
Information on whether an attribute has the "List" setting activated or not
-
-
Tag
-
Domain
-
Default value NOTE: The attribute pool can be sorted and filtered. The Assignment info column can be used, for example, to filter all attributes that have not yet been assigned to a classification.