How to configure Web2Print
RNC
1) Create RNC in Administration
-
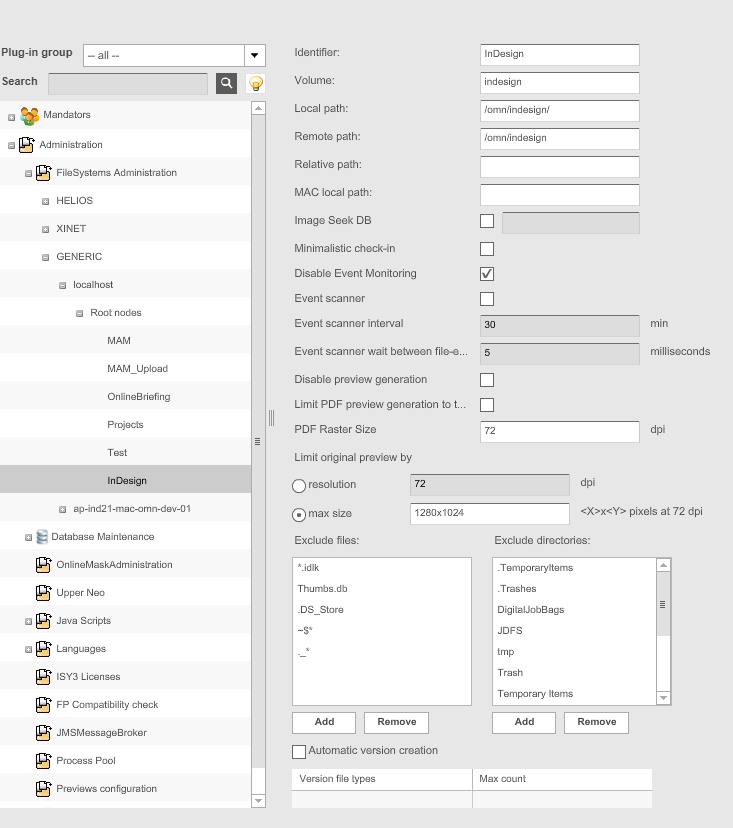
Navigate to Administration ⇒ FileSystems Administration ⇒ GENERIC ⇒ "your Host" ⇒ Root nodes
-
Create a new RNC
-
Set a value to Identifier, Volume, Local Path and Remote Path
-
Save

InDesign
Configuration of InDesign Server
InDesign Server is a developer tool and requires job specific scripts or plugins and is often integrated with content management and worklow solution.
Your first step is to evaluate InDesign Server to see if it’s the right technology for your solution. Plug-ins and scripts can be prototyped on InDesign software first. You should make sure you have the appropriate development skills, including a working knowledge of C++ and scripting and, ideally, some experience developing publishing tools or plug-ins for the desktop version of InDesign. The InDesign Server Software Development Kit (SDK), gives an overview of InDesign Server. More info can be found on the official website.
Indesign scripts must be copied to a directory on your server. This directory must be specified in the configuration.
The scripts are available and can be downloaded from gitlab
-
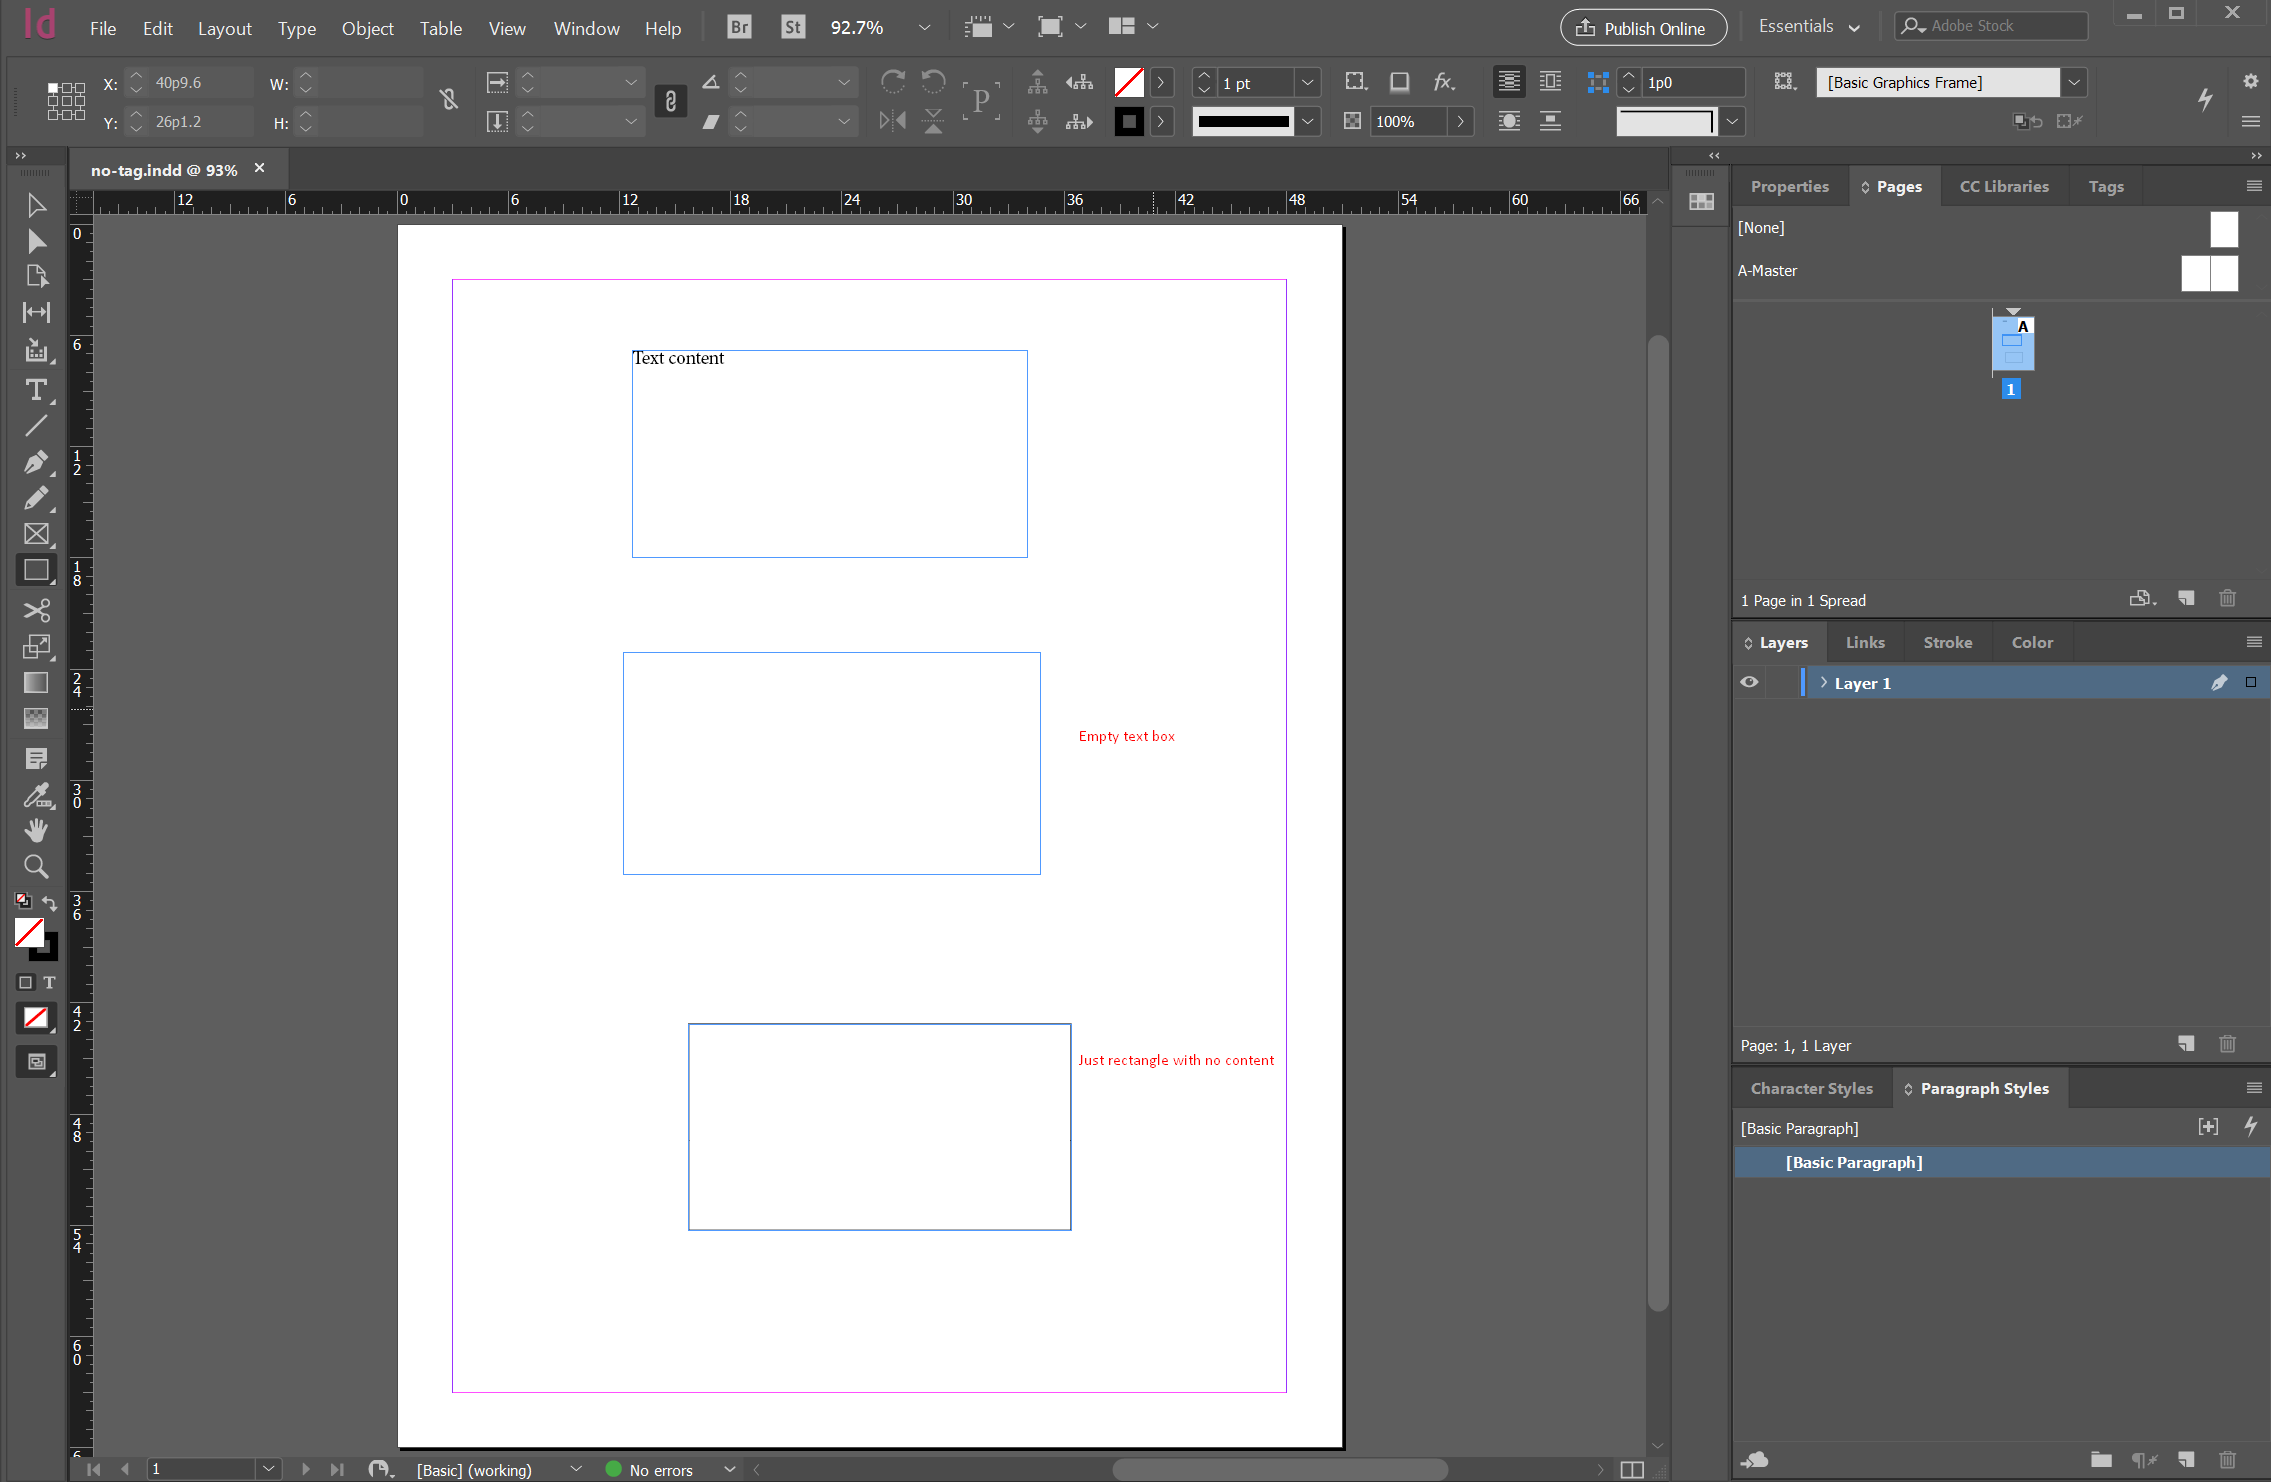
Script import.js. and Script importimages.js The script are needed to import data from an InDesign document into a xmlFile.
-
Script merge.js. and Script mergeimages.js The script are needed to apply user changes in indd document and generate pdf, jpg, png previews.
In order to get an InDesign server, you need:
-
Download Adobe InDesign Server
-
Install and generate license
-
Run
-
Add startup scripts: copy .joboptions files to /Users/user-name_/Library/Application Support/Adobe/Adobe PDF/Settingscopy json2.js file to /Applications/Adobe InDesign Server 2020/Scripts/startup scripts/
-
Restart OS
-
Add nfs share (mount):
-
make mountpoint (e.g. sudo mkdir -p /System/Volumes/Data/mnt/ptpb for MacOS)
-
list exported shares (e.g. showmount -e apollon.html5.de)
-
mount share (e.g. sudo mount -o resvport,rw -t nfs apollon.html5.de:/mnt/ptpb /System/Volumes/Data/mnt/ptpb)
-
add to automount (e.g. sudo crontab -e add line: @reboot /sbin/mount -o revsport,rw -t nfs apollon.html5.de:/mnt/ptpb /System/Volumes/Data/mnt/ptpb)
-
restart OS
-
-
Start Indesign with SOAP Service: nohup /Applications/Adobe\ InDesign\ Server\ CS6/indesignserver –port 20060
-
You can store the next text as shell-script and use it to start InDesignServer (logs will be written to file ~<username>/ids/log/cs6log.log):
-
cd /Applications/Adobe\ InDesign\ CS6\ Server\ Debug/
-
nohup ./indesignserver -port 20060 > ~ <username>/ids/log/cs6log.log
-
Note: replace <username> to current user name.
-
-
Web2Print Applications Module
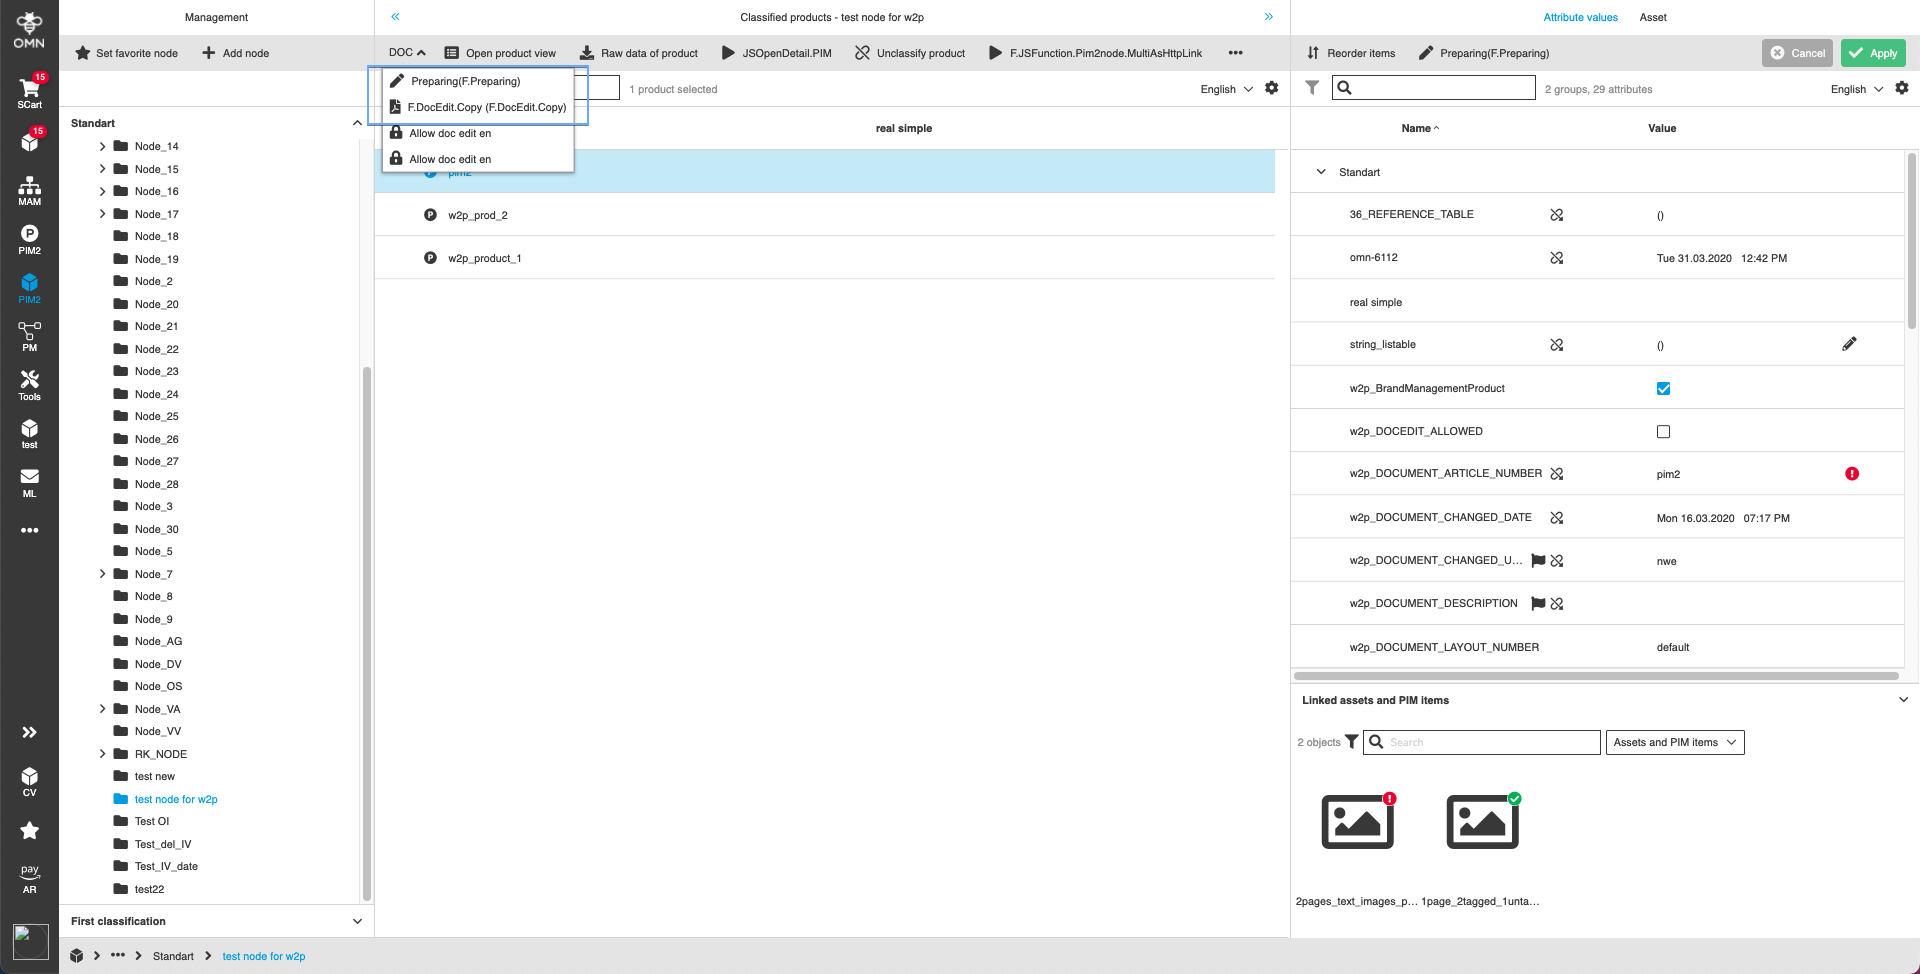
There exists an application module “Web2Print” for each mandator where the servers are configured. It is recommended to leave most settings on the tabs on the default settings. Expand <Mandator name> → Application modules and select Web2Print. The Plug-in configuration consists of four tabs, the “General” tab displays by default on opening the page.
"General"

To set boxes to editable while checkin process: The selection list contains two entries. Choose “All” to set all text and image boxes to editable when documents are checked in. Otherwise they are unusable for DocEdit.
Reference table attribute: needs to be configured to find linked asset (InDesign document) with a product.
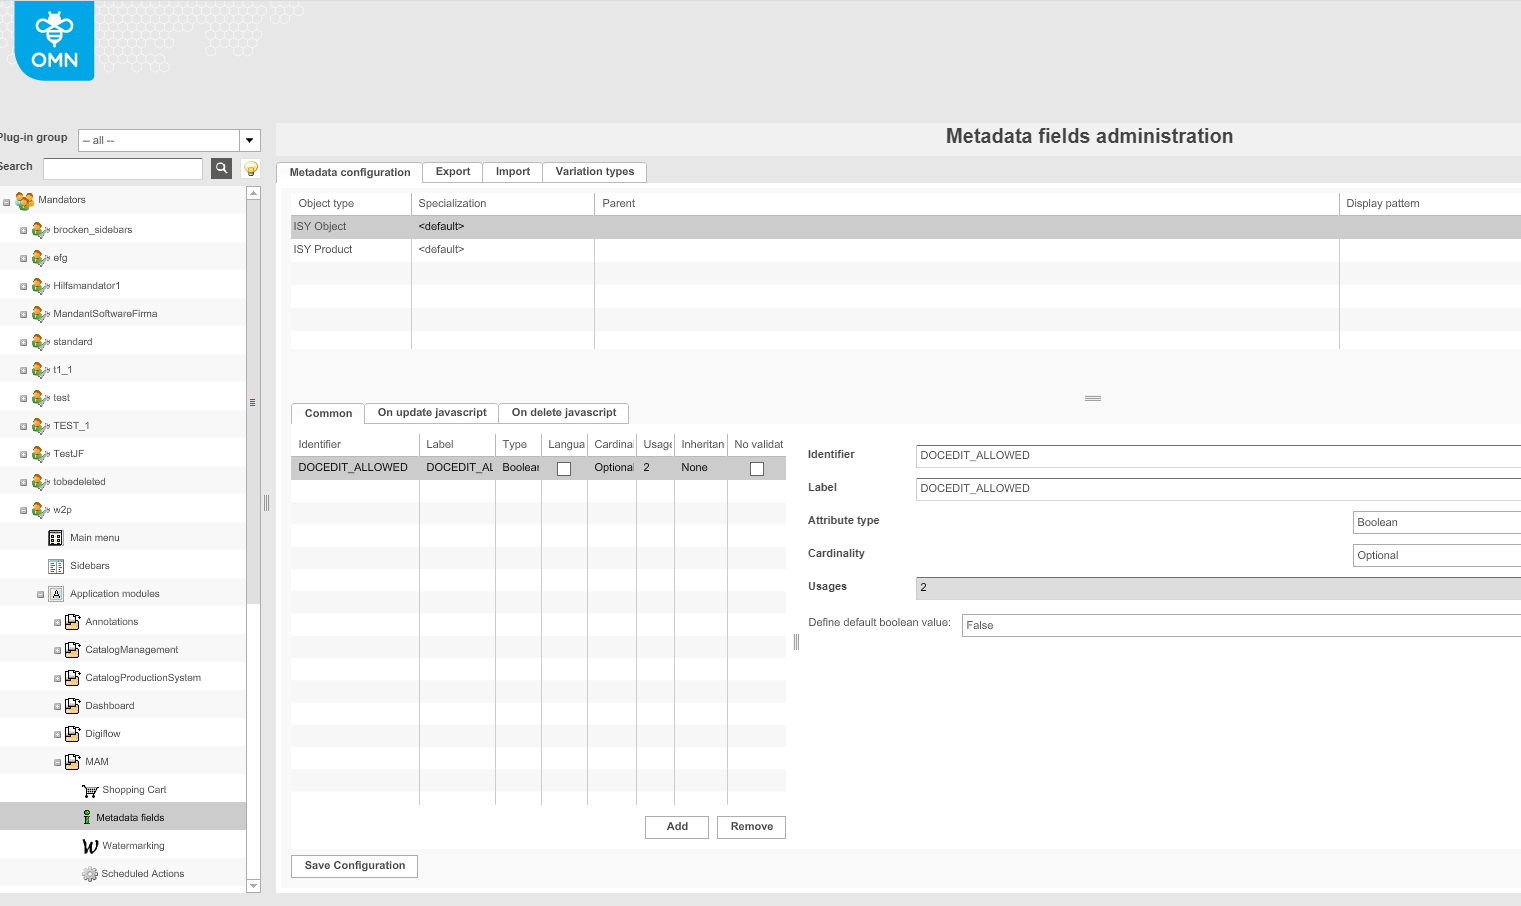
Web2Print allowed attribute: needs to be configured for displaying 'Allow DocEdit' function
DocEdit allowed attribute: needs to be configured for displaying 'Allow DocEdit' function
Document article number attribute: needs to be configured to use article field for a product
Document layout number attribute: needs to be configured for document version of layout
Document type attribute (Standard layout): needs to be configured to provide information to product that document is standard layout. Standard layout means document is not used in the external shop (DGVerlag specific) and depends on document settings in Preparing: metagroup, group and client. If these settings is empty then document is marked as a standard layout.

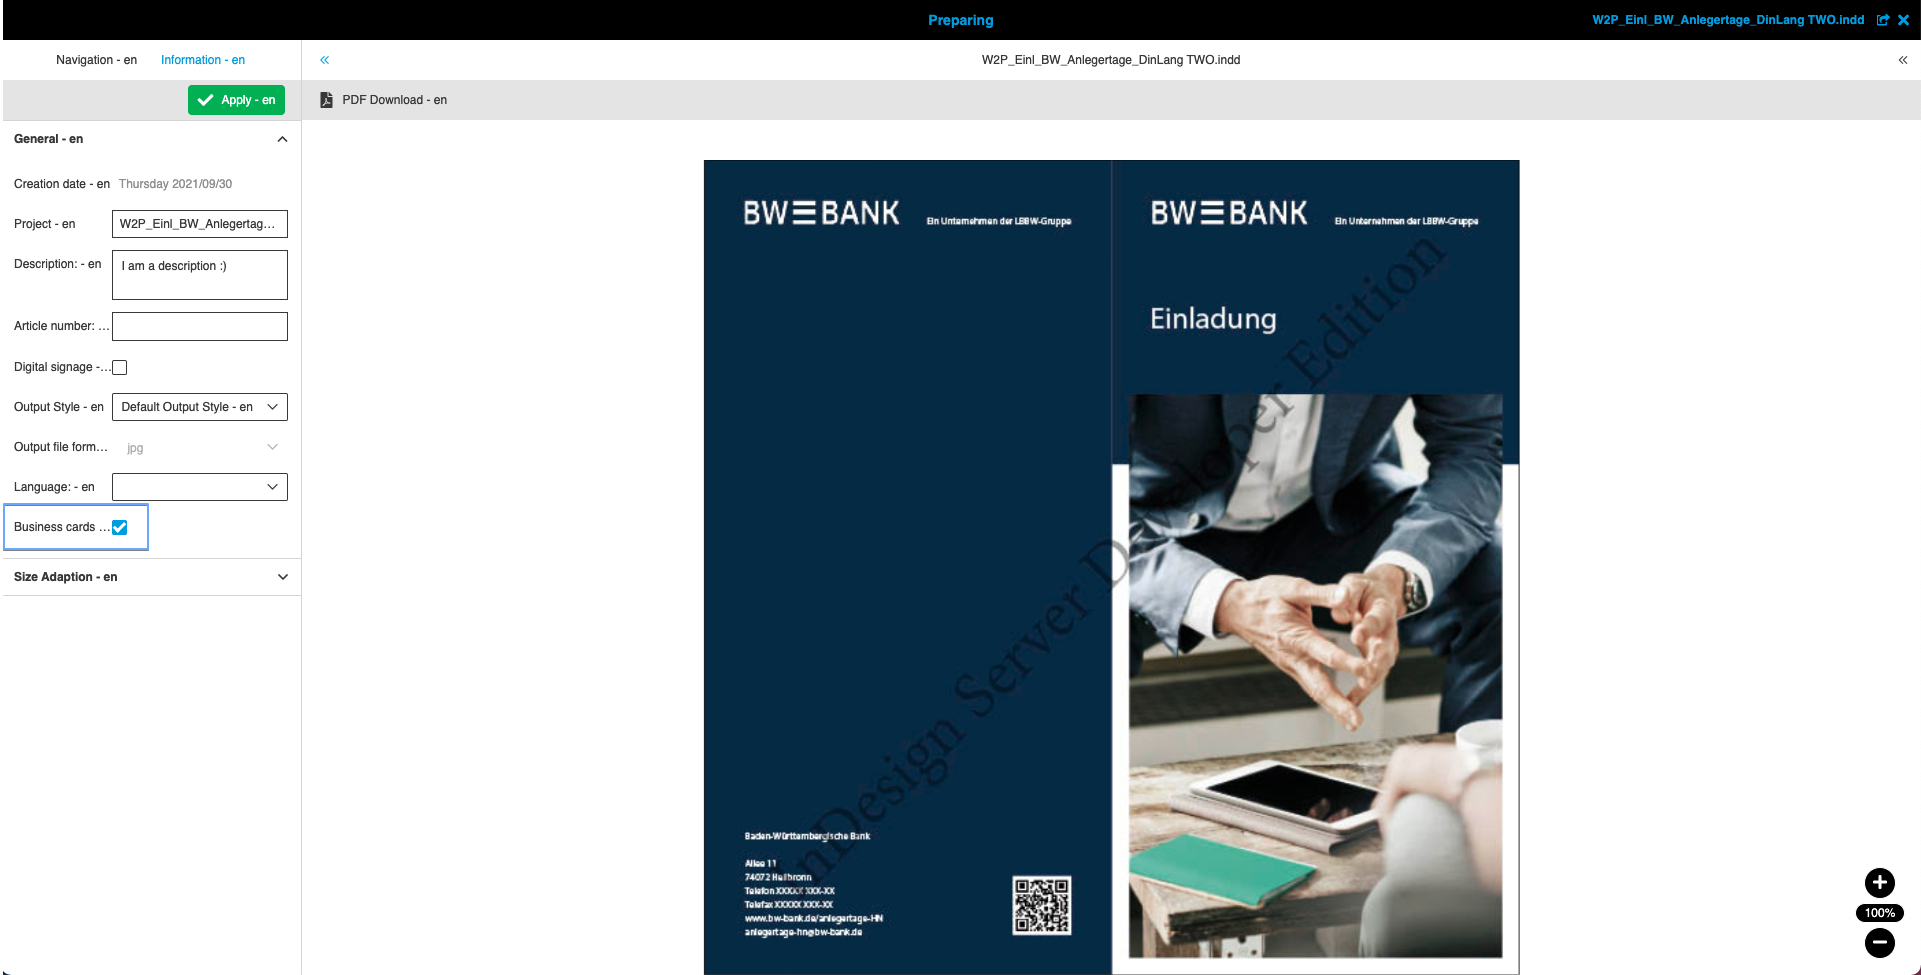
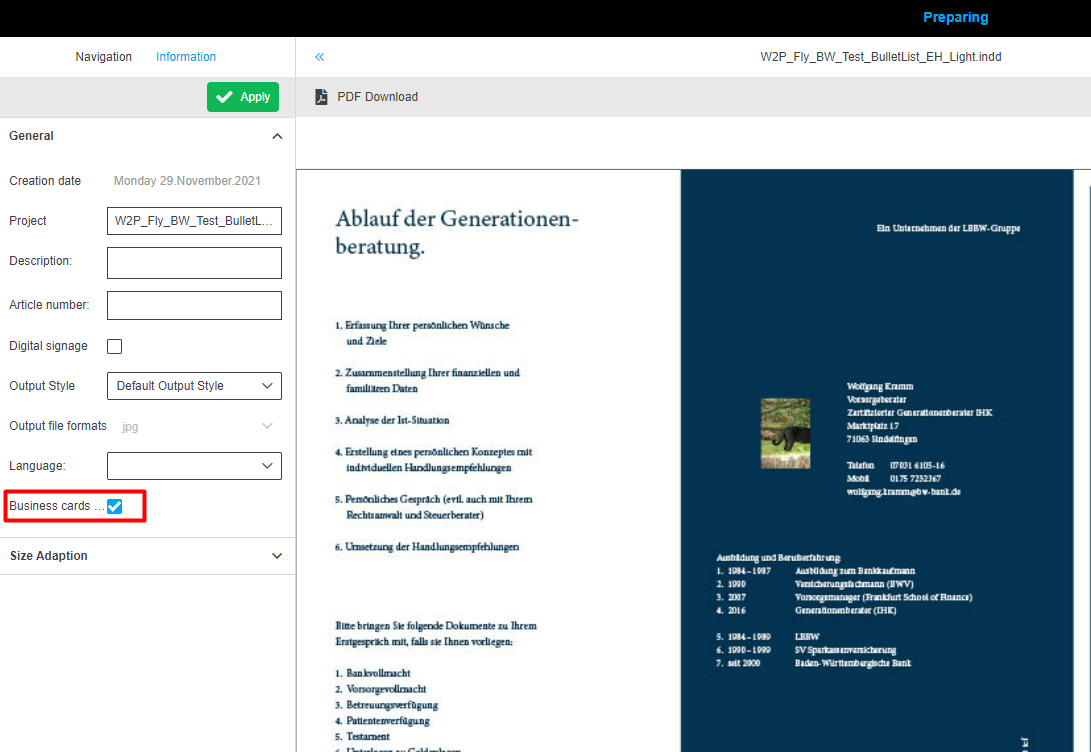
Document version editor is available for business card mode only.
Document description attribute: needs to be configured to use description field in a document
Document project name attribute: needs to be configured to use Projectname field in a document (name of opened document)
Document changed user attribute: needs to be configured to see user who changes the document
Document changed date attribute: needs to be configured to see the date when the document was changed
Document locked user attribute: needs to be configured to see the last user who worked with the layout
Document locked date attribute: needs to be configured to see the last date where layout was opened
| Name | Type | Description (these are guesses) |
|---|---|---|
BrandManagementProduct |
BOOLEAN |
Defines that the layout is linked to the brandmanagement product
|
DOCEDIT_ALLOWED |
BOOLEAN |
Value of button Enable/Disable DocEdit
|
DOCUMENT_ARTICLE_NUMBER |
STRING |
Value of article number attribute (Preparing)
|
DOCUMENT_CHANGED_DATE |
DATE |
Last modification date of layout
|
DOCUMENT_CHANGED_USER |
STRING |
Last user who made modifications to the layout
|
DOCUMENT_DESCRIPTION |
STRING |
Value of Description attribute (Preparing)
|
DOCUMENT_LAYOUT_NUMBER |
STRING |
document version of layout
|
DOCUMENT_LOCKED_DATE |
DATE |
Last date where layout was opened
|
DOCUMENT_LOCKED_USER |
STRING |
Last user who worked with the layout
|
DOCUMENT_PROJECT_NAME |
STRING |
Value of Project Name attribute (Preparing)
|
DOCUMENT_TYPE |
BOOLEAN |
Defines that the layout is standard
|
Reference type |
REFERENCE_TABLE |
Used Layout for Product
|


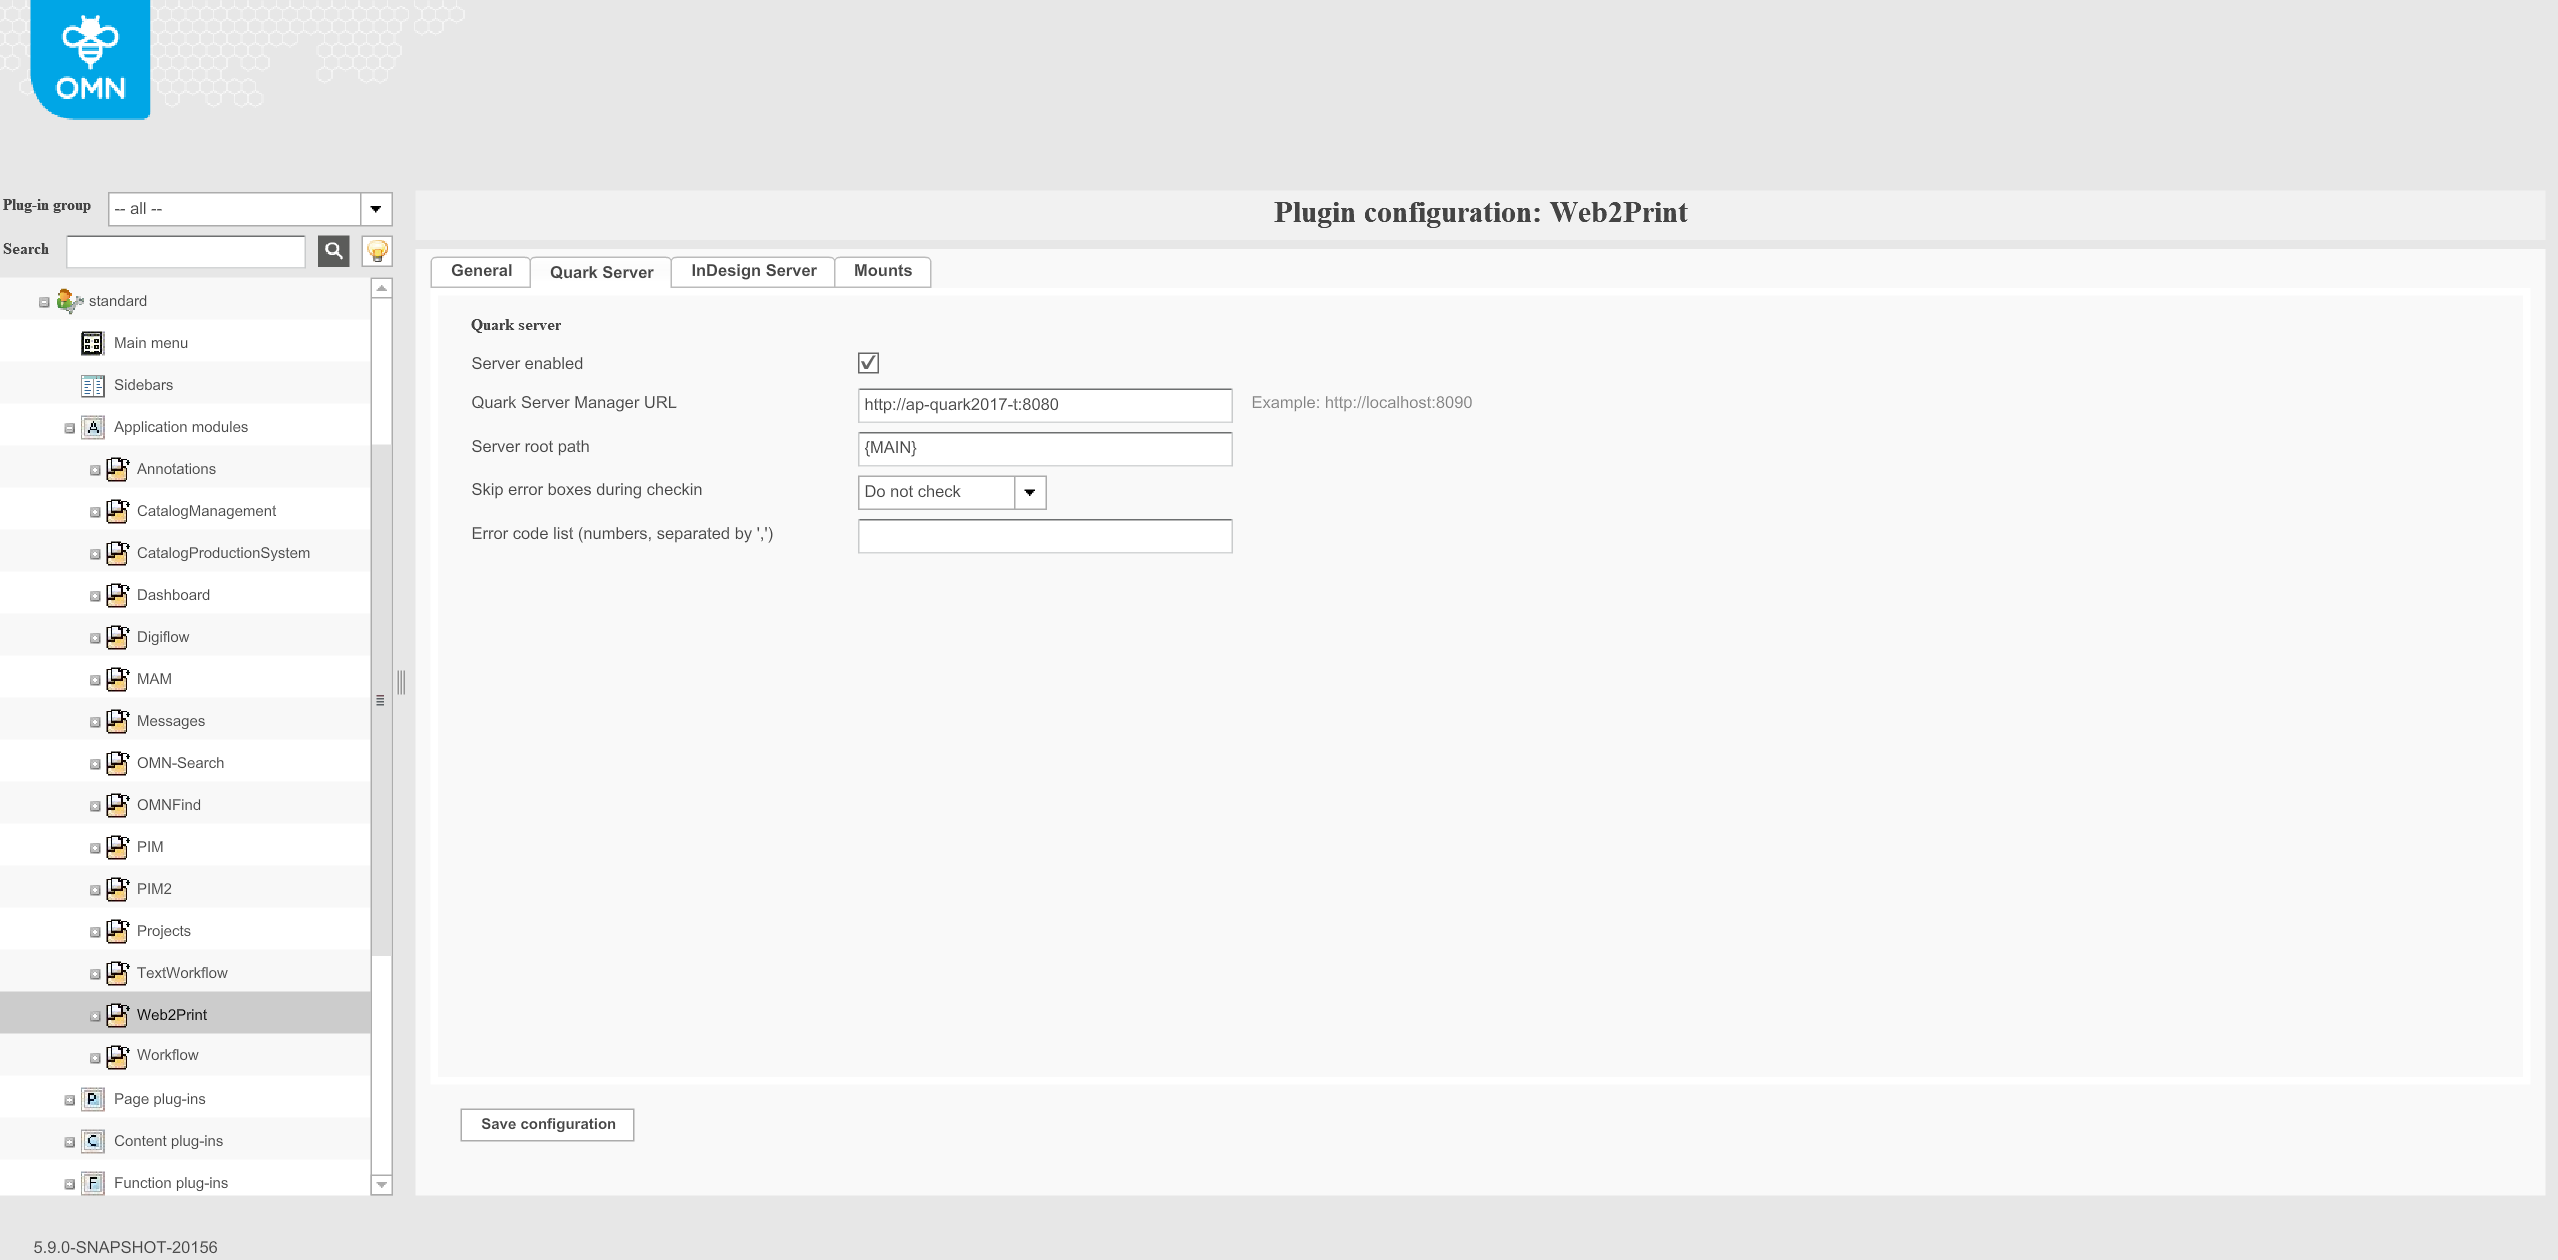
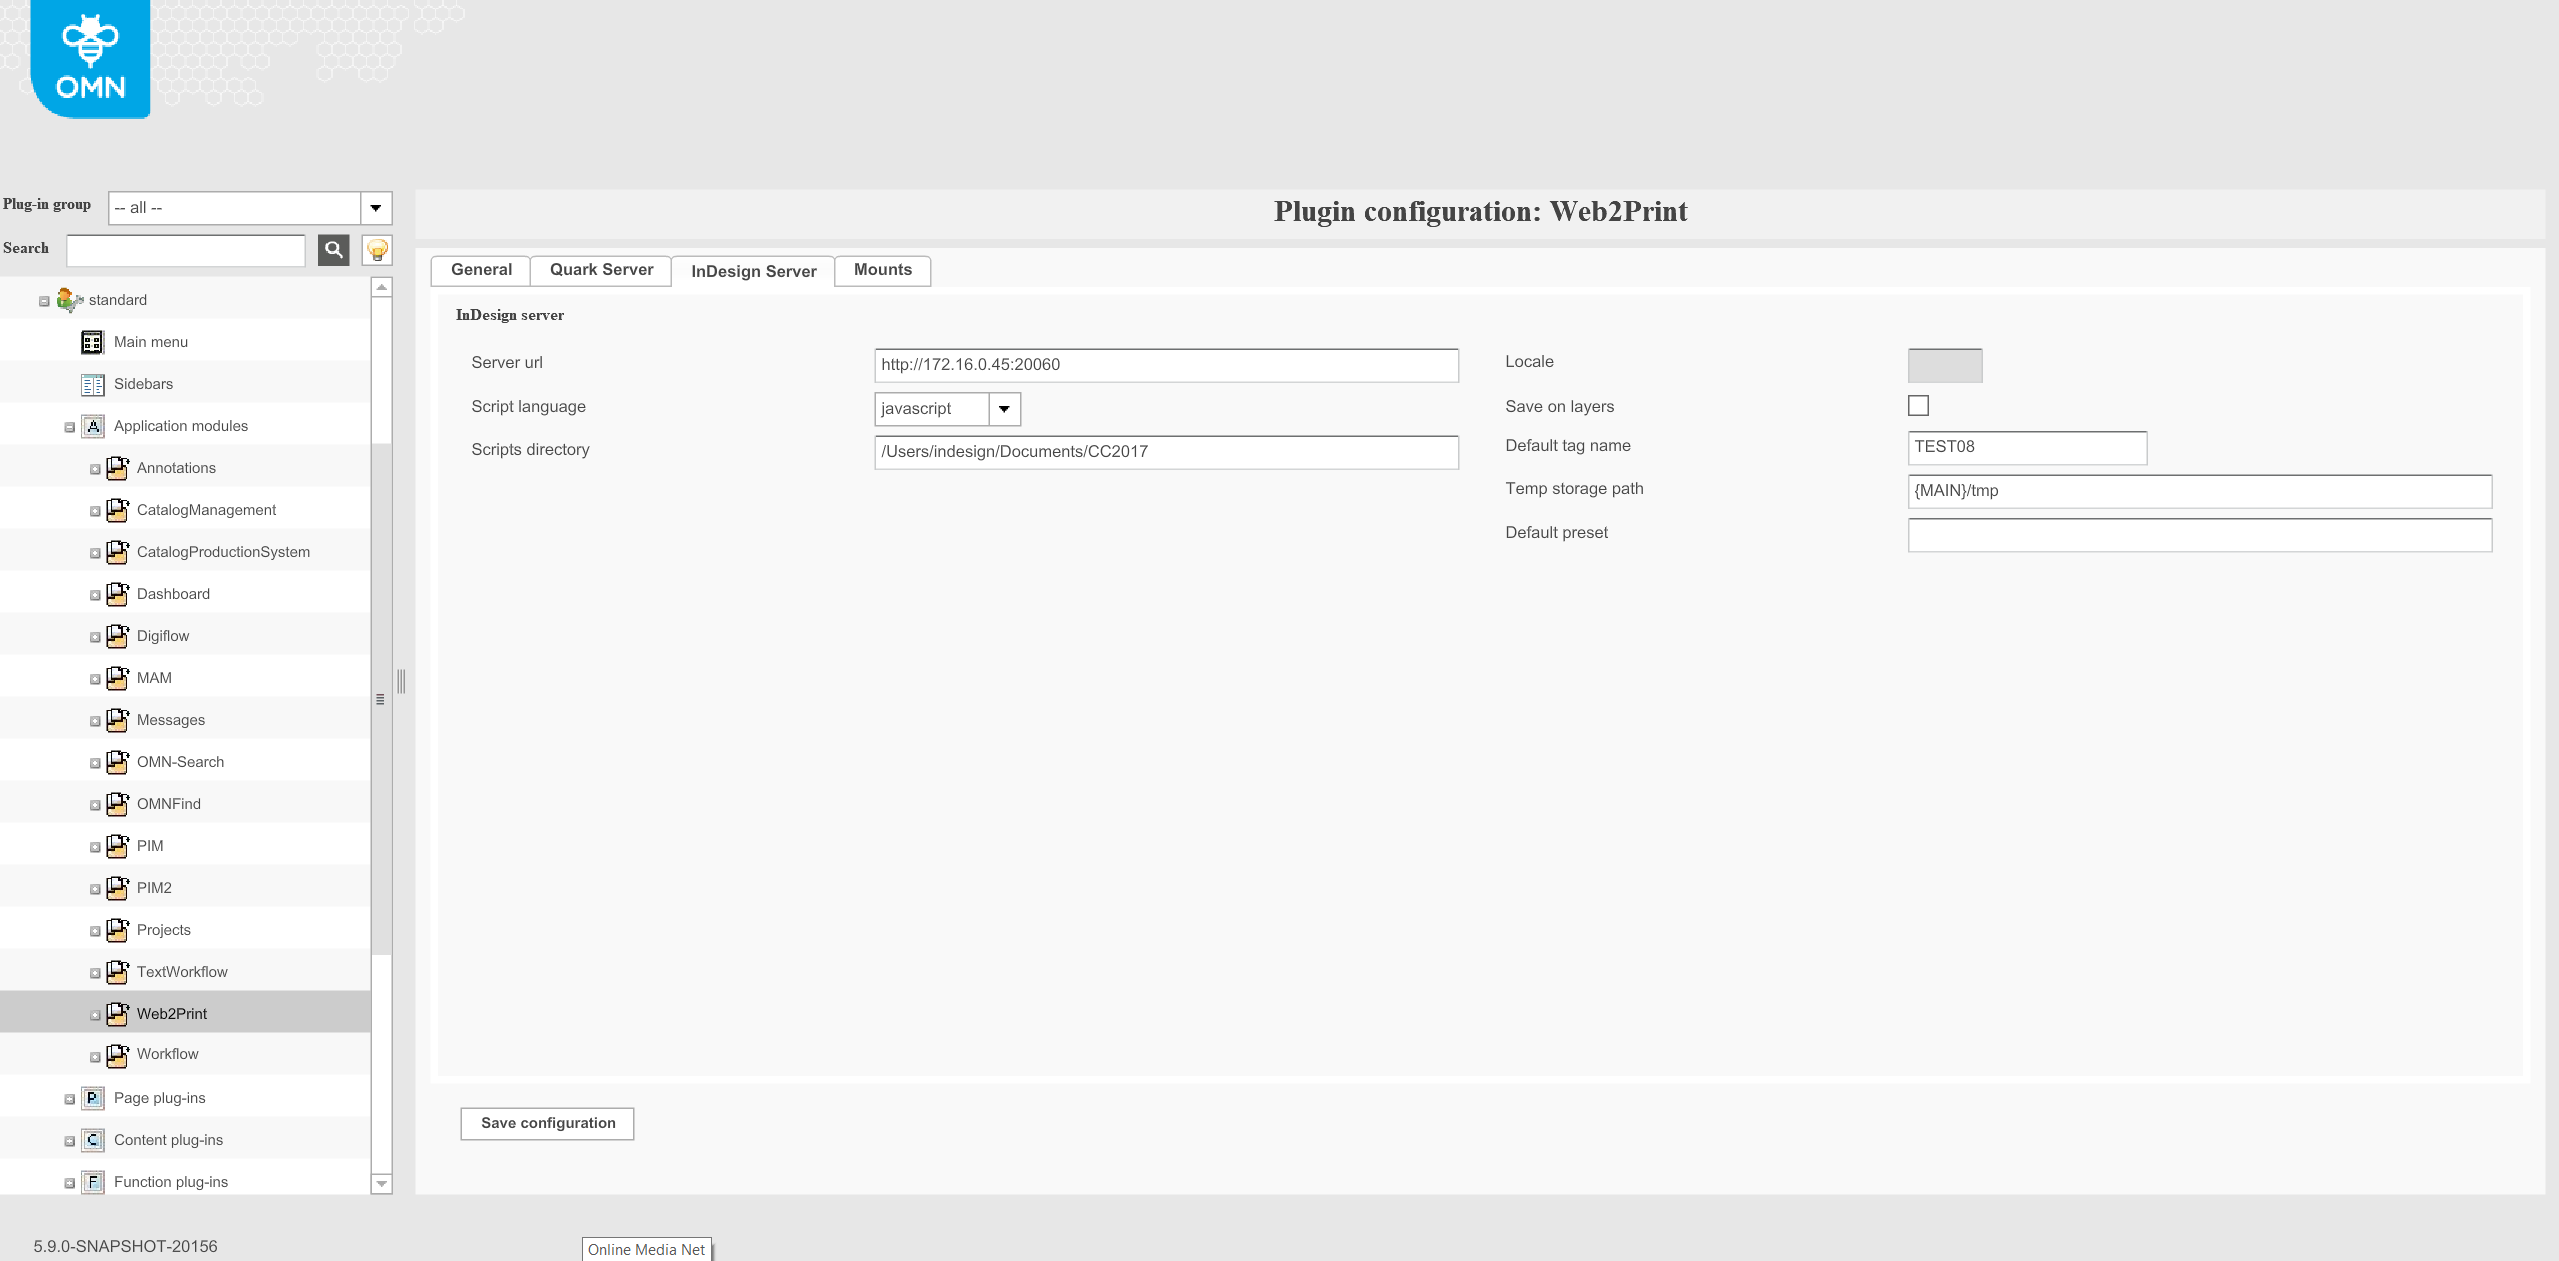
"Indesign Server"
Server url: Enter the complete URL of your InDesign Server together with protocol, server name and port. The URL should have the following format: http:// <your server>:<port>
Script language: To create and modify InDesign documents the server needs some scripts. Per default the server uses scripts written in JavaScript. The default setting is highly recommended.
Scripts directory: Please enter here the location of the above mentioned scripts on your InDesign server. The entry should contain the local path.
Locale: Leave the setting on the default value. This option is not used for the Individualization (modifying on documents)
Save on layers: This option is not supported yet.
Default tag name: is used for the naming of boxes that have no assigned tag and content (empty box).


Temp storage path: While working on a document, the render process creates temporary files which will be stored in this path.
Default preset:
Goal
Configuration of the default preset that is used during PDF-generation.
Basic configuration and usage
During PDF-generation with different setting the presets are used. Currently the default preset is hardcoded and can not be changed via the interface. To make this option more flexible the configuration of a global default preset will be implemented.
To archieve this proposal Web2Print module will be extended by a special field “Default preset”:
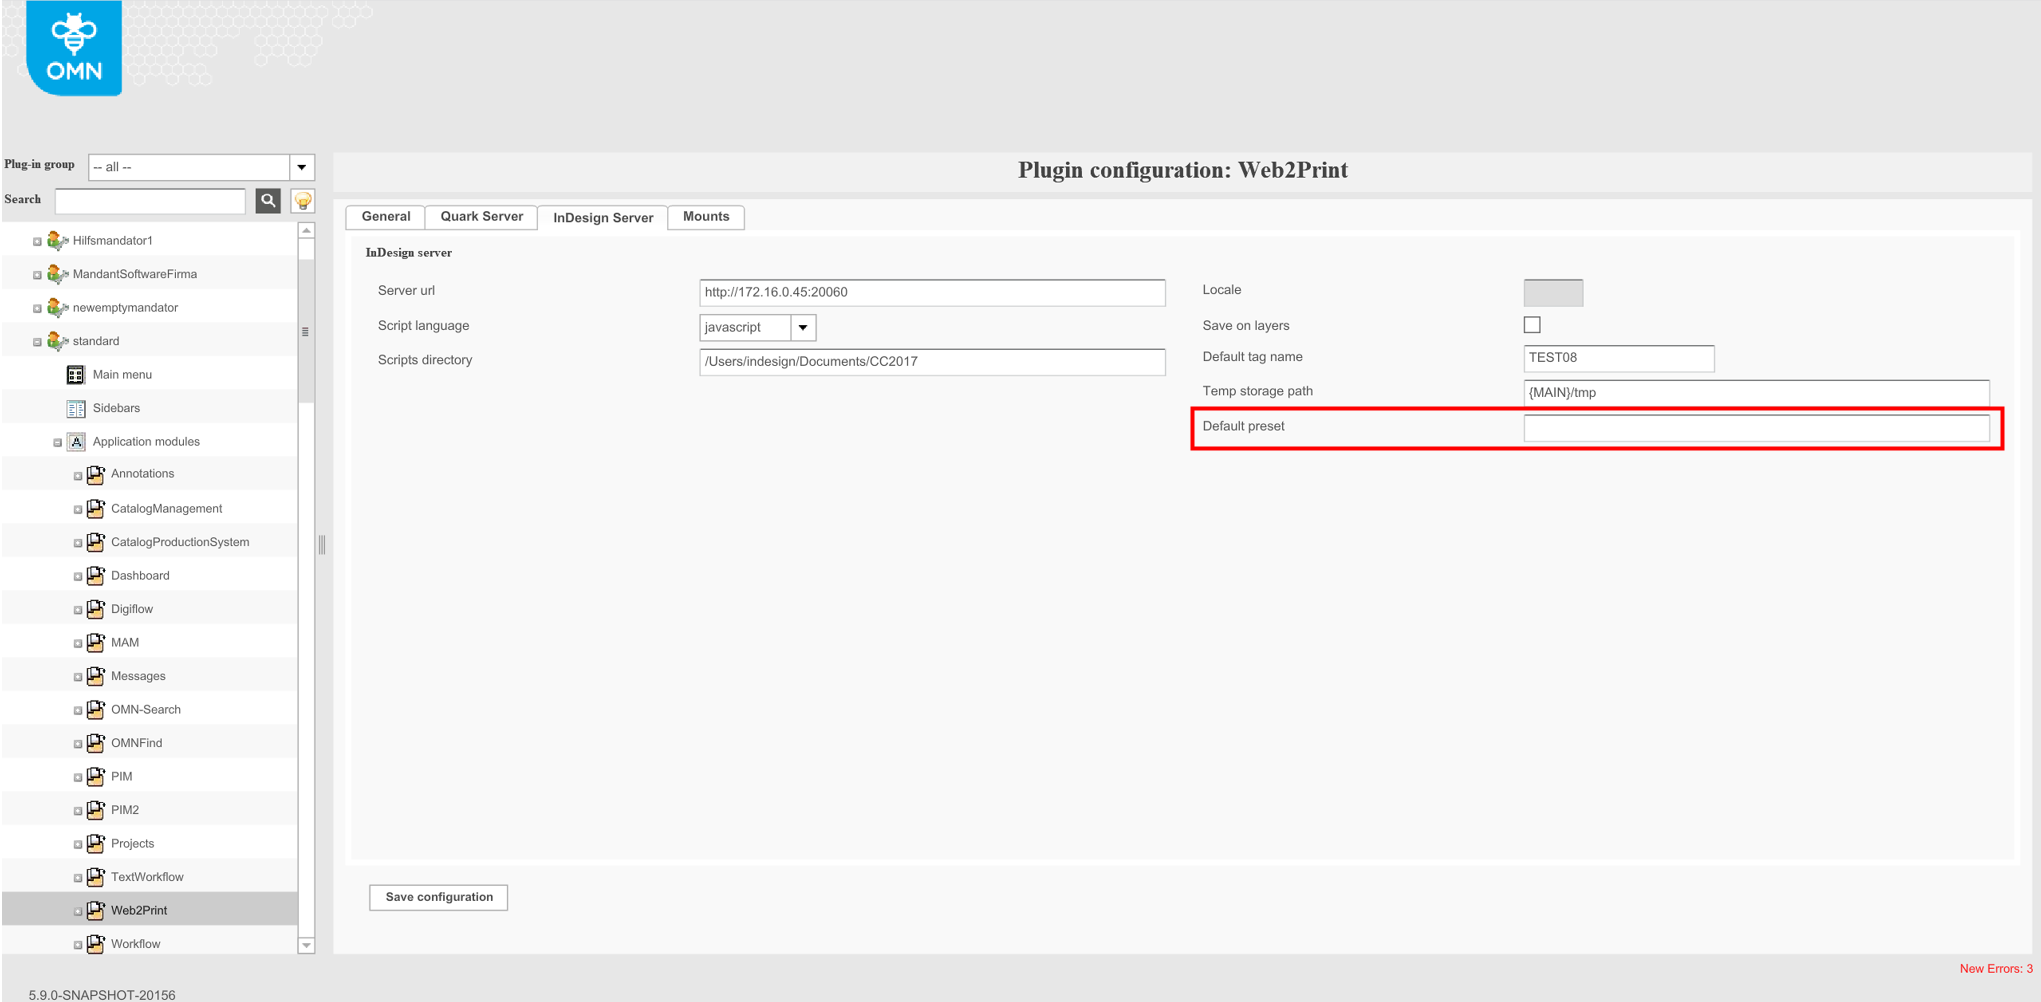
No any validation for this field.
The global default preset can be used during the generation of different PDF types: HiRes, MediumRes, LowRes, etc.:
-
during the generation of PDF from DocEdit
-
during the generation of PDF from workflow
-
during the generation of PDF from Preparing
-
during the generation of temp PDF for SWF preview
"Mounts"
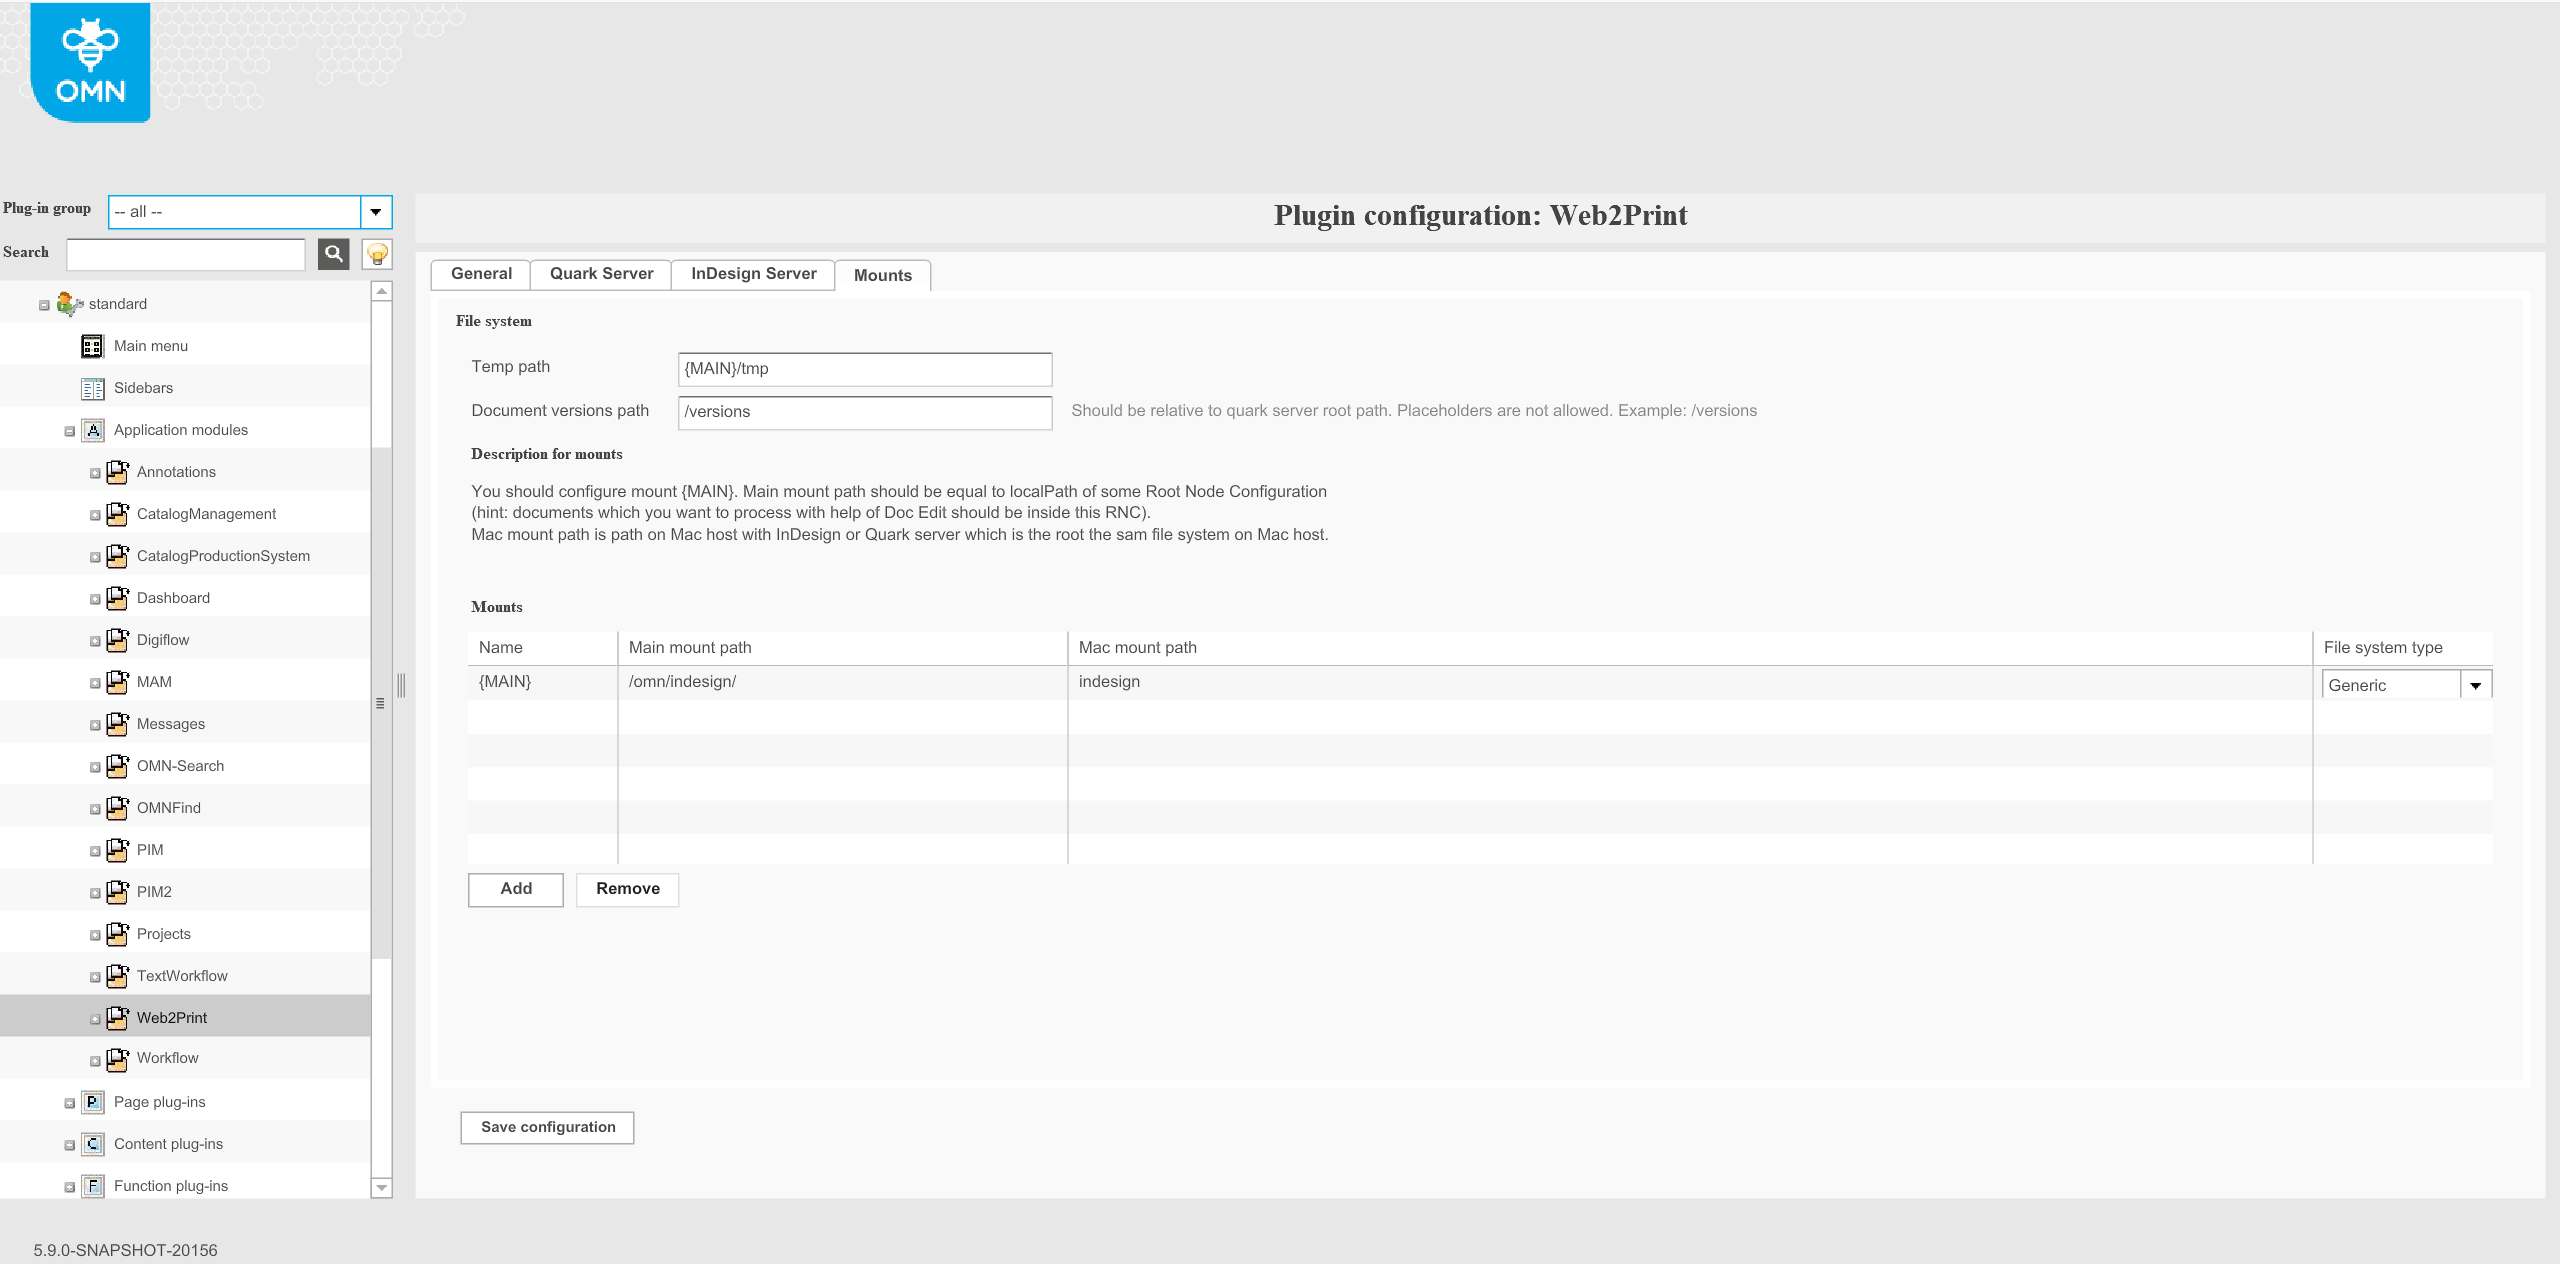
"Mounts" tab is used for configuration file system between OMN server and renderer server (InDesign or Quark).
Temp path: defines a path to the temporary folder in which temporary previews are placed.
Document versions path: defines the path to the folder in which temporary versions of quark documents are placed. It is quark specific option.
Mounts: "Mounts" table is used for conversion paths of resources from OMN server to Renderer server and vice versa.
-
Name: a unique name that is used as a definition and can be used in other path fields of Web2Print configuration. Recommendation: use special characters so that this name is not matched with the names of files or folders. It will be used as placeholder. Normally it is named as {MAIN} and used in Temp Path
-
Main mount path: absolute path on the OMN server to the shared resources with Render server and vice versa. The local path where the files & folders are located. Should be equal to RNC path
-
Mount path on the render server: absolute path on the Render server to the shared resources with OMN server and vice versa.
-
File system type: defines a type of file server that is used for sharing resources between OMN and Render servers.
-
"Generic" - for any common file server
-
"Helios" is used for Helios file server.
-
Preparing
These are the necessary steps to build a basic functioning Preparing. Not specified functions in this guide can still be added to the configuration, see Preparing Guide.
-
Navigate to Function plug-ins ⇒ Preparing
-
Create the plugin
-
The Previews Tab is mandatory and needs to be configured. Here is an example configuration for HTML5
| Identifier | Preview type | Preview file type | Quality | Path | Width | Height | Use java scaling | Document preview | Use cases |
|---|---|---|---|---|---|---|---|---|---|
coarse |
Master |
Jpeg |
Lowres |
{MAIN}/preview/${version_id}/JPG/coarse_master_${spread_index}.jpg |
|||||
coarse_html5 |
Master |
Svg |
Lowres |
{MAIN}/preview/${version_id}/SVG/coarse_master_${spread_index}.svg |
true |
||||
hi_res |
Master |
Highres |
${document_folder}/../PDF/master_${document_name_without_ext}.pdf |
true |
hi_res_pdf |
||||
lowres |
Master |
Lowres |
{MAIN}/preview/${version_id}/PDF/master_${document_name_without_ext}.pdf |
true |
|||||
page_preview |
Master |
Jpeg |
Lowres |
${document_folder}/../PDF/master_${document_name_without_ext}_${spread_index}.jpg |
hi_res_pdf |
||||
product_title_preview |
Master |
Jpeg |
Lowres |
{MAIN}/preview/${version_id}/JPG/product_title_preview.jpg |
|||||
swf_coarse |
Master |
Swf |
Lowres |
{MAIN}/preview/${version_id}/SWF/coarse_master_${spread_index}.swf |
|||||
thumbnail |
Master |
Jpeg |
Lowres |
{MAIN}/preview/${version_id}/JPG/thumbnail_master_${spread_index}.jpg |
200 |
100 |
true |
update |
-
Save the configuration
-
Go to Content plug-ins ⇒ BrandManagementImageSelector
-
Create the plugin
| This plugin needs to be created so Preparing will be loaded |
-
Set "File Enabled" and "Search Enabled"
-
Choose your RNC
-
Insert your upload folder
-
Choose your upload plugin
-
Save the configuration
DocEdit
These are the necessary steps to build a basic functioning DocEdit. Not specified functions in this guide can still be added to the configuration, see DocEdit Guide.
-
Navigate to Function plug-ins ⇒ DocEdit
-
Create the plugin
-
Choose mode individualization
-
General tab
-
Choose your Preparing plugin in "Characters plugin configuration"
-
-
Image box selector tab
-
Choose one Image Selector plugin
-
-
Previews tab
-
Insert the following values into the Preview descriptor
-
| Identifier | Preview file type | Quality | Path | Width | Height | Use java scaling | Document preview | Use cases |
|---|---|---|---|---|---|---|---|---|
coarse_combined |
Jpeg |
Lowres |
{MAIN}/preview/${version_id}/${instance_id}/JPG/coarse_combined_${spread_index}.jpg |
|||||
coarse_combined_html5 |
Svg |
Lowres |
{MAIN}/preview/${version_id}/${instance_id}/SVG/coarse_combined_html5_${spread_index}.svg |
|||||
hi_res |
Highres |
${document_folder}/../PDF/${instance_id}/${document_name_without_ext}.pdf |
true |
hi_res_pdf |
||||
low_res |
Lowres |
{MAIN}/preview/${version_id}/${instance_id}/PDF/${document_name_without_ext}.pdf |
true |
|||||
page_preview |
Jpeg |
Highres |
${document_folder}/../PDF/${instance_id}/${document_name_without_ext}_${spread_index}.jpg |
hi_res_pdf |
||||
thumbnail |
Jpeg |
Lowres |
{MAIN}/preview/${version_id}/${instance_id}/JPG/thumbnail_${spread_index}.jpg |
200 |
100 |
true |
update |
-
Save the configuration
Web2Print with MAM
FSTable
-
Create FSTable pluign
-
Choose ISY Object as object type
-
Add some basic object attributes
-
Save

3) Open Preparing/DocEdit
-
Open frontend and navigate to your MAM
-
Upload a QXP or INDD file
-
Choose your uploaded file
-
Only Open Preparing is available now
-
Open Preparing and do your stuff
-
The other functions becomes available after you close Preparing
-
You can click Allow DocEdit to enable Run DocEdit function
-
Open DocEdit
-
Enjoy your Web2Print
Web2Print with PIM2
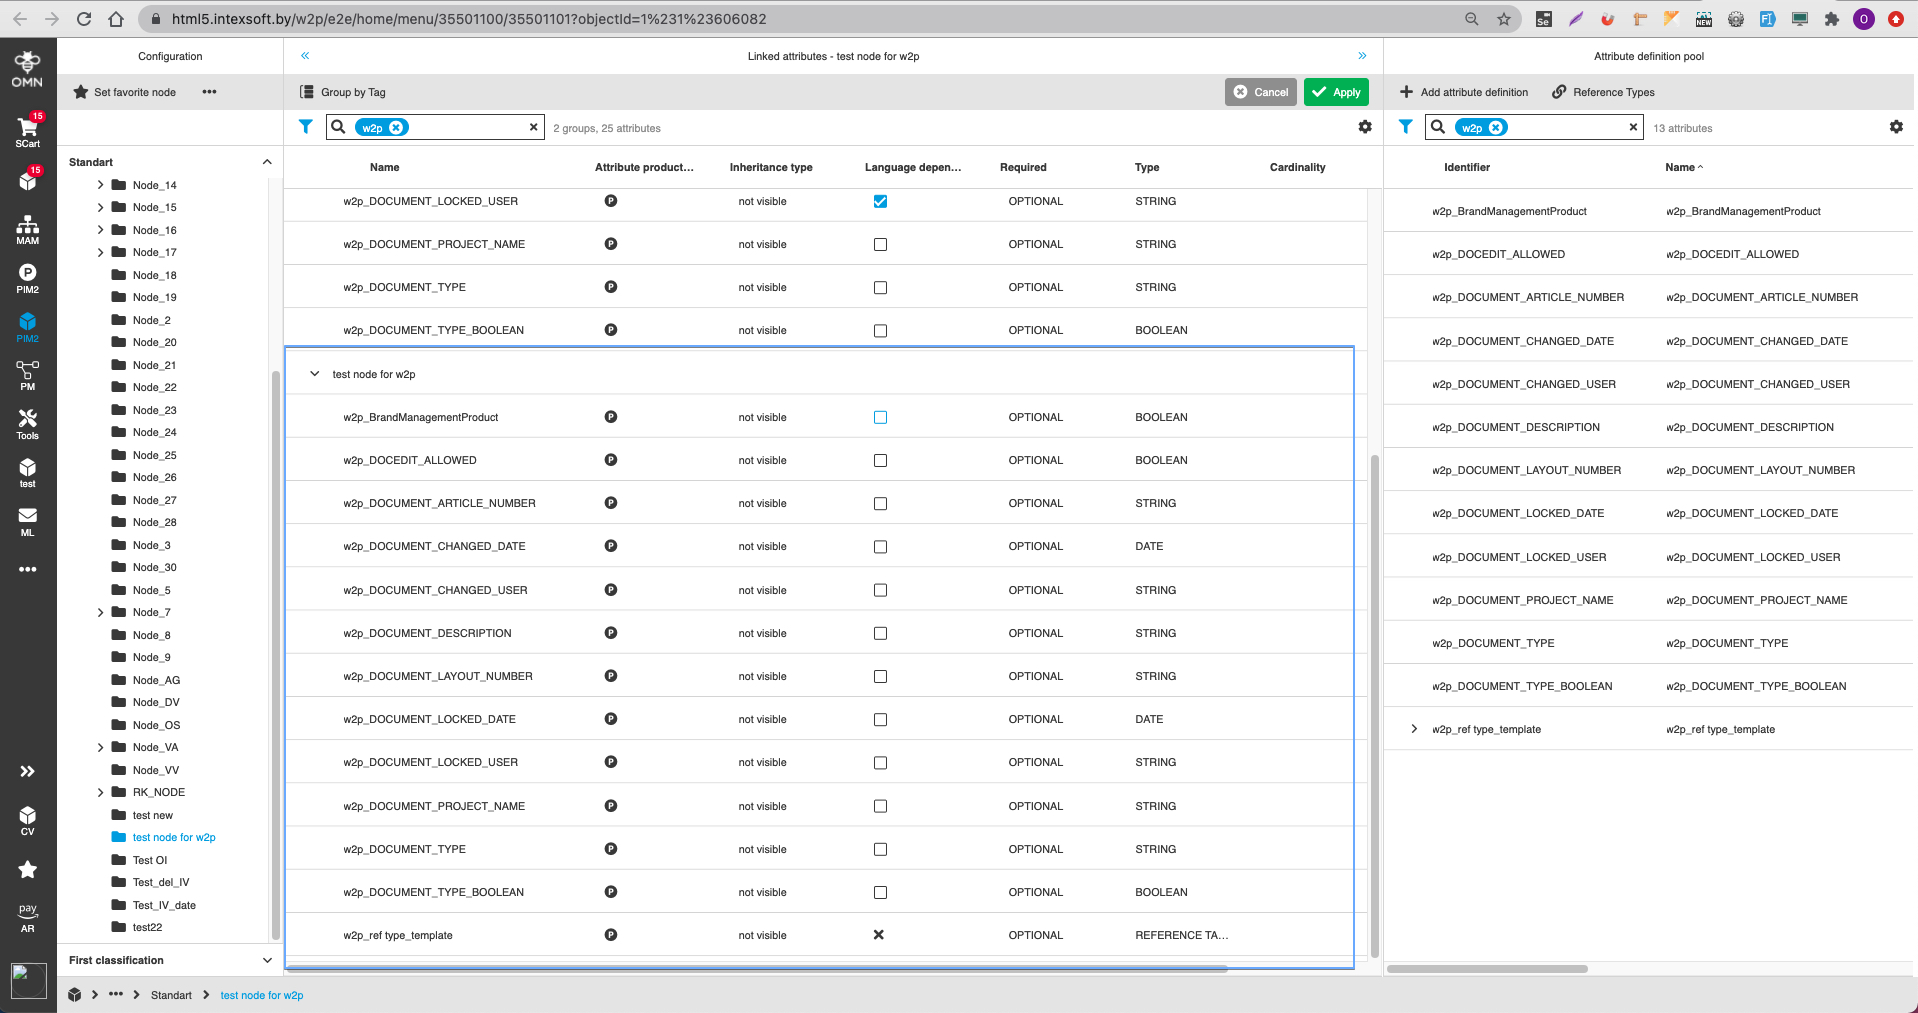
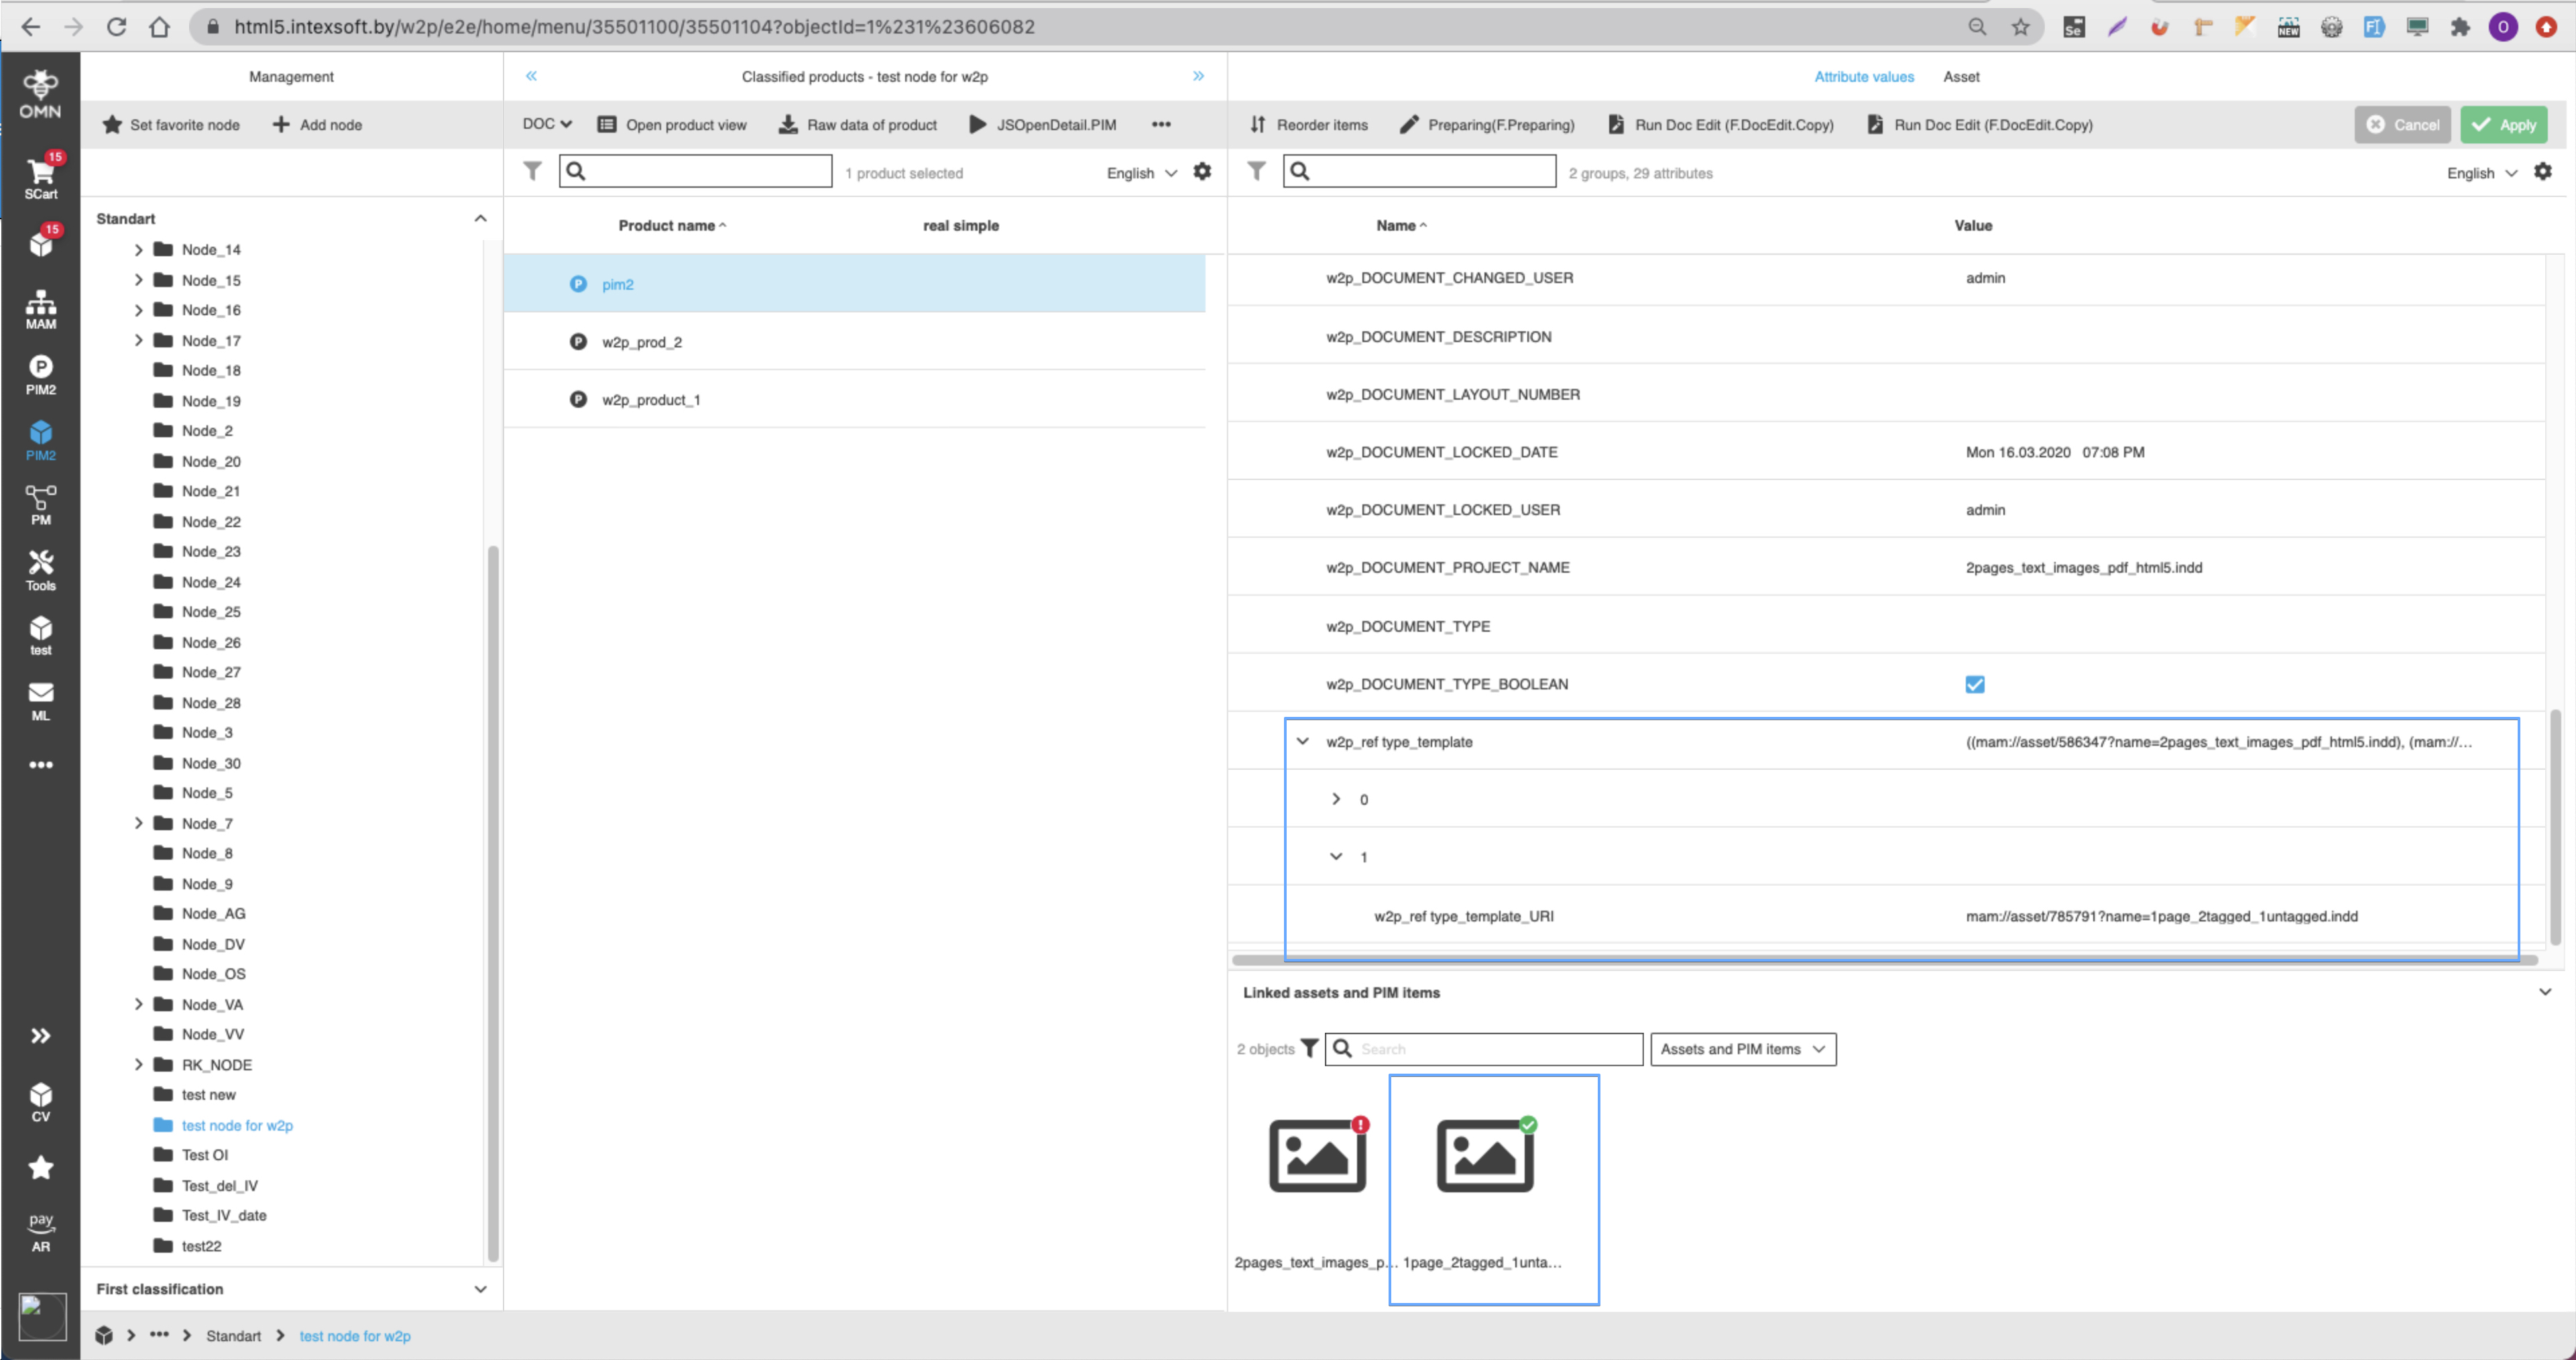
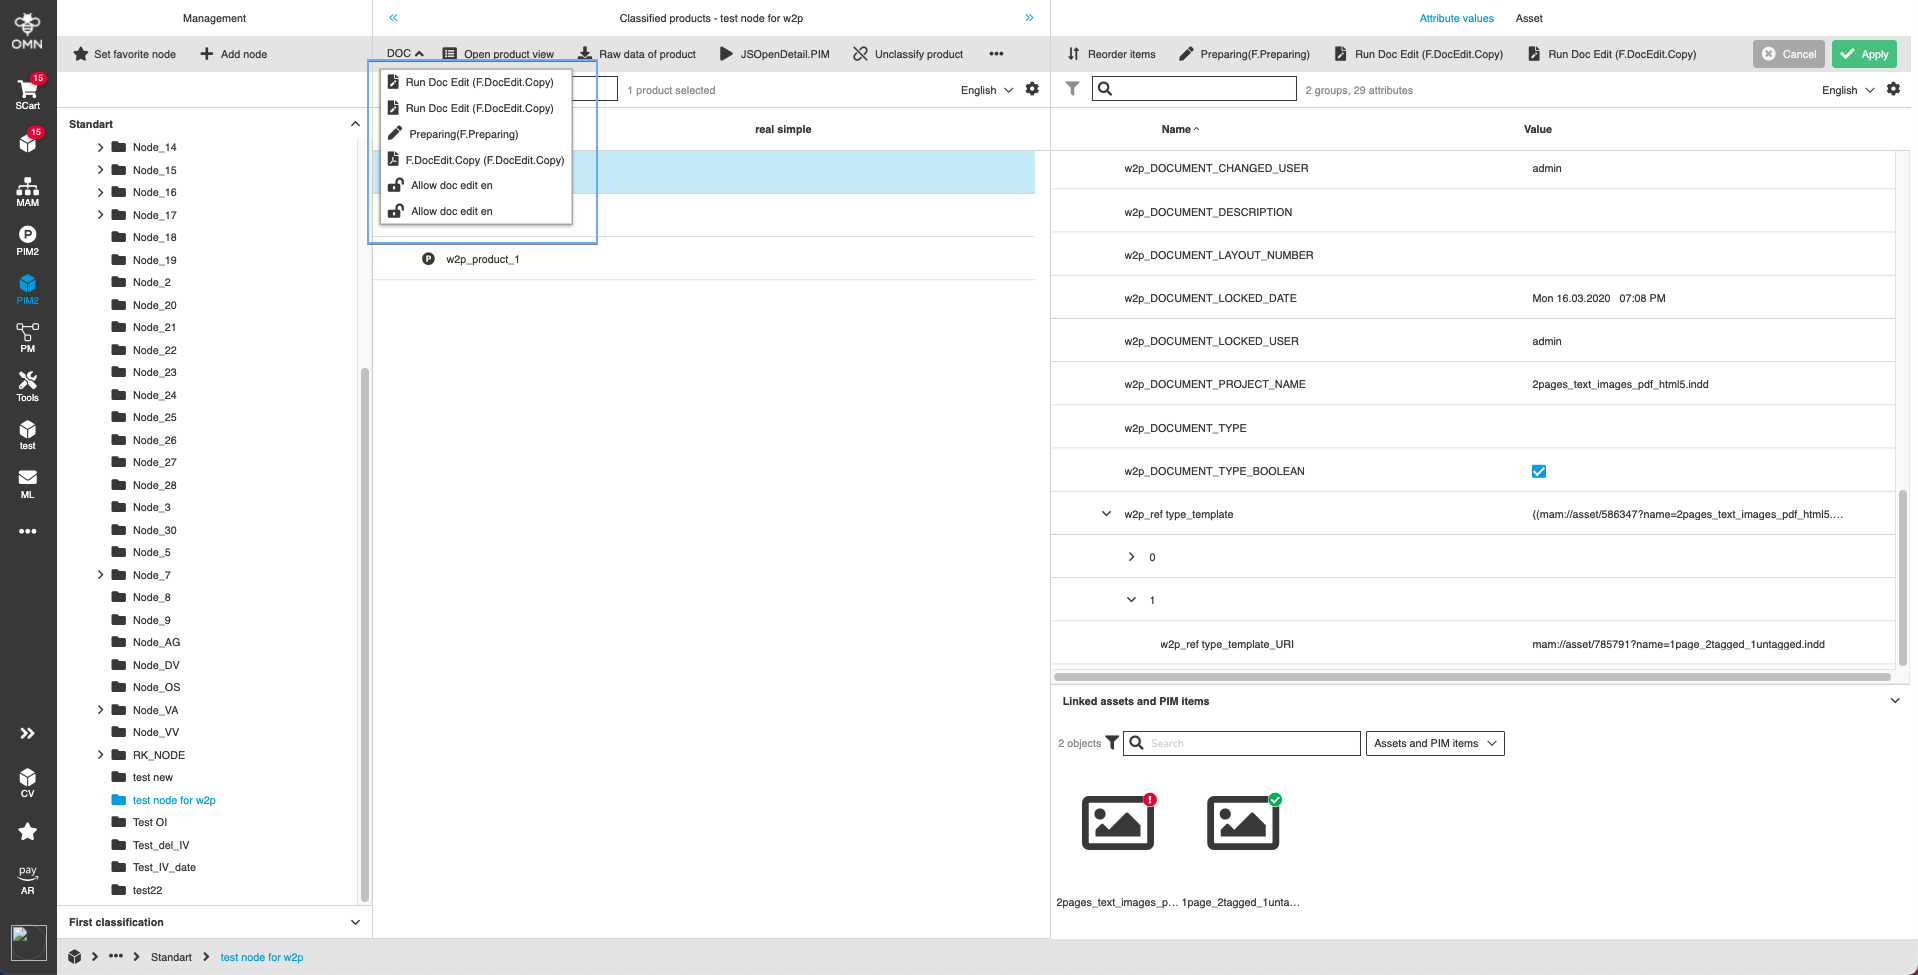
Web2Print functionality requires a number of attributes to work properly. For pim1 they were hardcoded. For some of them it was required to additionally create them in 'Metadata fields' with specific names and for a specific specialization.
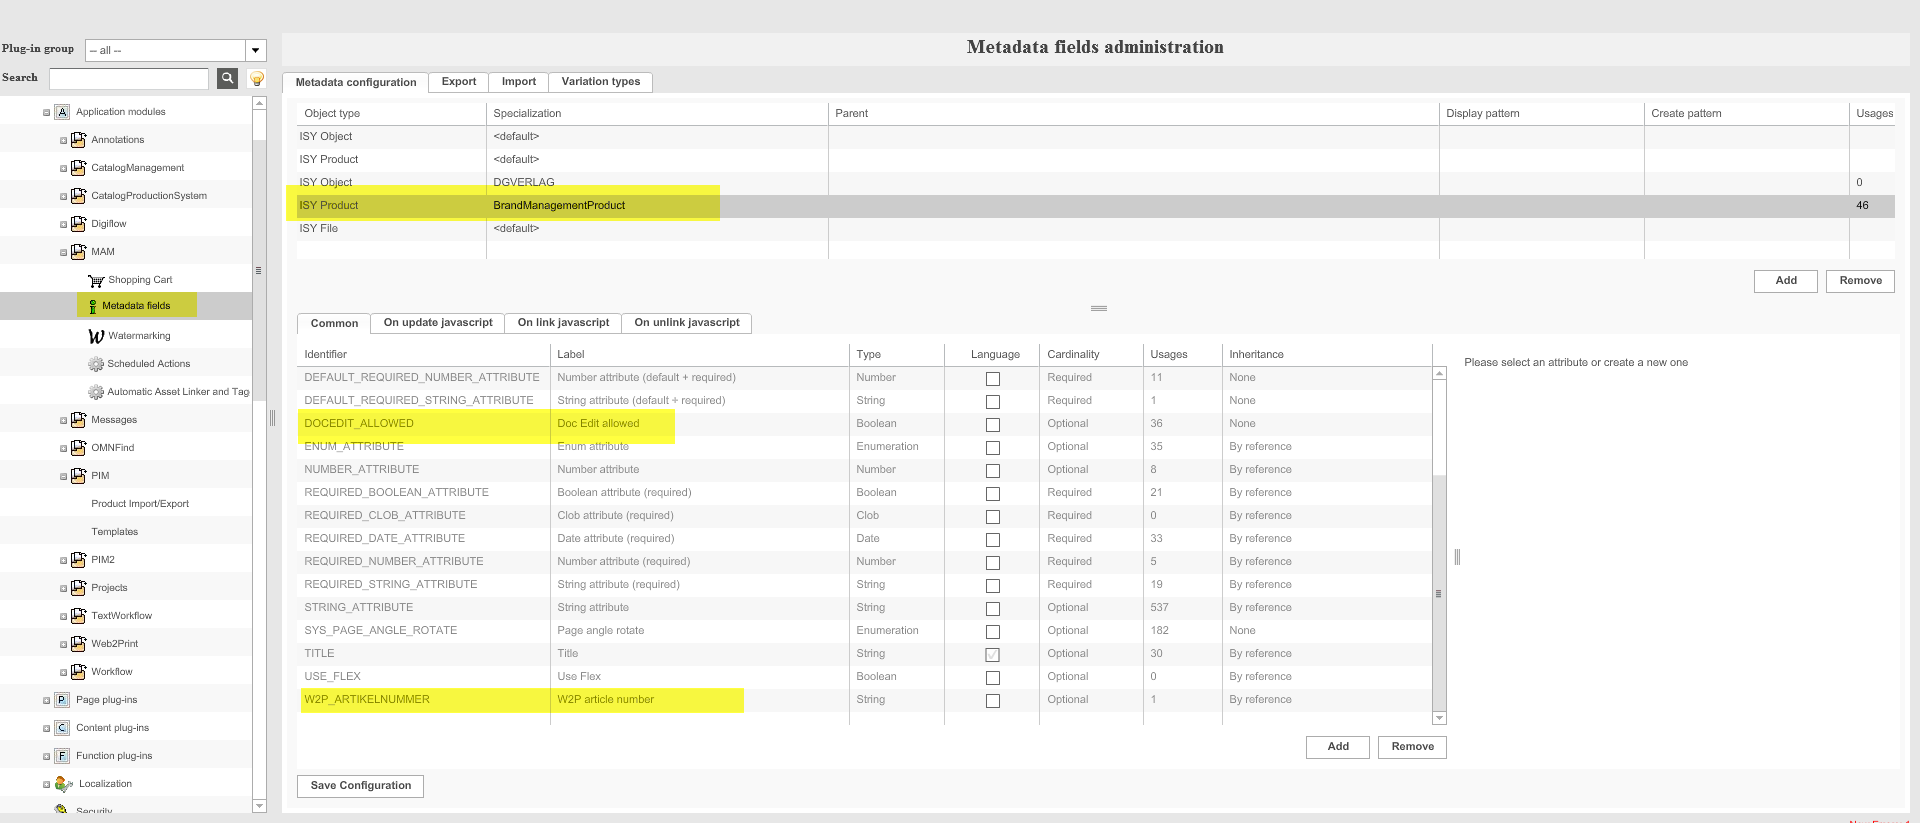
A more flexible configuration was implemented for PIM2 products with all necessary attributes. Attributes can be created in ClassificationView (page plug-in) on the client. They can have any names but must have certain types.
List of attributes
| Name | Type | Description (these are guesses) |
|---|---|---|
BrandManagementProduct |
BOOLEAN |
Defines that the layout is linked to the brandmanagement product
|
DOCEDIT_ALLOWED |
BOOLEAN |
Value of button Enable/Disable DocEdit
|
DOCUMENT_ARTICLE_NUMBER |
STRING |
Value of article number attribute (Preparing)
|
DOCUMENT_CHANGED_DATE |
DATE |
Last modification date of layout
|
DOCUMENT_CHANGED_USER |
STRING |
Last user who made modifications to the layout
|
DOCUMENT_DESCRIPTION |
STRING |
Value of Description attribute (Preparing)
|
DOCUMENT_LAYOUT_NUMBER |
STRING |
document version of layout
|
DOCUMENT_LOCKED_DATE |
DATE |
Last date where layout was opened
|
DOCUMENT_LOCKED_USER |
STRING |
Last user who worked with the layout
|
DOCUMENT_PROJECT_NAME |
STRING |
Value of Project Name attribute (Preparing)
|
DOCUMENT_TYPE |
BOOLEAN |
Defines that the layout is standard
|
Reference type |
REFERENCE_TABLE |
Used Layout for Product
|
Configuration of pim2 attributes for web2print
Several steps should be performed to configure the web2print functionality:
1) Creating the necessary attributes:
-
Open ClassificationView plug-in on client
-
Open Configuration tab
-
Create all necessary attributes: all attributes (can be with other names) from the list above. Important: types of attributes must be the same as in attached list
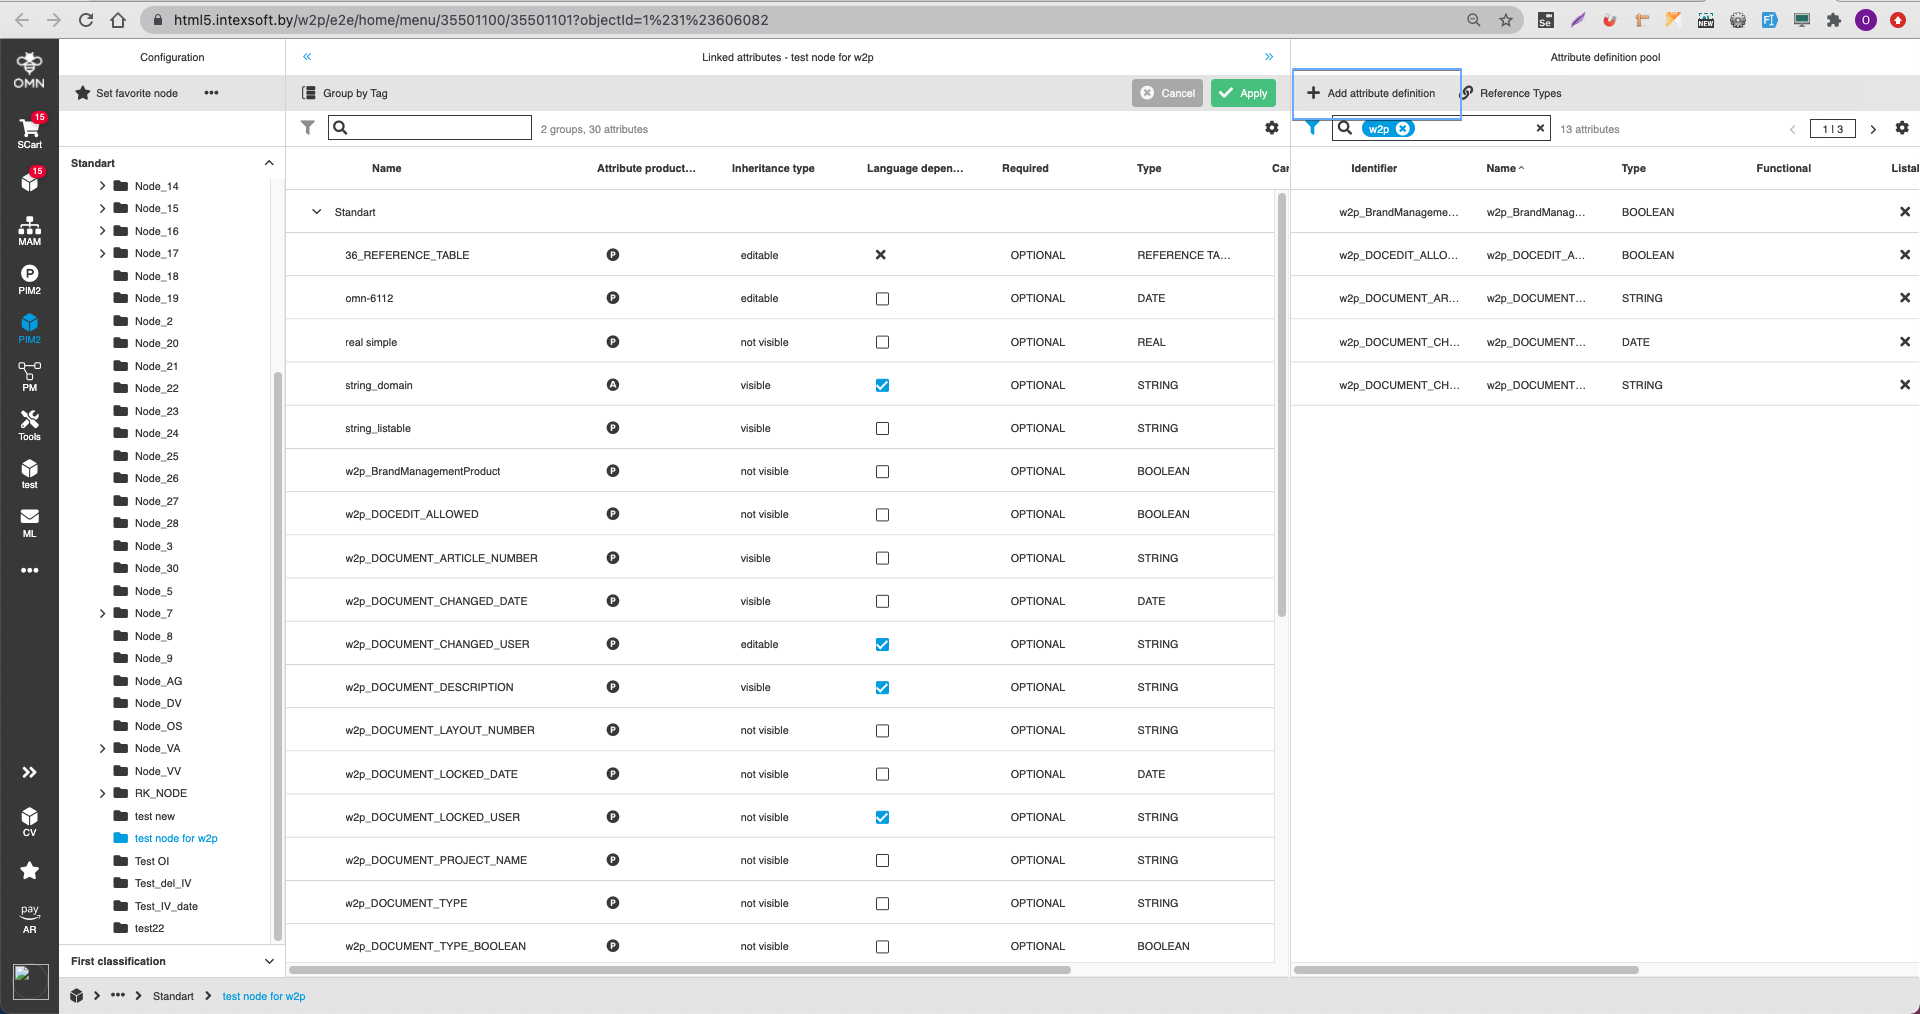
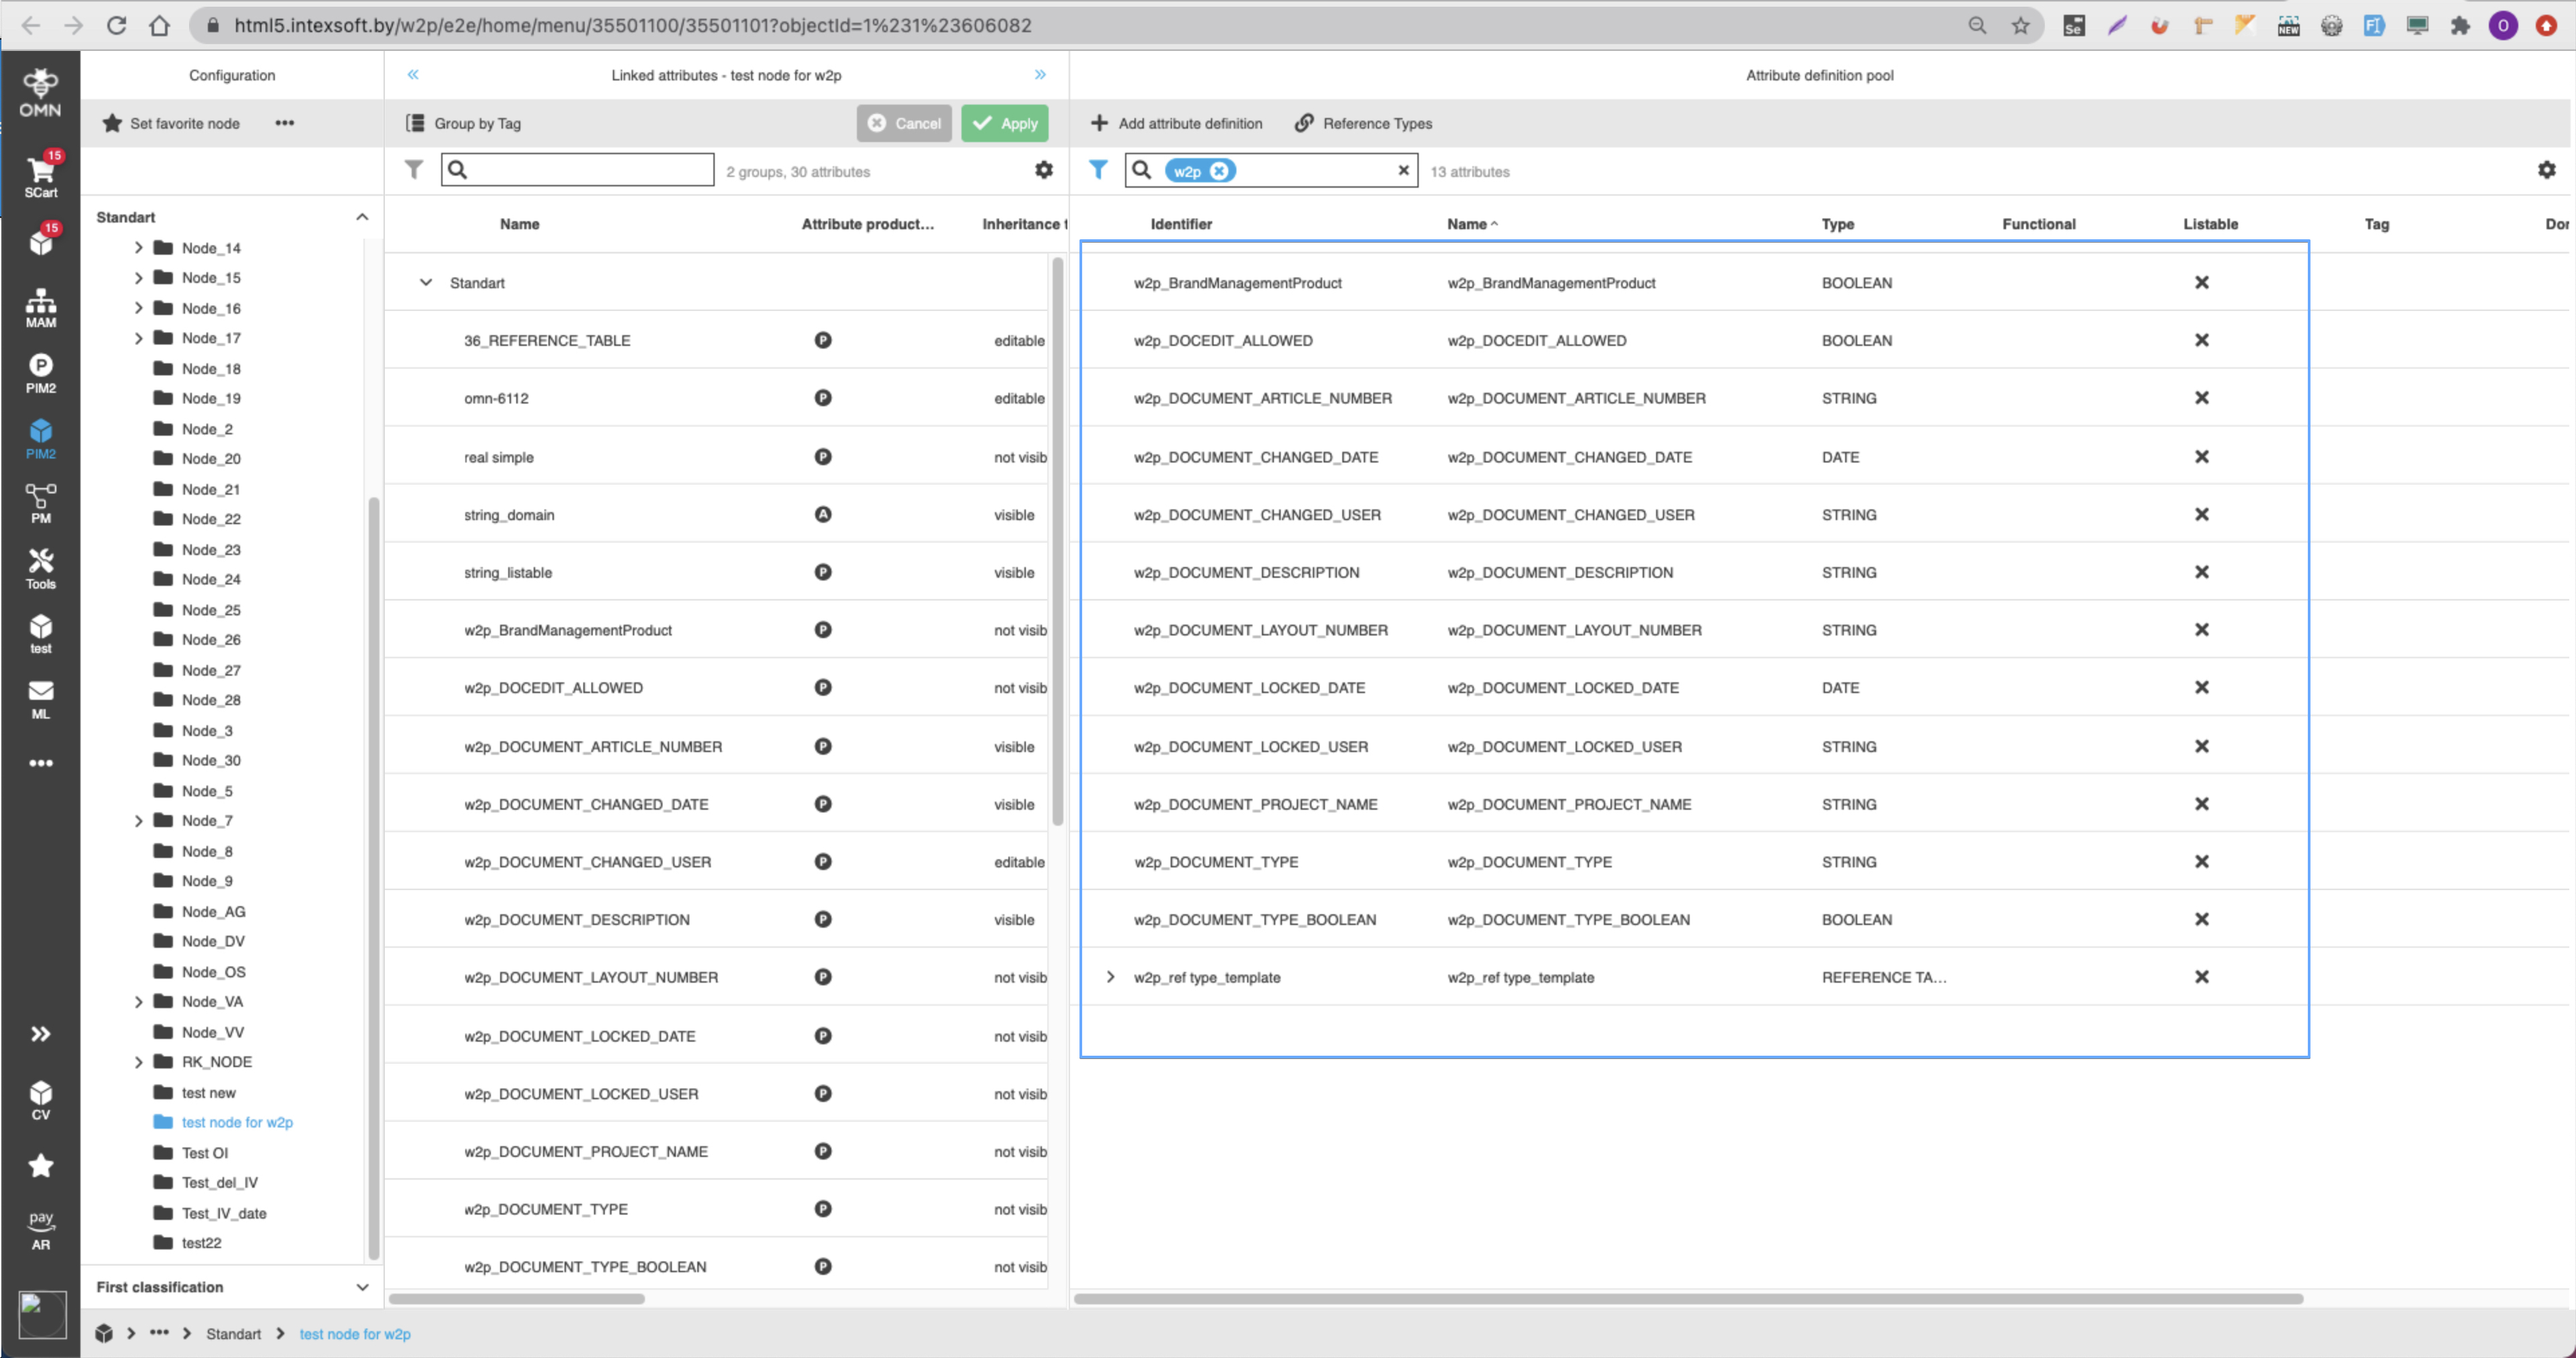
2) Link attributes to the node:
-
Link created attributes to the necessary node. This can be done by dragging attributes to the node.
-
Settings of linked attributes:
-
Attribute product type = Product
-
Inheritance type = not visible
-
Language dependency = false
-
Required = Optional
-
Cardinality (for reference table) = not set or '1'
-
Domains = should not be created
-
3) Configuration in ConfigClient: Web2Print
-
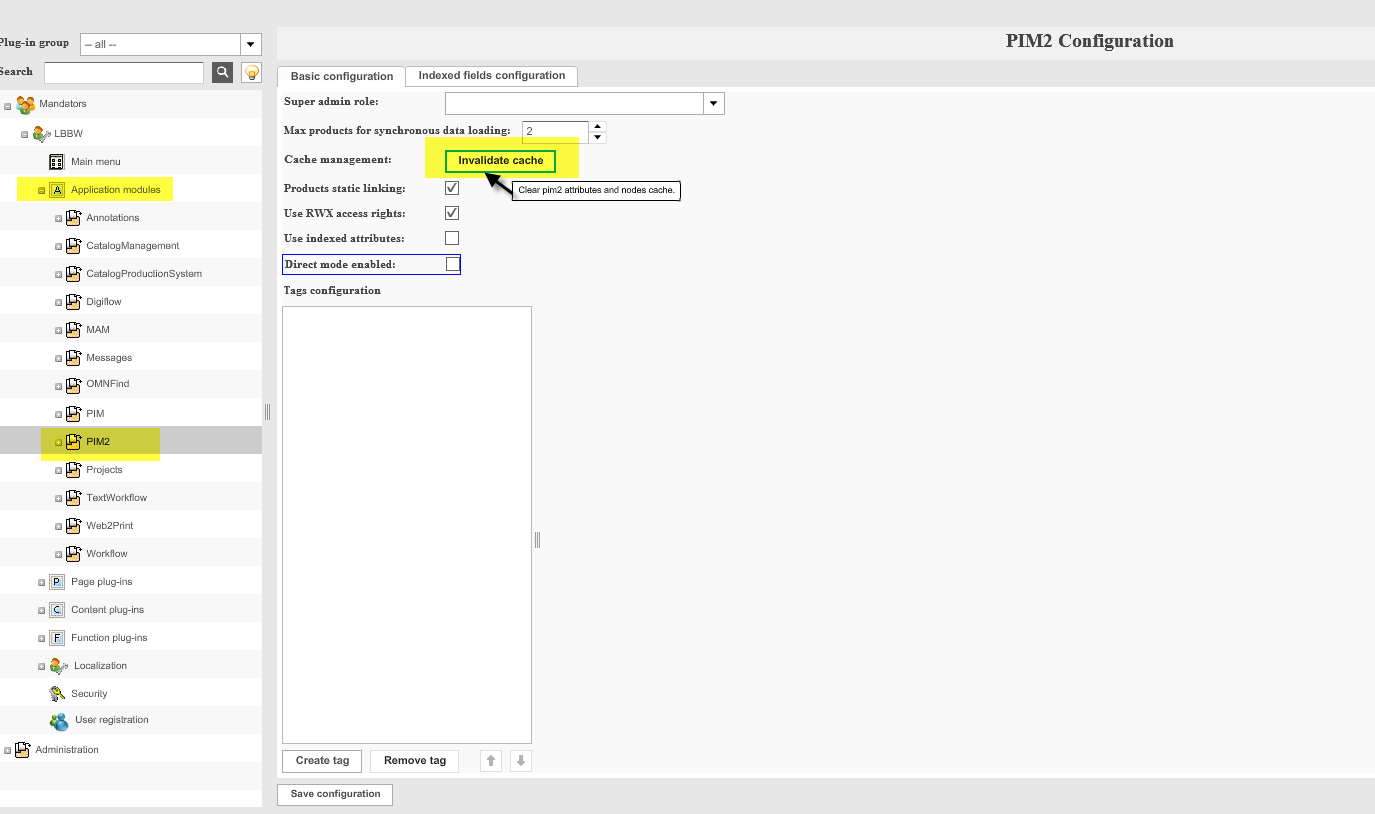
Make 'Invalidate cache' so that all created attributes become available for further configuration of w2p (Application modules → PIM2 → Invalidate cache)
-
Open Web2Print configuration (Application modules → Web2Print → General tab) and select correct attributes for all points.


4) Configuration in ConfigClient: ClassificationView
-
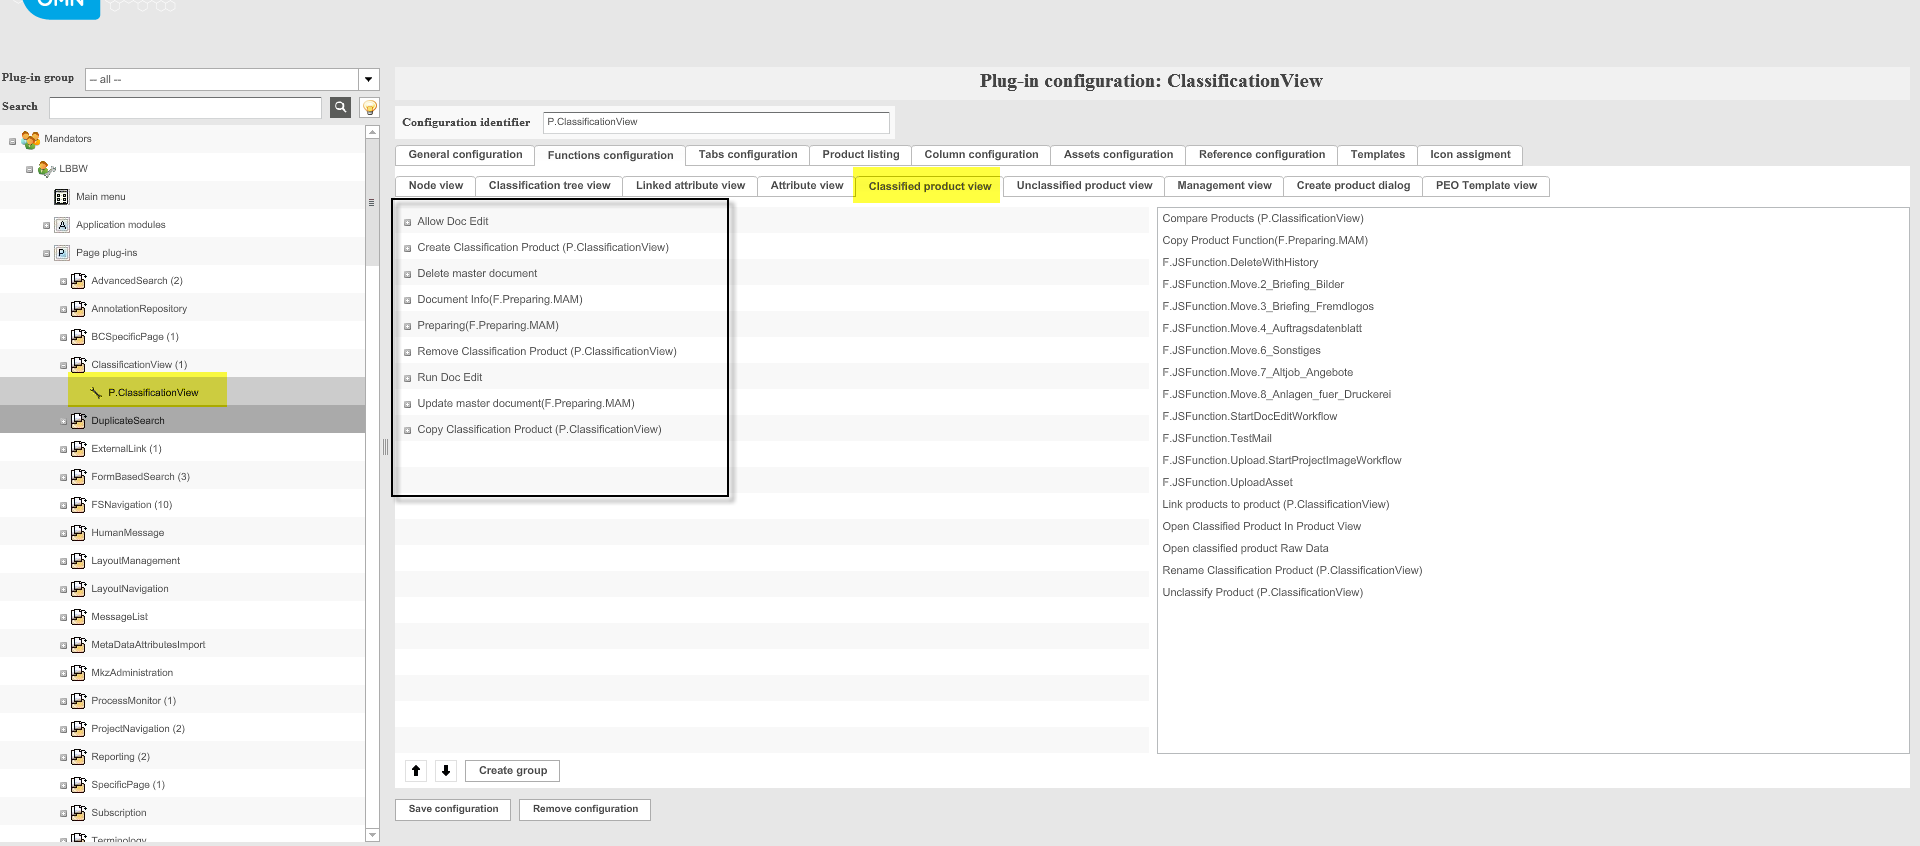
Open ClassificationView (page plug-in) → 'Function configuration' tab → 'Classified product view' tab
-
Activate w2p functions via dragging from the right column to the left.
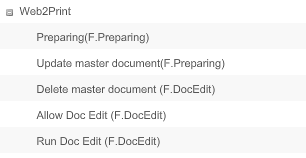
List of w2p functions:
-
Preparing
-
Run Doc Edit
-
AllowDocEdit
-
Update master document
-
Delete master document
-
DocumentInfo
Note: in order for the functions to be available, the plug-in configuration for 'Preparing', 'DocEdit' and necessary plugins for these ('BrandManagementImageSelector', 'DocEditLeftArea') configurations must be created, similarly as for pim1
-
Activate pim2 functions: 'Create Classification Product', 'Remove Classification Product', 'Copy Classification Product'
Creation of product on client
-
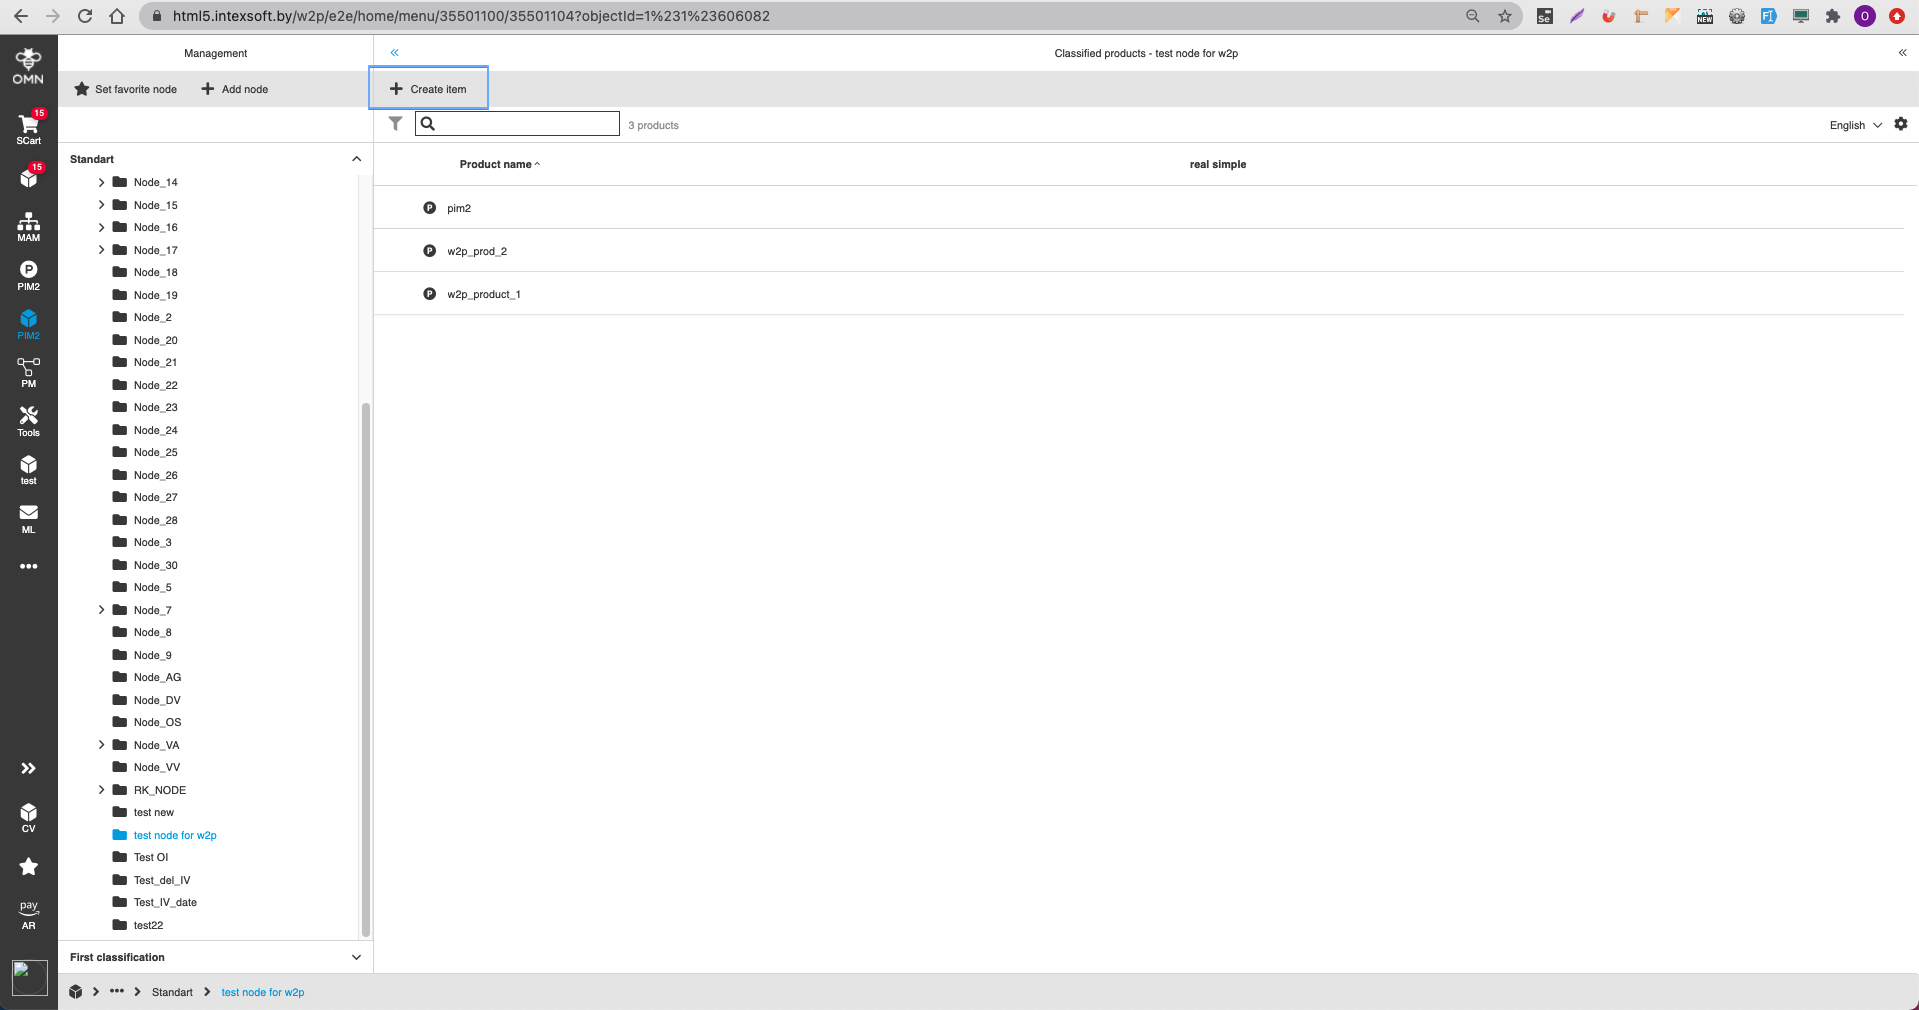
Open ClassificationView on client
-
Open Management tab
-
Create product
-
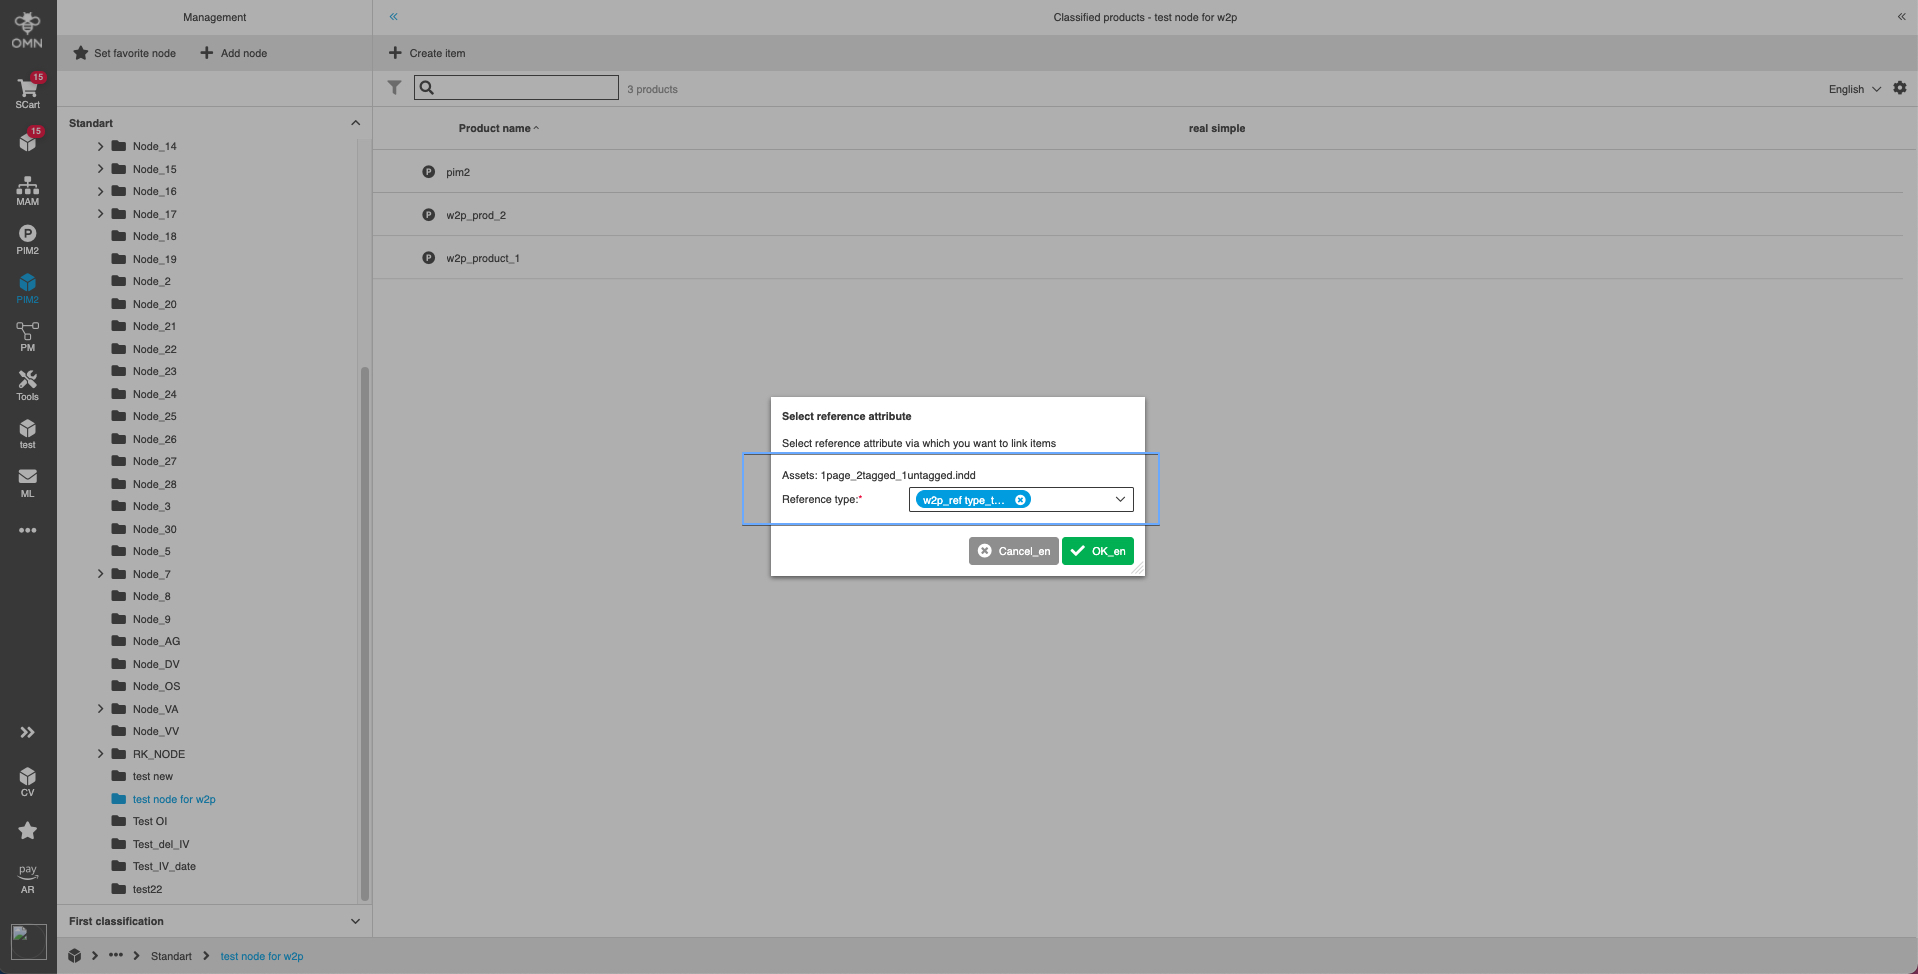
Link .qxp / .indd file to product via dragging from FSTable in FSNavigation
-
Select reference type, the one that was selected in the configuration of Web2Print module
-
Save changes.
-
Functions: Run DocEdit, Update master document, Delete master document, DocumentInfo should appear after product opening in Preparing.
Note: If AllowDocEdit = enable the functions 'RunDocEdit 'and 'DocumentInfo' are available; if AllowDocEdit = disabled the functions 'RunDocEdit' and 'DocumentInfo' are not visible
Important: DocumentInfo function is available only if mode 'Business cars' is enabled in Preparing