Annotation Tool
General information
The Annotation Tool can be opened directly in the DAM module or from a search in a file. With the Annotation Tool, catalogue and document pages or other files (e.g. images) can be annotated and commented. In principle, the annotation tool can also be integrated into a workflow process in conjunction with the workflow module. This is useful if annotations are to be carried out on a document for defined process steps/defined roles.
The annotation tool offers the possibility to add annotations and comments to document pages and images. Annotations are not stored directly in the OMN database. The following procedure is recommended for working with the annotation tool:
-
Open annotation tool
-
On files (e.g. images)
-
Via Flatplan
-
Via workflow function
-
-
Create and save annotations
-
Use tools
-
Color comments/annotations
-
Structure
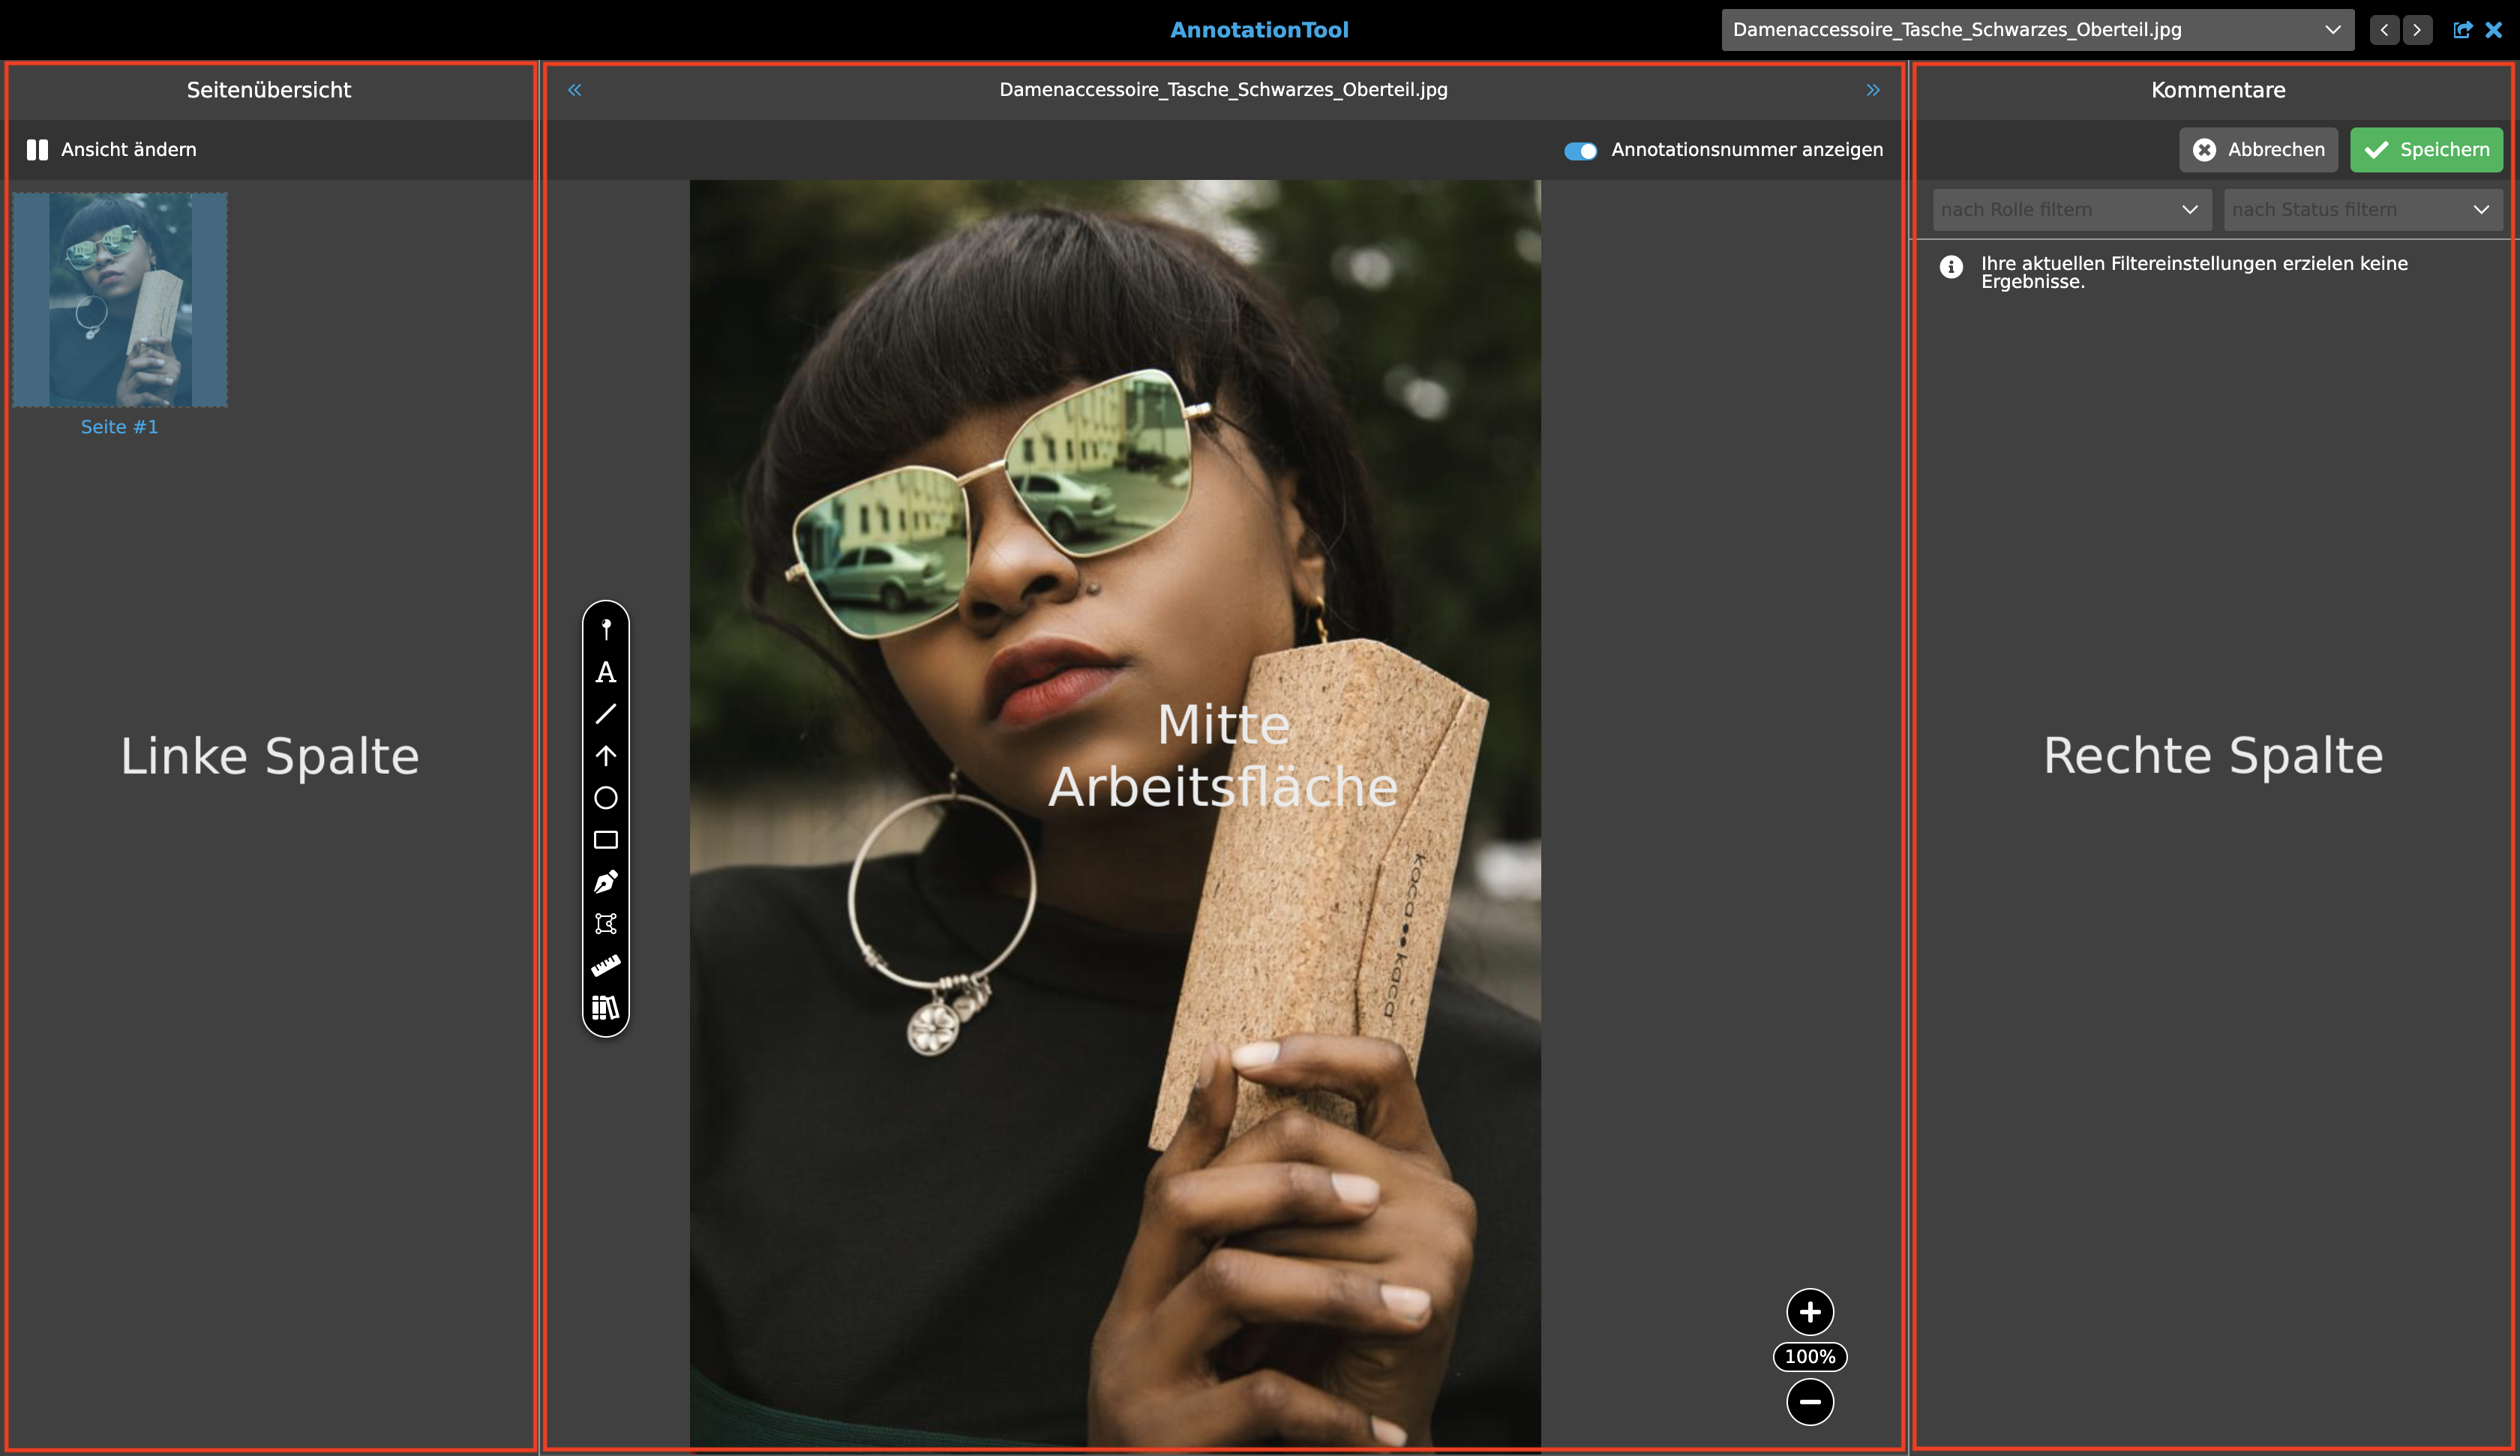
The Annotation Tool is an editor. All editors have a certain structure. For more information, see editors. The annotation tool is divided into three sections:
-
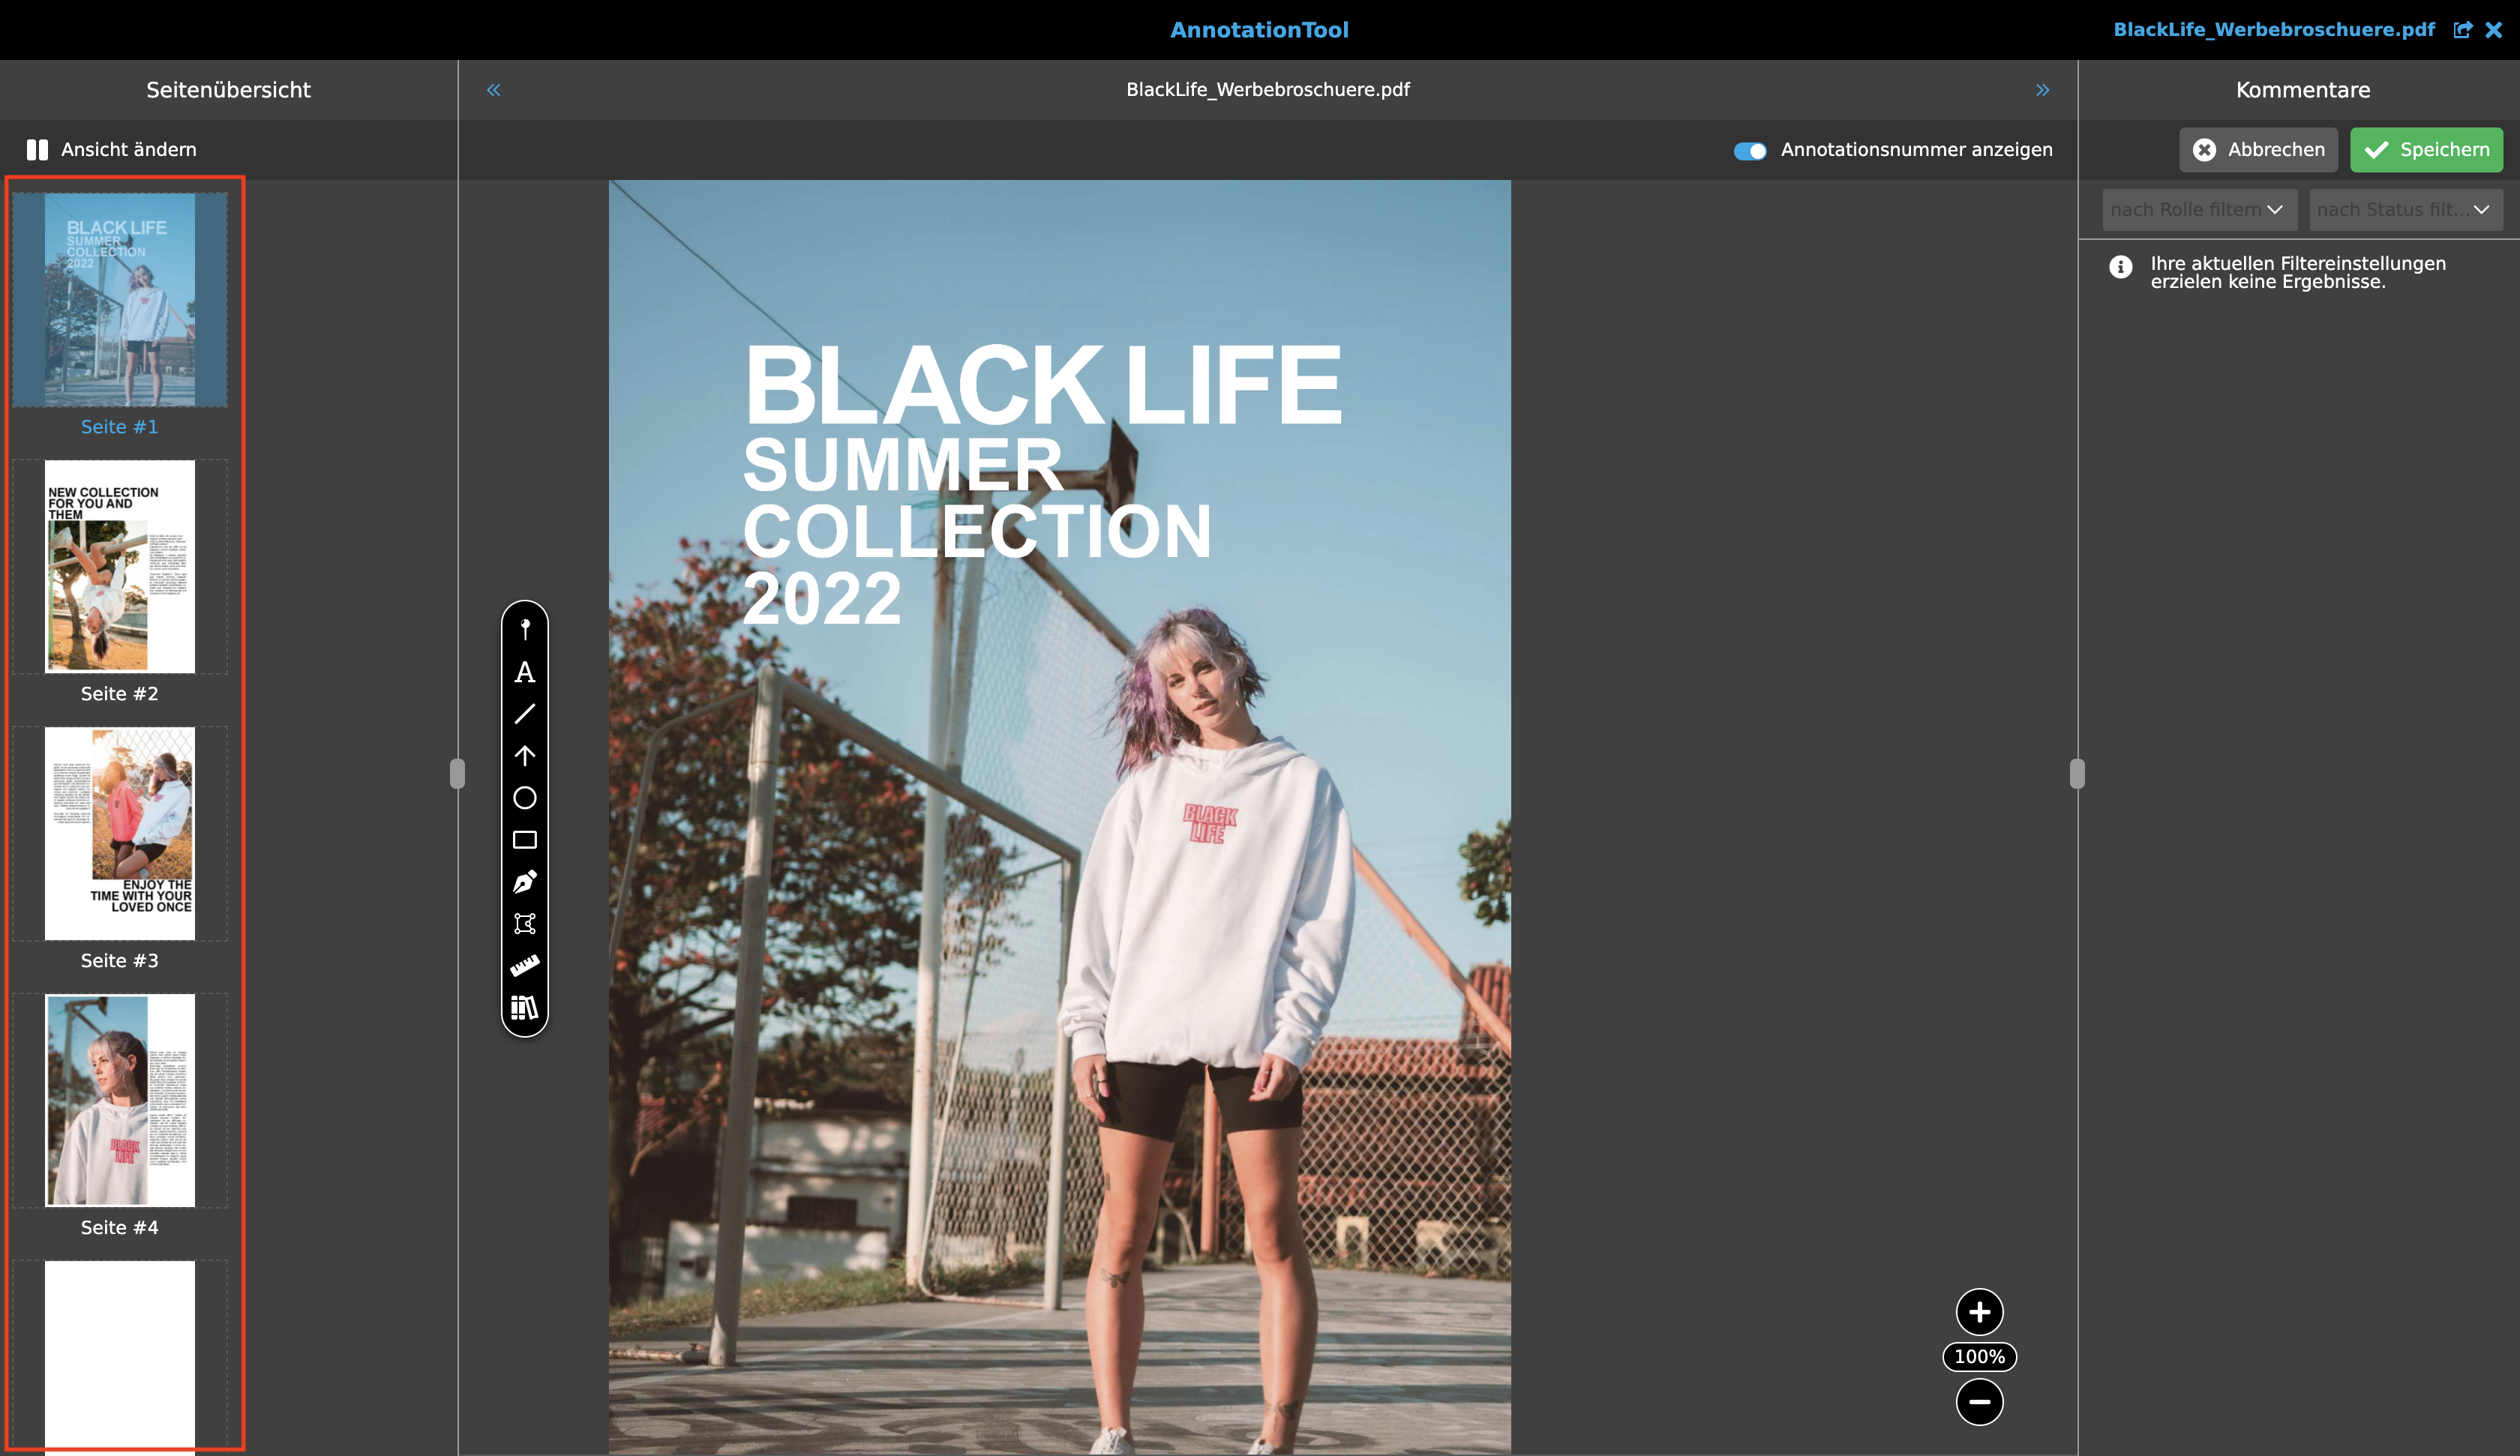
Left column: If an image file is opened, the preview can be viewed here. This provides an overview of pages or double pages of a document (if several files are opened, e.g. by a workflow, or several pages of a PDF are opened in the annotation tool).
-
Centre: Workspace (selected document page or image and tools).
-
Right column: Overview of annotations and possible comments on the annotations.
These areas are described in more detail below.
Document overview
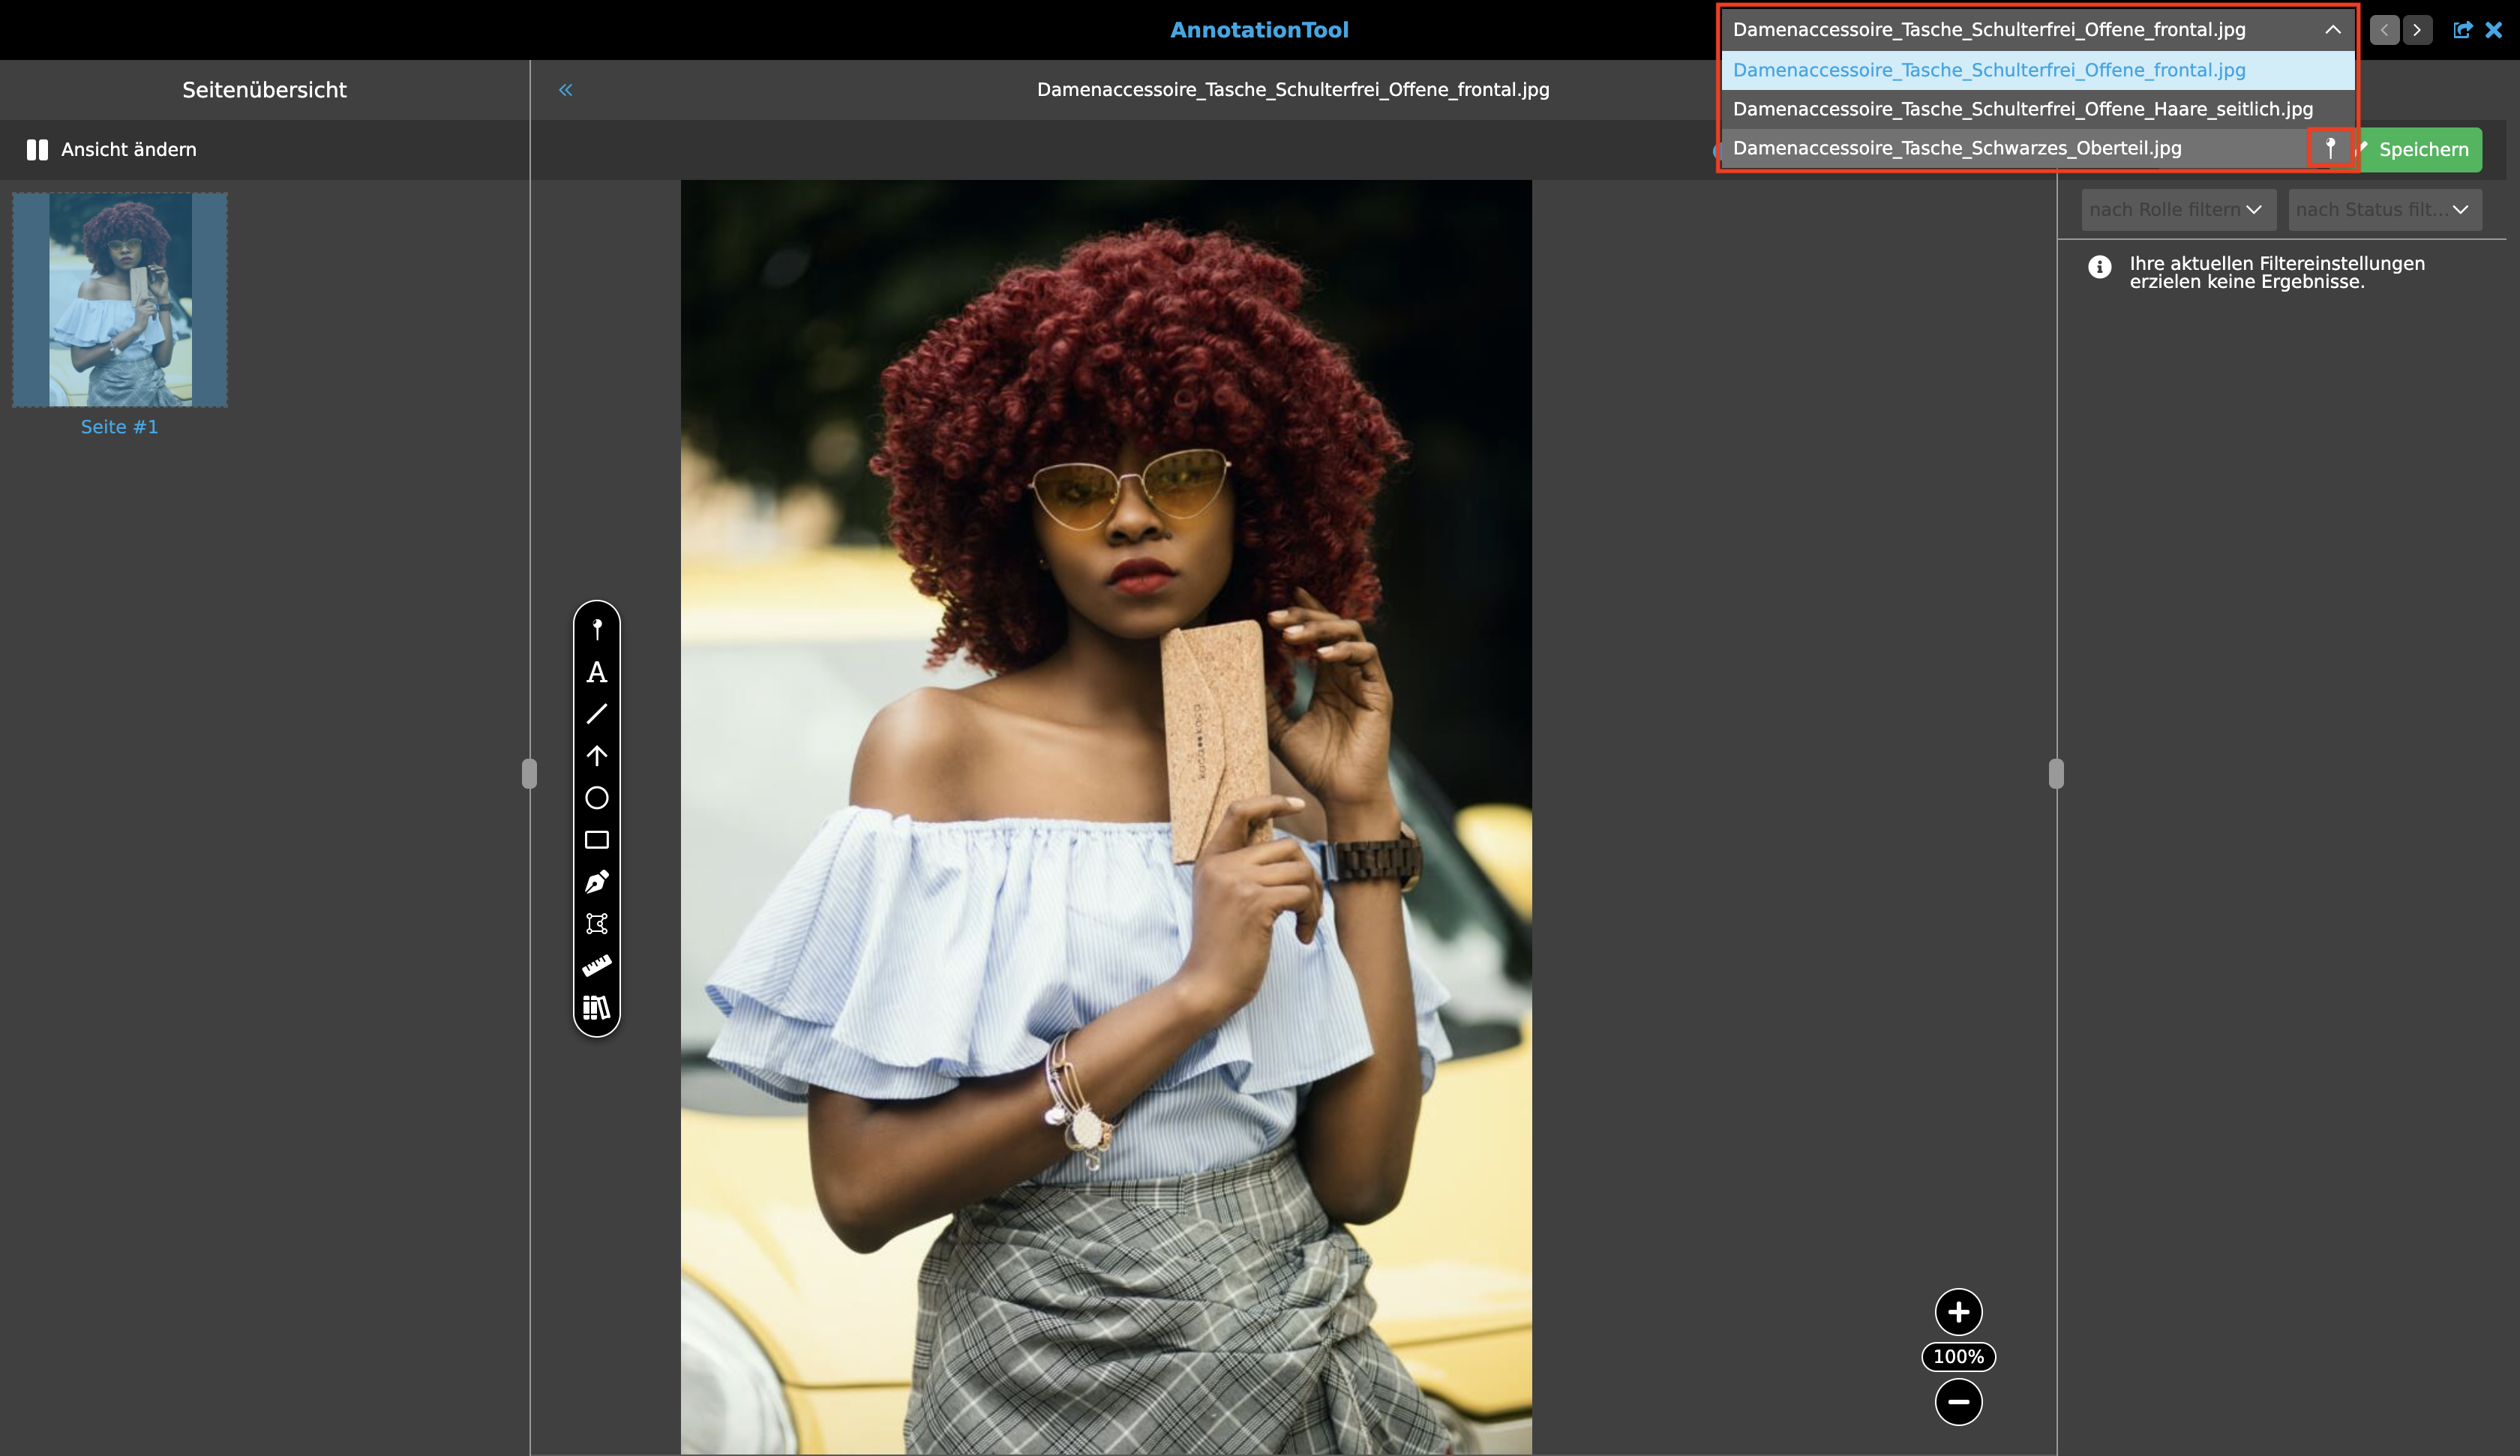
In the navigation bar, all files linked to the project are displayed in a dropdown. These are sorted chronologically, with the newest document or file at the top and the oldest document at the bottom. Also shown in the dropdown is a pin symbol to identify which files have already been annotated. The top document is automatically selected when the annotation tool is opened.
The Toolbar
The upper toolbar in the annotation tool contains various functionalities, such as creating PDF files or deleting annotations. It also contains a dropdown to assign certain roles and a toggle, the functionalities of which are explained below. The display and thus the number of functions in the toolbar depends on the configuration and can vary.

-
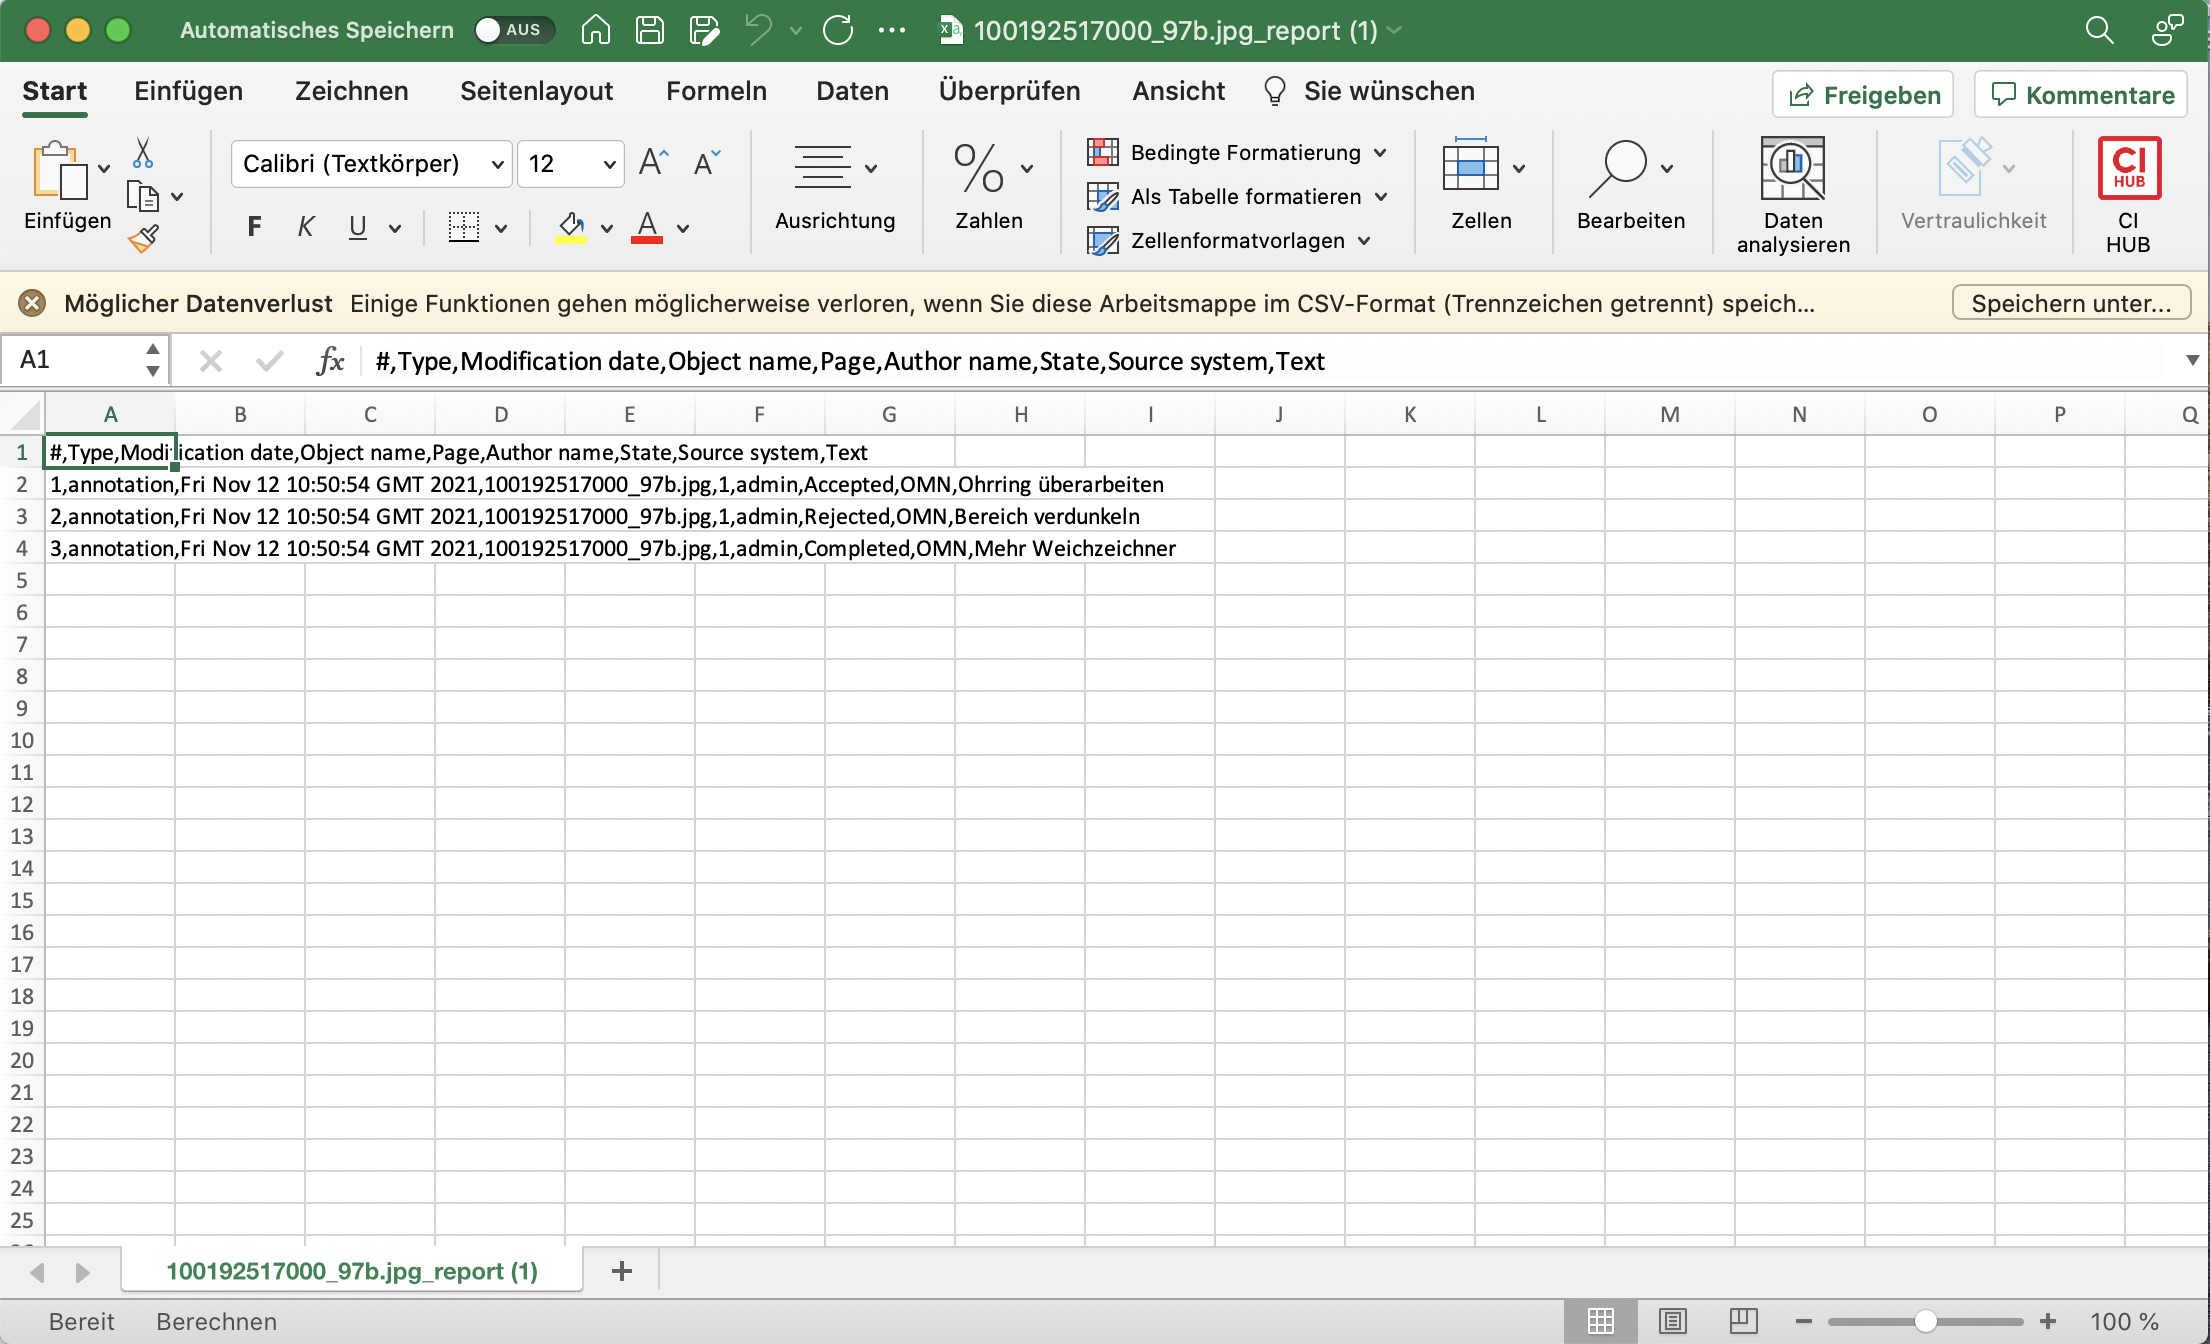
Annotation Export CSV: This button can be used to output a list of the annotations as a CSV file for the selected file that was annotated with the annotation tool.
-
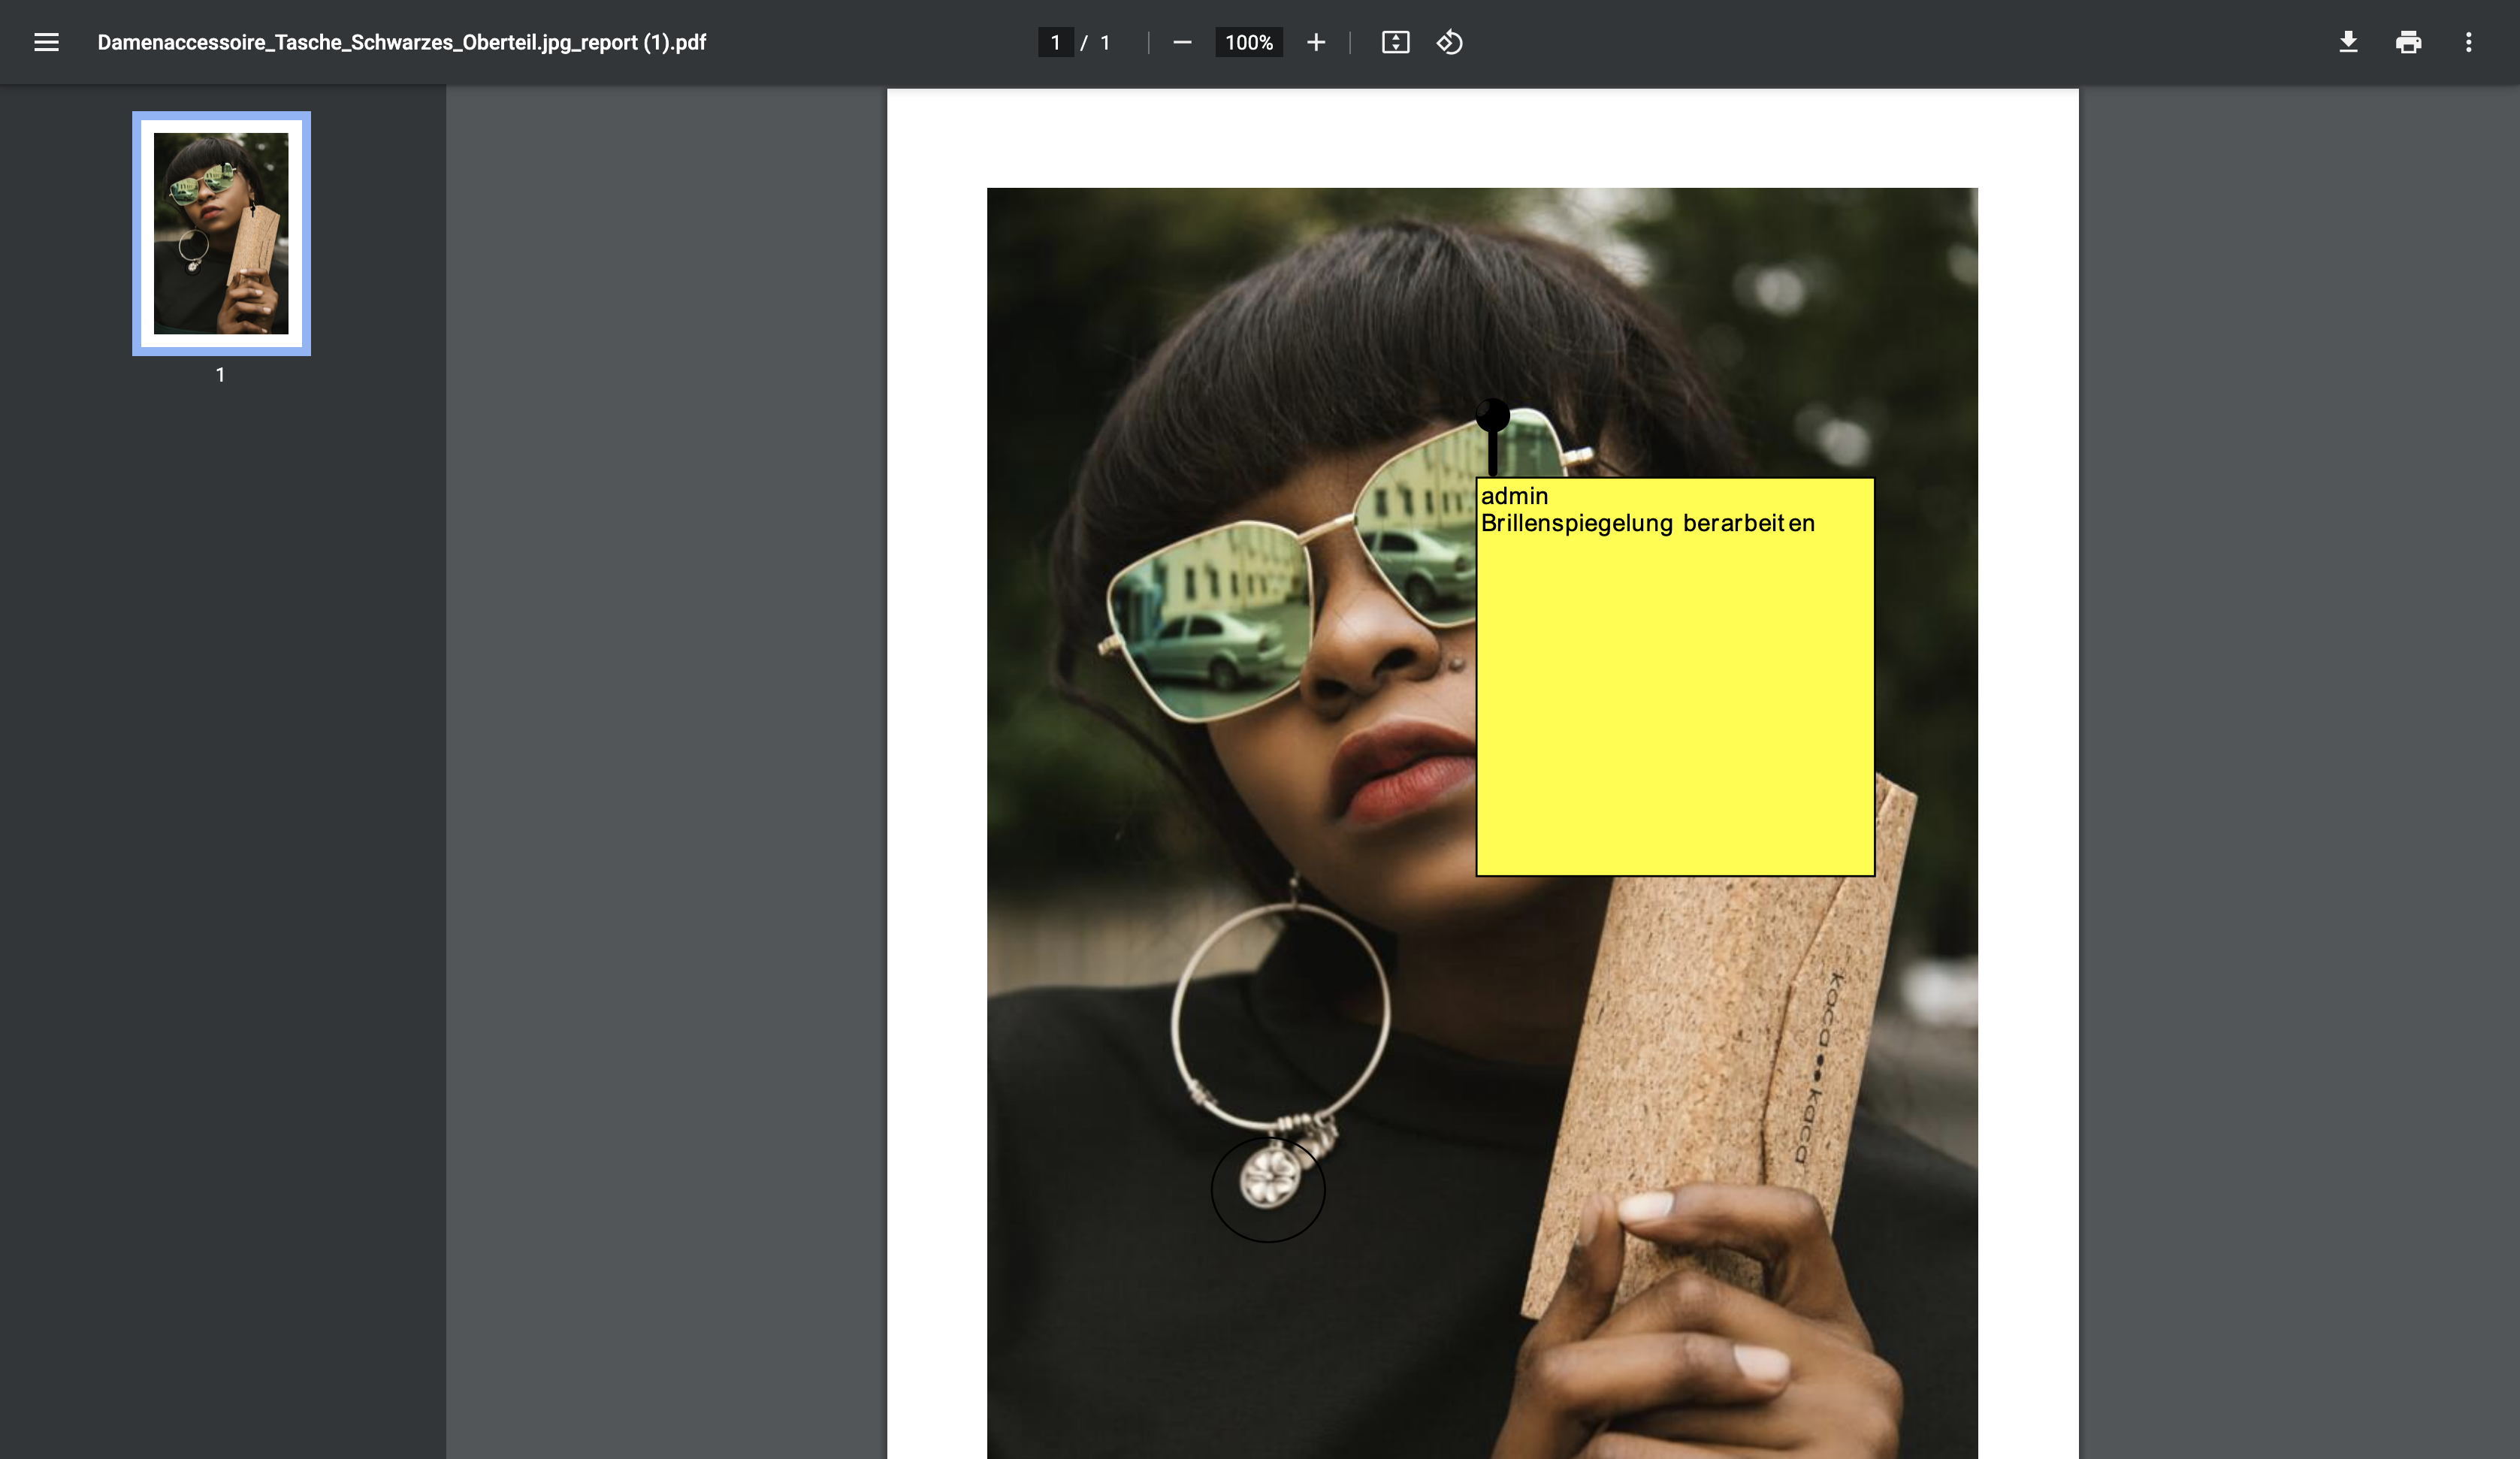
Annotation Export PDF: This allows the file with the created annotations to be exported as a PDF file. As far as technically possible, the annotations are embedded as Acrobat comments in the PDF file so that they can be viewed with PDF readers such as Acrobat Reader. Information: The annotations are not embedded in the original PDF file, but in a copy of the original PDF file. Some annotation types, such as rotated annotations, cannot be written to the file in an Acrobat Reader compliant manner. When a PDF file is created, the users are informed which types are not embedded in the PDF document.
-
Delete annotation: The "Delete Annotation" button can be used to delete annotations as required. The annotation to be deleted must first be selected with a mouse click. This can be done in the toolbar or in the right column.
-
Assign role: With the dropdown, roles can be assigned to the annotated file. This assigned role is then responsible for the further processing or history of the file. Roles can also be assigned via annotation. This function is located on the right side in the annotation overview.
-
Show annotation number: The annotations are numbered for better orientation. The toggle is there to show and hide the annotation numbers.

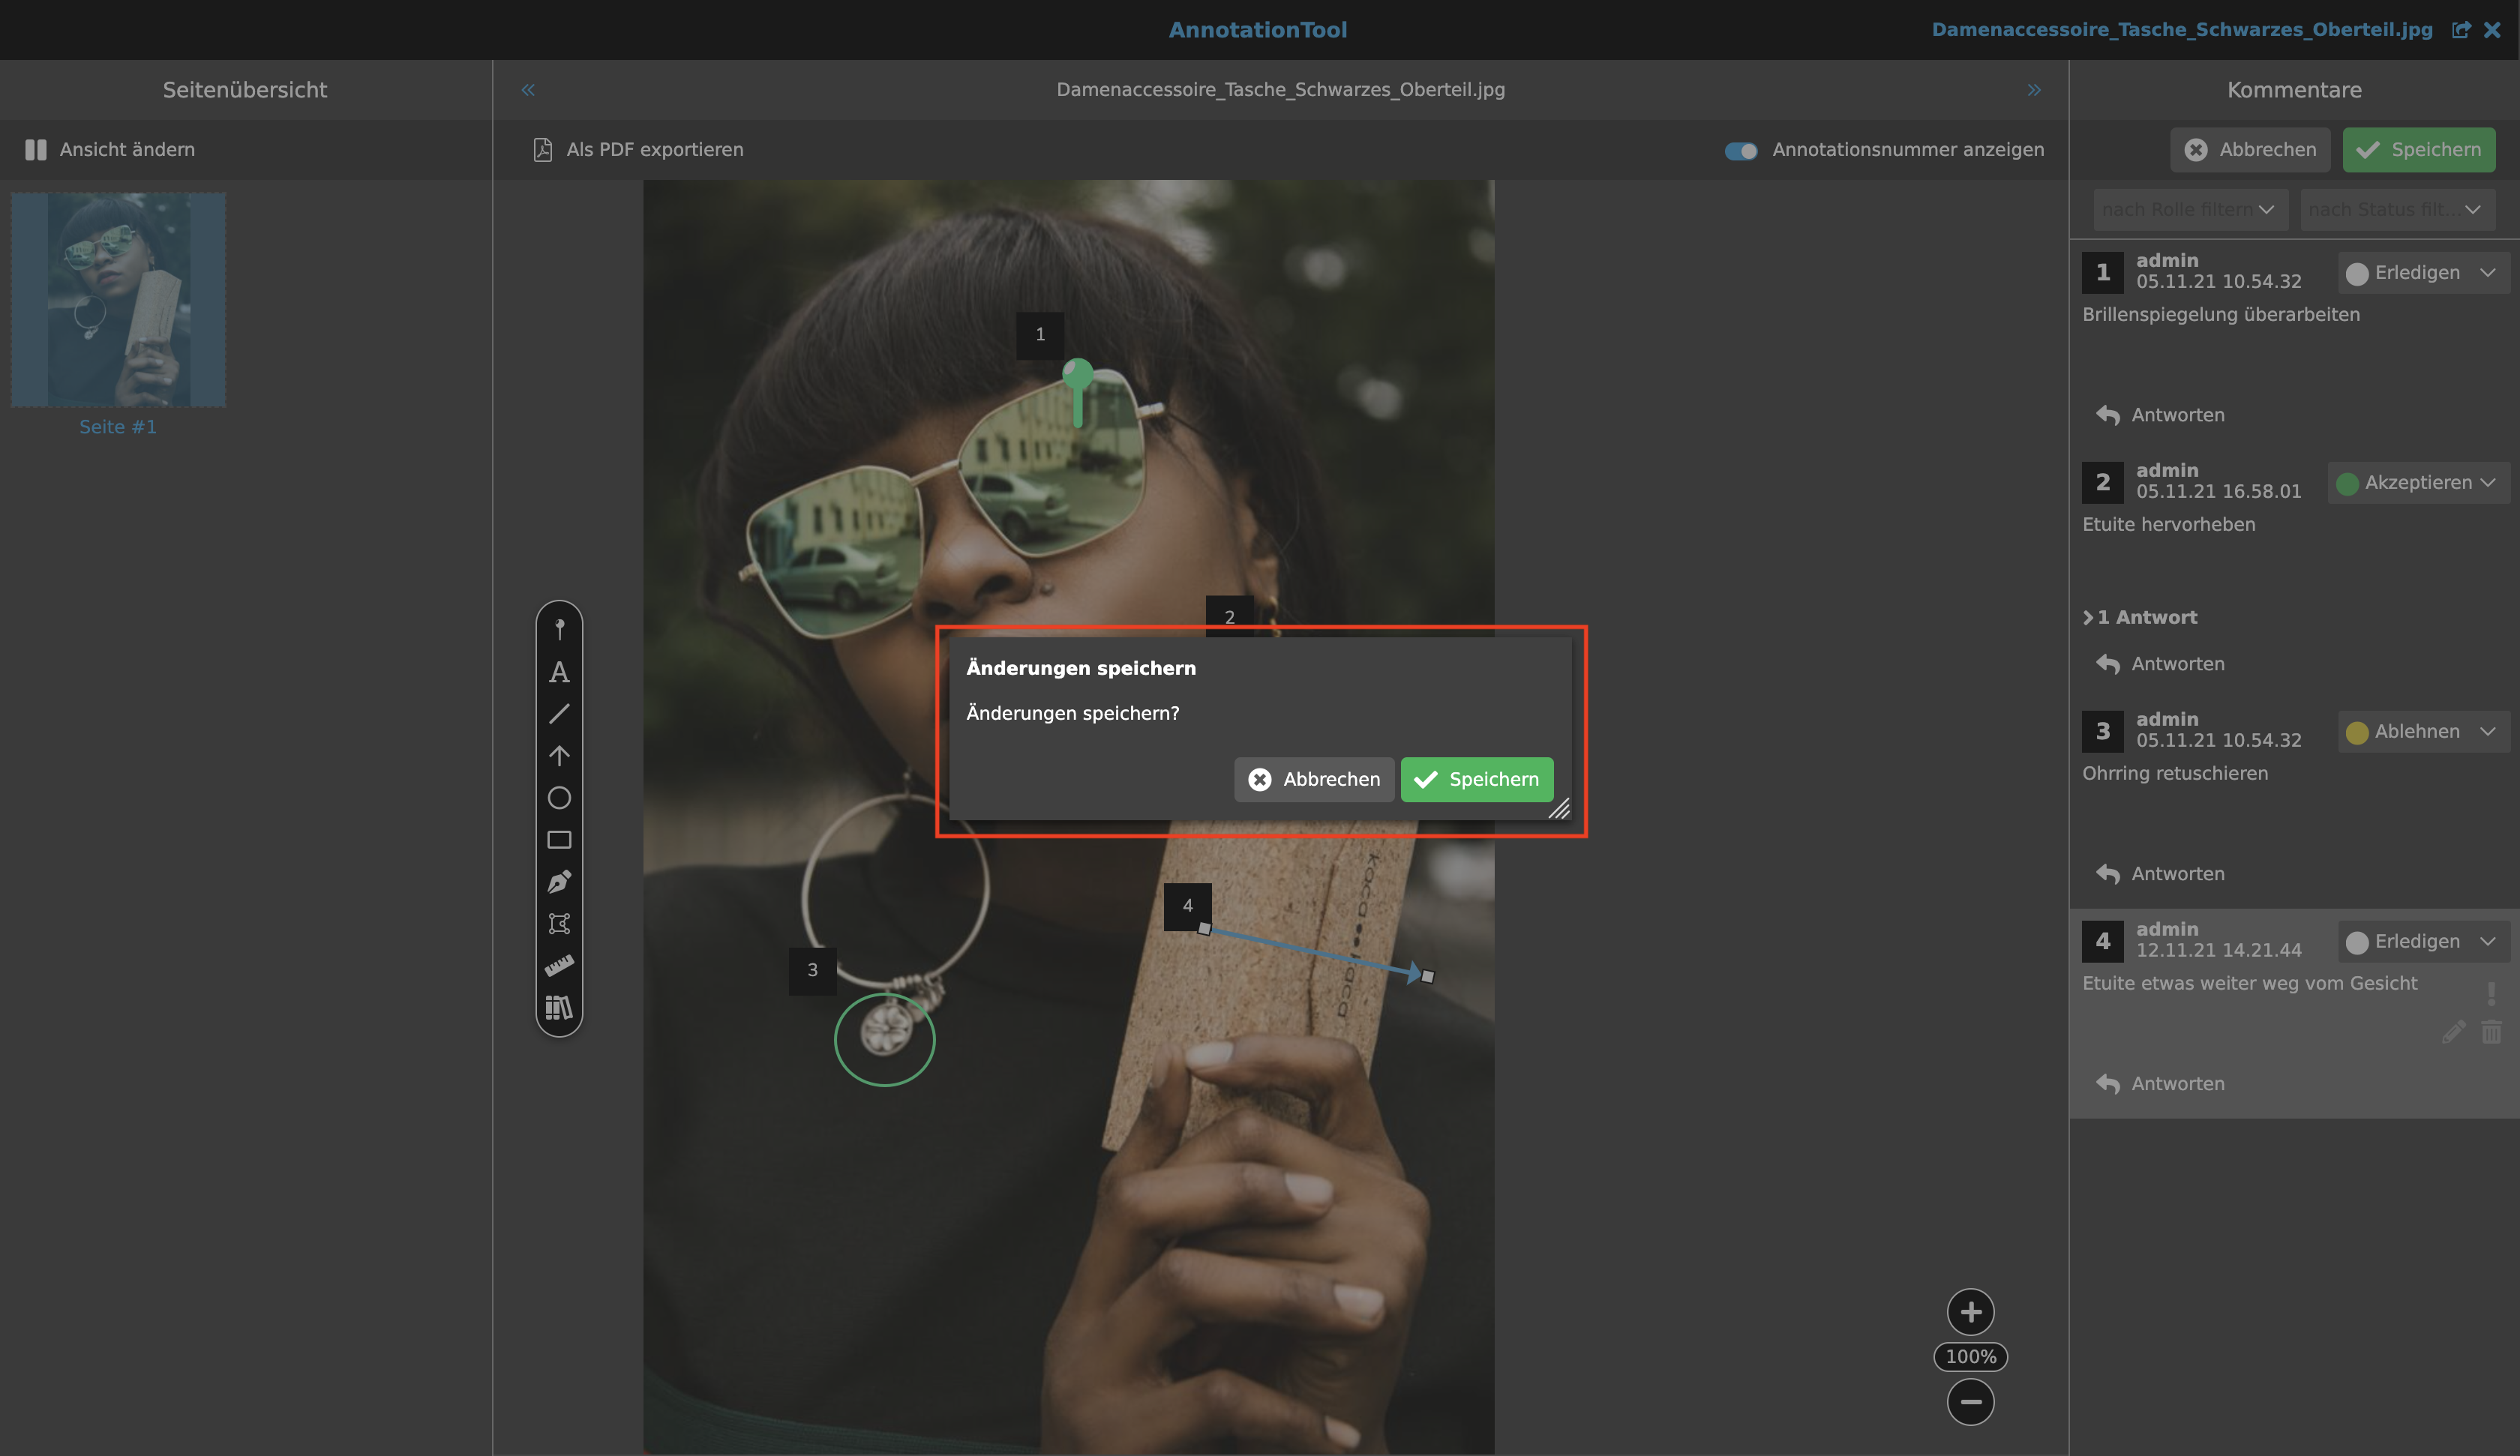
If close is selected without having saved first, a warning message appears for assurance.
Page overview
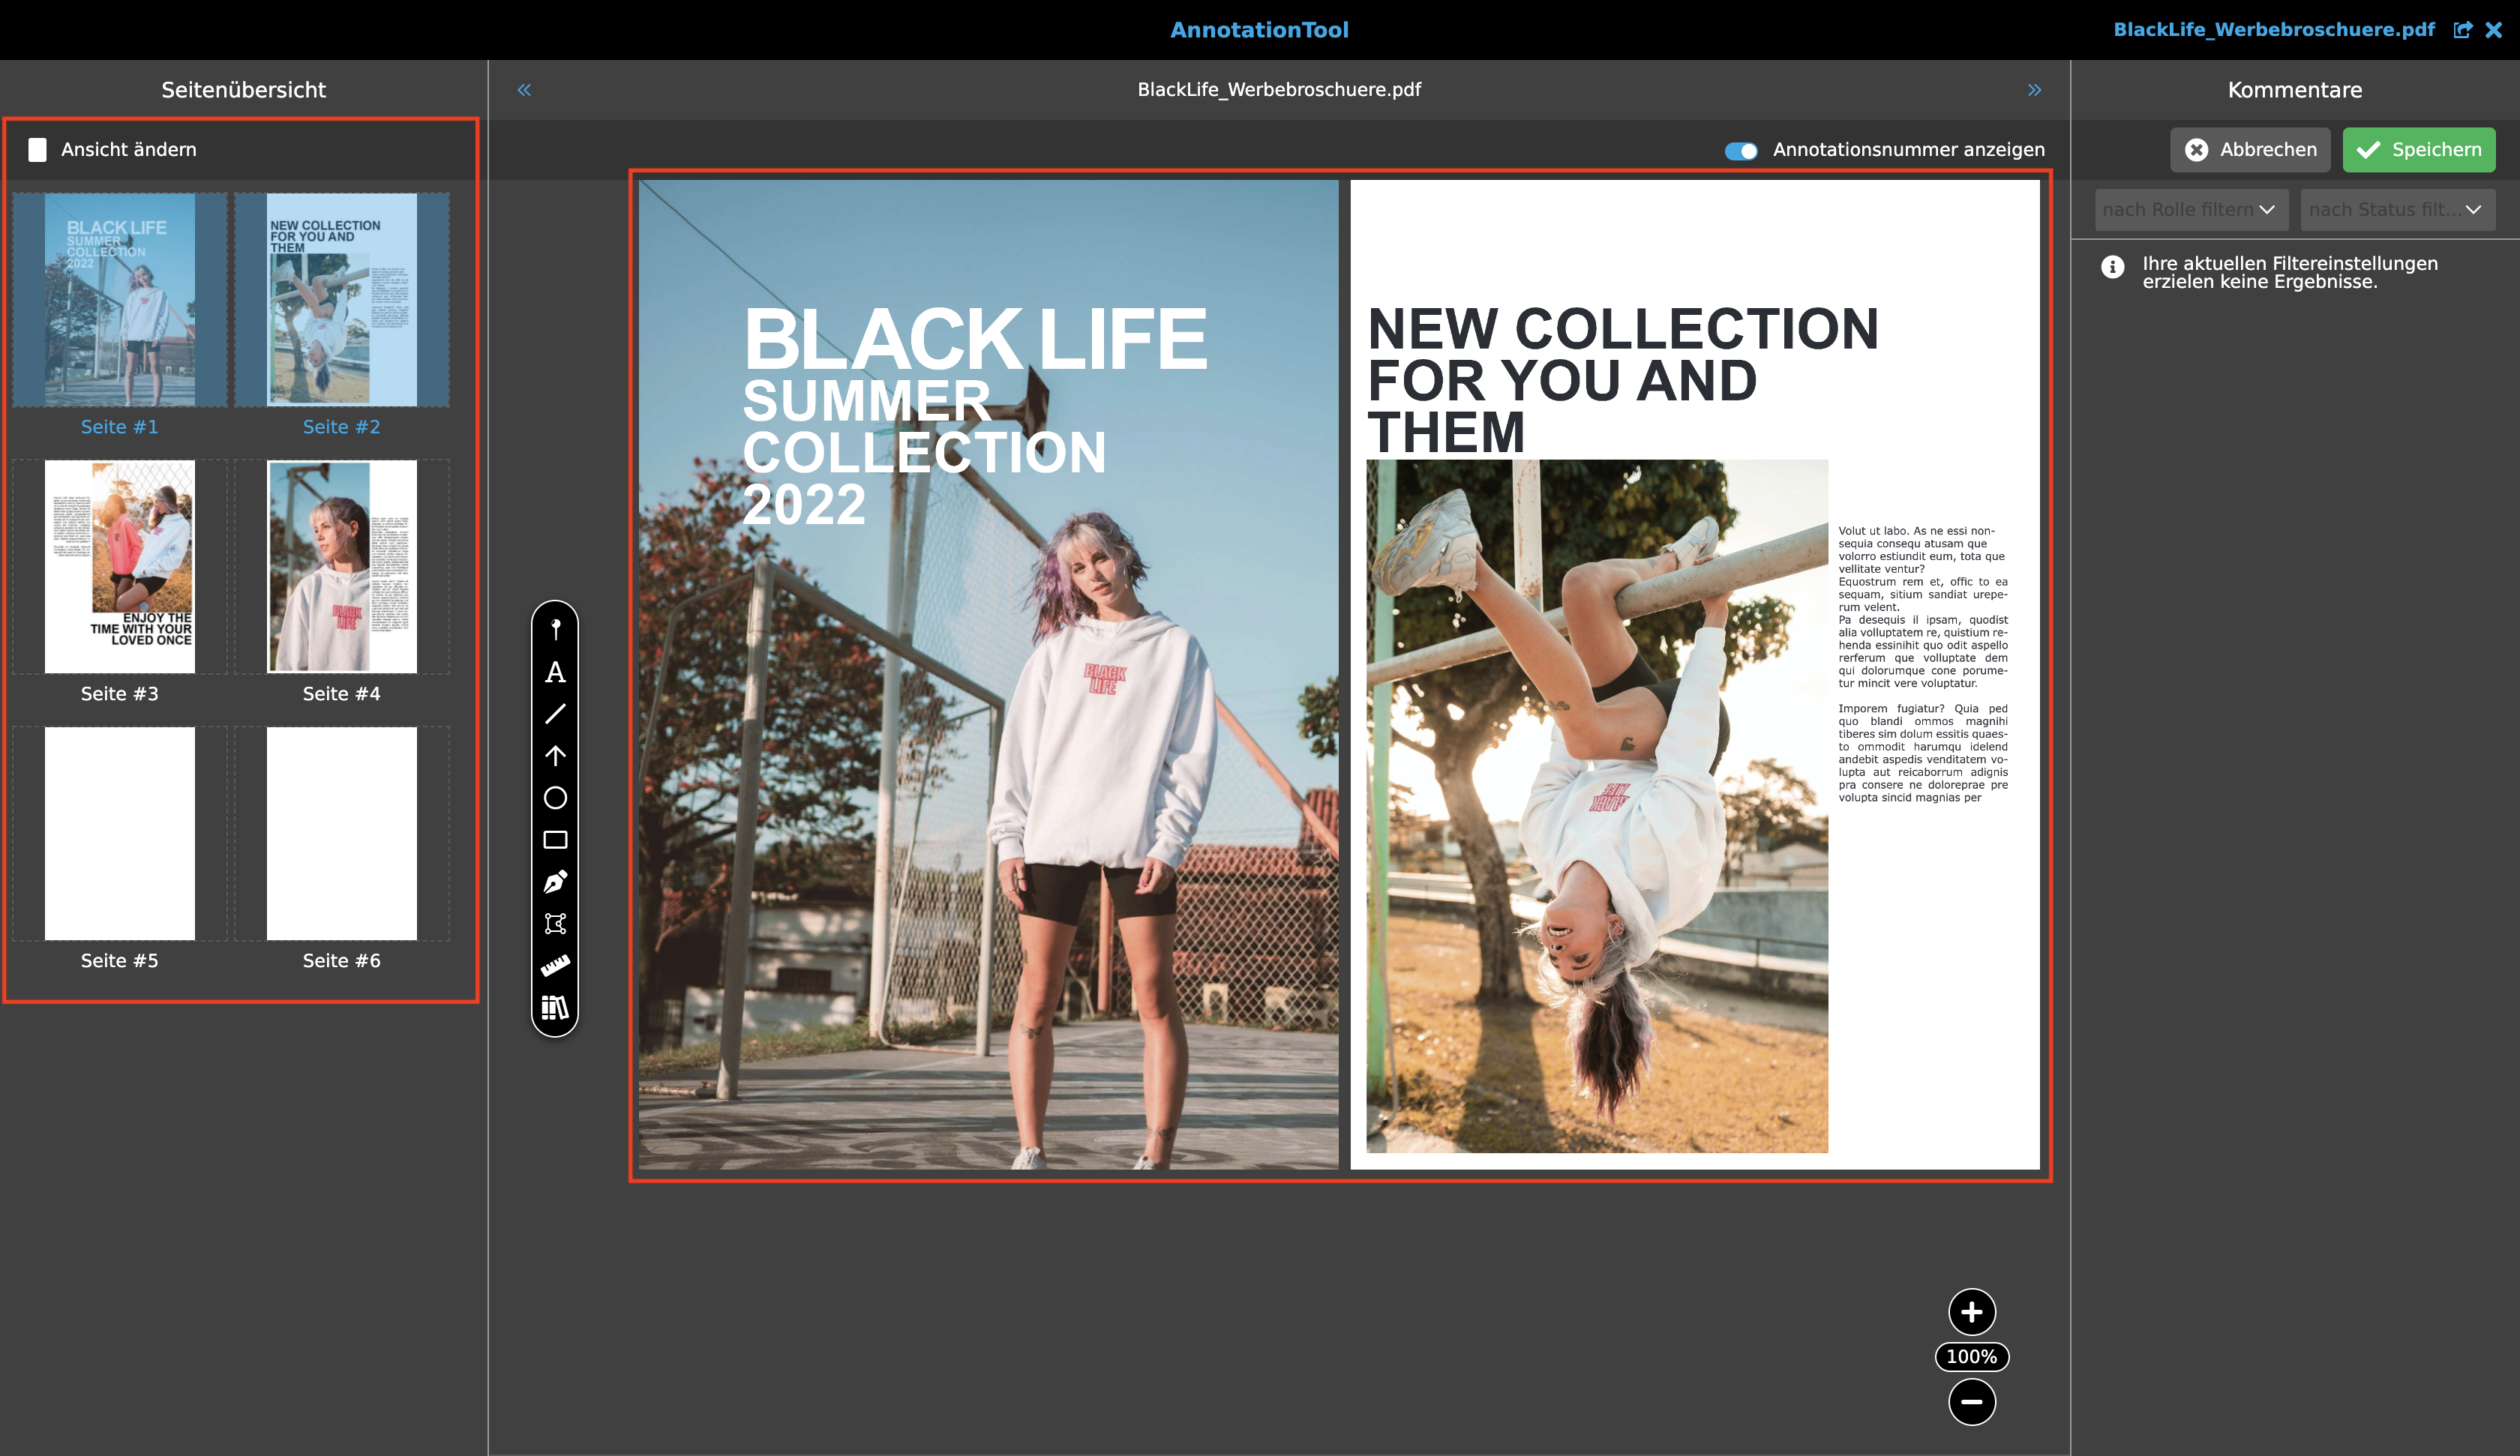
All pages of a document are shown in the left column. These can be freely selected. After selecting a page, it is displayed in the centre of the workspace and can be annotated from then on.
By changing the view, double pages of a document are displayed.
Workspace
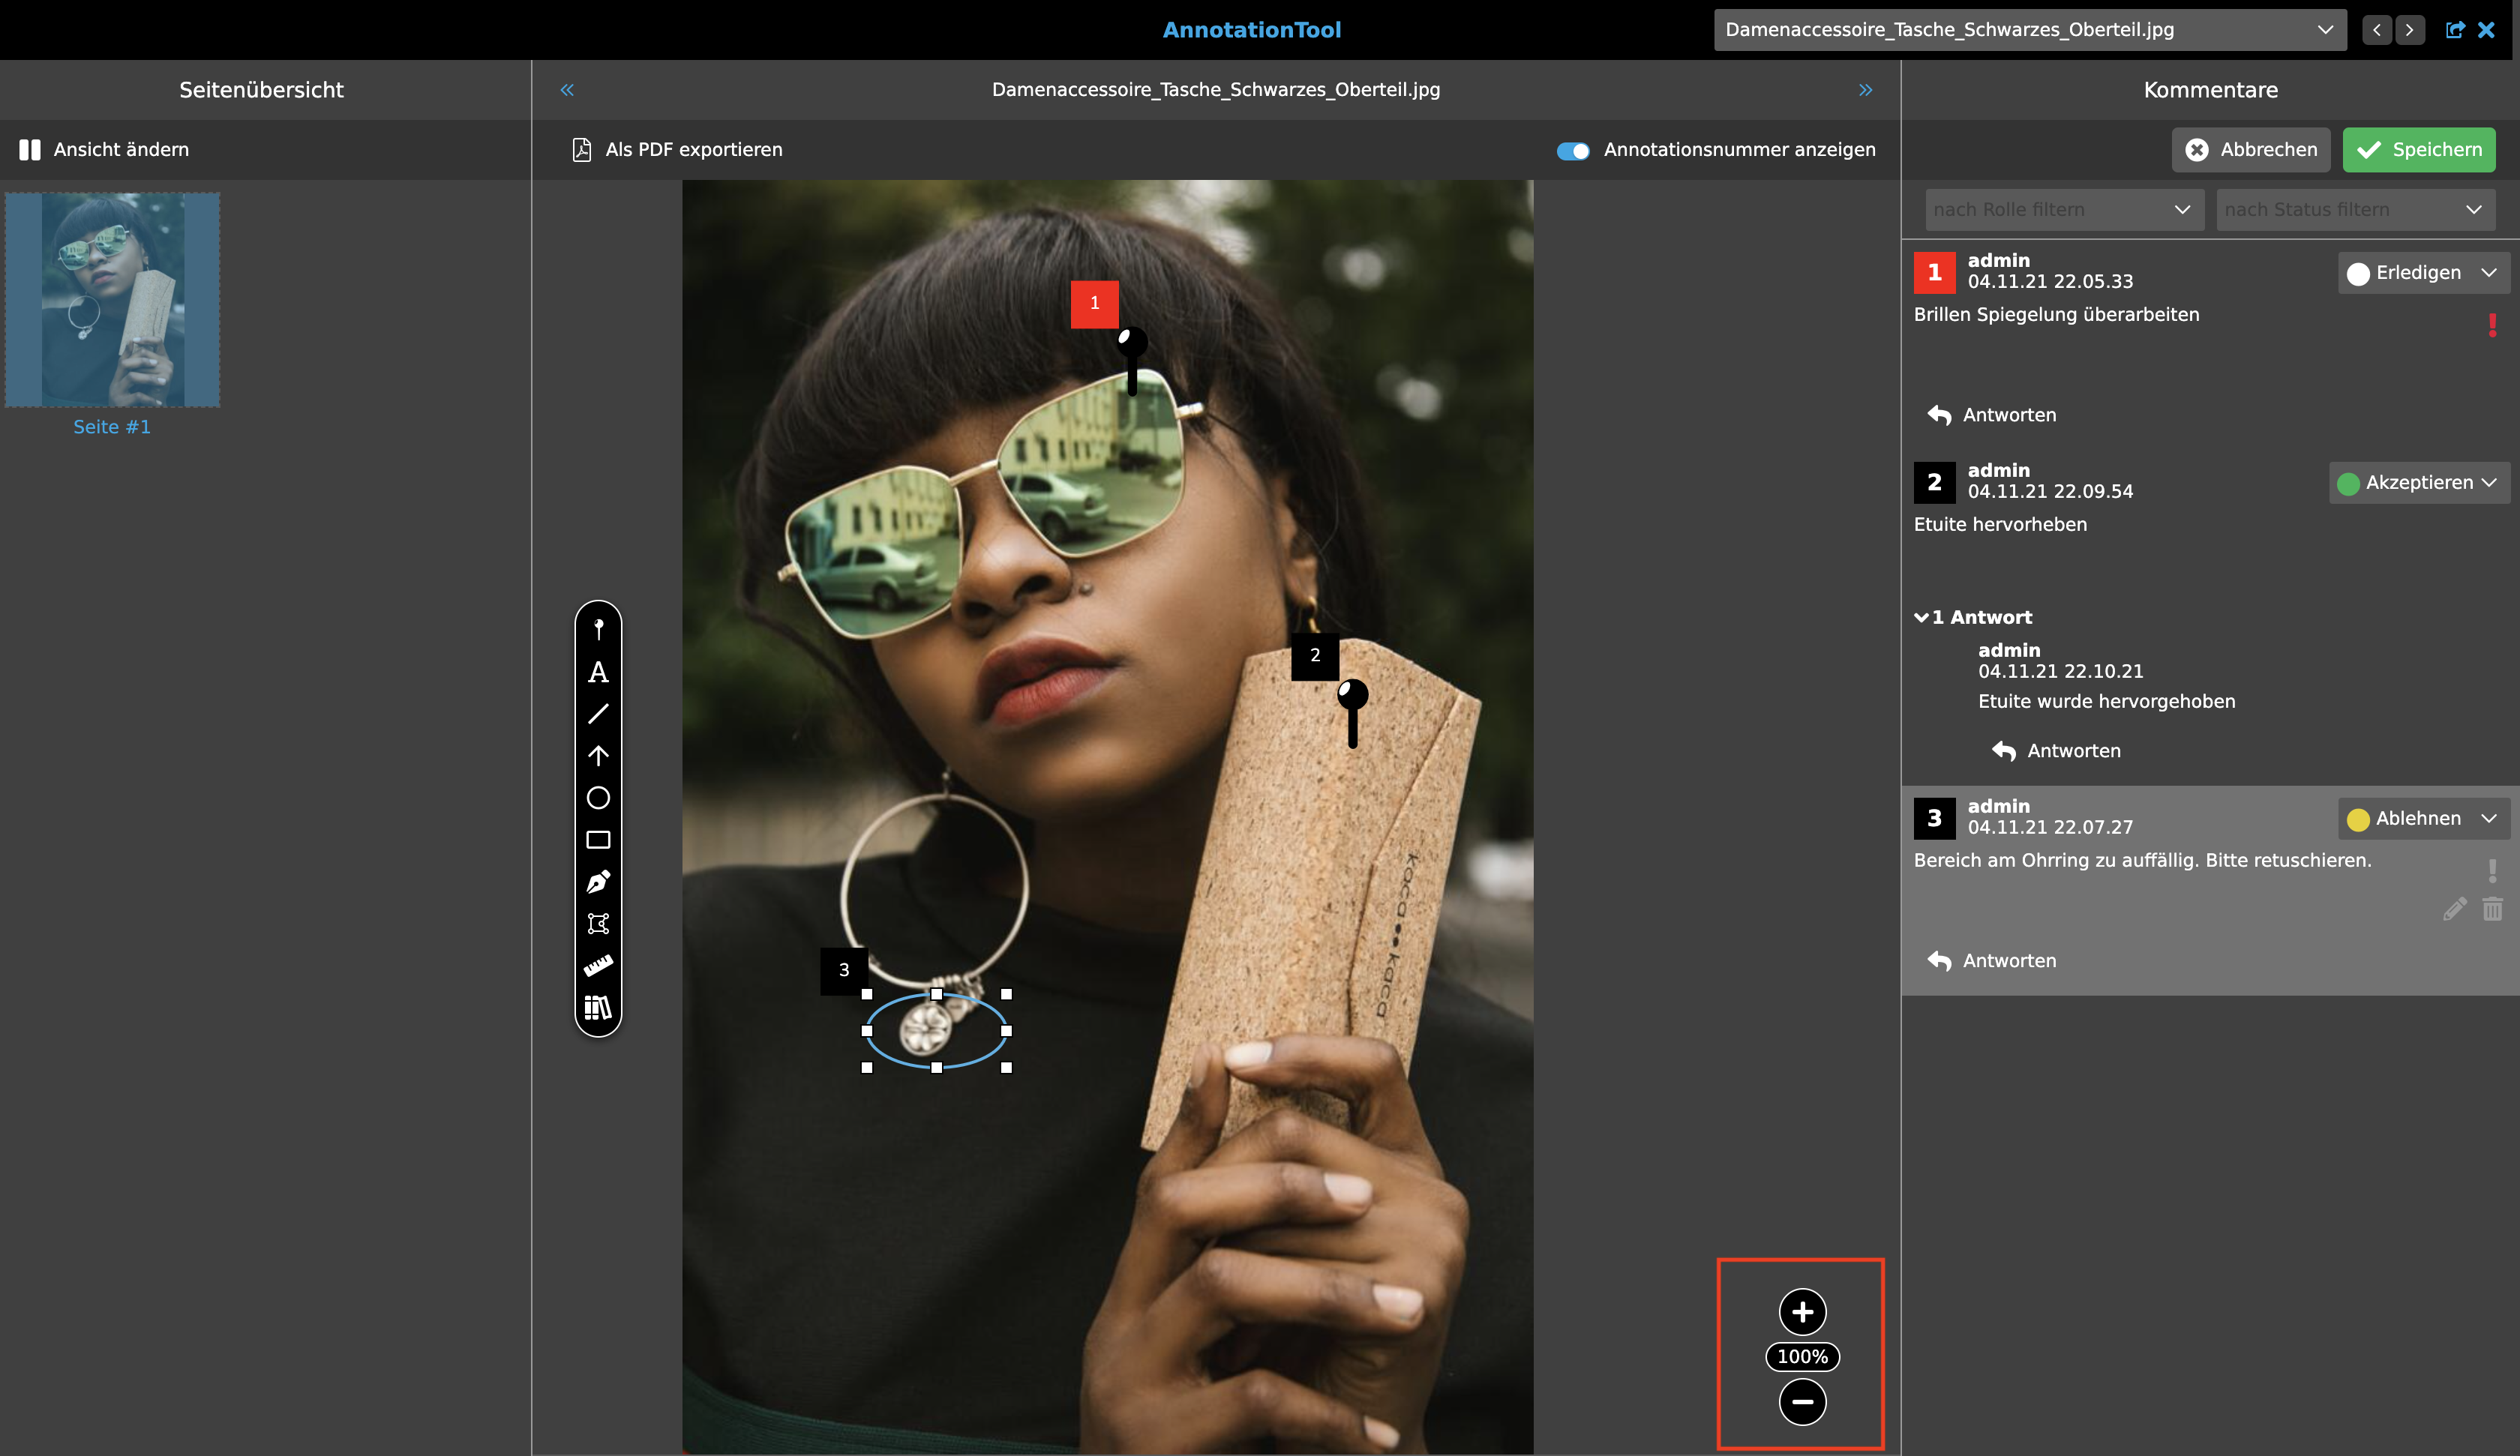
The document page selected in the left column is edited in the middle area. The document page can be scaled using the Zoom. The maximum scalability is 999%. This means that zooming only causes an enlarged or reduced display of the page in the tool and no change to the file itself.
If the zoom function has been selected, the touchpad or the mouse wheel can be used to navigate on the work surface from top to bottom or from left to right.
Annotation tools
On the workspace on the left, various tools are displayed vertically for inserting an annotation. The individual annotation options are described in more detail below:

-
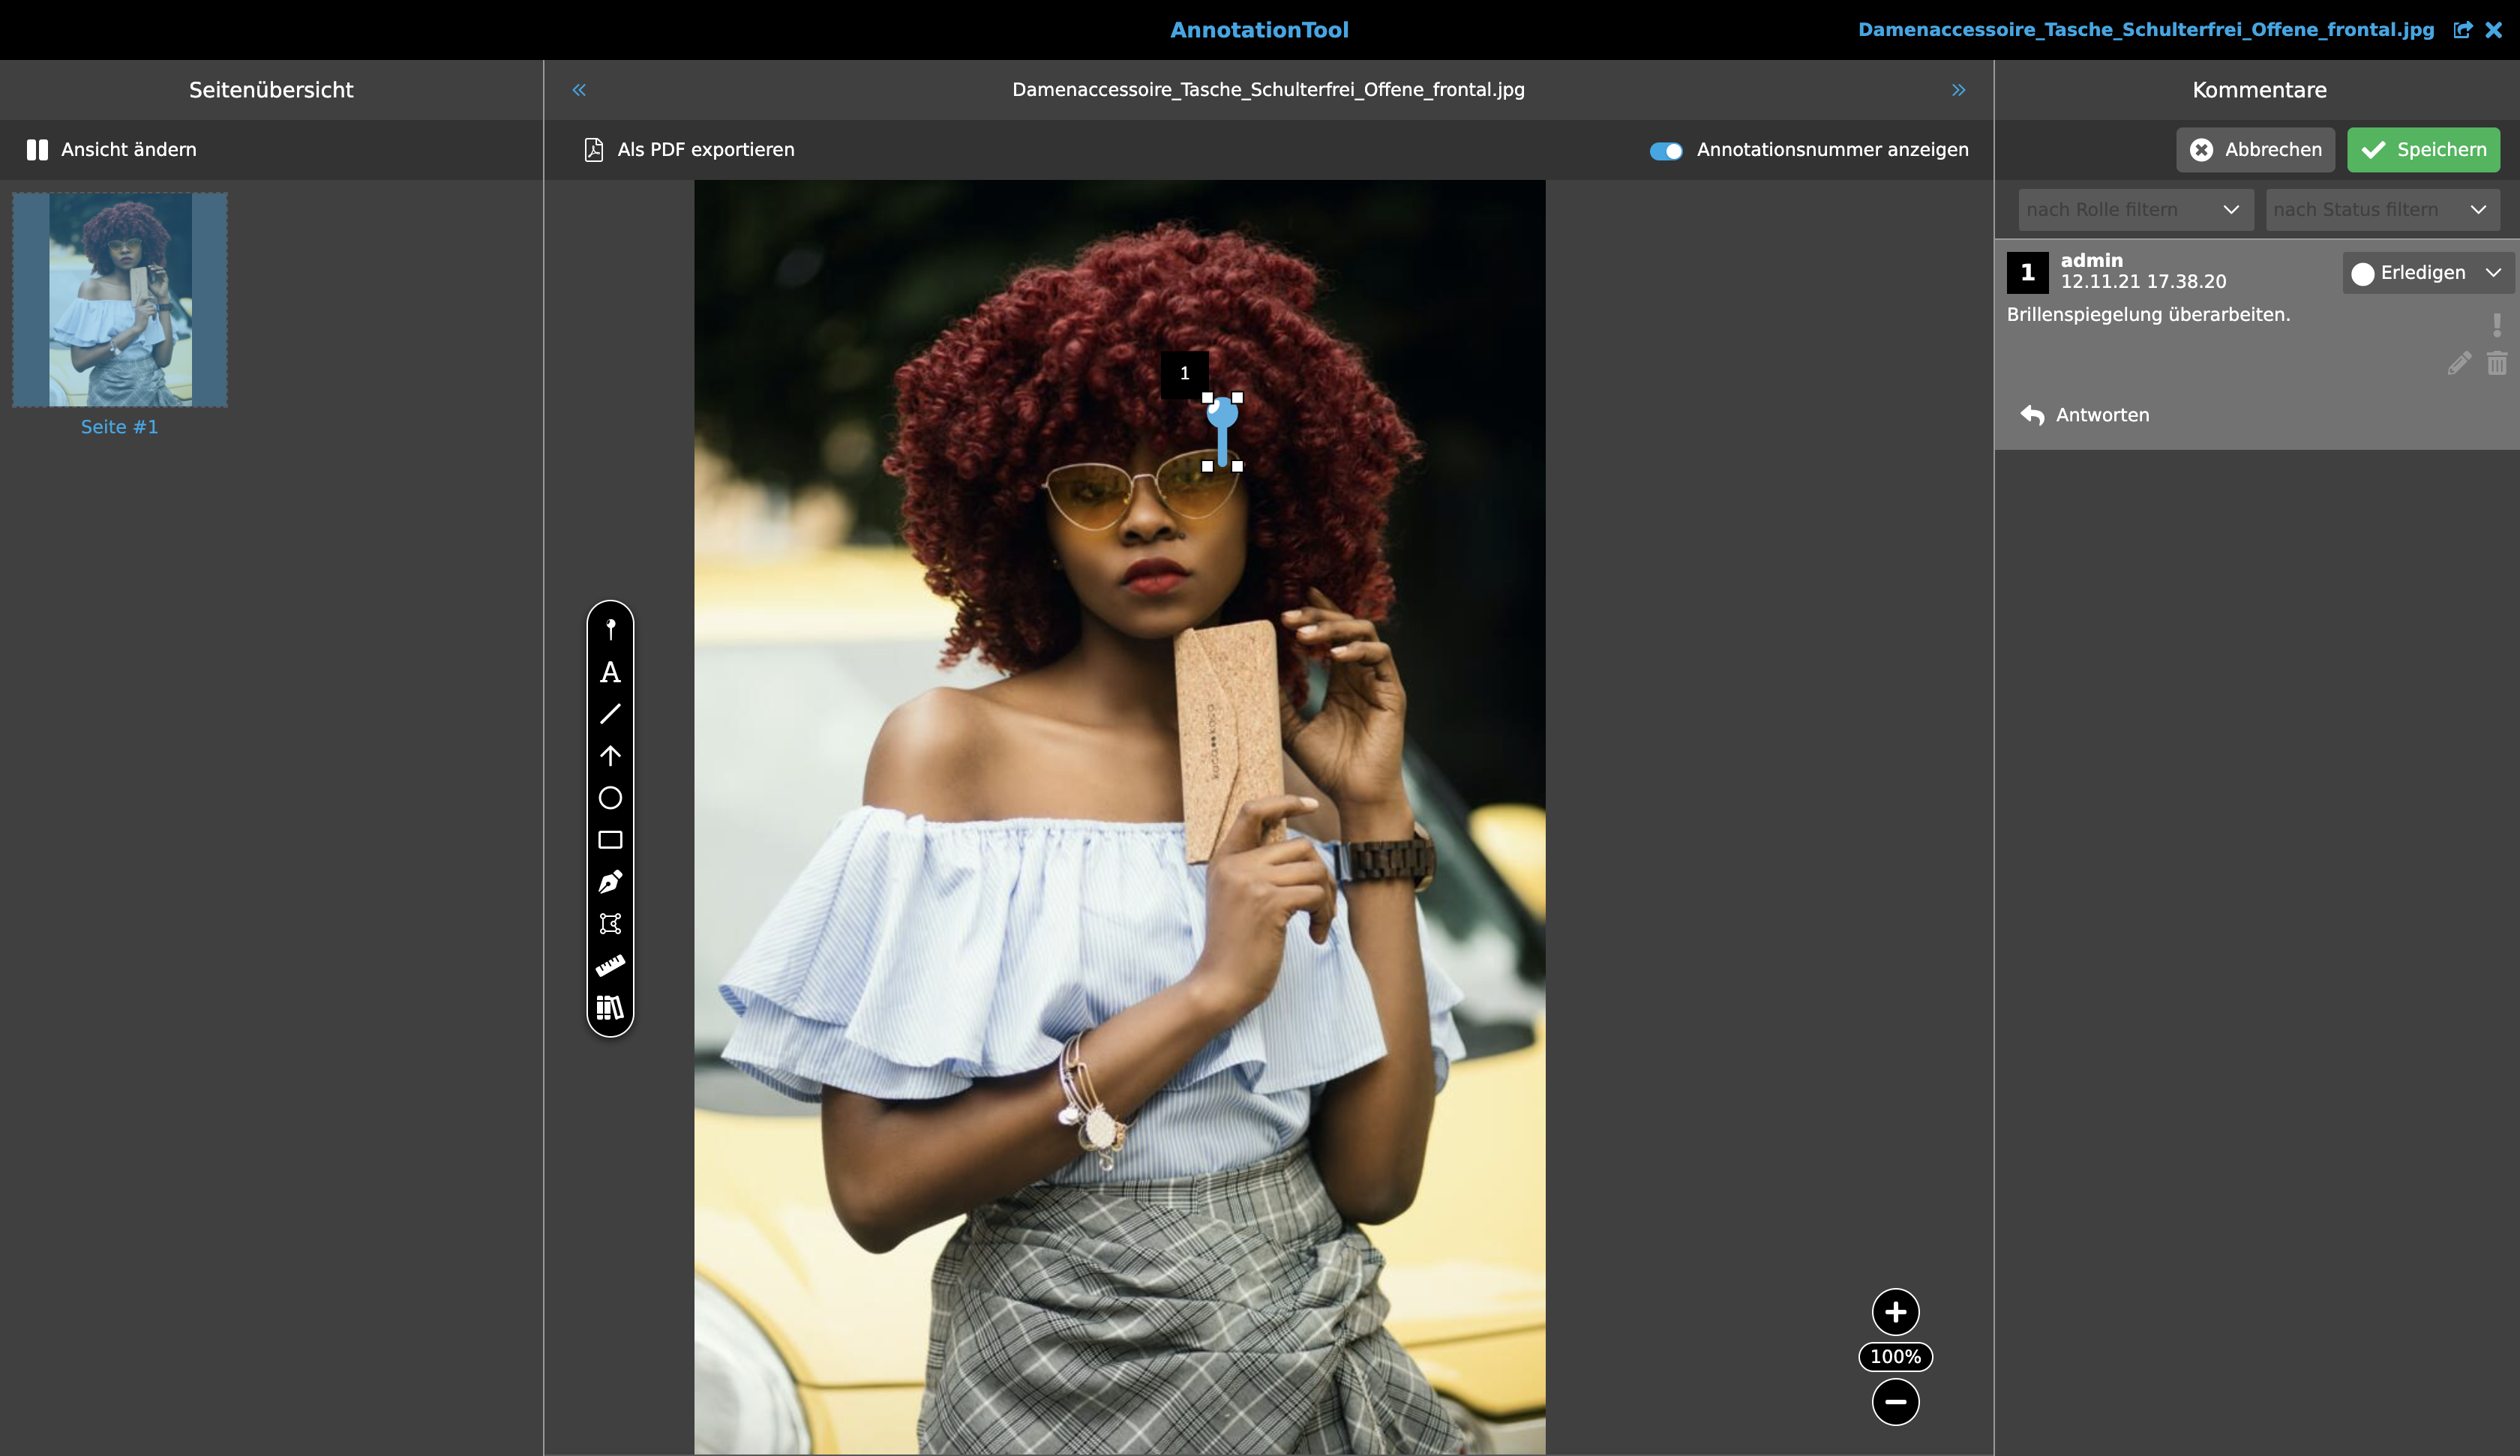
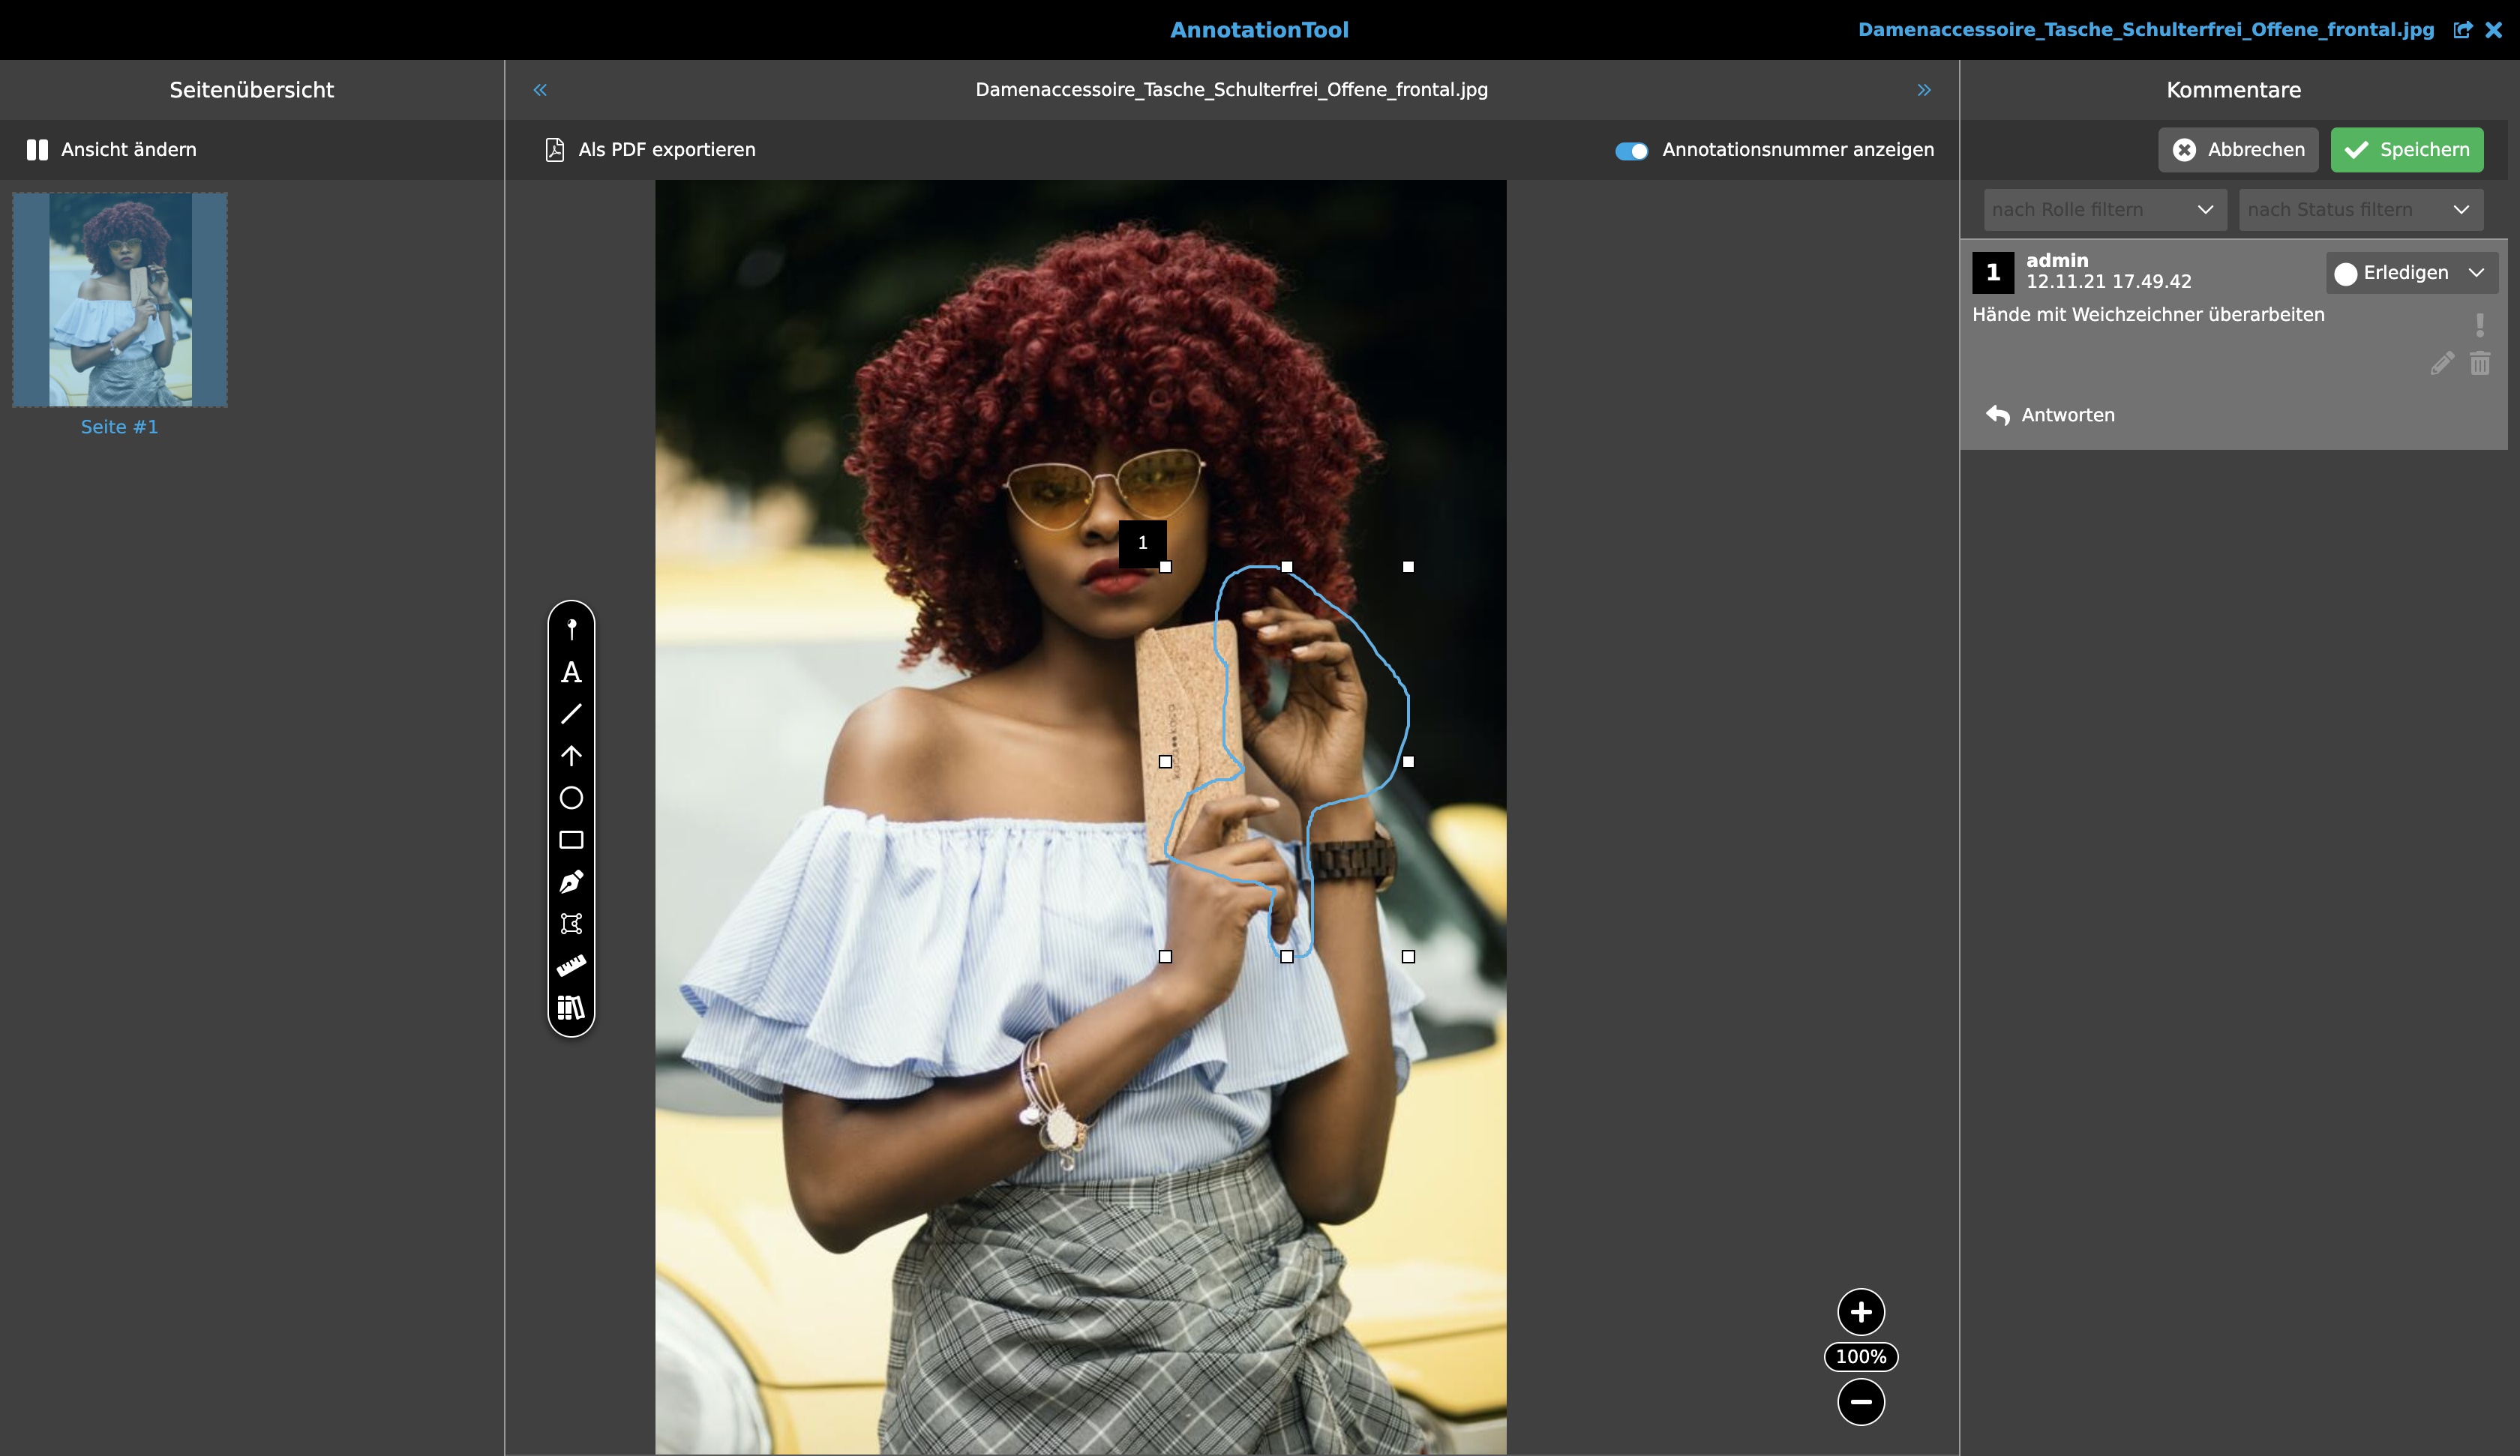
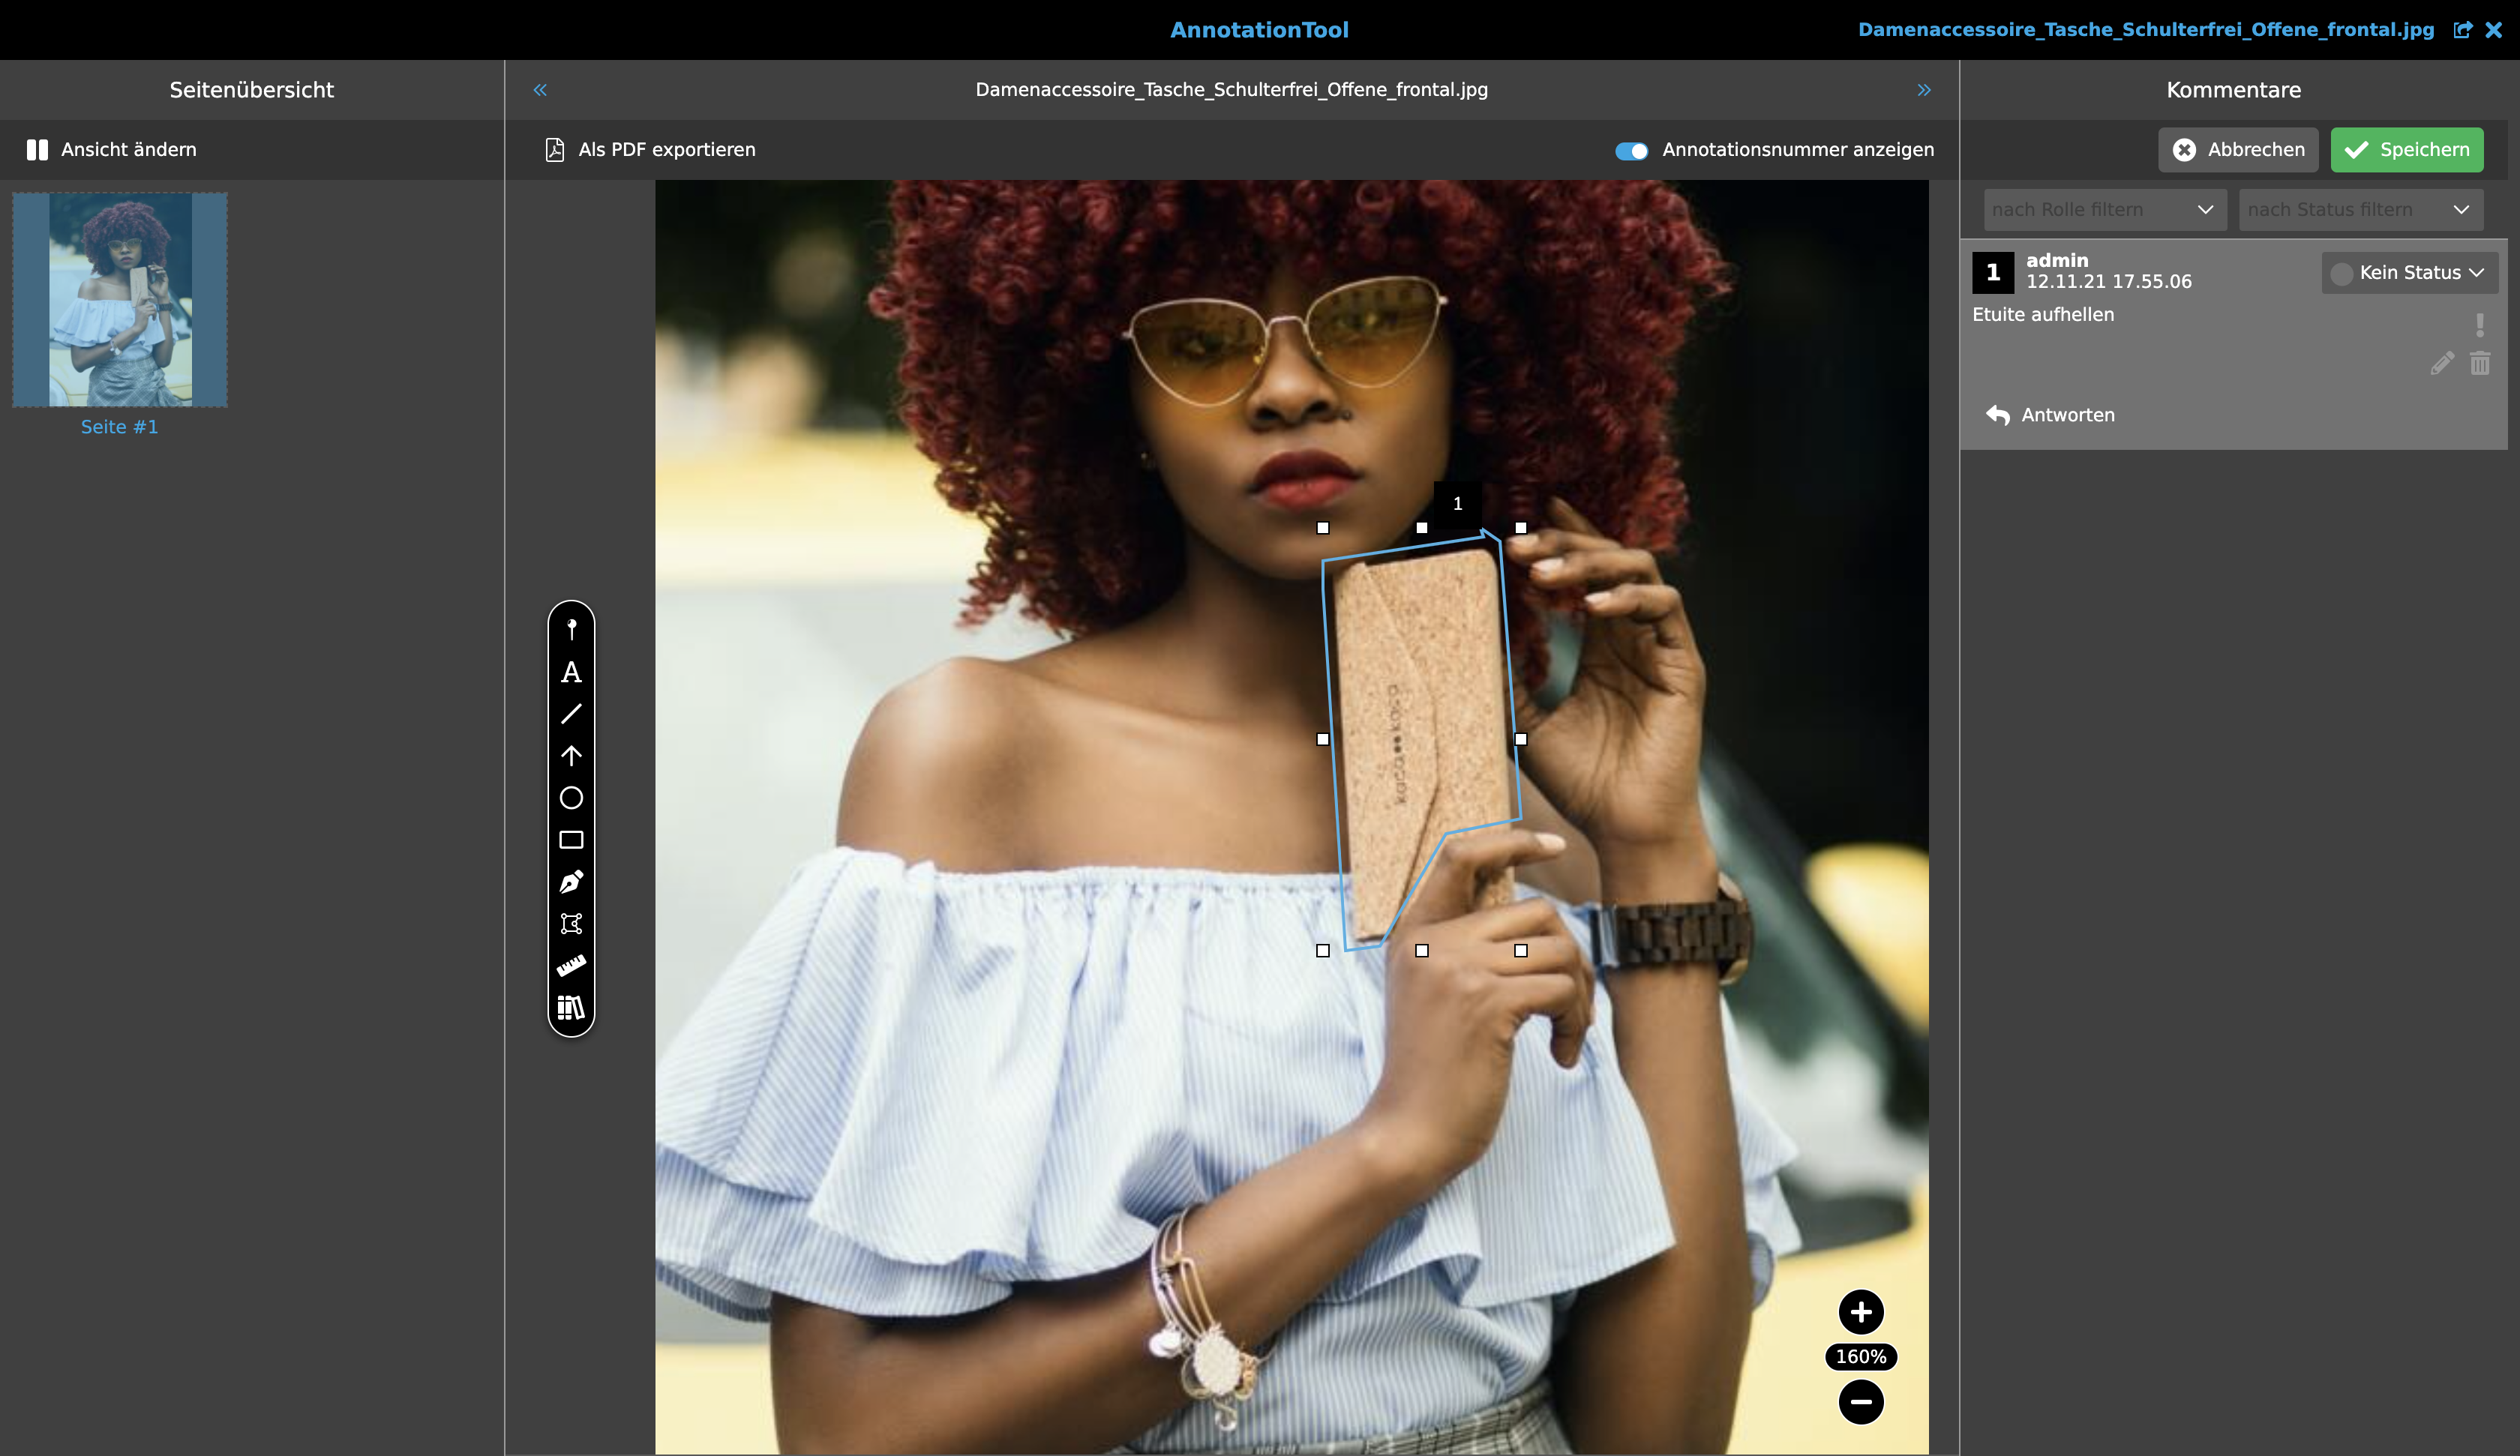
Annotation: This tool provides a pin that can be placed individually on the document page. By clicking on the pin, a simple dialogue appears to enter text. This is not visible in the document, but is noted in the right column. The pin is positioned by clicking and dragging it to the desired location.
-
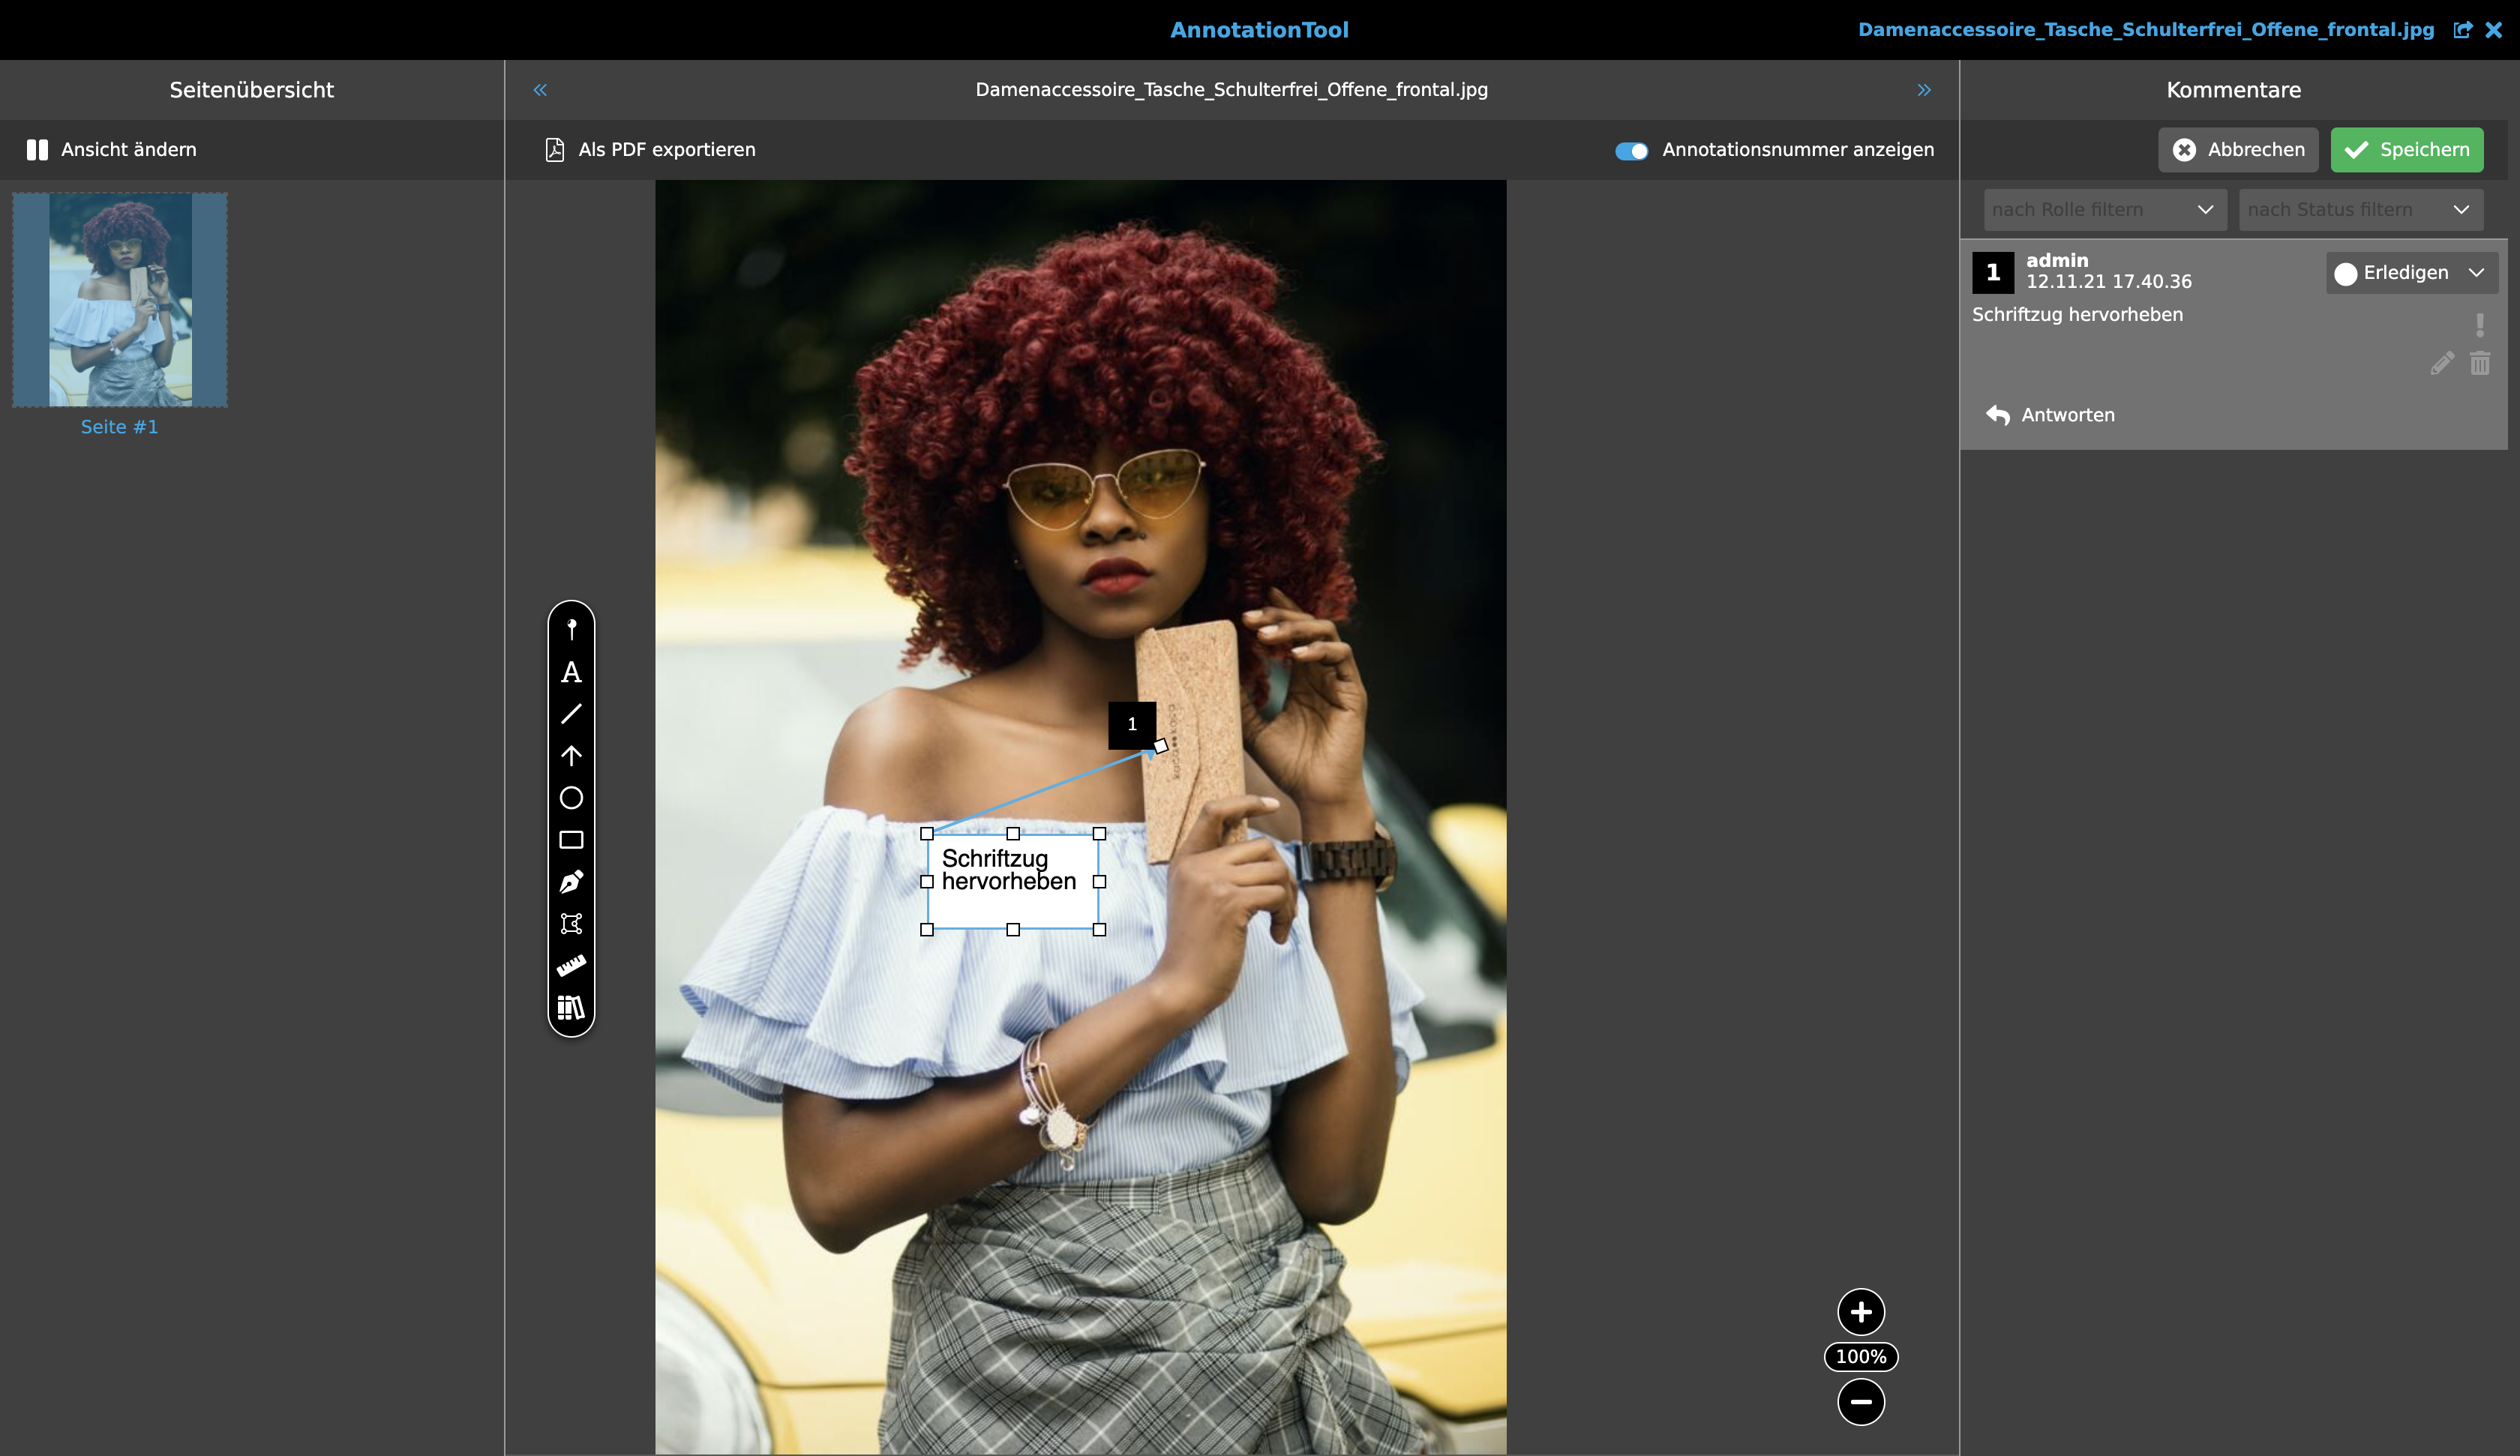
Text Callout: This can be used to open a text field that has an arrow in the upper left corner. Text can be entered directly into the text field, which also appears in the right column. The text field itself has eight grip points, and another one has the arrowhead. The shape is positioned by clicking on the edge and dragging it to the desired position.
-
Line: A simple straight line can be drawn on the document page. It has a starting point and an end point that can be changed afterwards. Overall, the line can be moved to another position by clicking and dragging. Direct labelling of the line is not possible, but text can be entered via the right column.
-
Arrow: This tool offers the same functionality as the line tool, but has an arrowhead at one end of the line. The arrowhead is always where the mouse is placed to draw the arrow.

-
Circle: This tool offers the same functionality as the rectangle tool, but creates a circle. This is not automatically symmetrical. It is therefore also suitable for displaying ellipses. Text cannot be added in the circle, but only in the right column. The circle has eight grip points for subsequent deformation and can be rotated around its centre via a further grip point outside the circle. The shape is positioned by clicking on the edge and dragging it to the desired position.

-
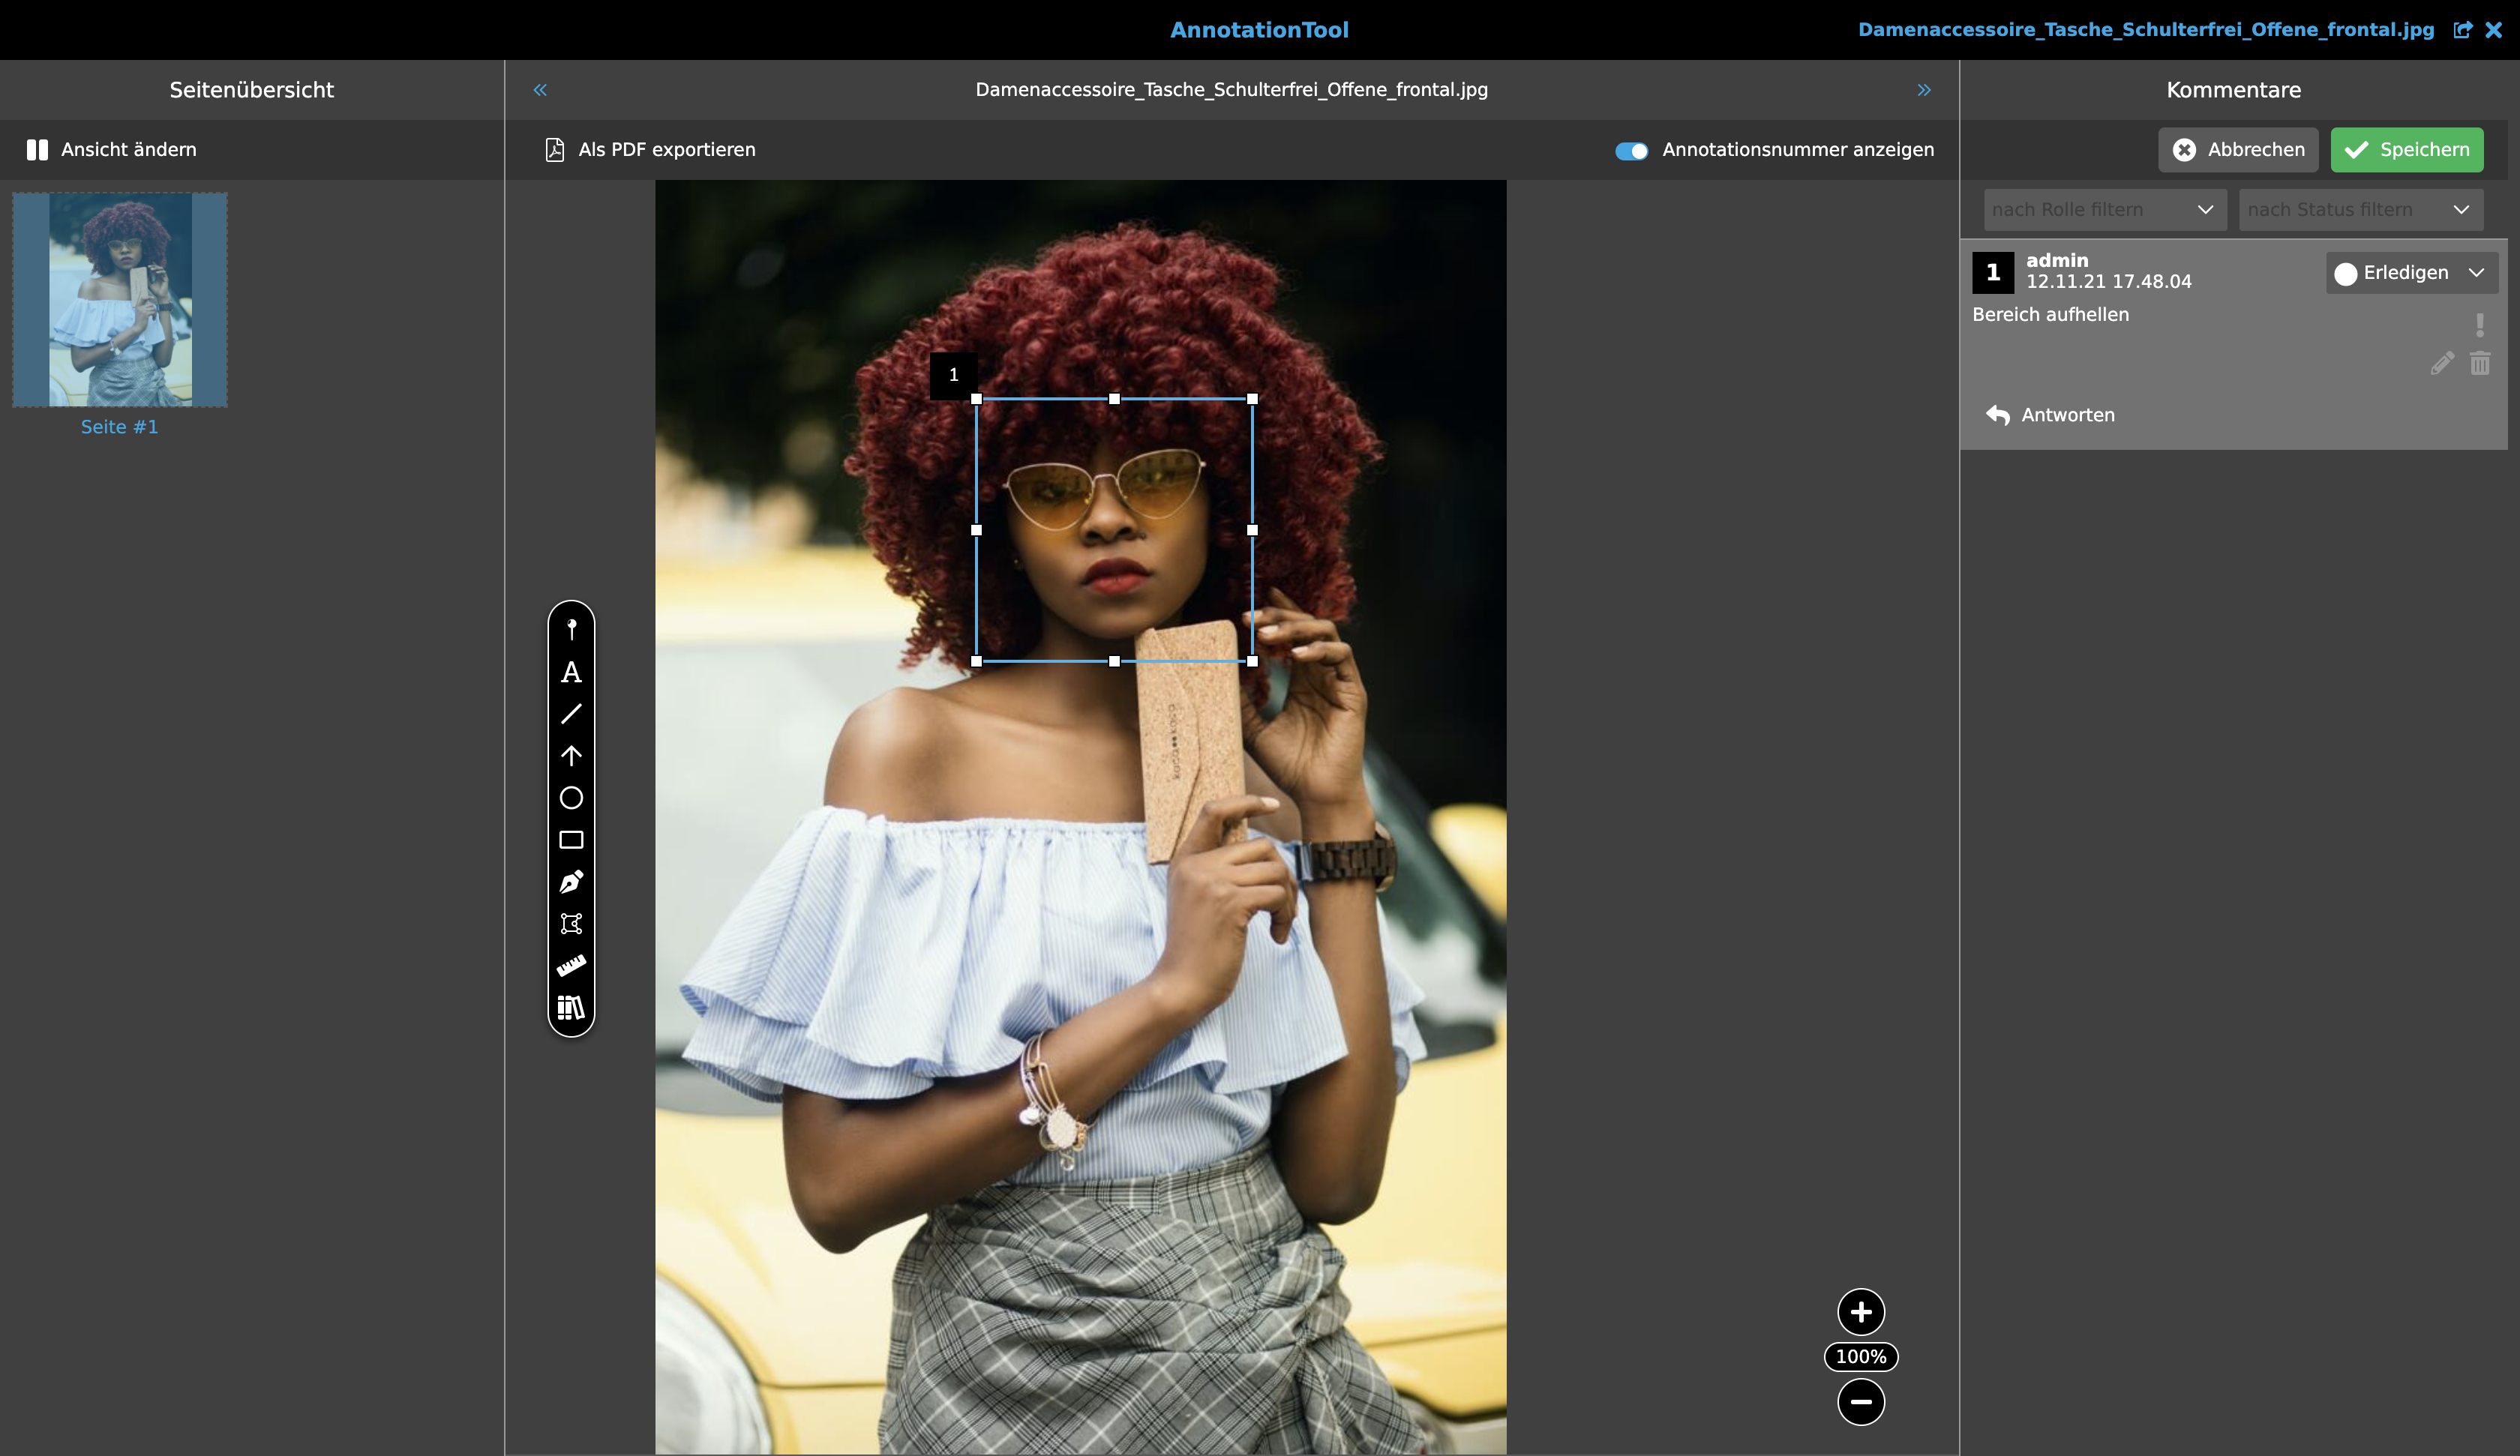
Rectangle: This can be used to draw a simple rectangle on the document page. Text cannot be written directly into the shape, but can be added in the right column. It consists of eight grip points that allow subsequent resizing or stretching or compressing in horizontal or vertical direction. In addition, there is a further grip point outside the rectangle that can be used to rotate the rectangle around its centre. The shape is positioned by clicking on the edge and dragging it to the desired position.
-
Free Hand: Selecting this tool allows you to draw freehand on the document page. The resulting line is oriented to the mouse pointer. In this way, individual shapes can be created. Text is entered via the right column. The shape can be resized, stretched or compressed horizontally and vertically using four points of attack. The shape is positioned by clicking on the edge and dragging it to the desired position.
-
Polyline: This allows you to create a line with corners. By clicking in the document page, you define the starting point. Each subsequent click defines a corner point of the line. Text entries are only possible via the right column. The size and shape of the line can be changed subsequently via its corner points or grip points. The shape is positioned by clicking on the edge and dragging it to the desired position.
-
Measure: This tool provides a measuring tool. The first click on the document page determines the starting point, the second the end point. The distance in between is indicated as distance. Measurements are not saved as annotation.
-
Icon from library: With a mouse click on this button, so-called icons from the asset library can be dragged and dropped onto the file or the document page to mark it.
-
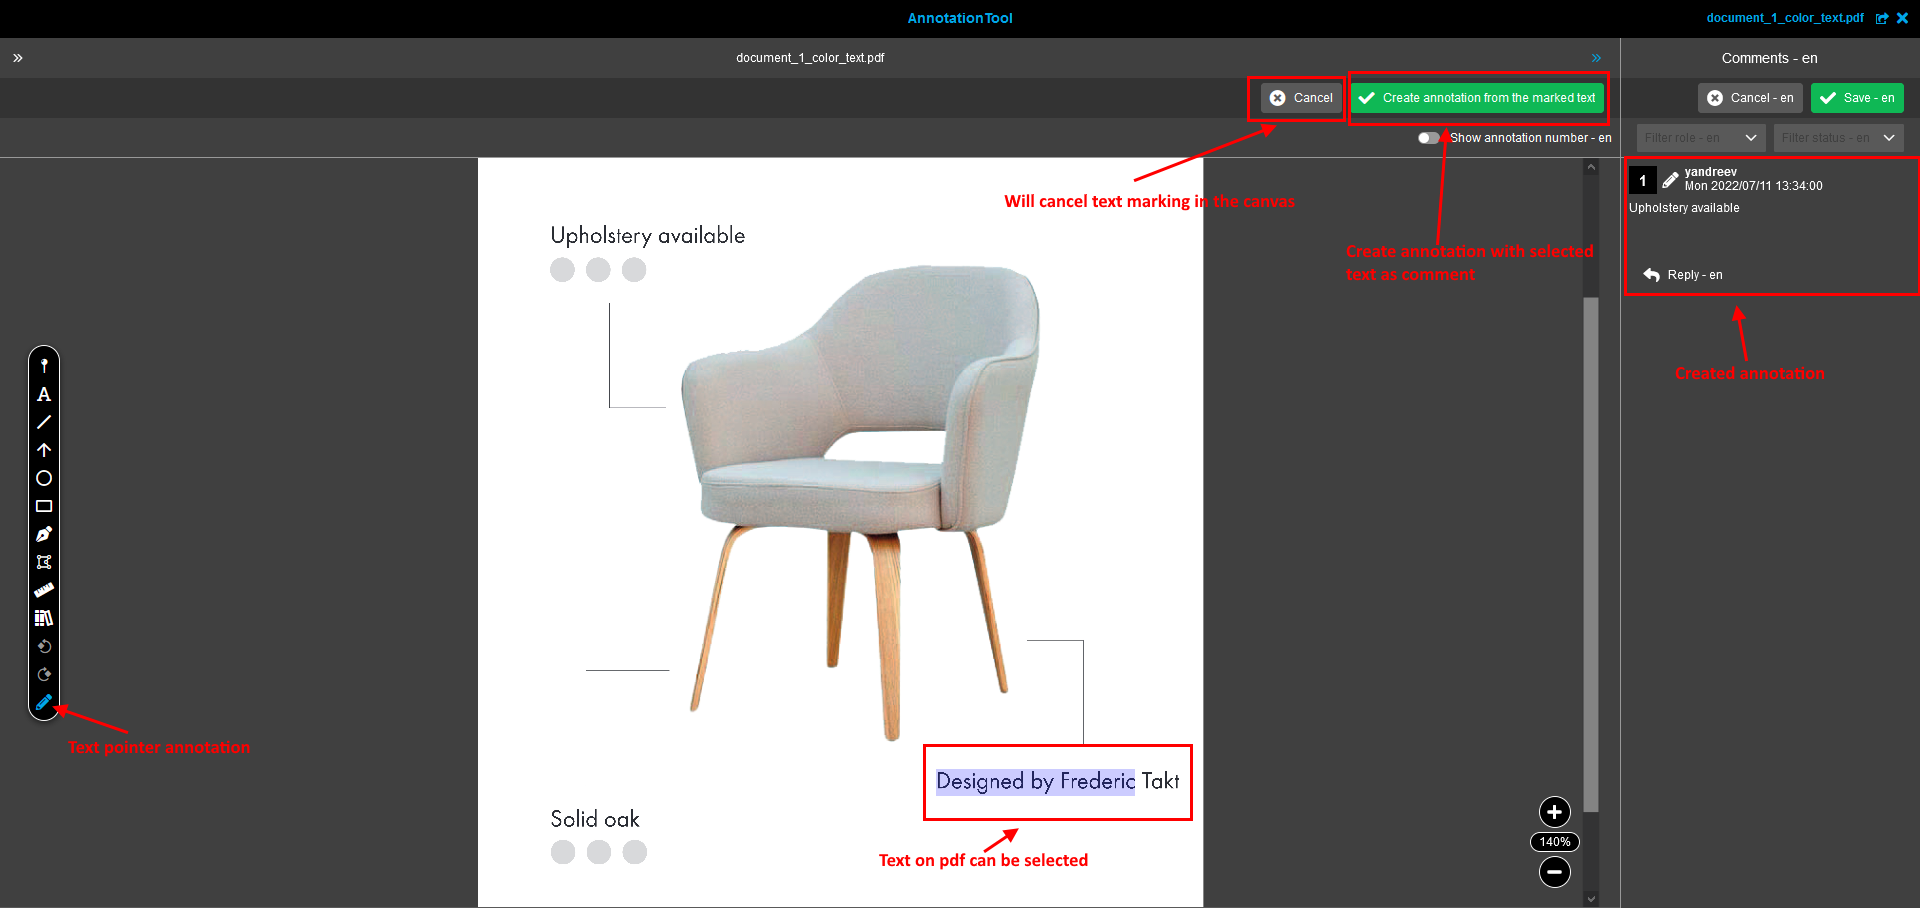
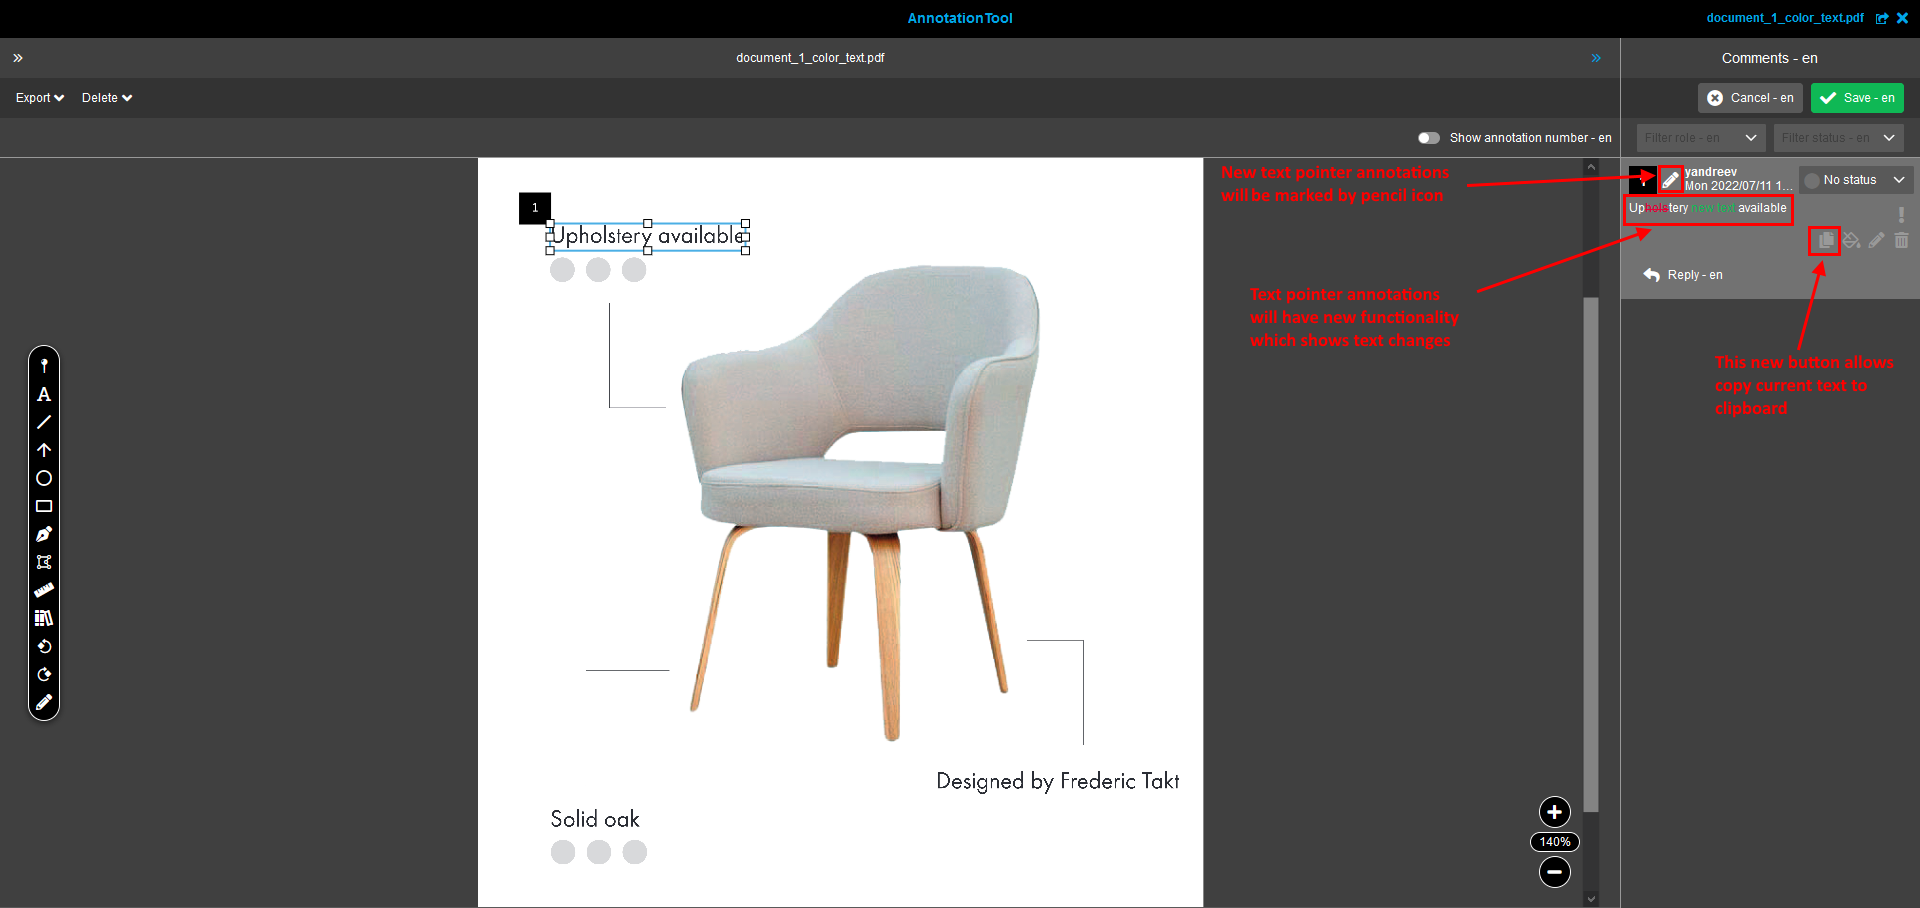
Text pointer: This tool provides a possibility to mark text on the pdf file. The marked text will be copied to new annotation as a comment. The functionality to show changes of the text of a comment was realized for the new text pointer annotation.
To edit an annotation afterwards, i.e. to change its size or position, you can select it with a simple mouse click on the annotation itself. The grip points then become visible. In addition, the corresponding element in the right column is marked by a frame.
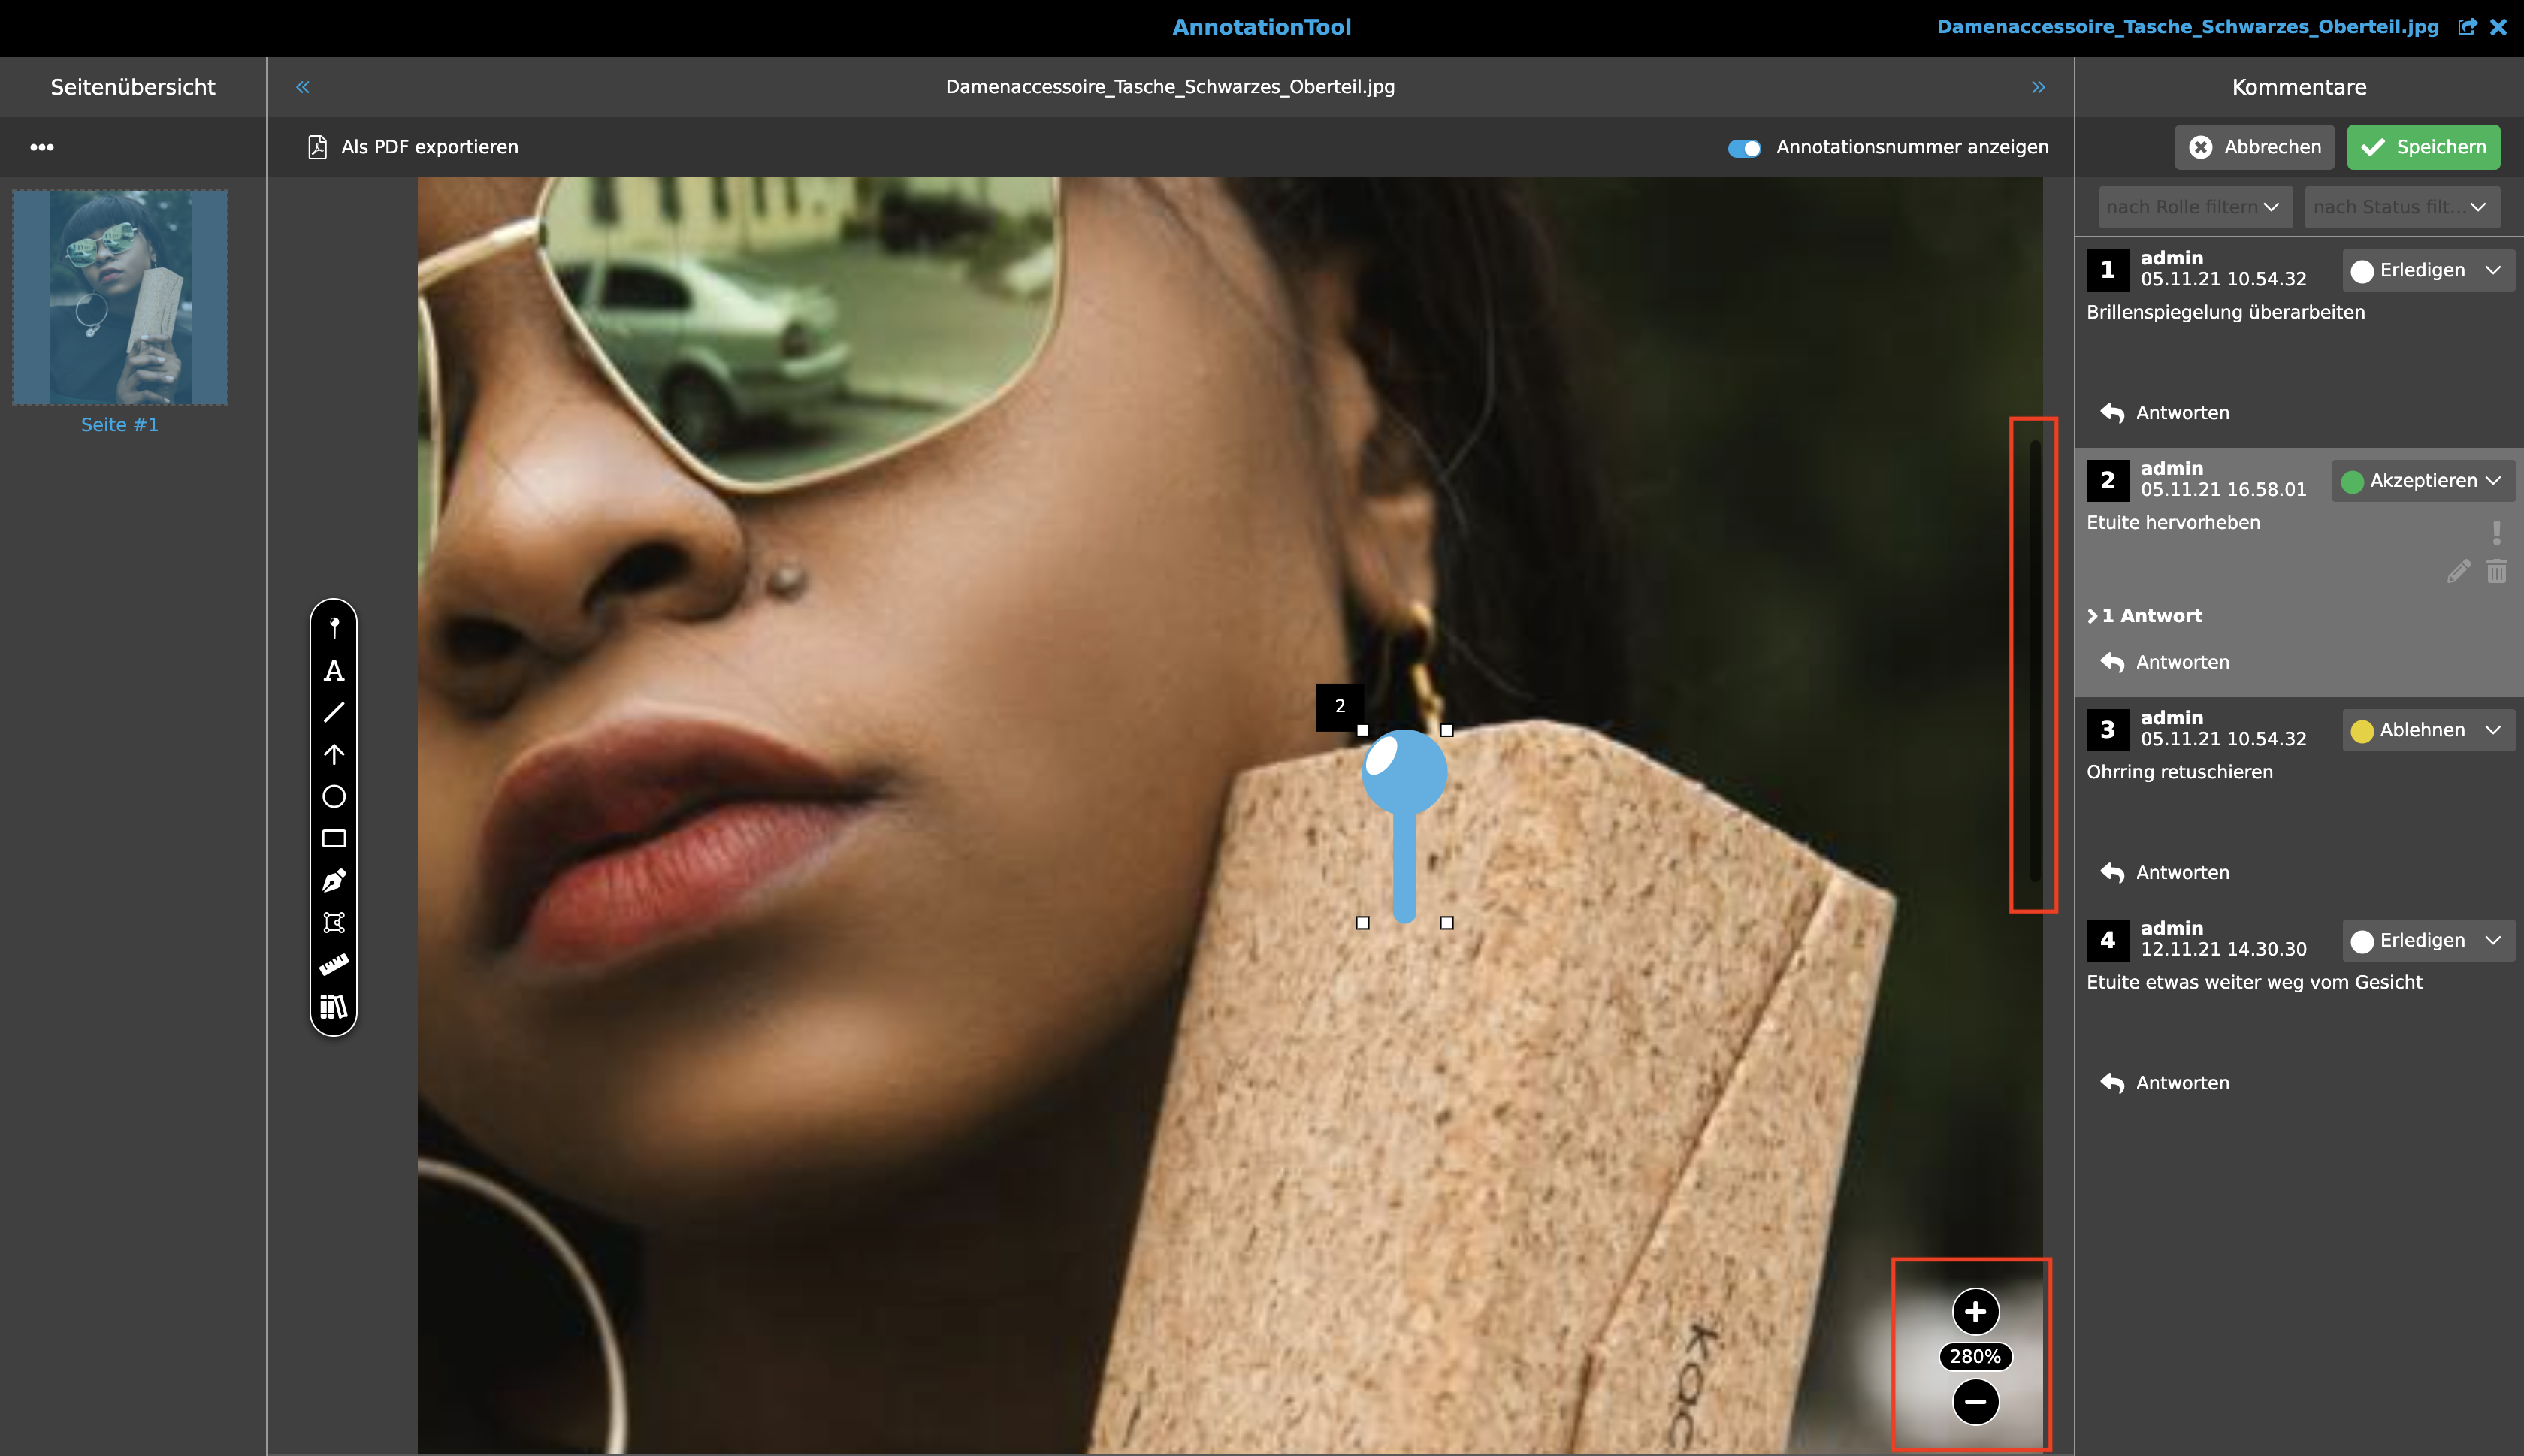
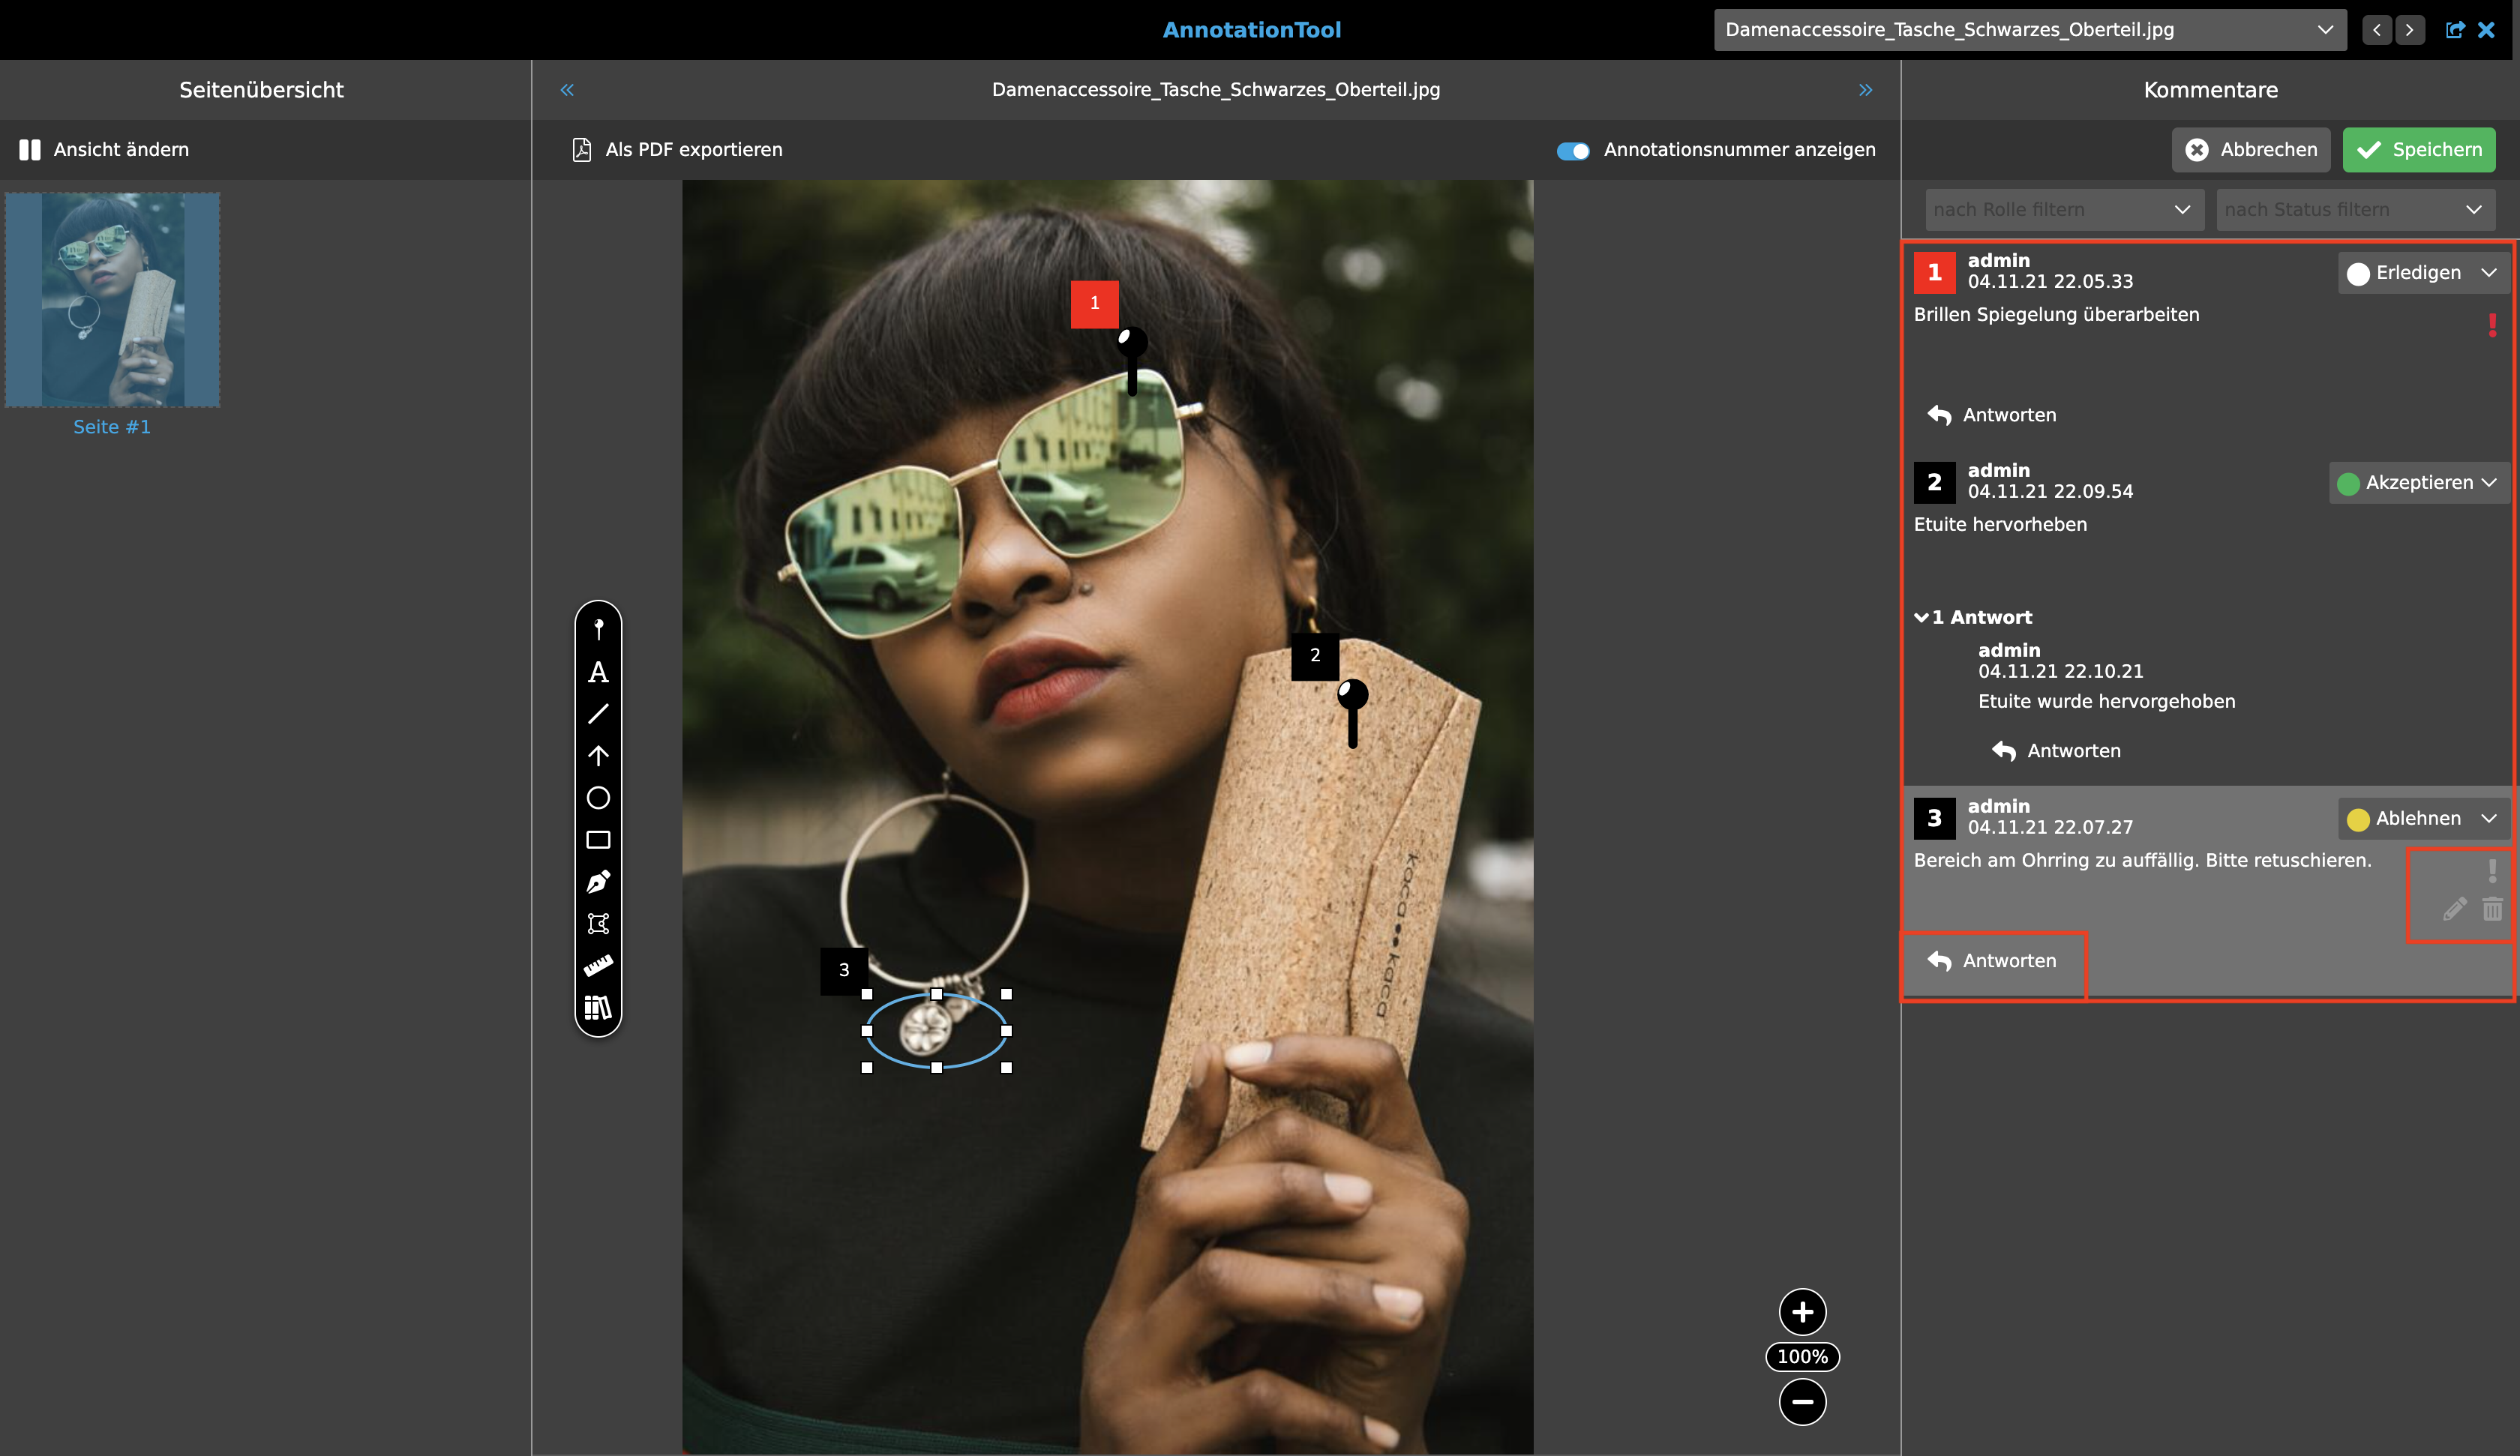
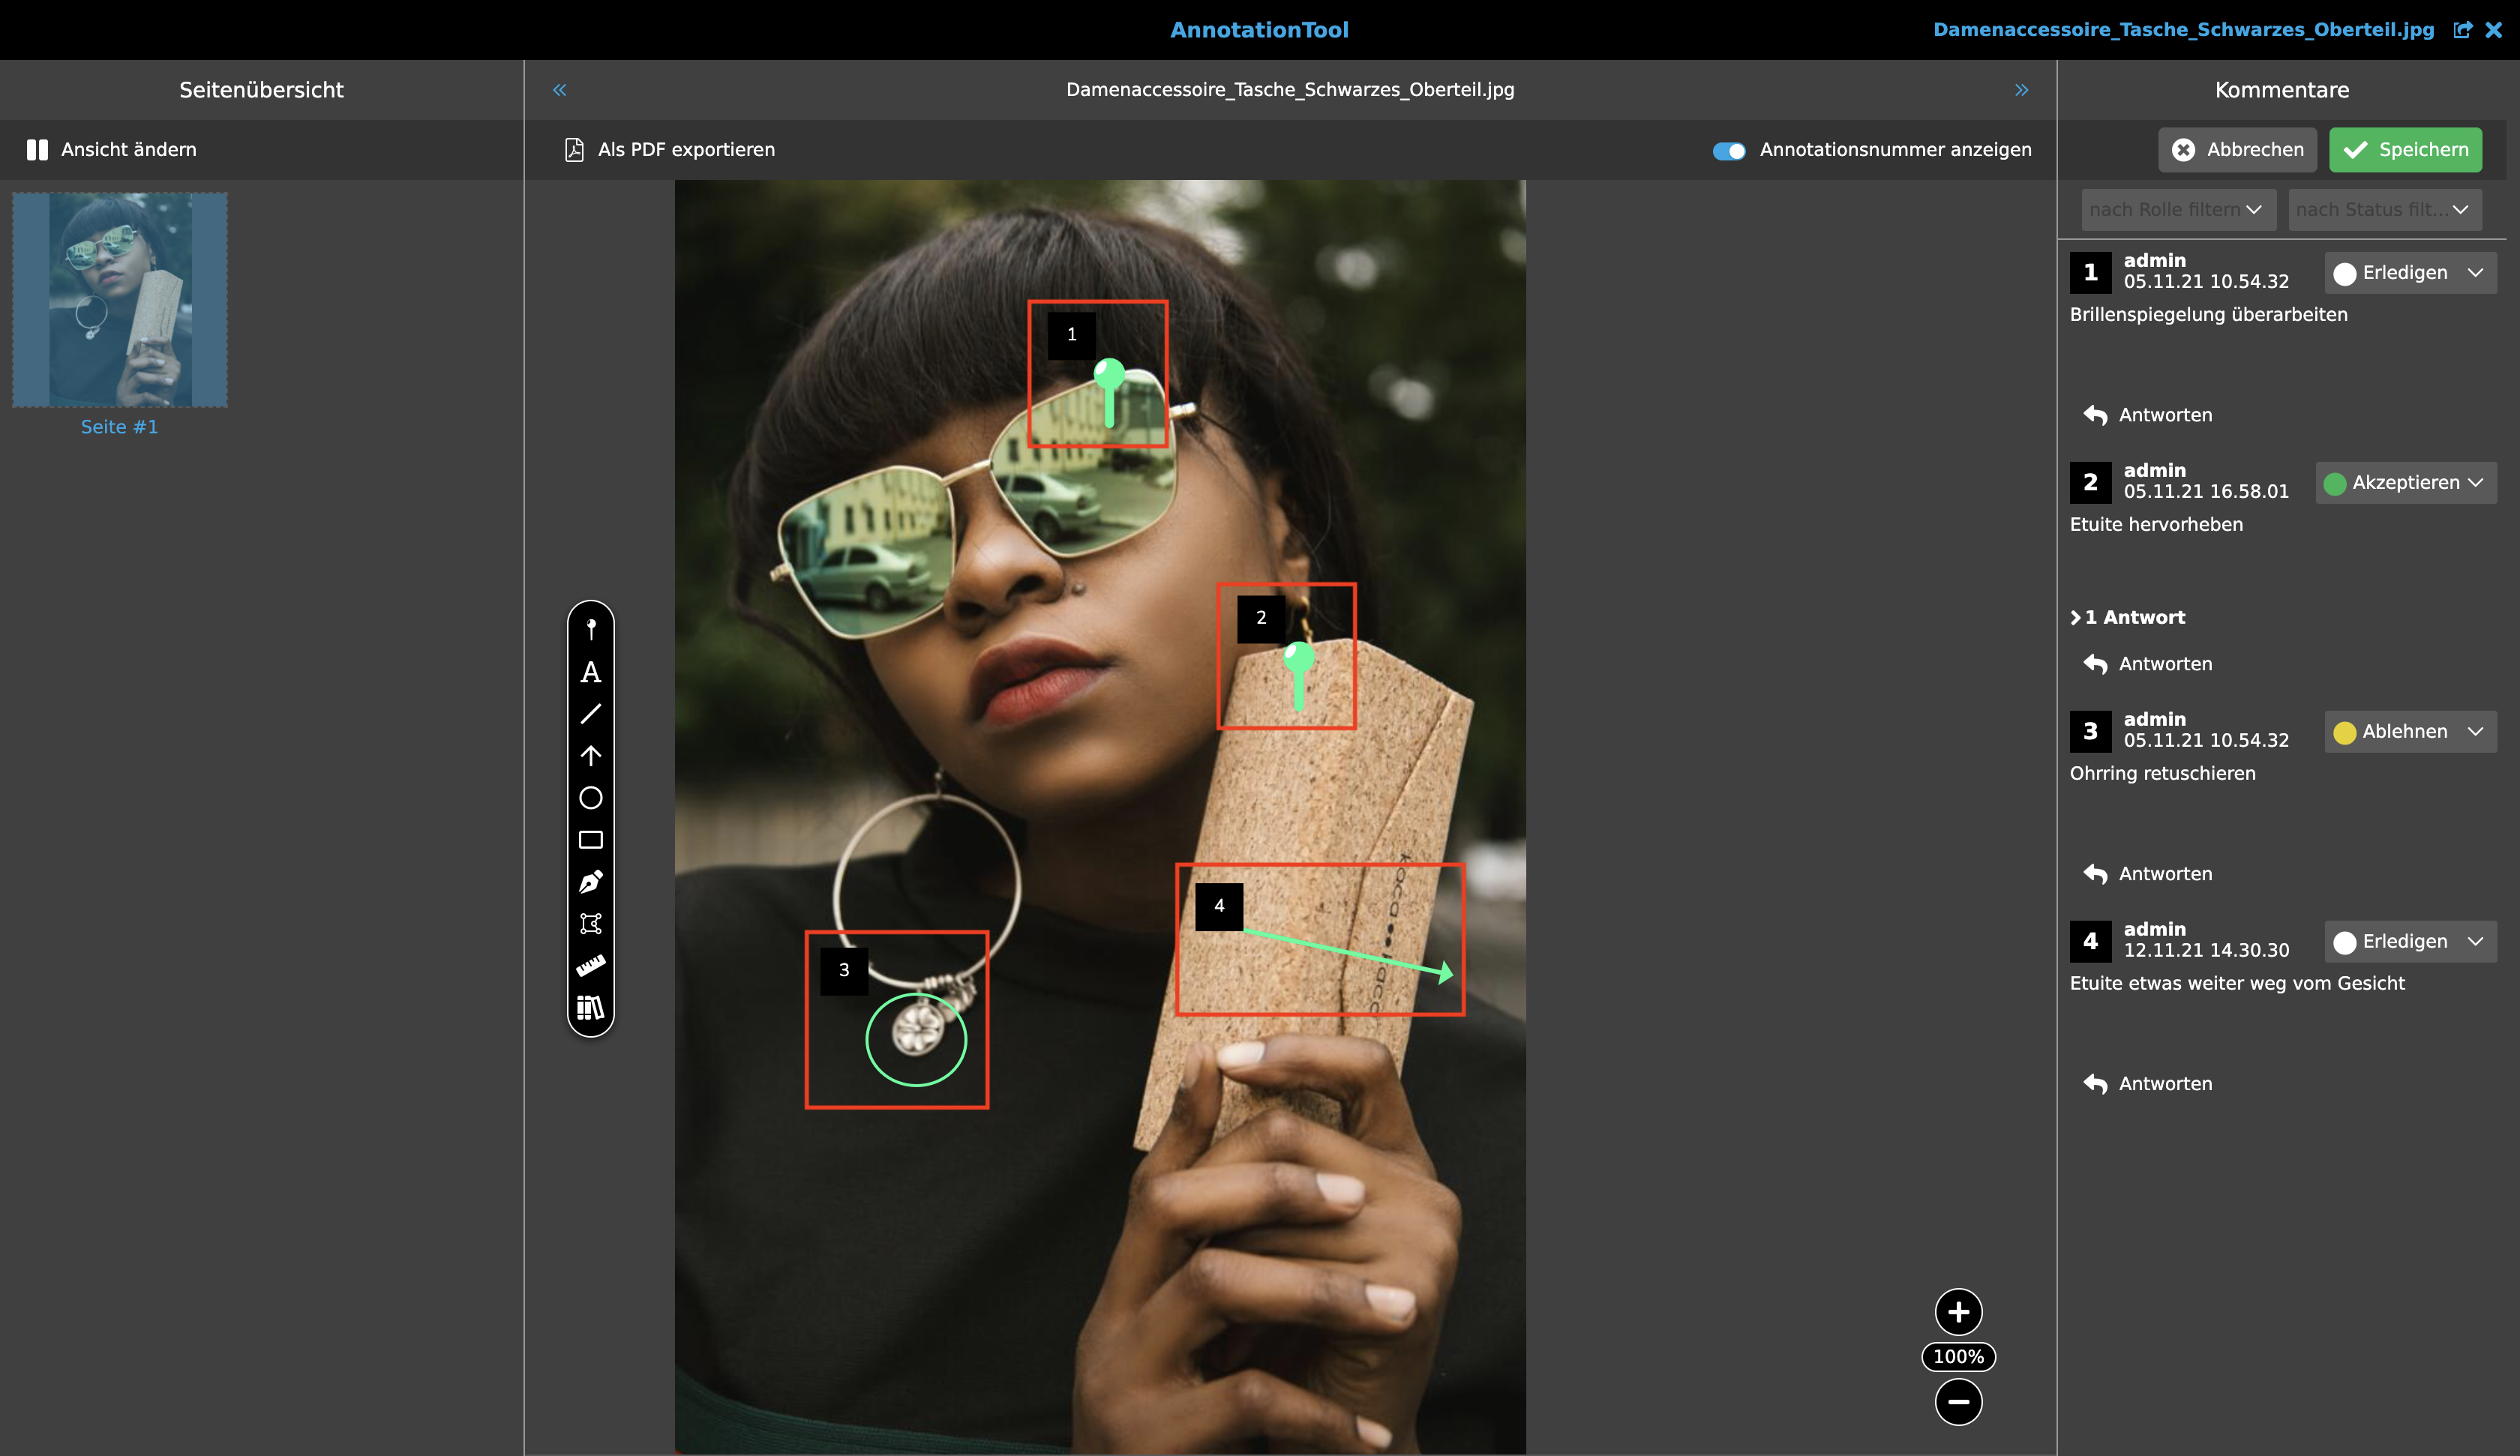
Annotation overview
The right column contains an overview of all annotations that have been made to the selected document page, as well as the Save and Cancel buttons. The annotation overview contains the date and time of creation as well as the name of the creator. If it is an annotation with text content, this is also displayed.

A drop-down list to the right of the author’s name can be used to assign a status to an annotation. A menu opens in which the following entries can be selected. The annotations have the following color code:
-
No status (grey circle): The annotation has no status.
-
Accepted (Green circle): The annotation or task noted in the annotation has been accepted.
-
Cancelled (Red circle): This annotation has been cancelled.
-
Completed (White circle): This annotation can be considered completed.
-
Rejected (Yellow circle): The content of this annotation has been rejected.
A status can only be selected at the top level, i.e. directly in the annotation. No answers can be accepted, rejected, cancelled or completed. Only replies can be made. The annotation status has no dependency or relevance for systemic release processes.
Four further options are available for all annotations and responses, with which they can be formatted and deleted. These are described in more detail below:
-
Edit: With this option, the text and optional response text can be added, changed and deleted.
-
Assign Role: As already mentioned in the Toolbar section, roles can be added here by annotation. The assigned person is then responsible for the annotation.
-
Set priority: Priorities can be set for the annotations by clicking on the exclamation mark icon. This then appears in red and is therefore more conspicuous for the users.
-
Reply: Here you can enter a reply to an existing annotation. The name of the creator and the time of the answer with date and time are also included. The answer is displayed in hierarchical indentation directly below the corresponding annotation in the overview. Replies can be answered in turn. These are also inserted into the hierarchy accordingly. For clarity, the answers can be hidden and shown with the arrow symbol.
-
Delete: This option differentiates between annotation and answer:
-
If an annotation is selected and is to be deleted, it is completely removed from the document page.
-
If the user selects or deletes an answer, only the answer is removed from the right column, the annotation remains on the document page.
-
Change annotation colors
The colors of the annotations can be changed. This serves to distinguish the annotations of the users or to highlight certain annotations.
This can be selected in the user settings under color scheme, under editor settings. By selecting the square color area, the color selection window opens. Any colour can be selected here.
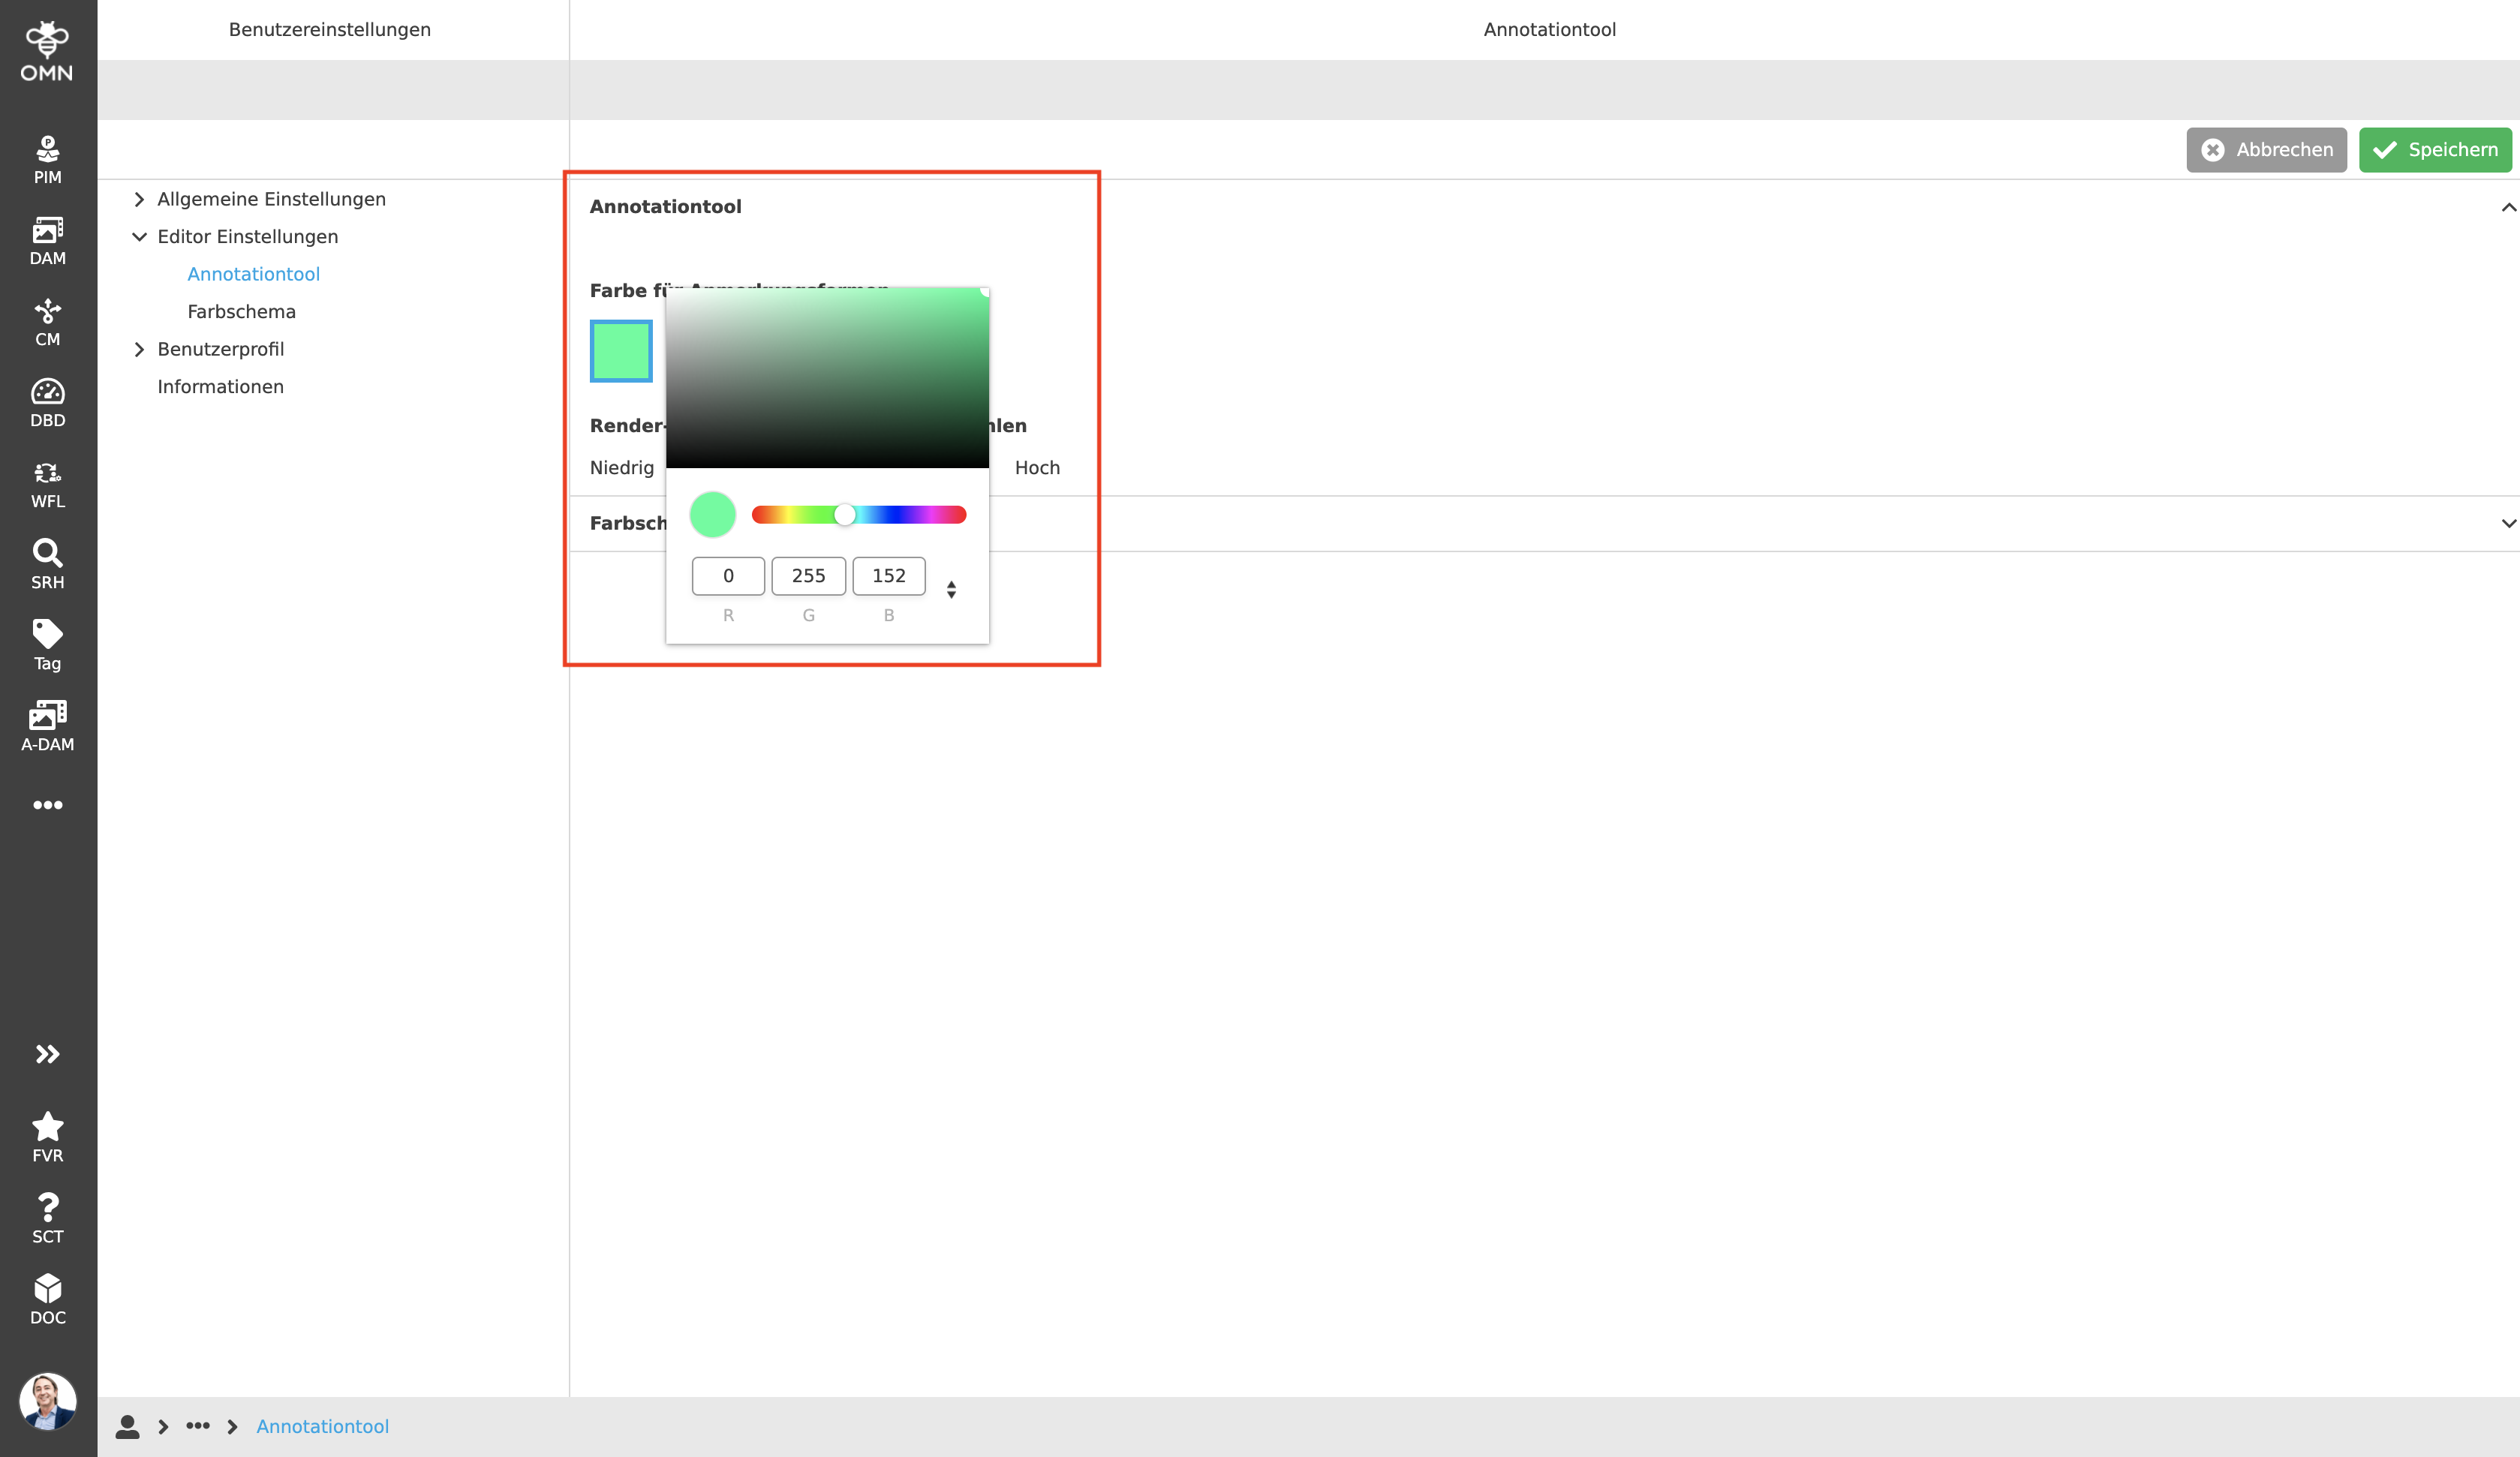
At last press save and the colour of the annotations are changed.
PDF-Formats
PDF.js is a cross-platform library for parsing and rendering PDF files that is written in HTML5.
According to the official PDF.js documentation, version 2.6 of the tool supports the following PDF formats:
-
PDF 1.7 (ISO 32000-1)
-
PDF 2.0 (ISO 32000-2)
-
PDF/A-1a, PDF/A-1b, PDF/A-2a, PDF/A-2b, PDF/A-2u, PDF/A-3a, PDF/A-3b, PDF/A-3u
-
PDF/X-1a:2001, PDF/X-3:2002, PDF/X-4, PDF/X-4p, PDF/X-5g, PDF/X-5pg
PDF.js currently only supports PDF documents based on the ISO 32000 specification.
Official Information about the library can be found under following links: