ArticleBriefing Configuration
General information
Can be found under UI Concepts and Requirements - Artikelbriefing
Configuration guide for ArticleBriefing
Several steps should be performed to configure the ArticleBriefing functionality:
Create ArticleBriefing plugin
-
Navigate to the back-end configuration
-
In the left view expand "Mandators" → "<Mandator name>" → "Functional plug-ins" → "ArticleBriefing"
-
Set a "Configuration identifier" in the corresponding field and click the "Create new configuration"-button.
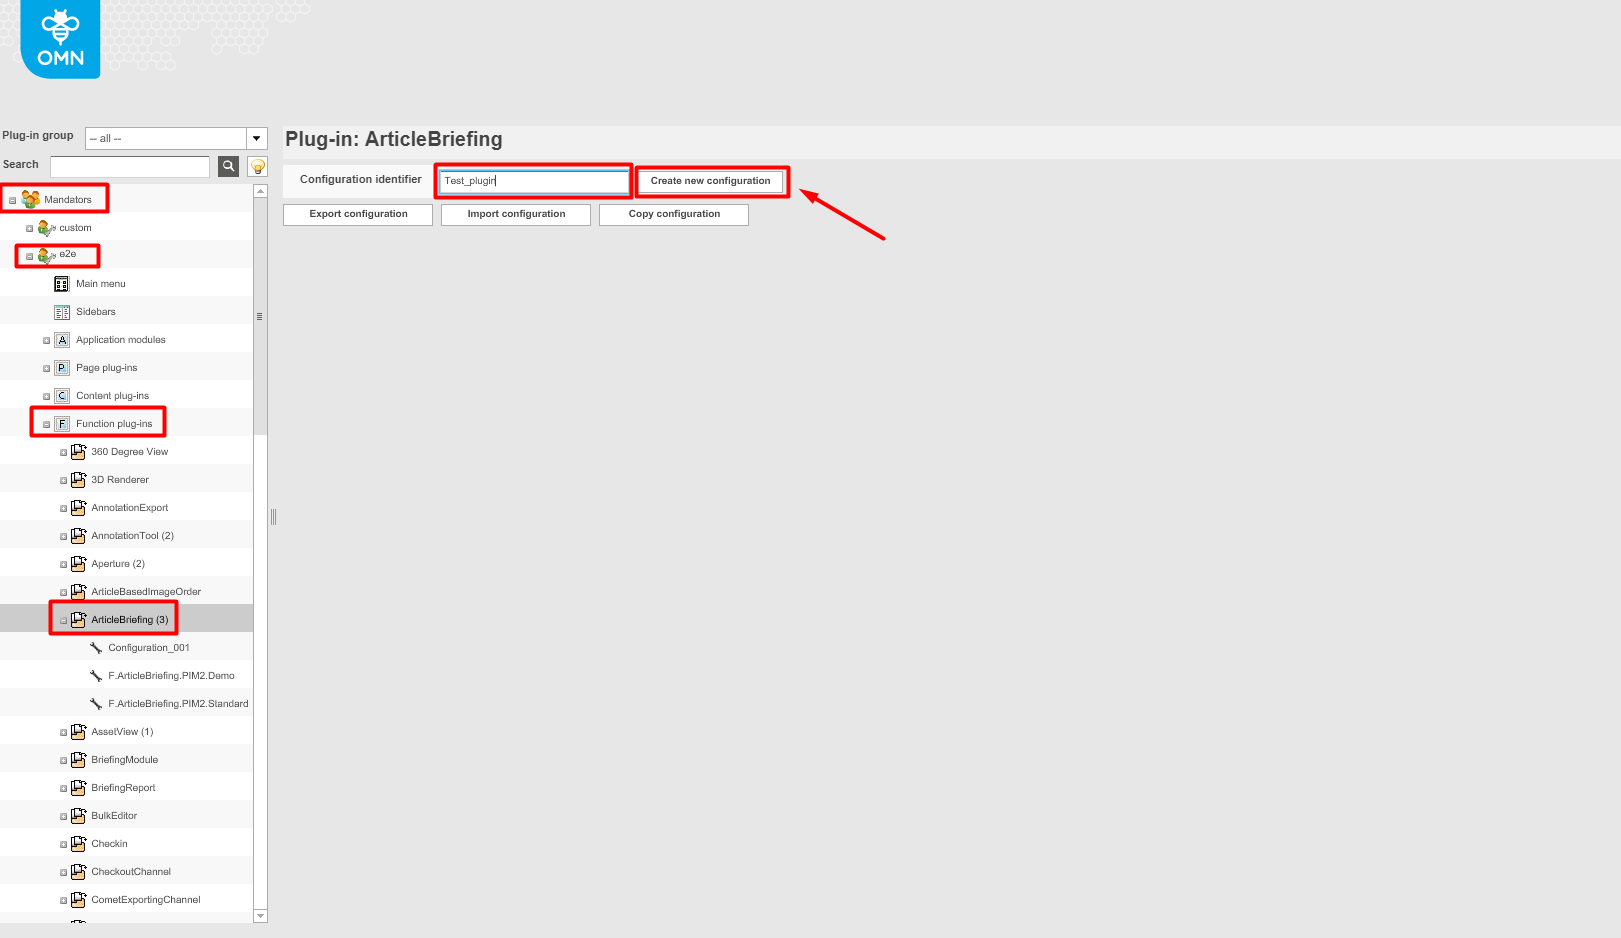
| It is possible to create several ArticleBriefing configurations Besides creating a configuration, the export, import, and copy of an Article Briefing configuration can be started from the creation page. |
Configure ArticleBriefing plugin
General Tab
After any of the previously created ArticleBriefing configurations is clicked on in the left menu General configuration tab opens in the right view.
Object type
Choose the required object type from the drop-down list.
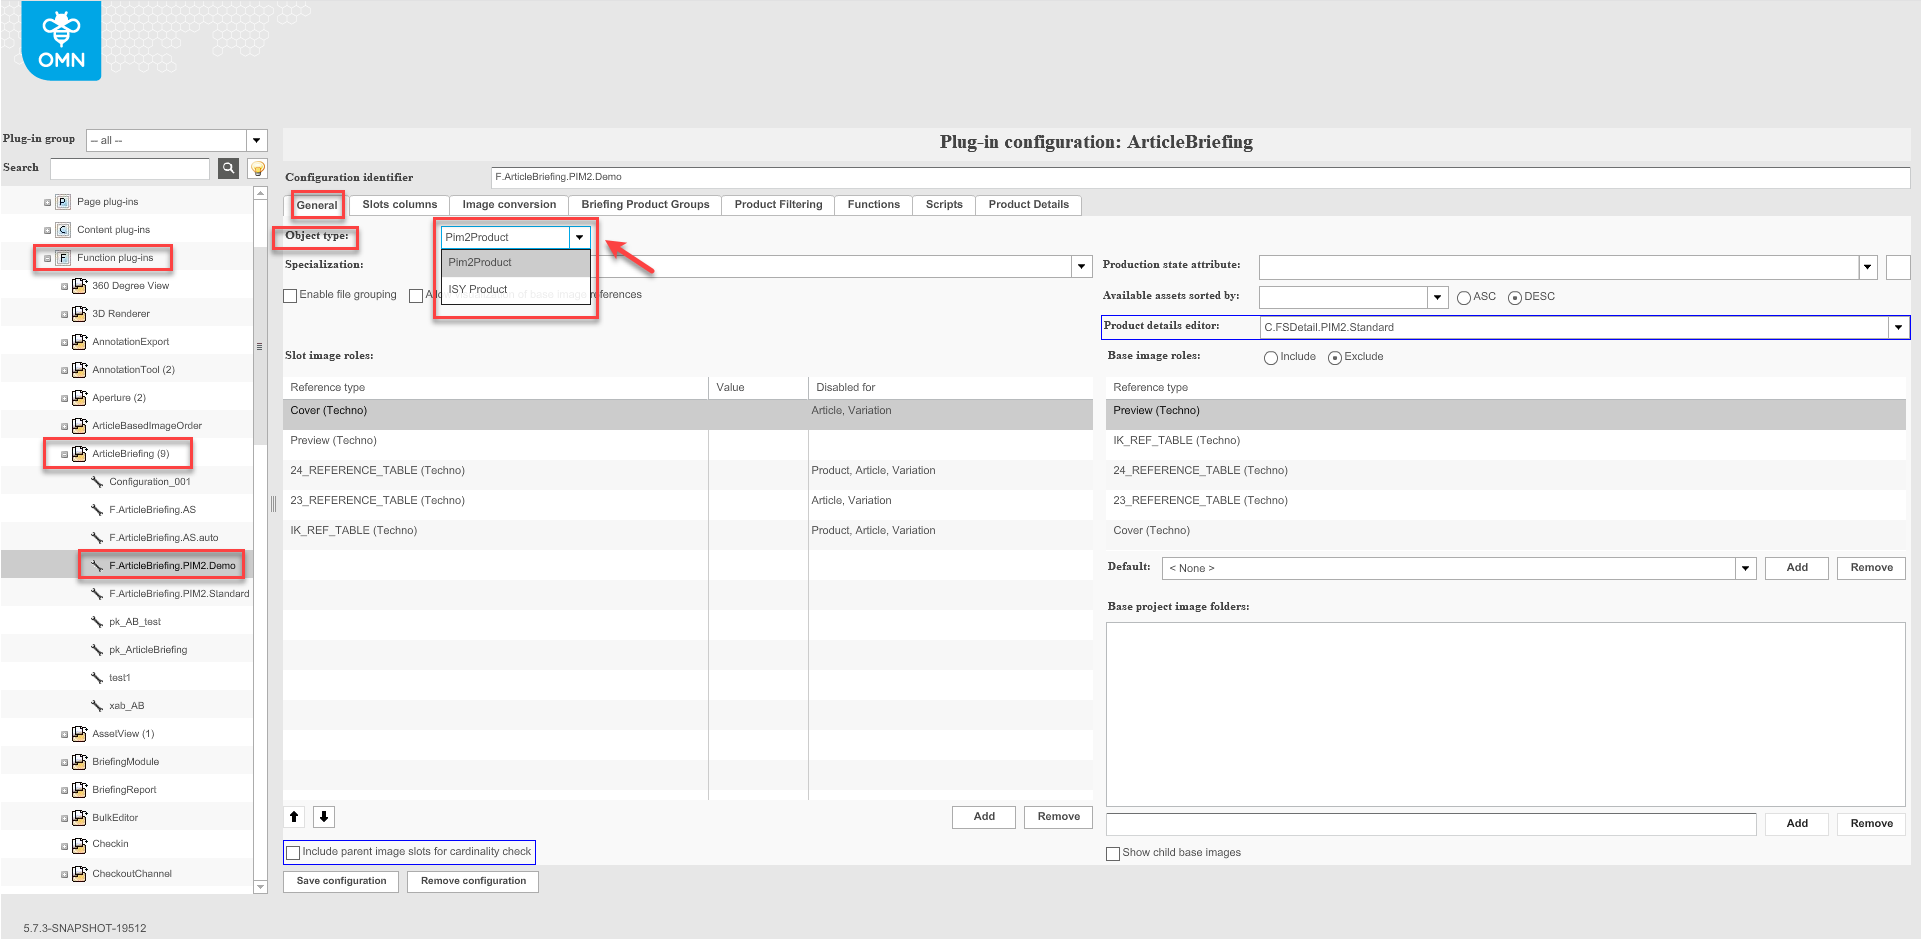
| Object type "ISY Product" is not supported for HTML 5 client. |
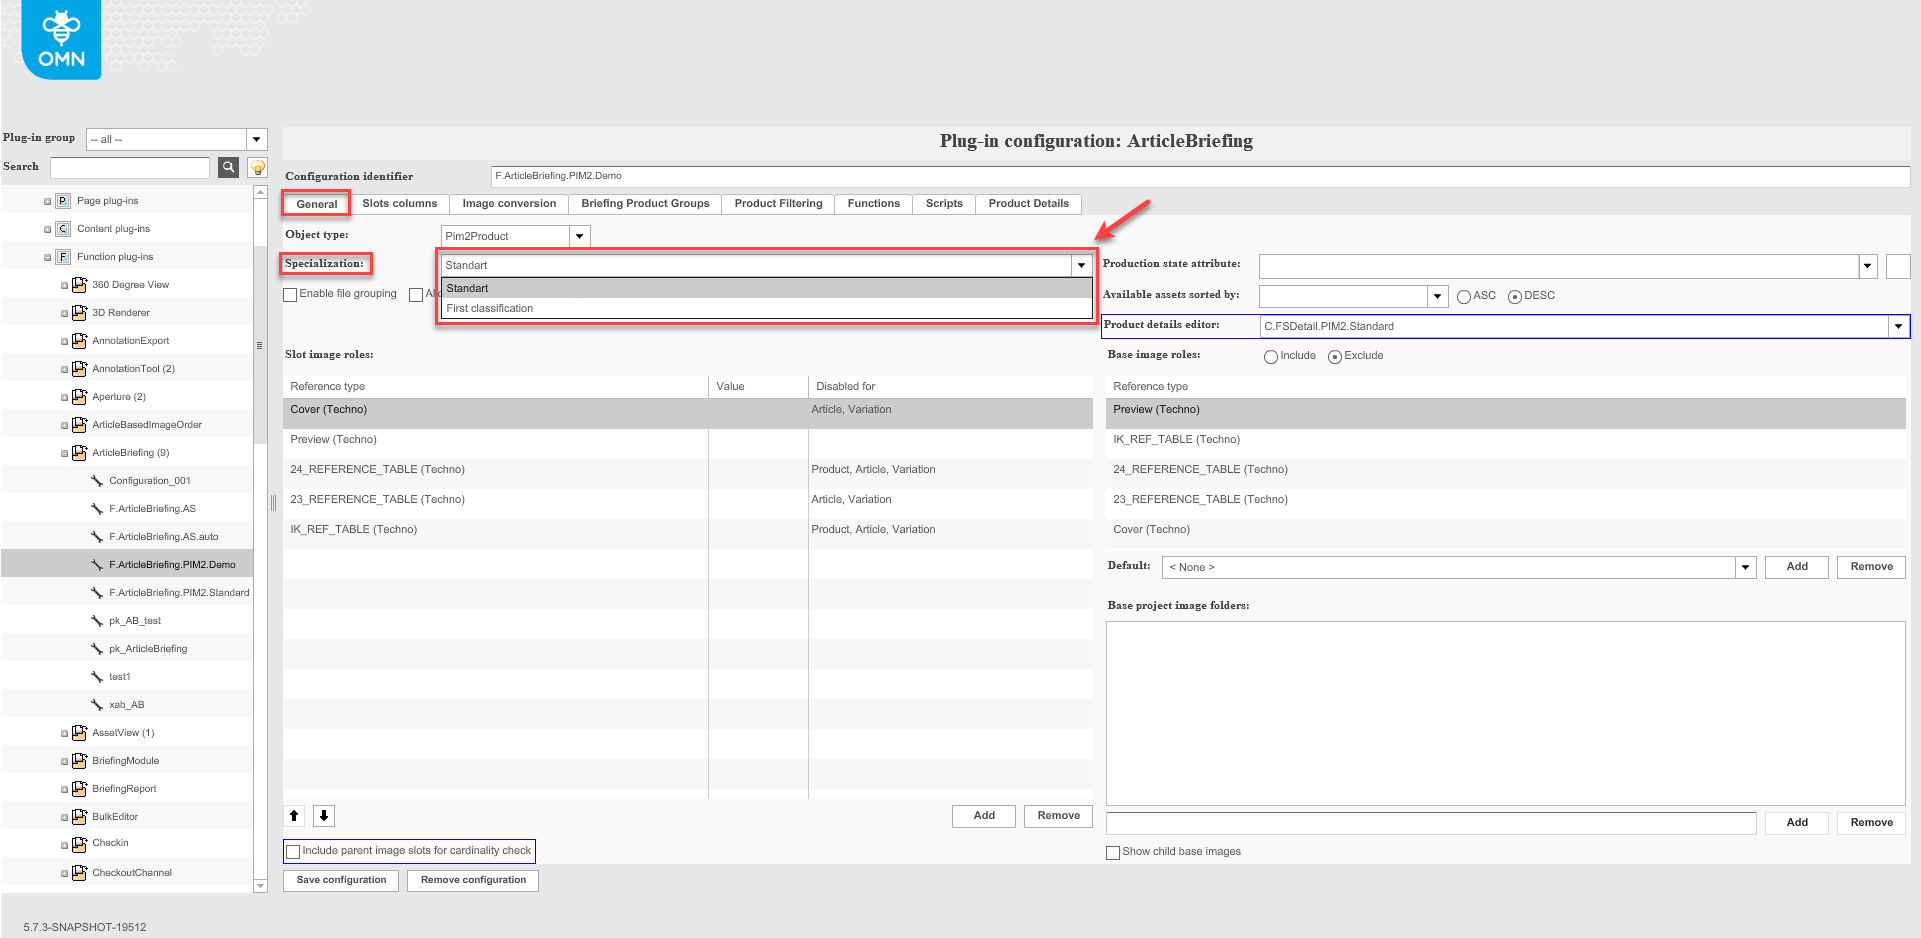
Specialization
Please note that Specialization is not applied for PIM2 products and this field is used to choose product Classification.
Choose the required Classification from the dropdown list. Classification presents a tree-type structure and a classified product is linked to a classification node.
Slot image roles
Click the "Add"-button to add a slot image role. Choose the required value from the dropdown list to replace the default value.
To remove the added slot image role click on it on the list and click the "Remove"-button.
To change the order of the slot image roles click on the "Arrow up" and/or "Arrow down" buttons.
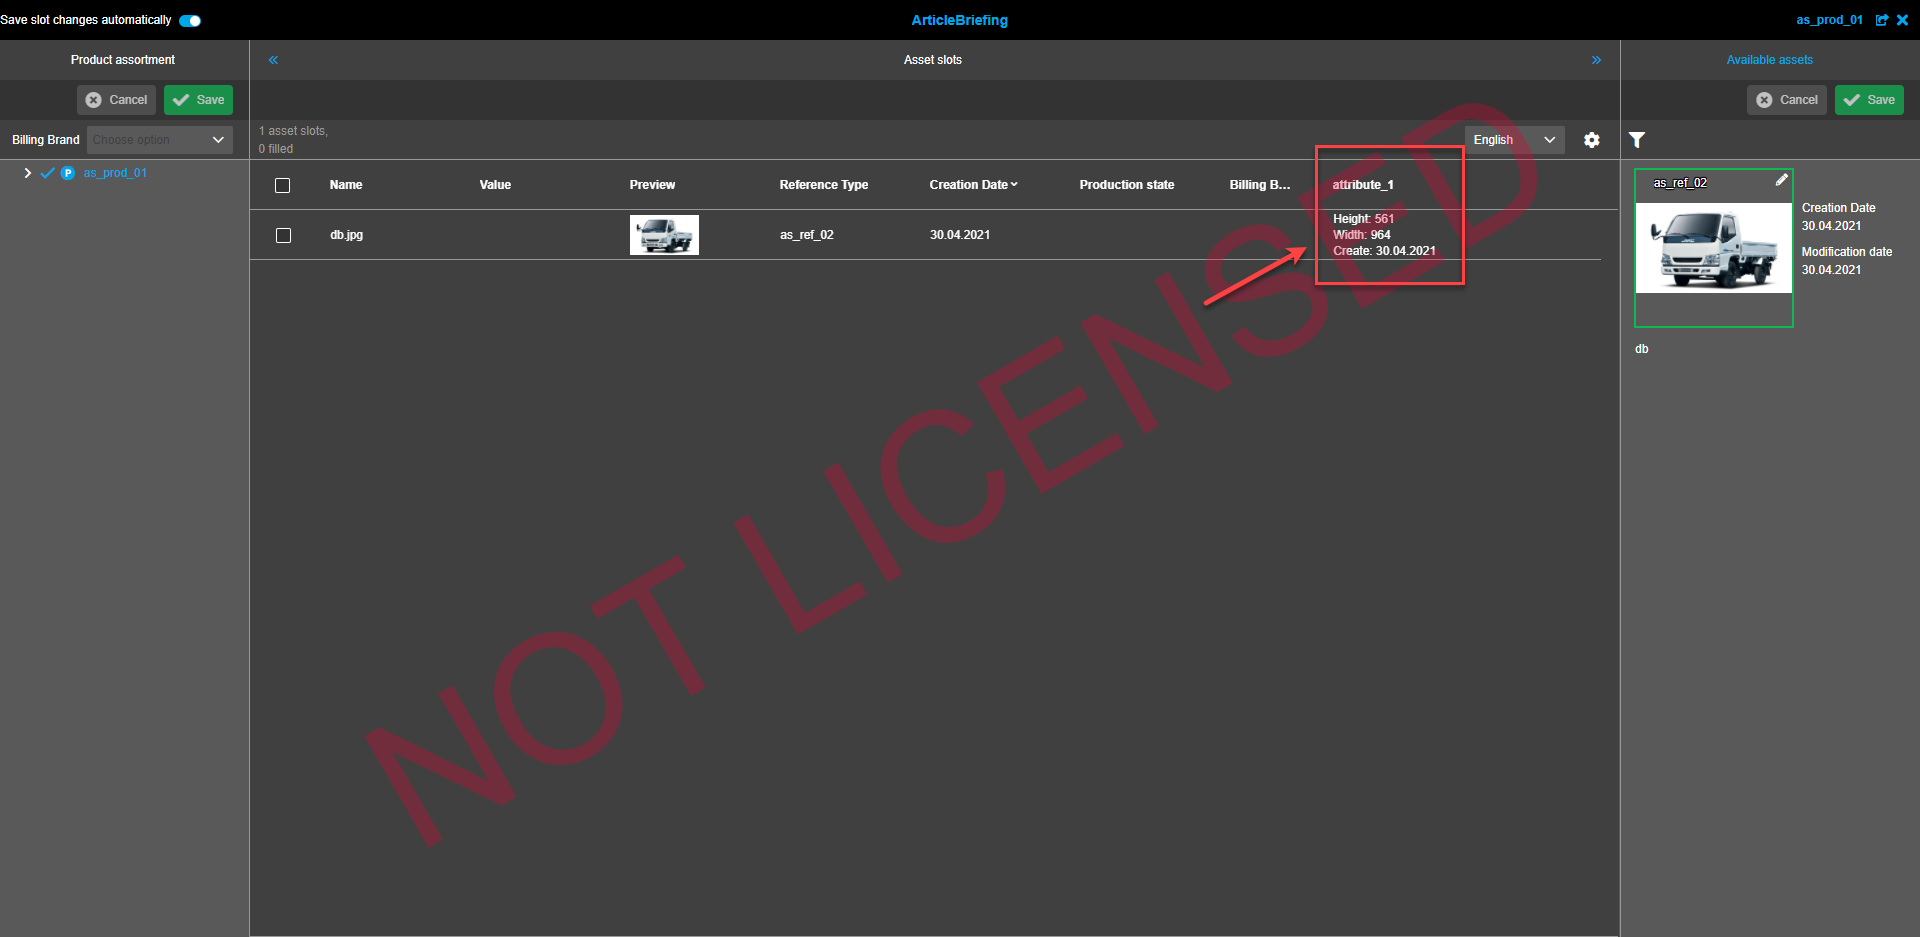
Configured slot image roles will be displayed in the central table of Article Briefing in the client.
The order of the slot image roles in the central view in Article Briefing will be in the exact order they are in the backend configuration.
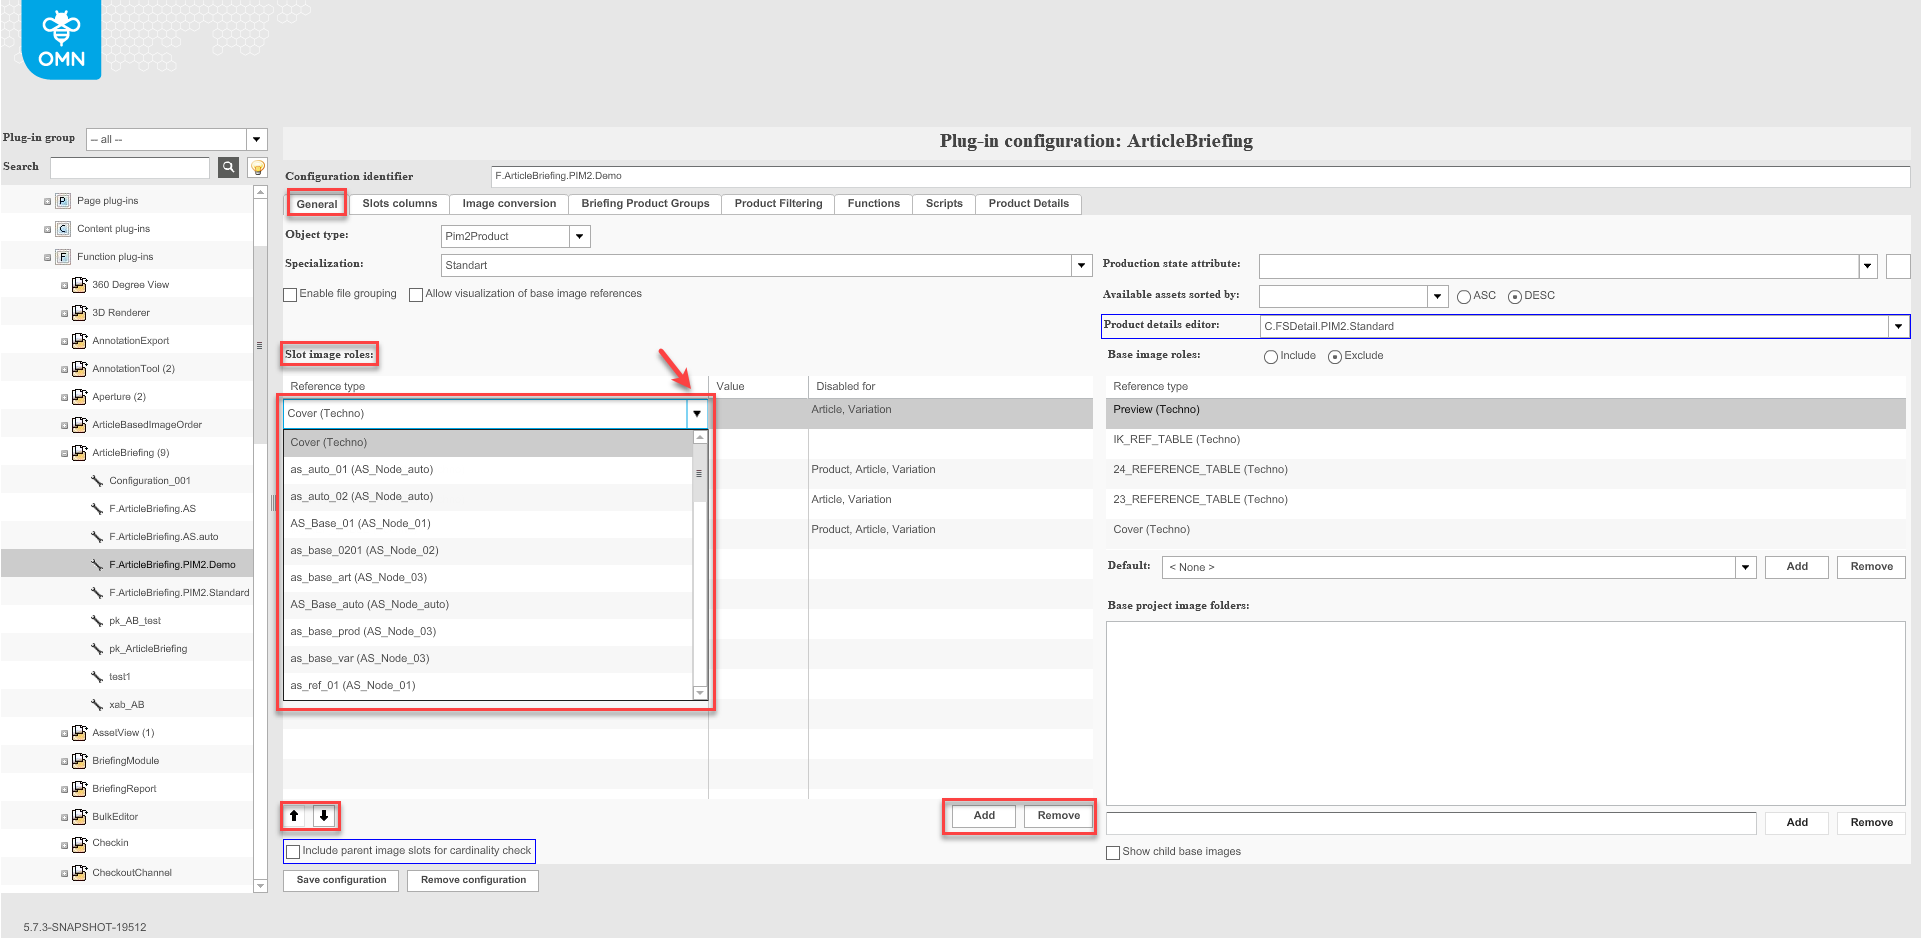
| Several Slot image roles can be added. |
To add a Value abbreviation relating to a reference type, click on a cell in the "Value" column and type an appropriate abbreviation.
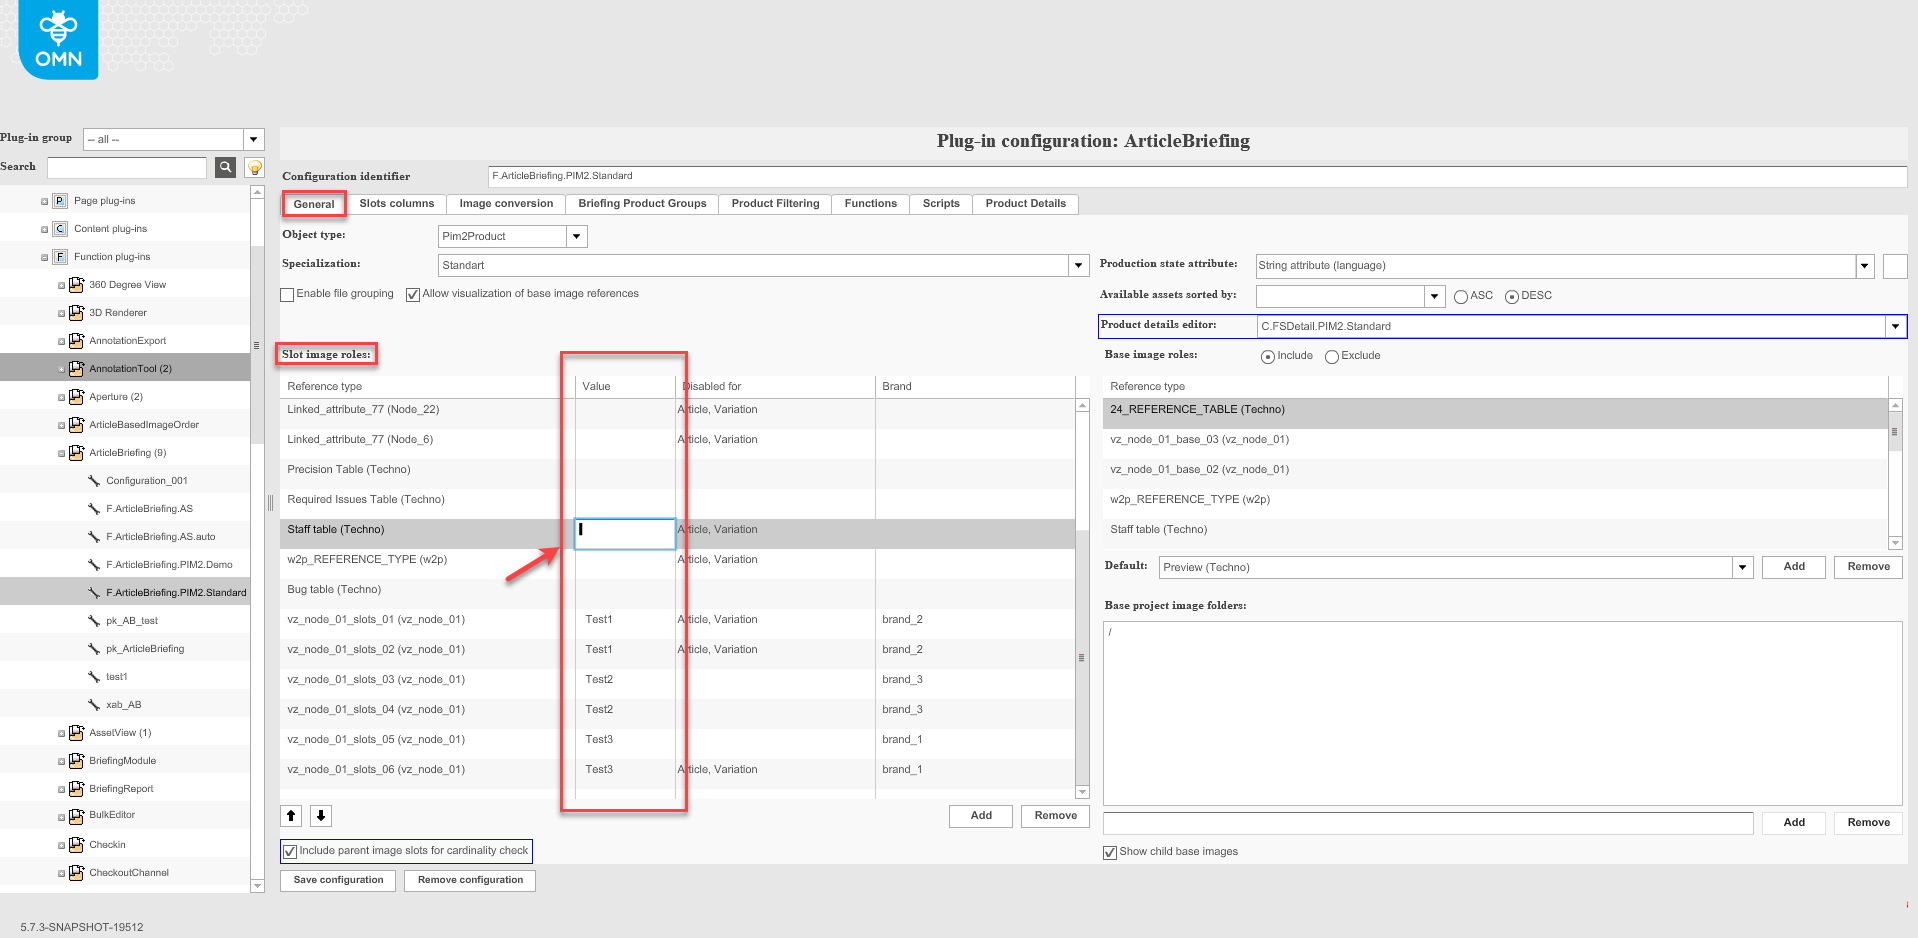
| "Disabled for" column is not supported in the HTML 5 client. |
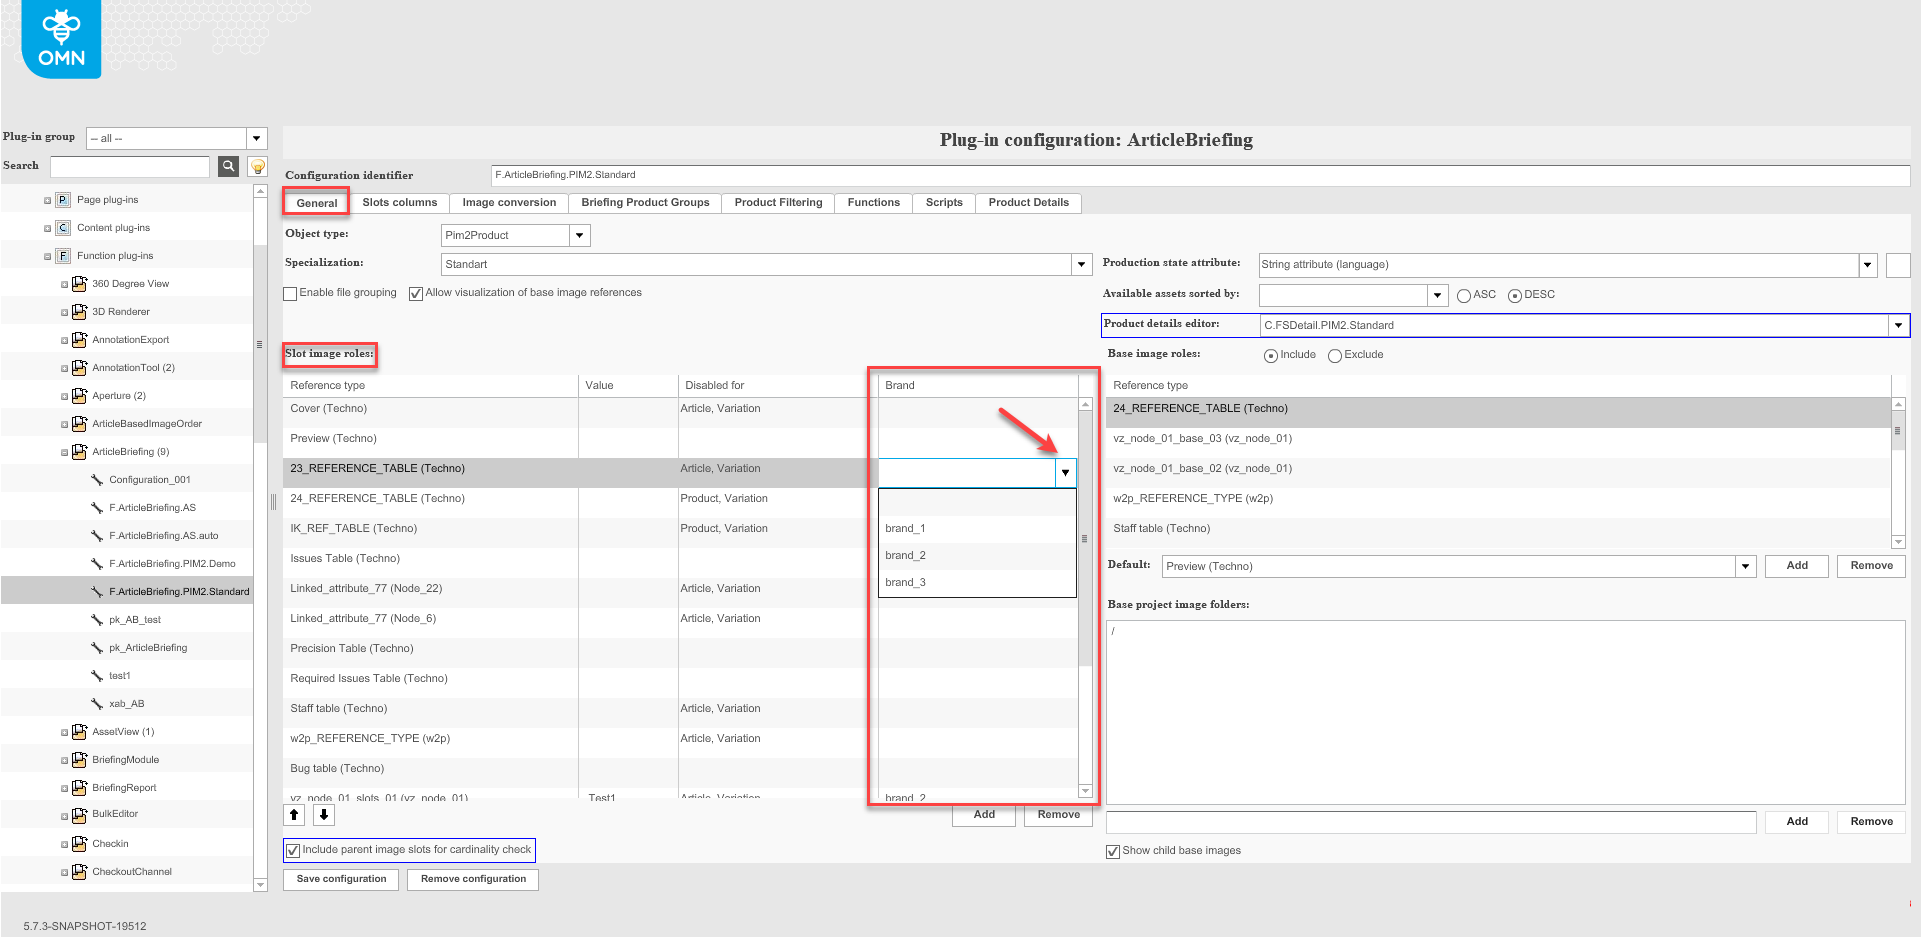
To add a billing brand for a reference type, click a cell in the "Brand" column and select a needed one.
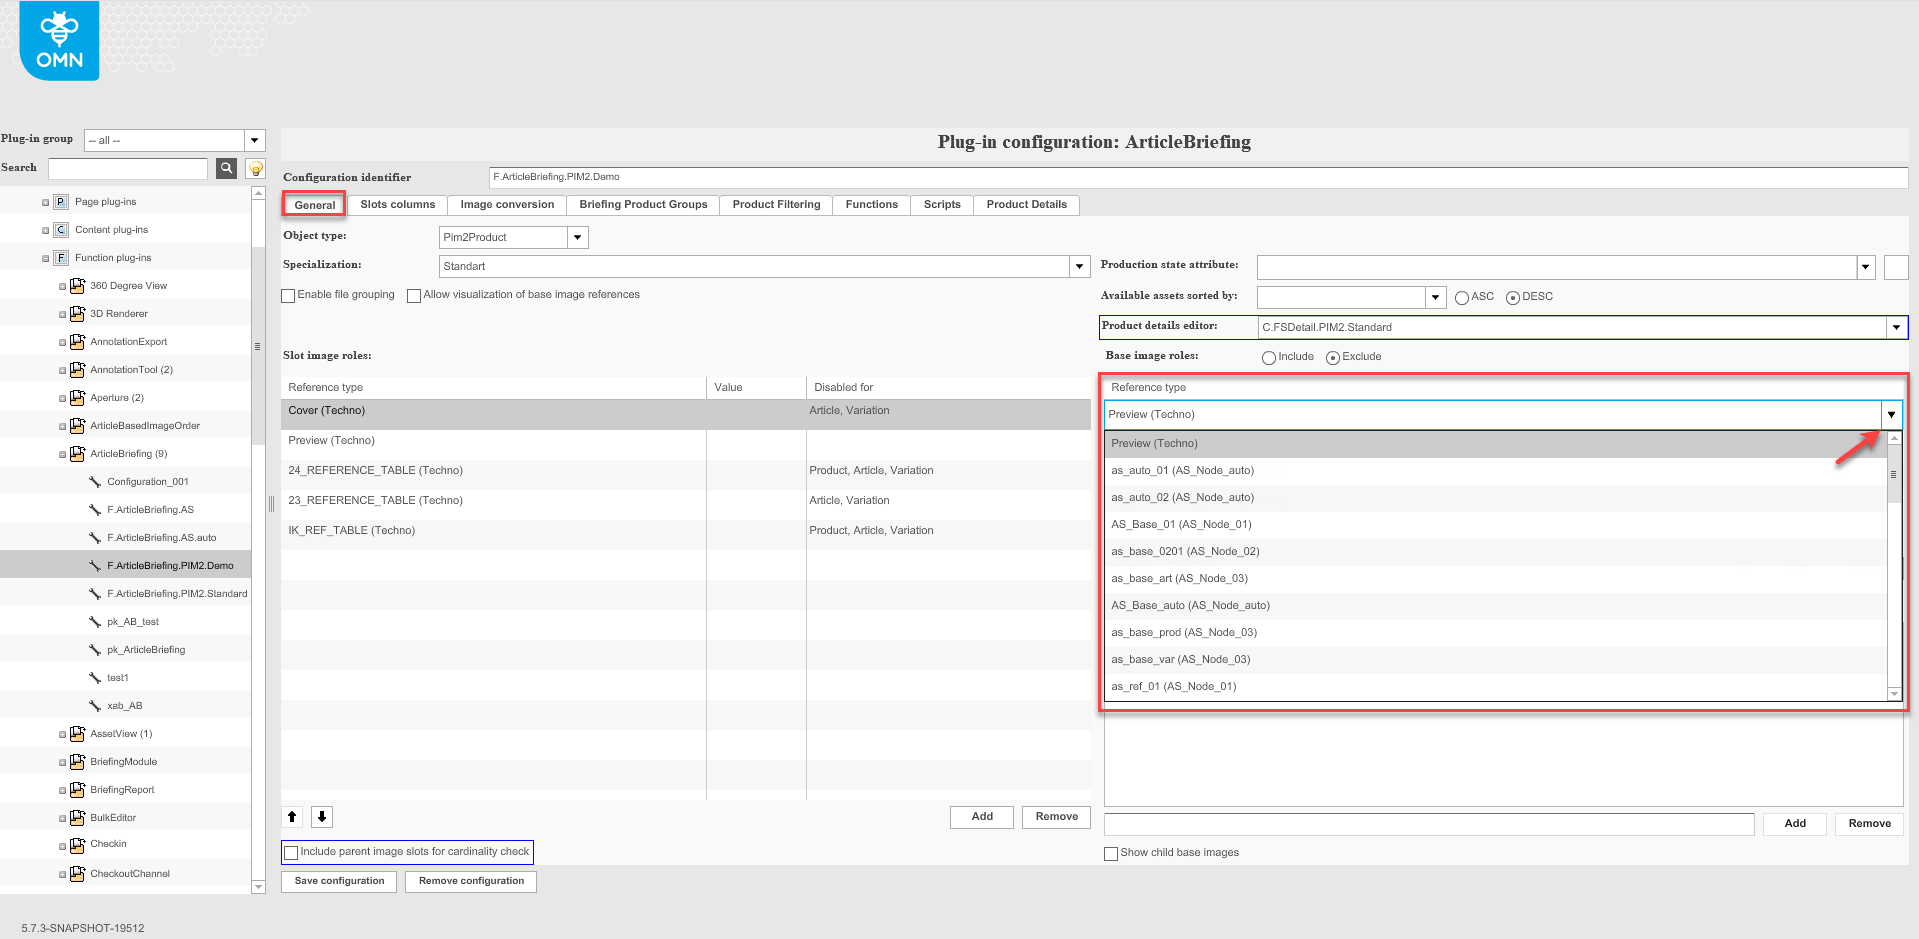
Base image roles
To configure base image roles add available reference types into the table by clicking on the "Add"-button and choosing the appropriate item from the dropdown.
Use radio buttons to choose one of the options:
-
"Include" to include configured reference types into the base image roles (i.e. exactly these reference types will be considered as base image roles).
-
"Exclude" to exclude configured reference types from the base image roles (i.e. all available reference types, excluding configured ones, will be considered as base image roles).
To remove added base image roles, click on a role in the list and click the "Remove" button.
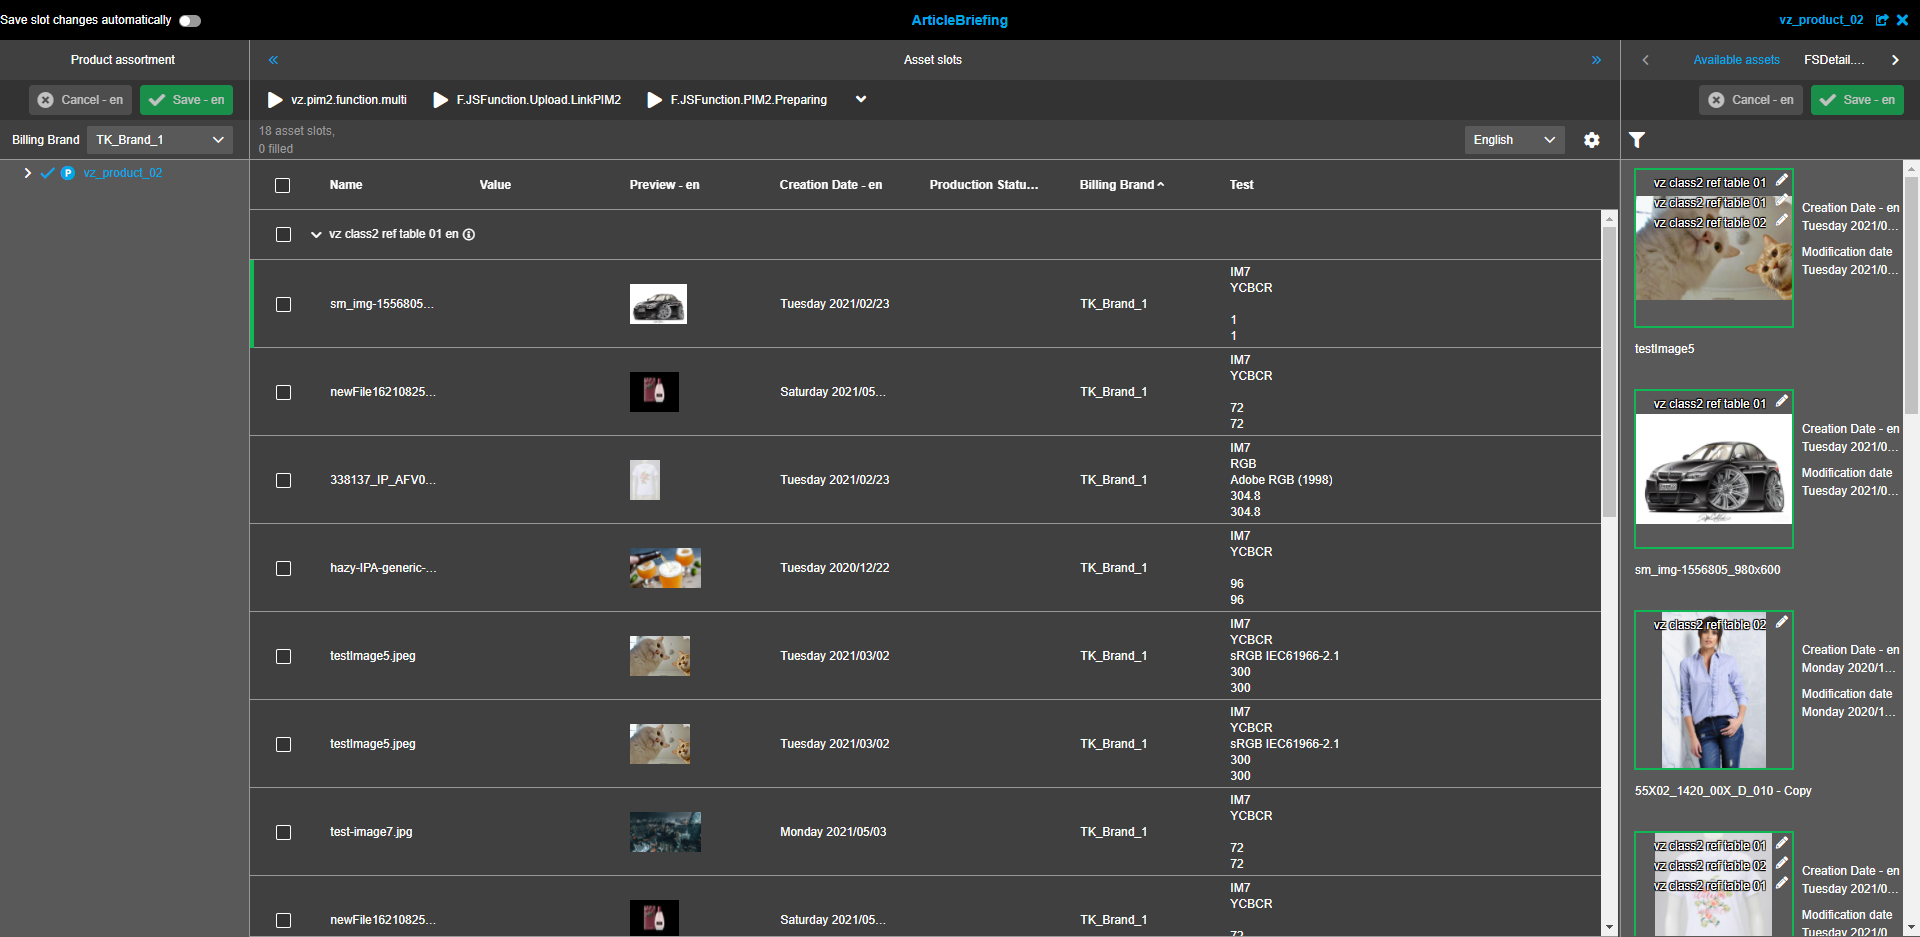
Images linked to the product by means of base image roles will be displayed in the right view of ArticleBriefing in the client.
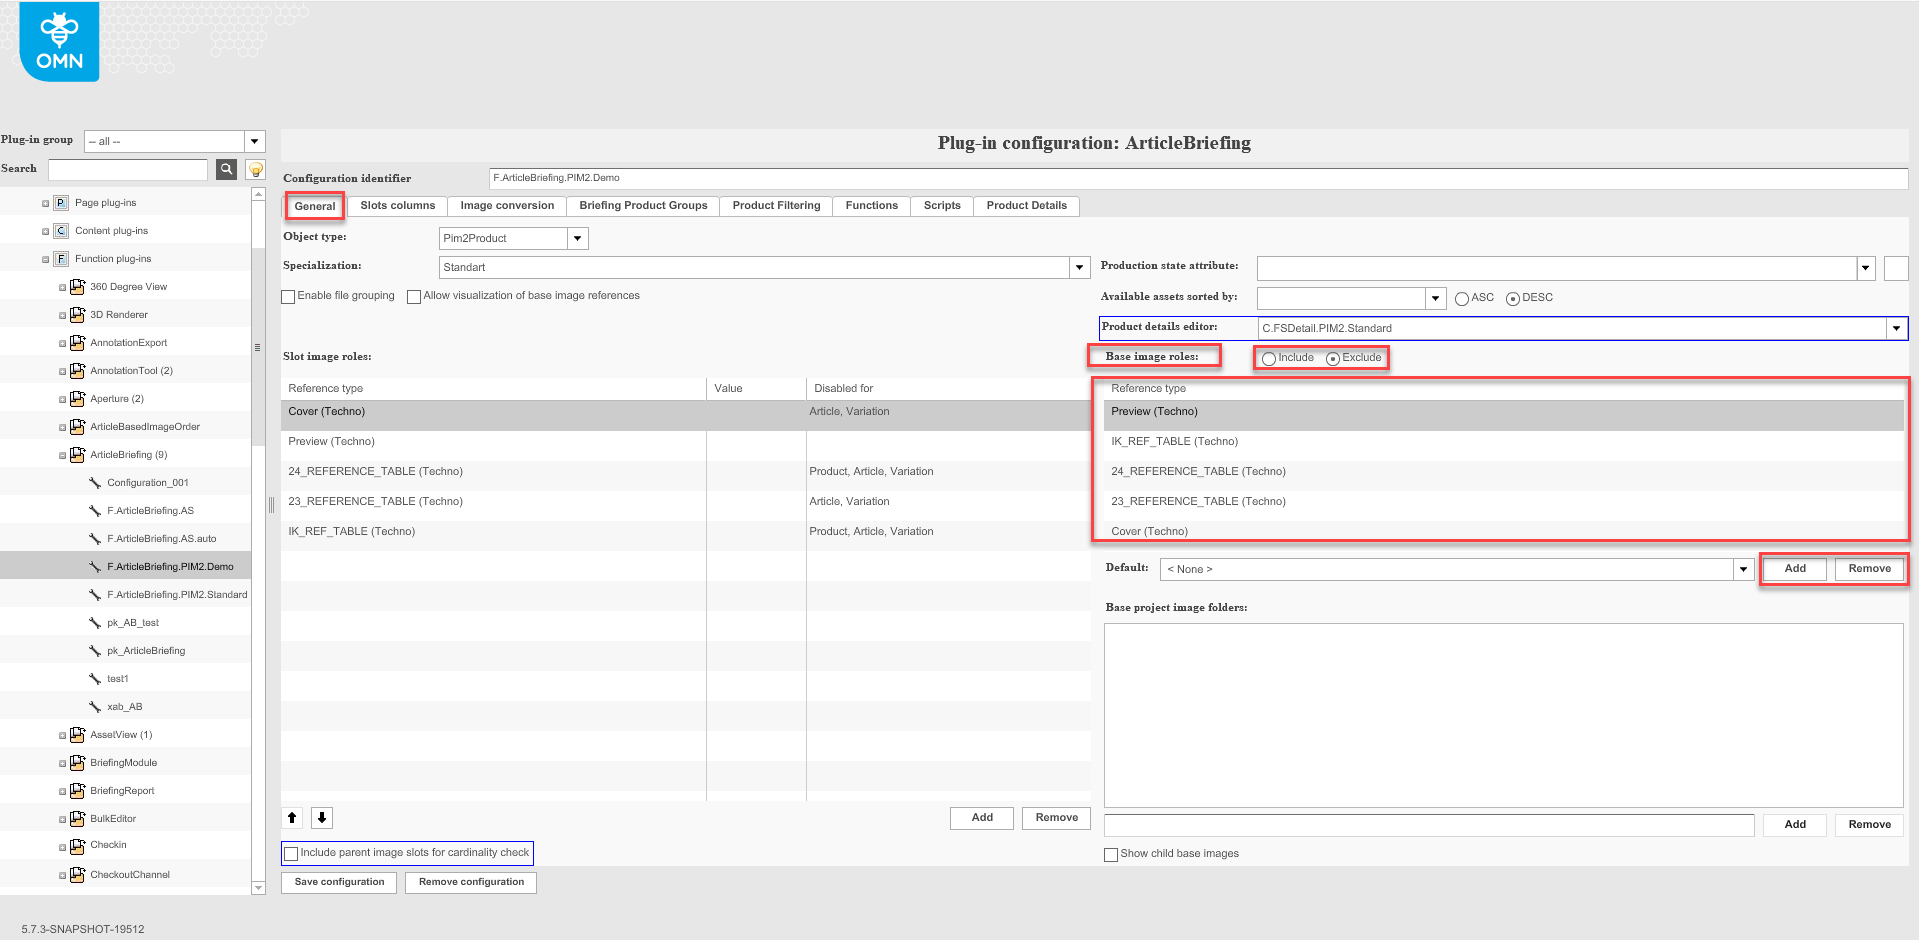
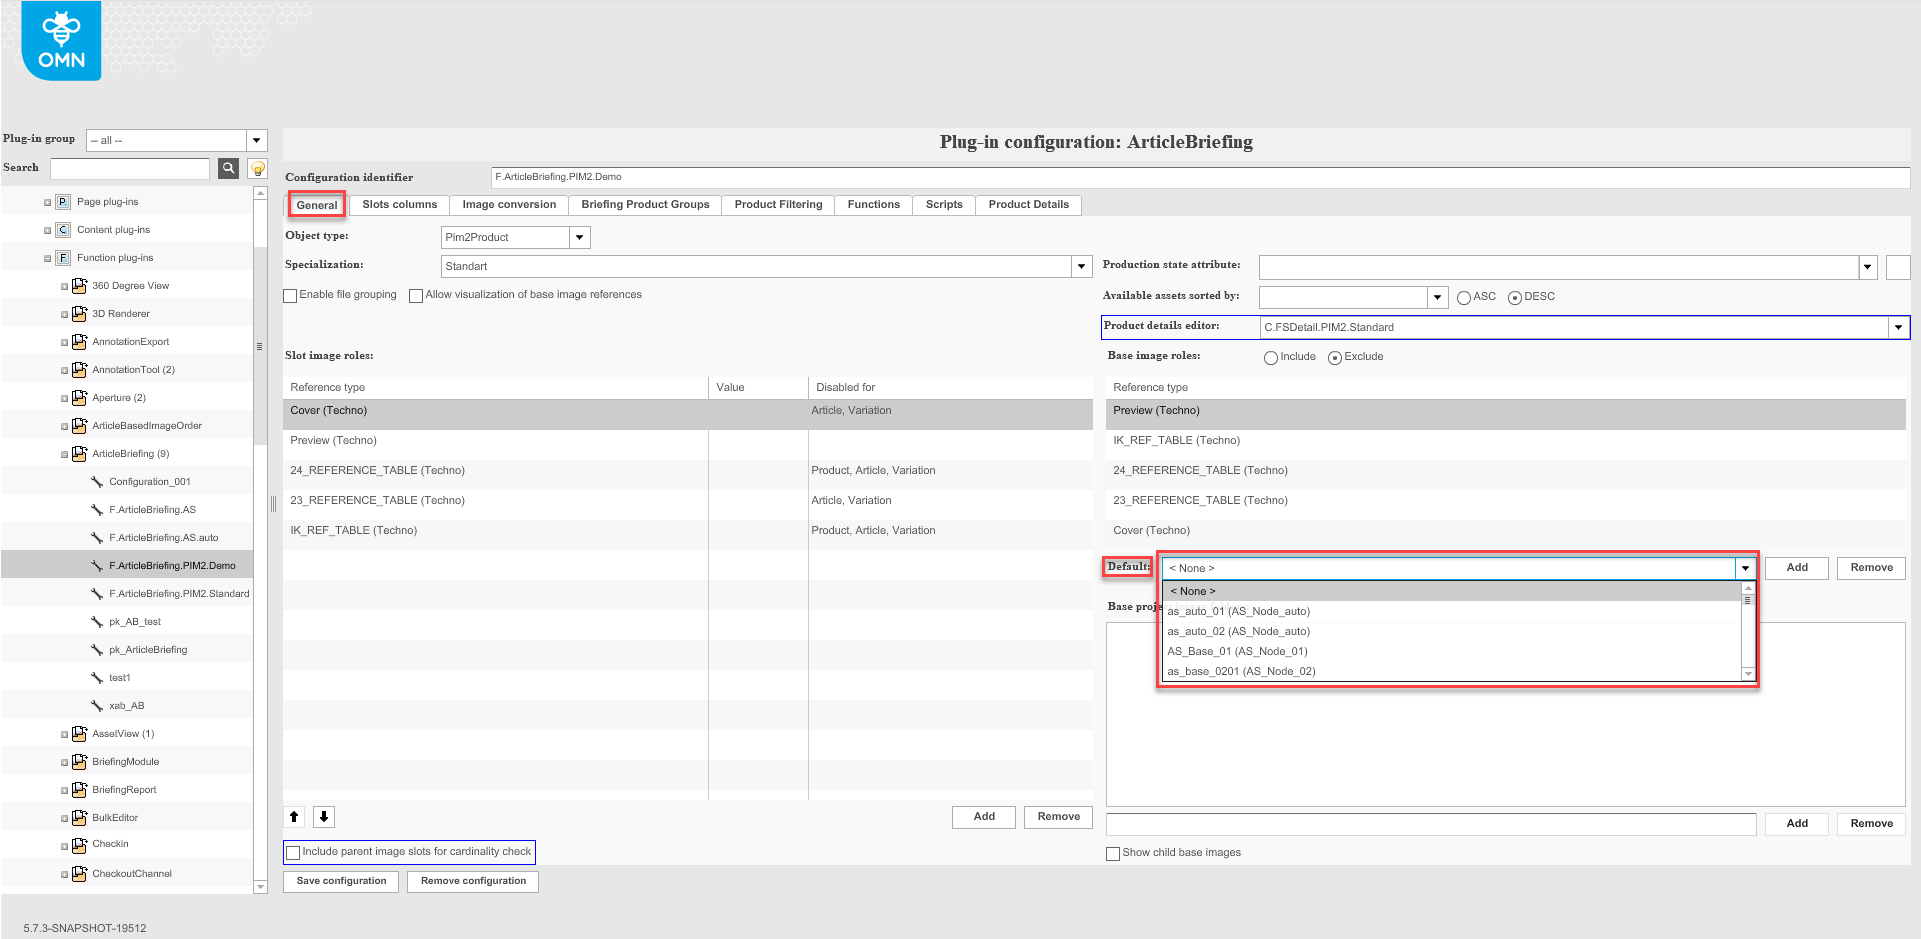
Default image role
Choose the reference type to be considered as the default image role from the dropdown list. The default image role can be selected only of the base image roles determined by the previous step.
On external DnD action (for example from search or from FS Navigation):
-
If a default image role is configured, the asset will be linked to the default base image role (it will be shown in the right view) and the slot will be saved for the Article Briefing.
-
If a default image role is not configured, the asset will not be linked to the base image role. It will only be linked to the slot.
Show child base images
A product might have a different set of assets on different levels (product, article, variation). To configure whether all assets linked to the product will be shown in the "Available assets" on the right hand side view or only the assets what are linked on a particular level, use the "Show child base images" checkbox:
-
"checked" - all assets for all levels are shown in the "Available assets" view.
-
"unchecked" - only assets for a particular product level are shown.
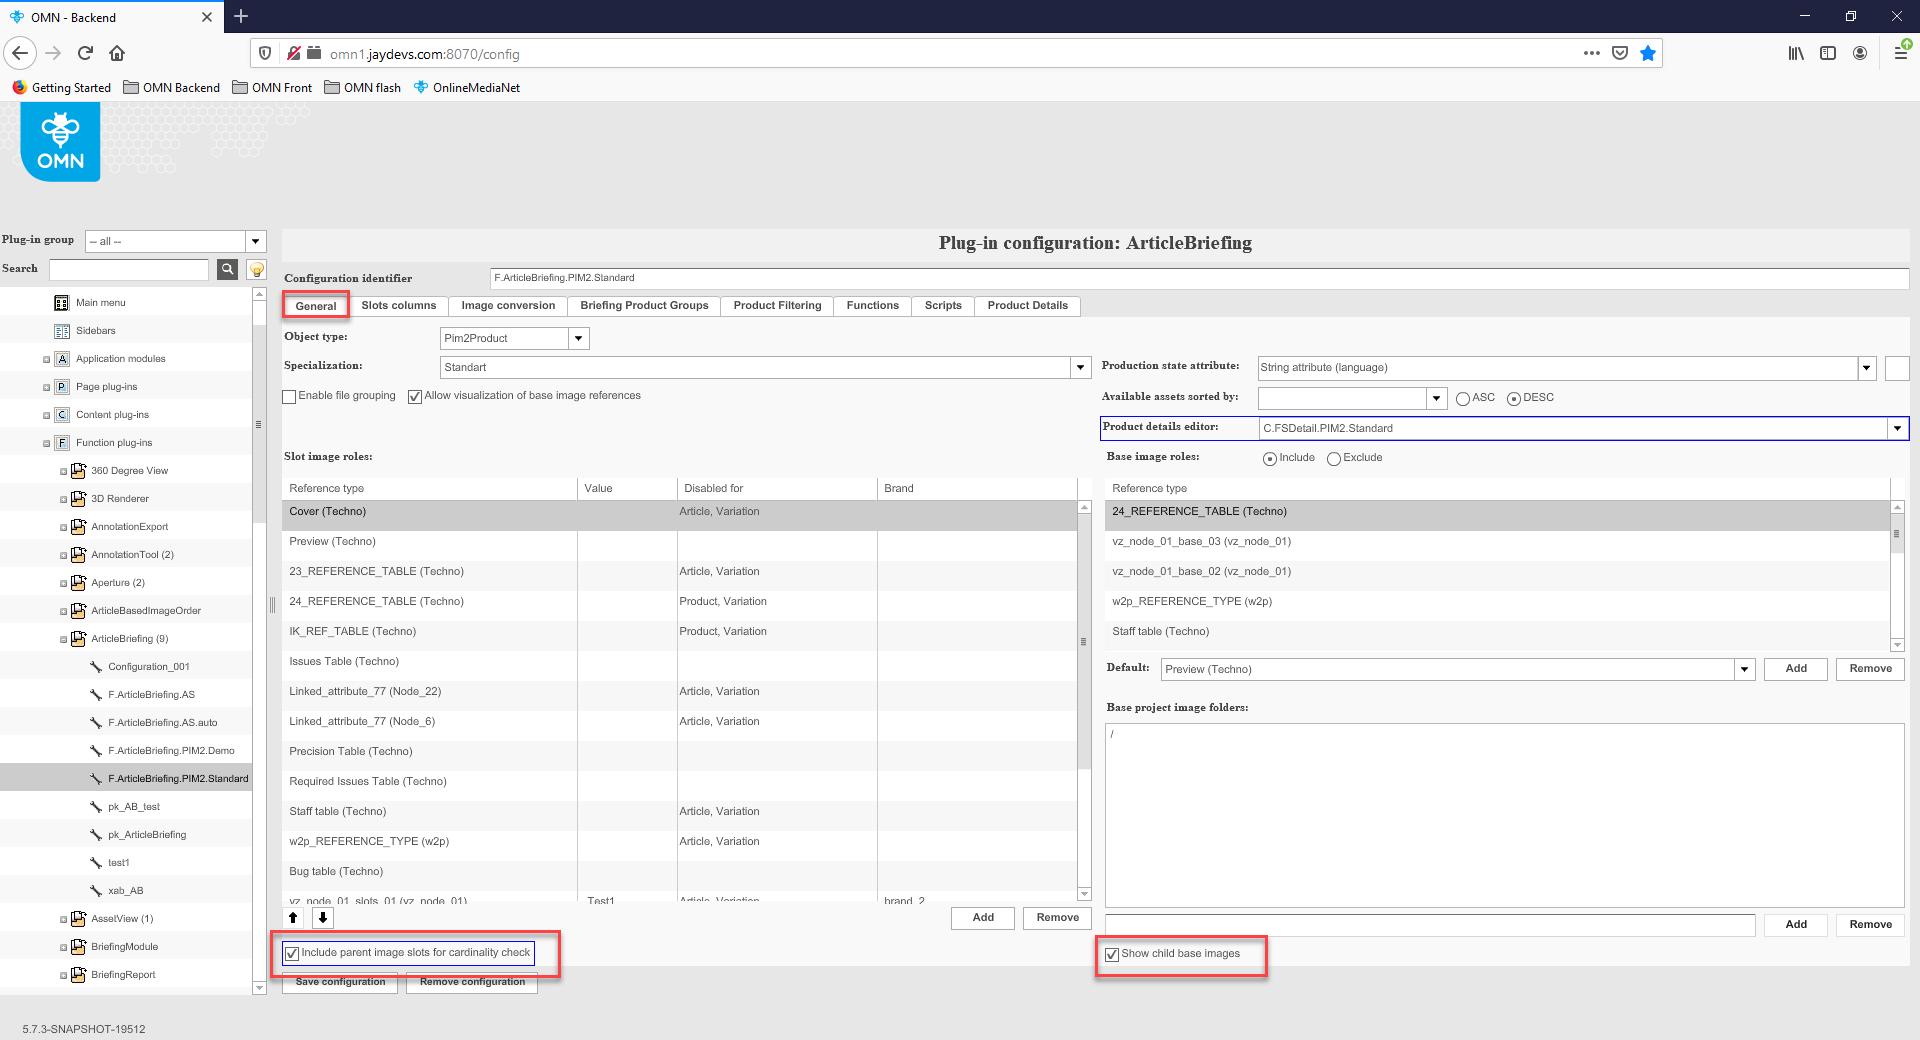
| "Include parent image slots for cardinality check" checkbox is not supported for HTML 5 client. |
Base project image folders
To add a "Project folder" type in or copy-paste a relative path of a folder into the text field and click on the "Add"-button. To remove the added base image folder, select it from the area and click on the "Remove"-button.
Assets which are linked to the configured folder are shown as available assets in the right "Available assets" view if Article briefing is opened from a project.

Allow visualization of base image references
Use checkbox for right-hand side references visualization:
-
"checked" - both visualizations will be shown: the green solid border for 1:1 reference and the dashed green border for base image that were edited in slots.
-
"unchecked" - only solid green border will be shown for linked base images to slots.
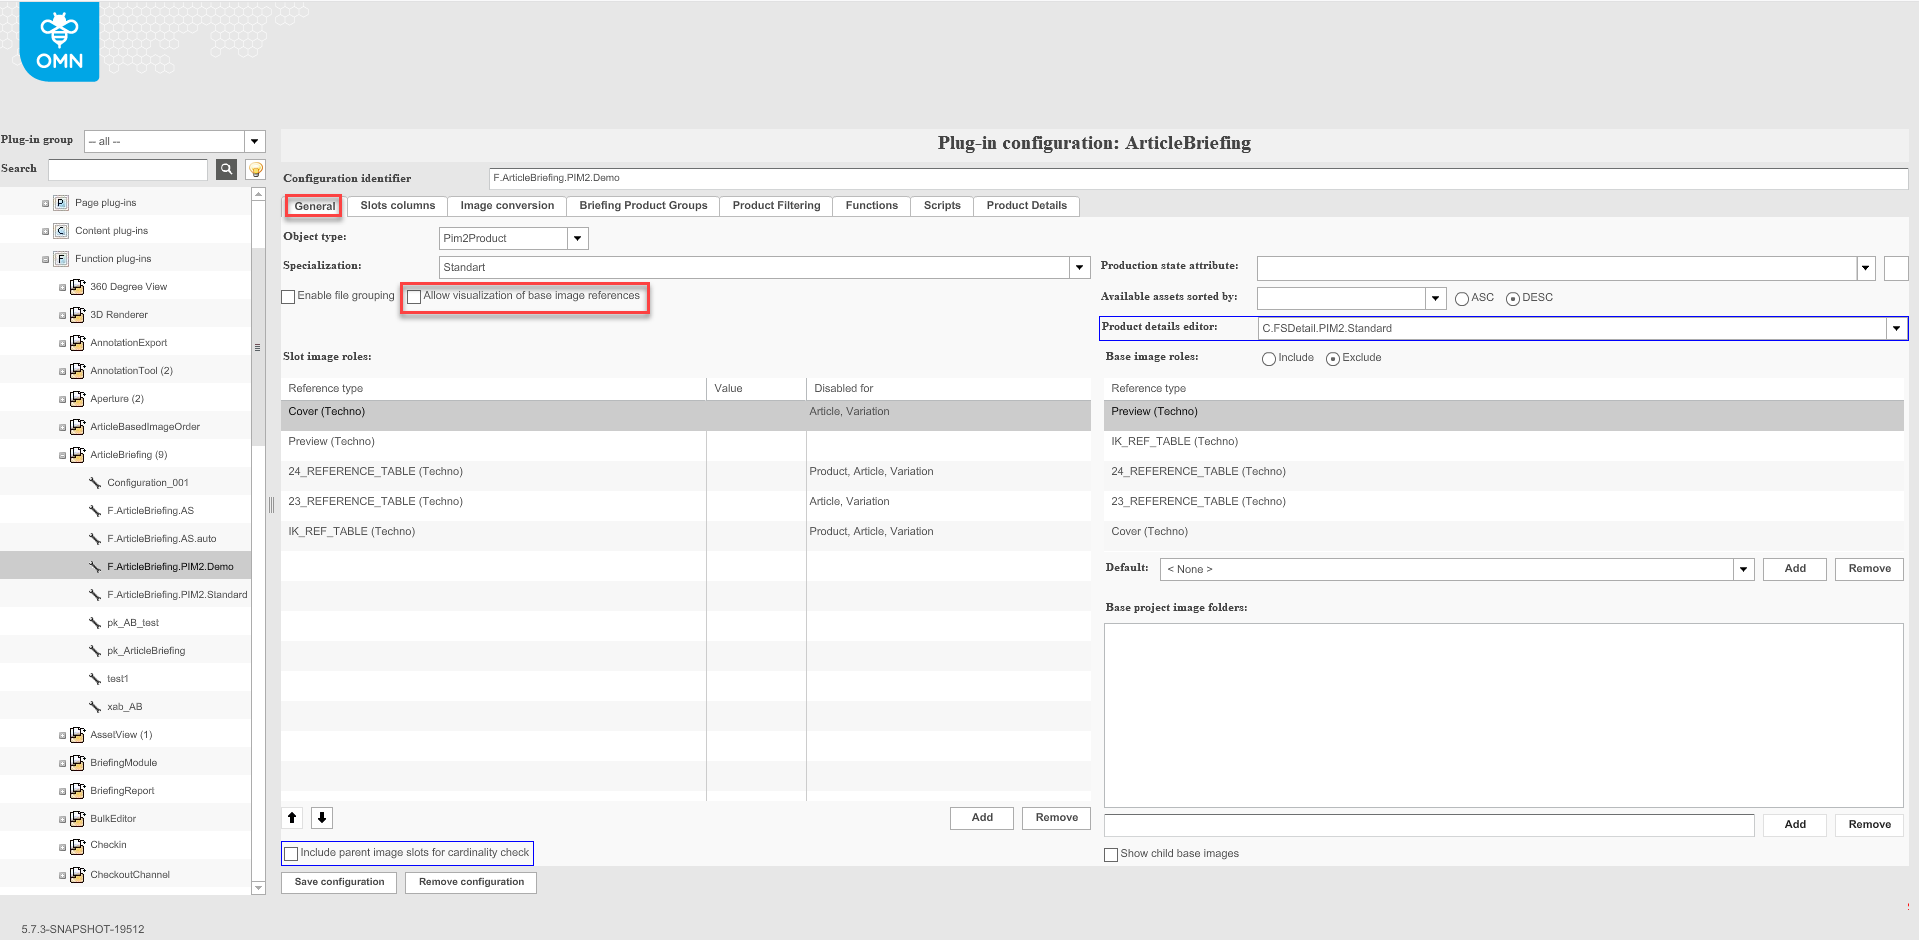
| "Enable file grouping" checkbox is not supported for HTML 5 client. |
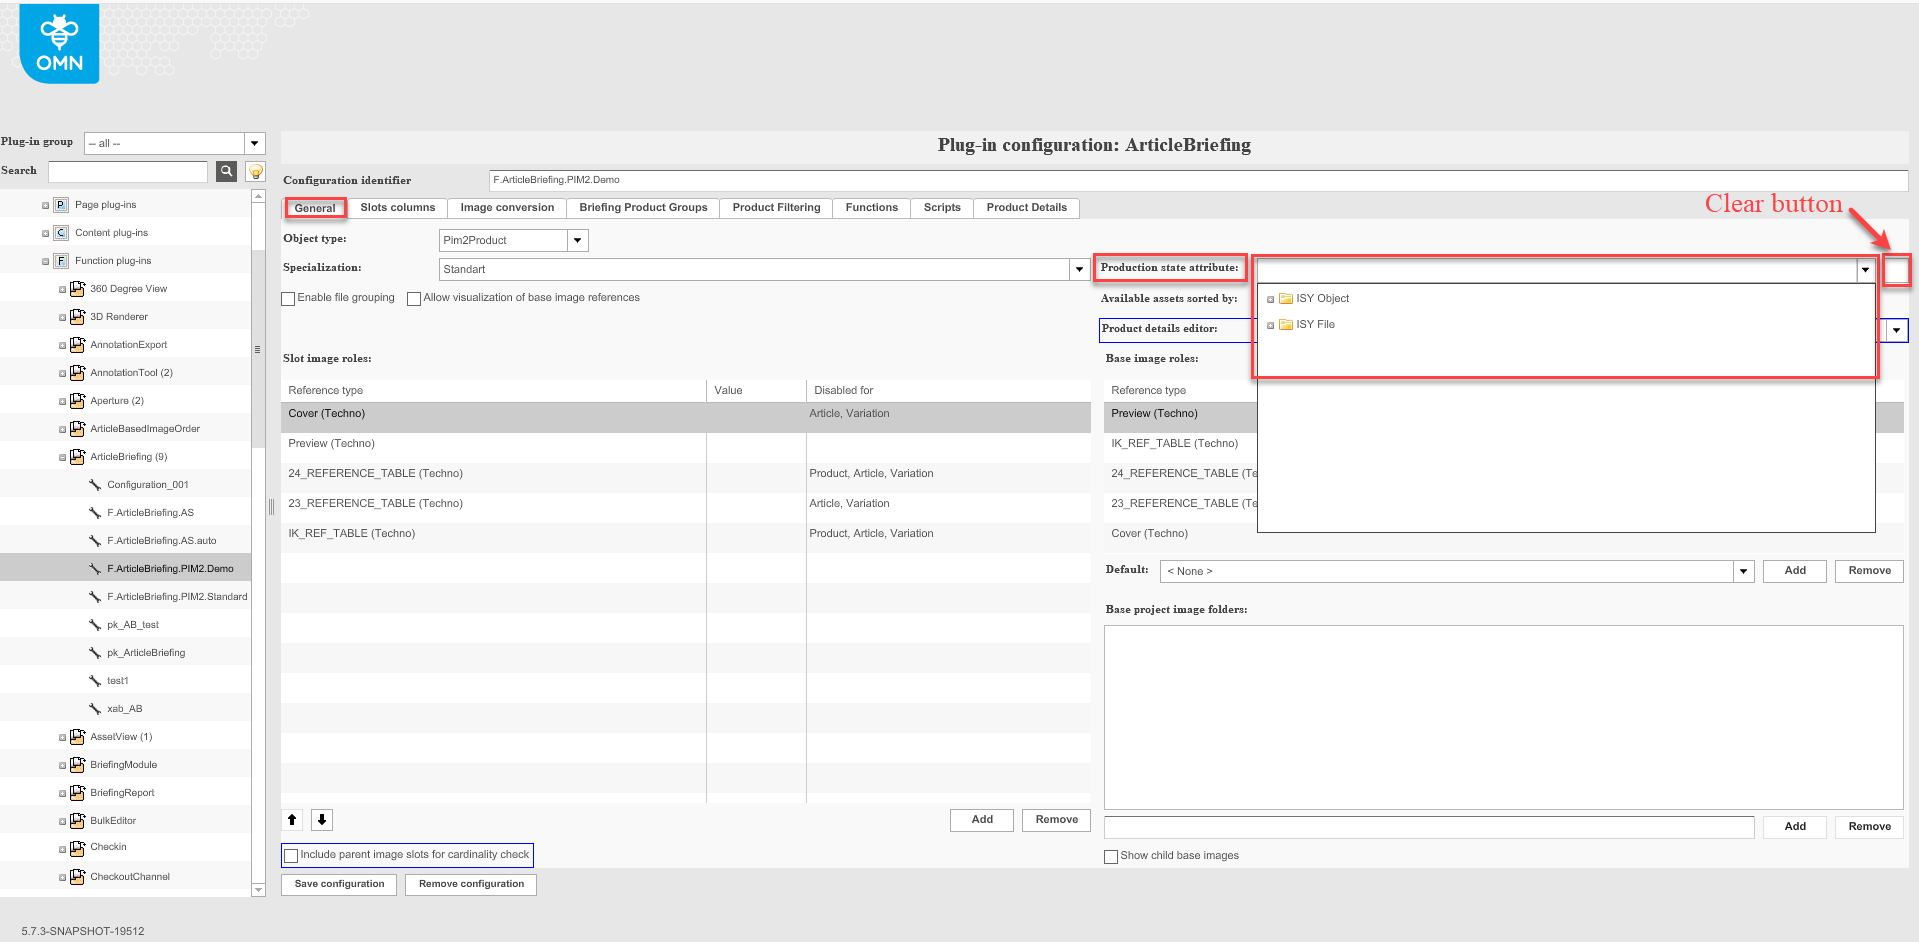
Production state attribute
From the drop-down list choose the metadata field of "ISY Image", "ISY File" or "ISY Object" which will be considered as a production state attribute for assets. It will be used for the filtering of assets by the production state attribute. To clear the chosen production state attribute click on the "Clear"-button.
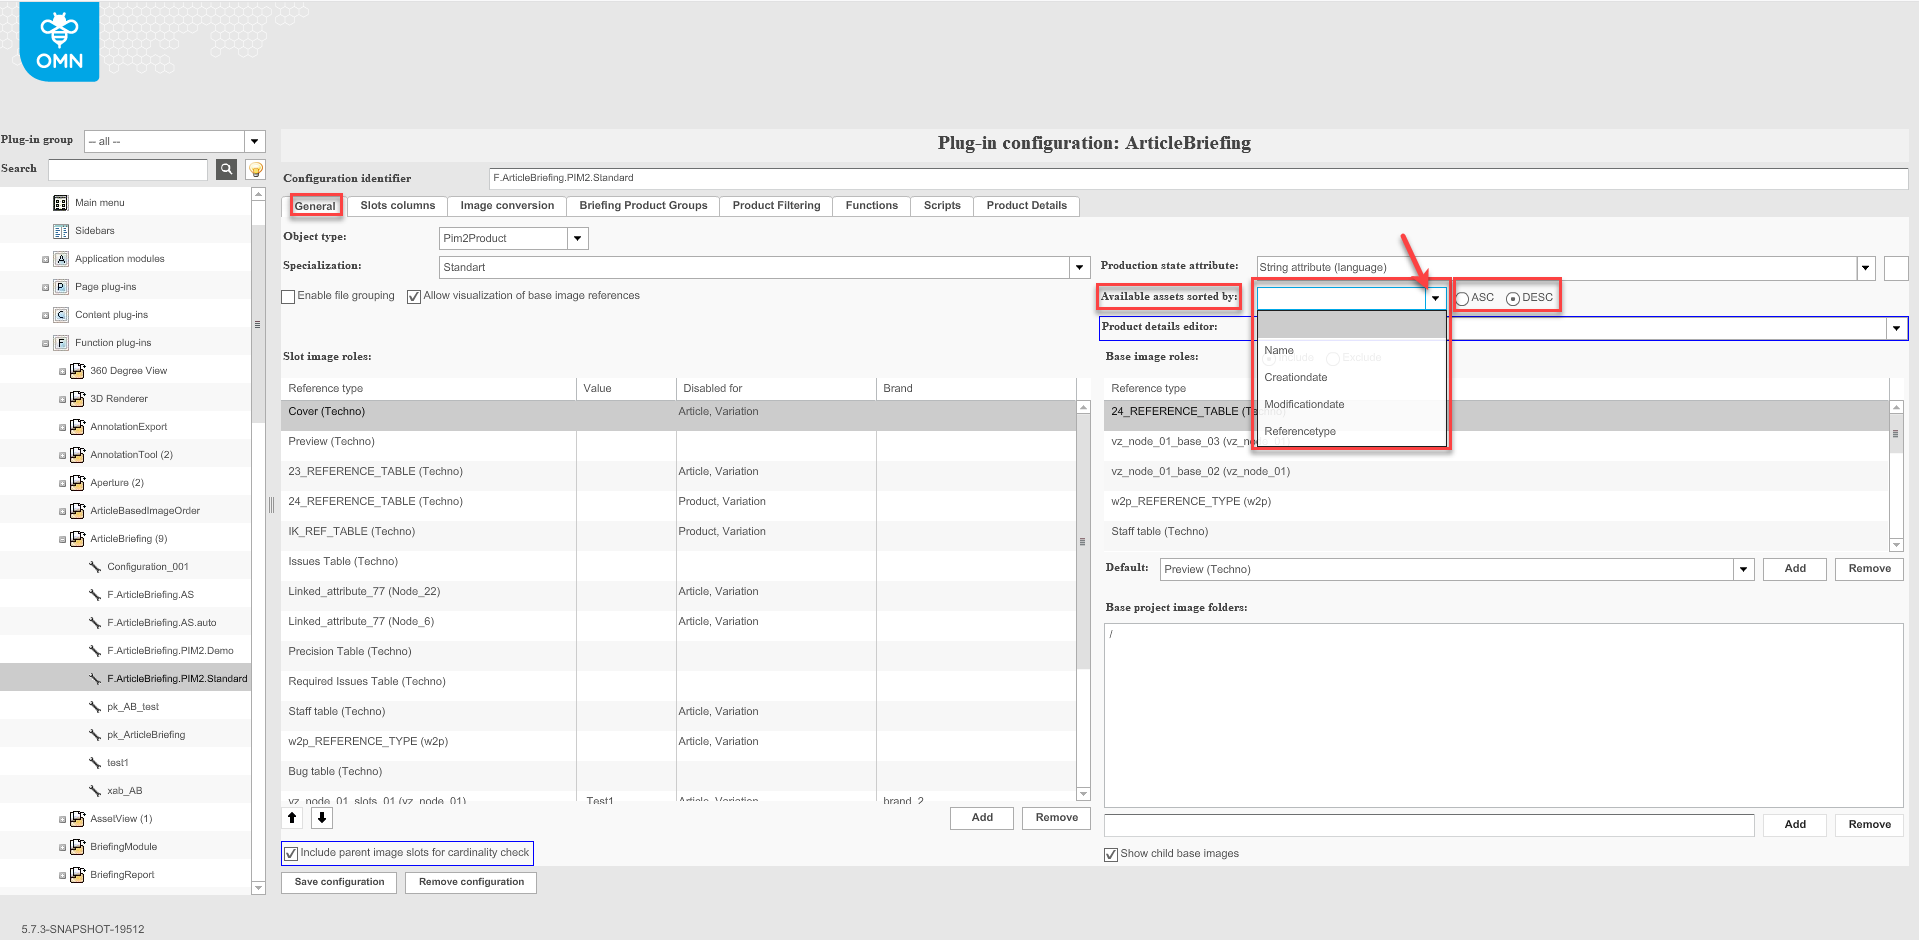
Available assets sorted by
To configure available assets sorting options:
-
Select sorting option from dropdown list.
-
Use "ASC" or "DESC" radio buttons for ascending or descending sorting respectively.
Available assets in right panel will be sorted in the selected way.
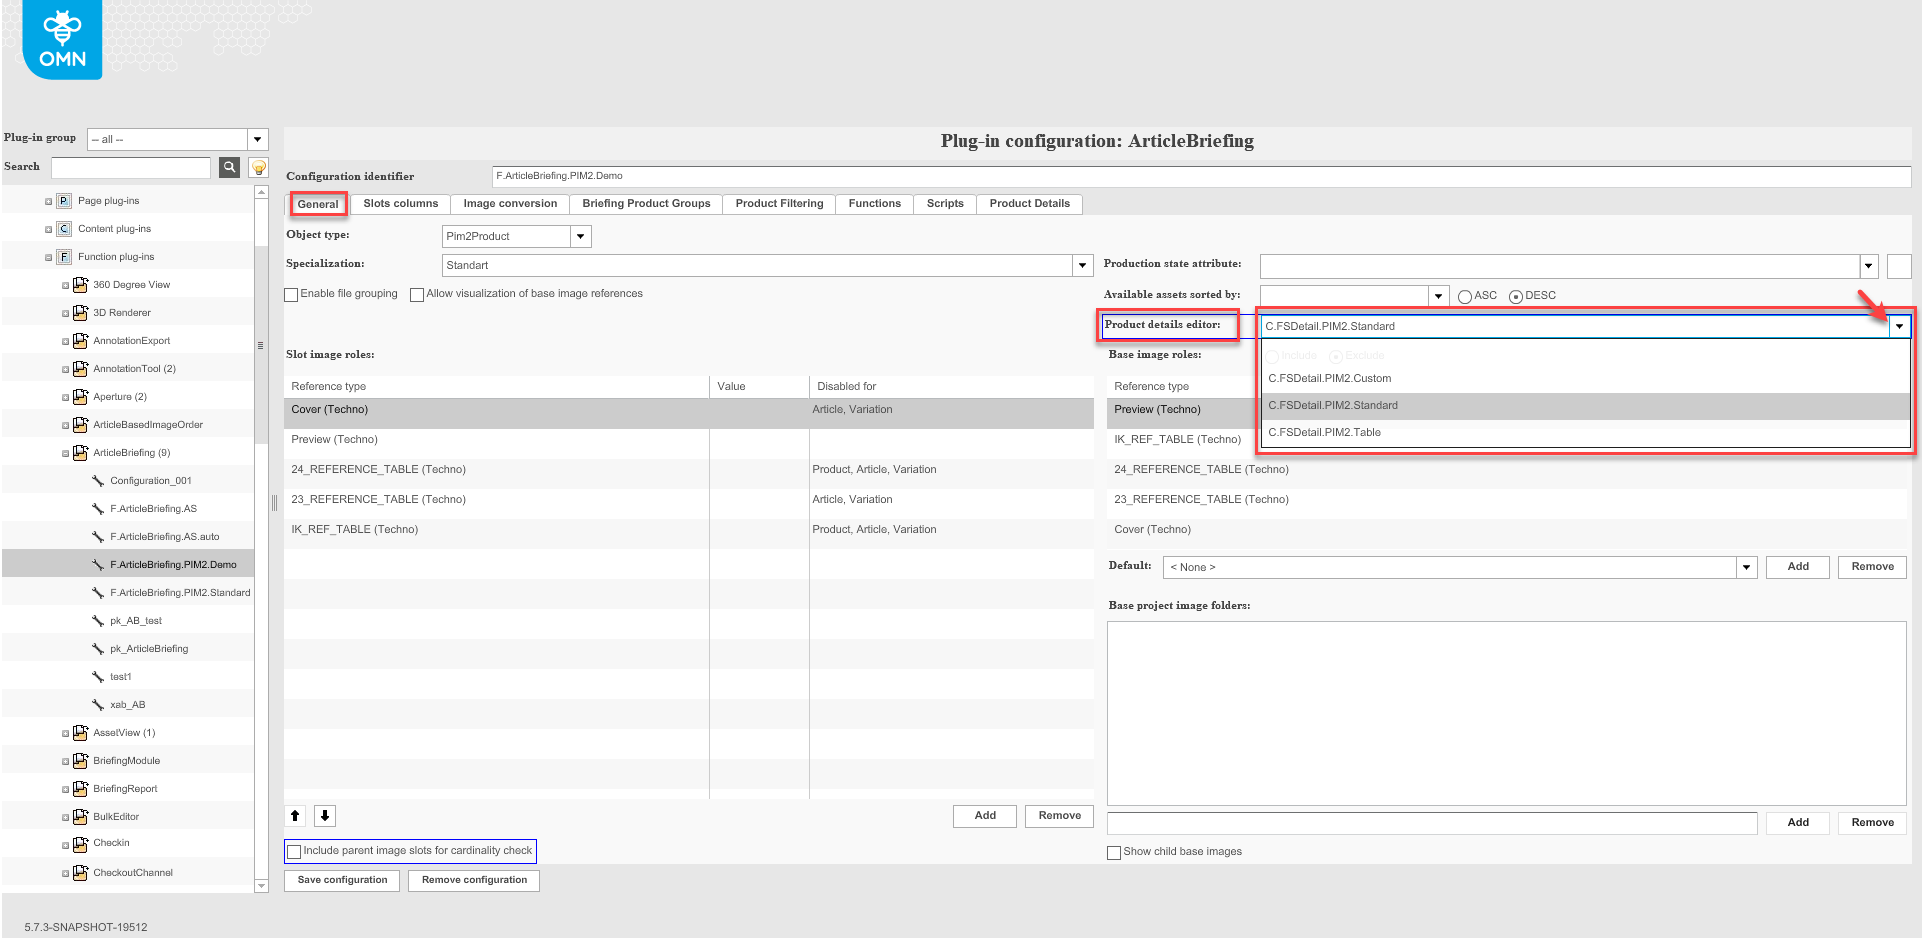
Product details editor
| The Product details editor in the "General"-tab works only for the old client version which will become unavailable starting from 2021. |
| The HTML version settings are located in the Product details tab. |
Choosing the required option from the dropdown list. Click the "Save configuration"-button to save changes.
| From now on the ArticleBriefing plugin is configured and is linked with the assets attributes to work with. Subsequently, ArticleBriefing should be configured in different views so that a corresponding button appears to open product/article/variation in the editor. |
Slot columns tab
This configuration tab is used for the configuration of additional columns in the central table.
Row height
|
"Row height" parameter is not supported for HTML 5 client. The table row height matches to content, which needs to be presented. |
Columns names
Click on the "Add"-button to configure a new column of the central table. Added column names are displayed in the “Name” list. If you want to remove the added column, select it in the list and click on the "Remove"-button.
Name
Enter the required column name to this field. Don’t use the default (“[undefined]”), empty or non-unique name. The name shouldn’t exceed 250 characters. Use "Arrow up" and "Arrow down" buttons to change the order of columns.
Alignment
Choose the required column content alignment from the dropdown. Available values are: left (default setting), right, and center.
Expression variables list
To configure column content add expression variables by clicking on the "Add"-button. To remove some expression variables use the "Remove"-button. At least one expression variable should be added to every column.
Identifier
Identifiers are created automatically after an expression variable is added. Identifier format is $<n+1> where <n> is a number of identifier of previously added expression variable for this column. Subsequently, this identifier can be used as a placeholder for the configuration of column content displaying patterns.
Pattern
Enter placeholder text including variable identifiers in the required pattern to be displayed in the column. For example:
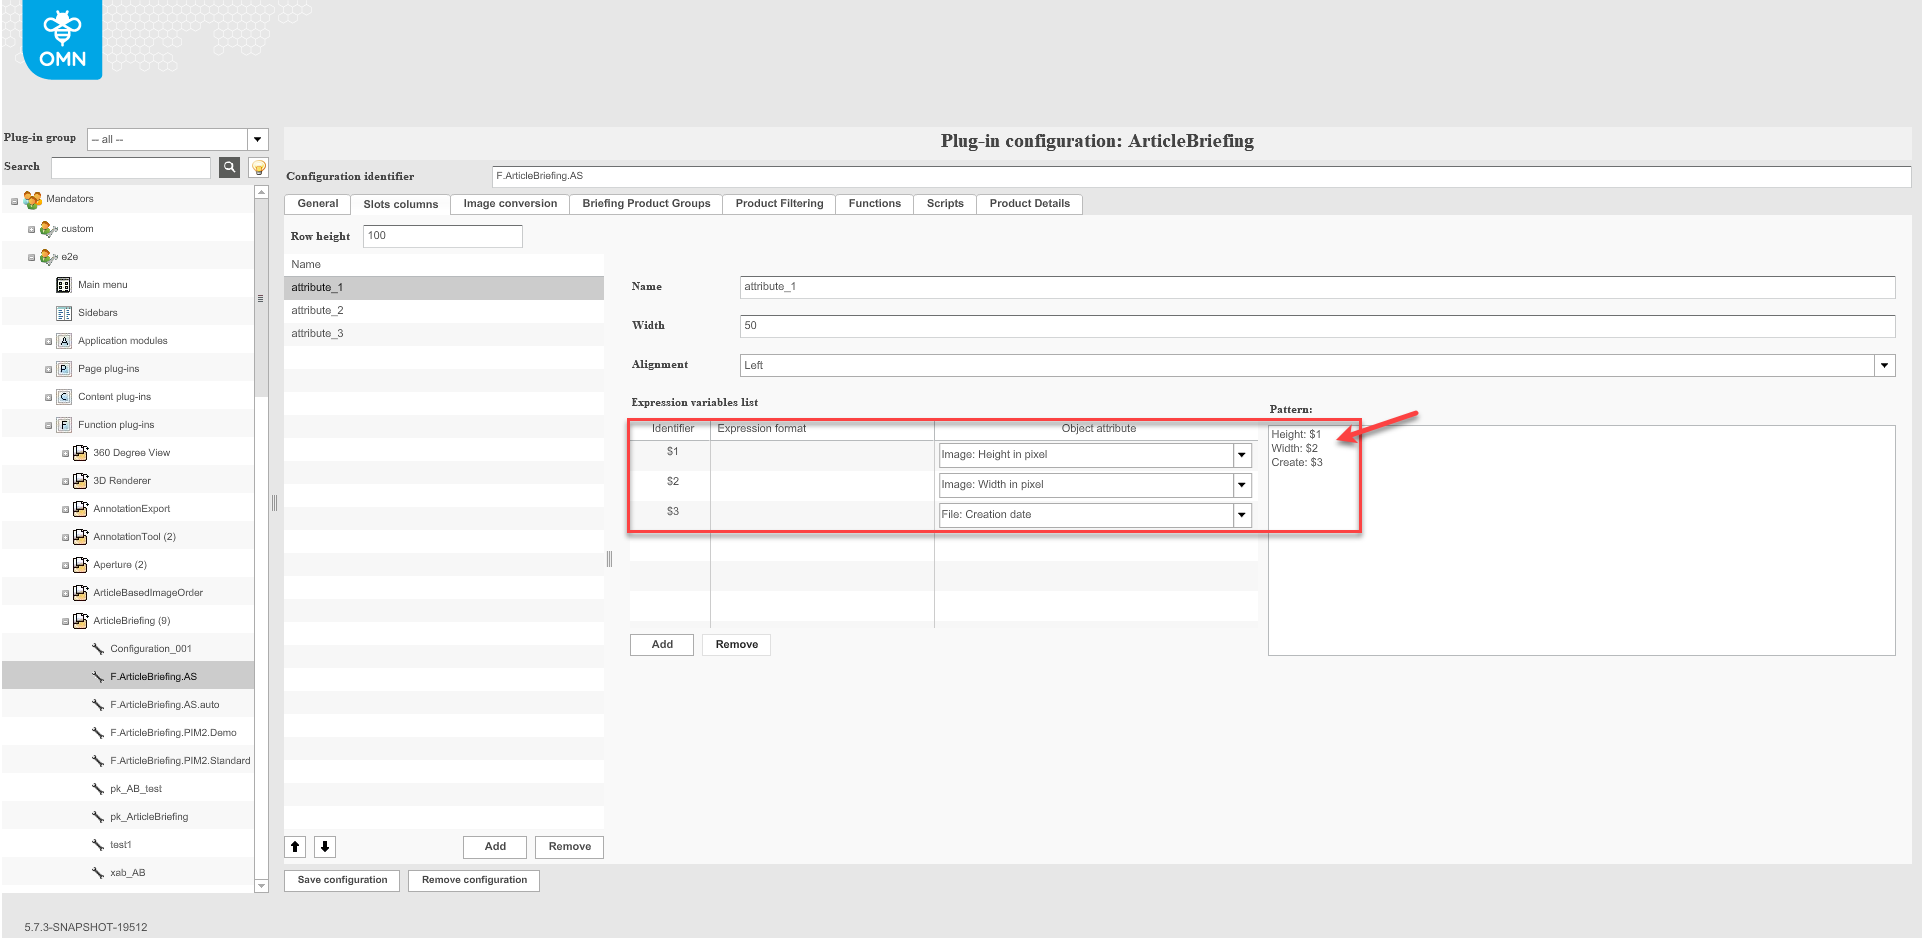
The default value is “no pattern configuration”. Don’t leave this area empty and leave the default value even if no pattern is required.
Additional slot columns are shown behind the fixed ones after they were configured. They can be shown/hide per status bar settings in Article Briefing.
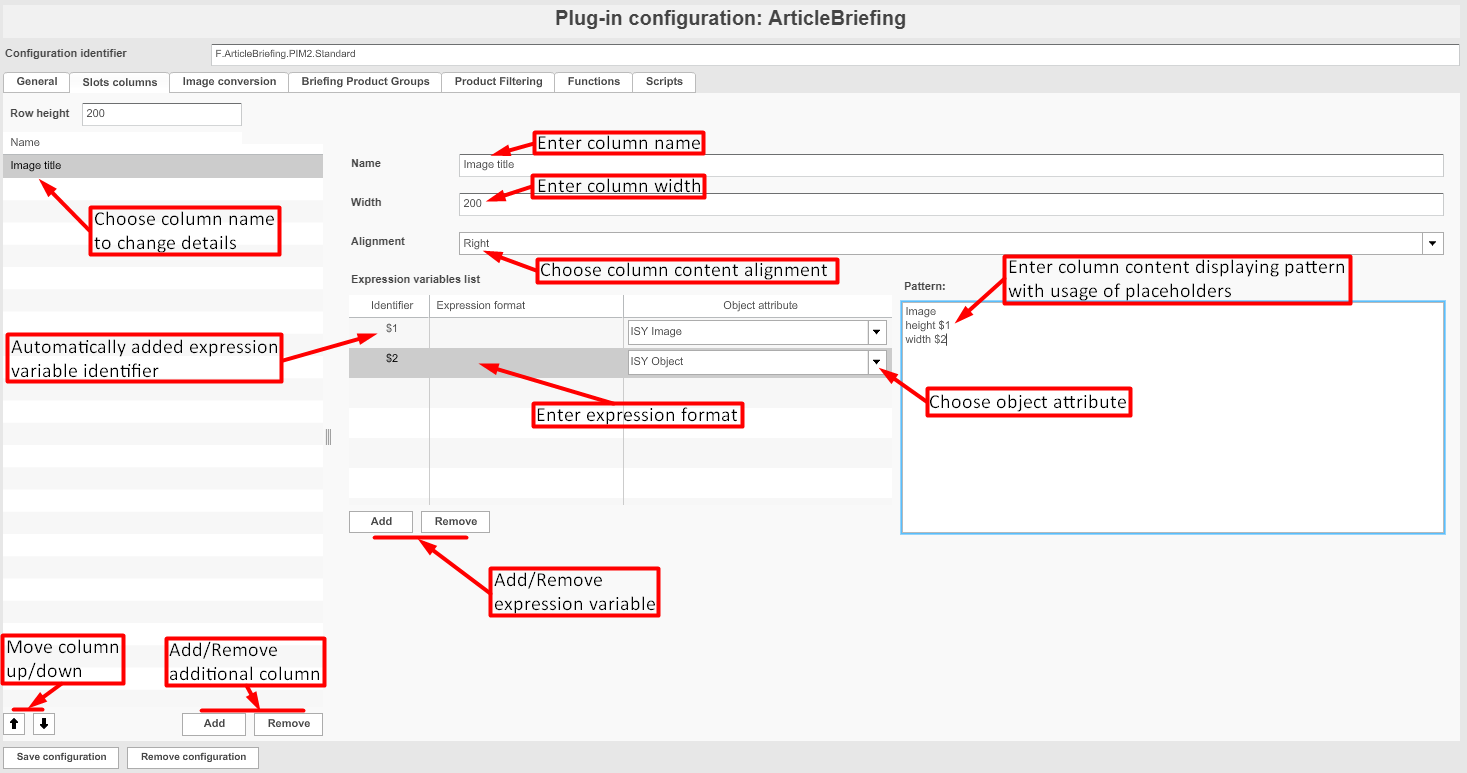
Image conversion tab
To enable the image conversion function check the "Enable image conversion" box.
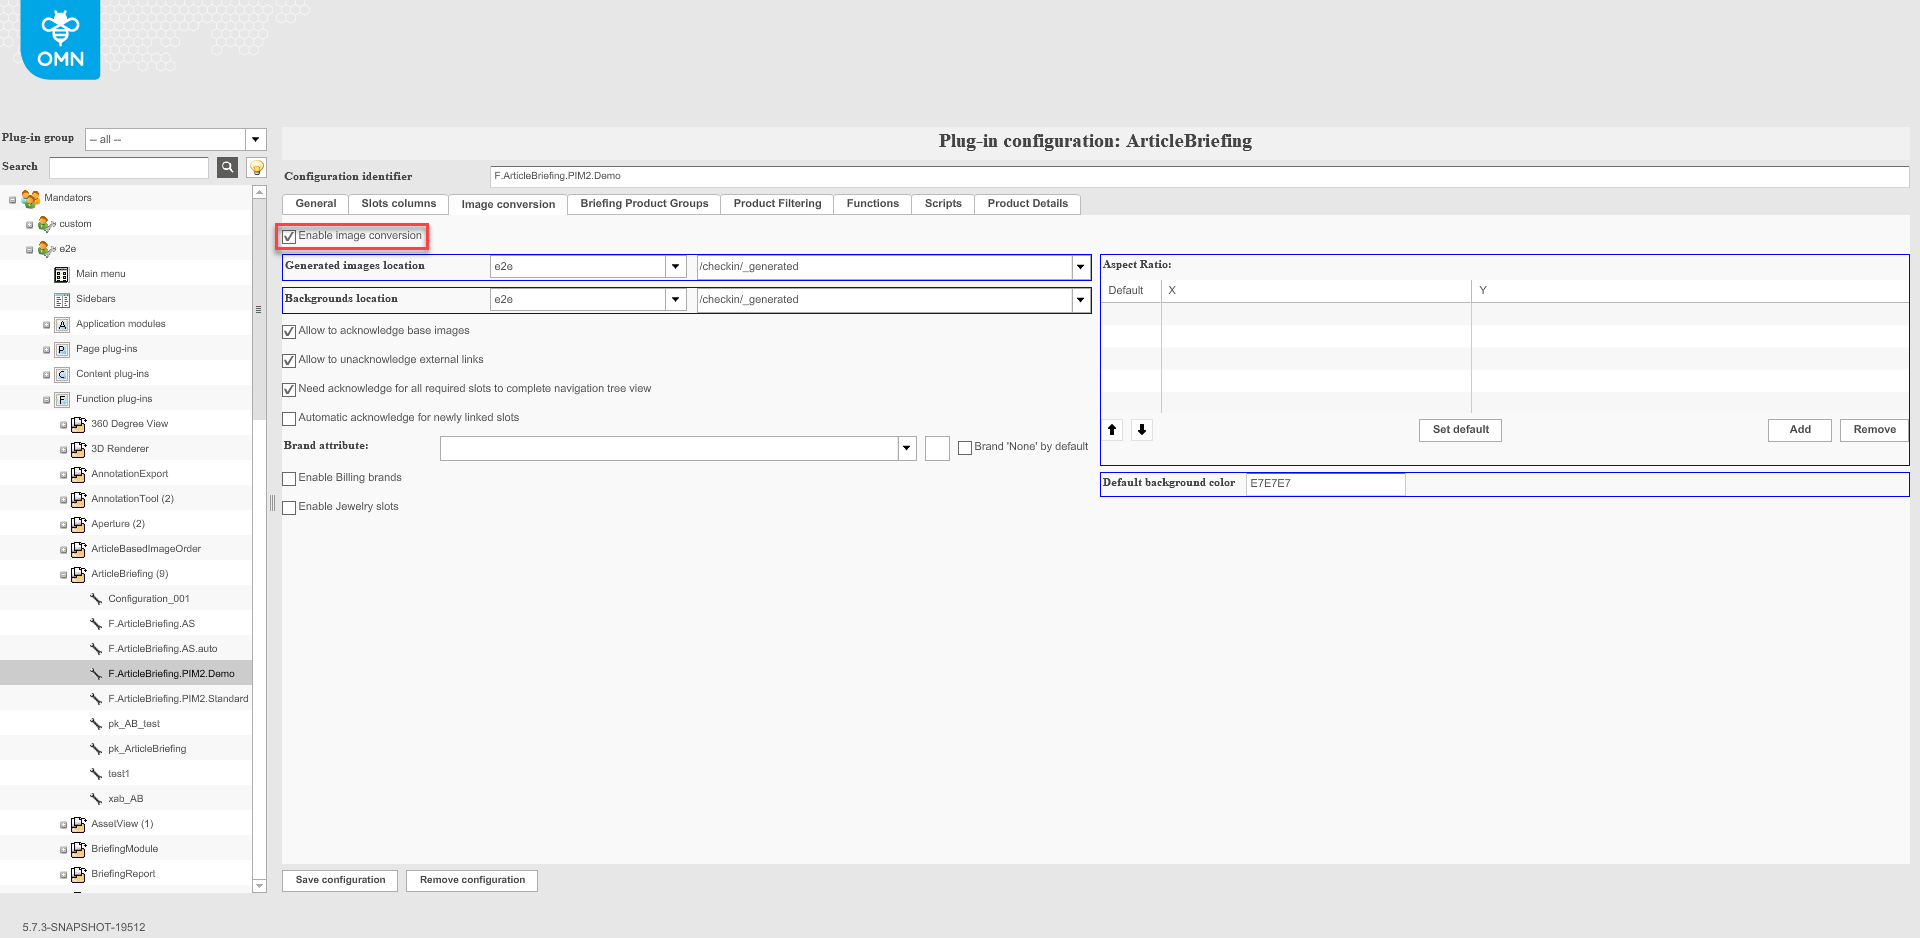
| "Generated images location", "Backgrounds location", "Aspect Ratio" and "Default background color" settings are not supported by the HTML5 client. |
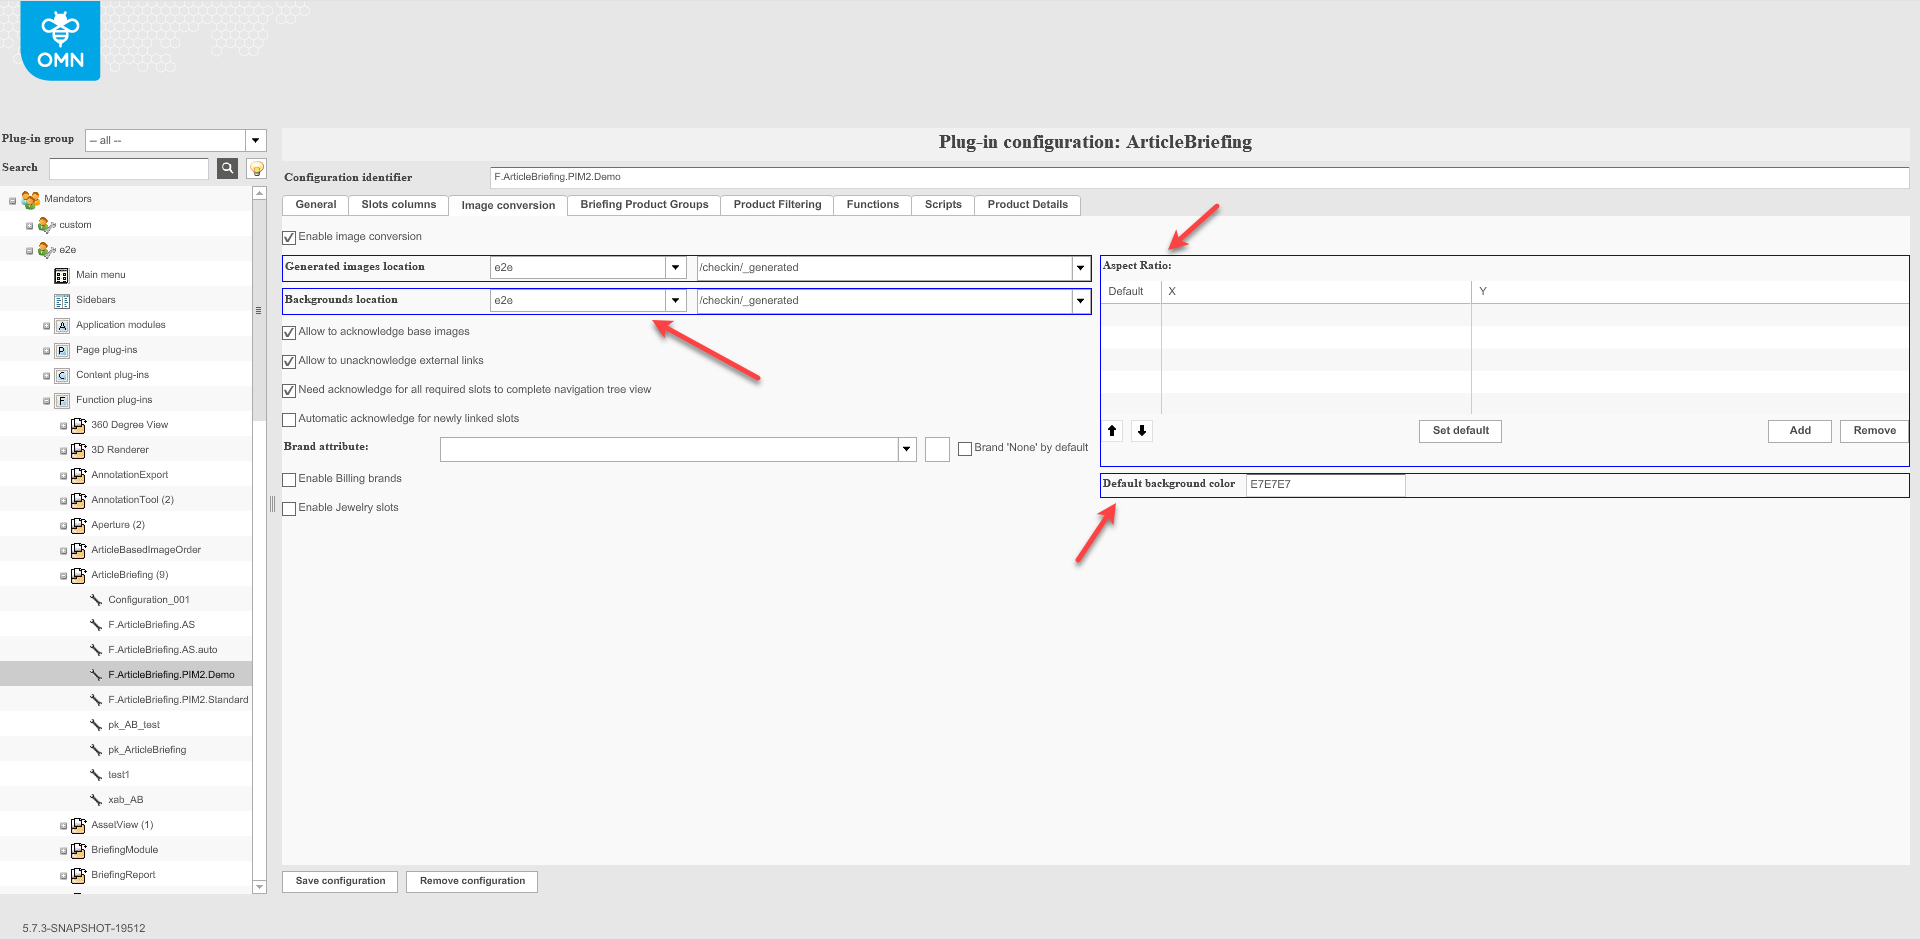
By checking the corresponding boxes acknowledgment option settings are done:
-
"Allow to acknowledge base images" enables acknowledgment of base images.
-
"Allow to unacknowledge external links" enables unacknowledgement of already acknowledged slots on the client.
-
"Need acknowledge for all required slots to complete navigation tree view" makes acknowledgment of all the slots with "Required" fields obligatory.
-
"Automatic acknowledge for newly linked slots" activates automatic acknowledgment after the image is linked to the slot on the client.
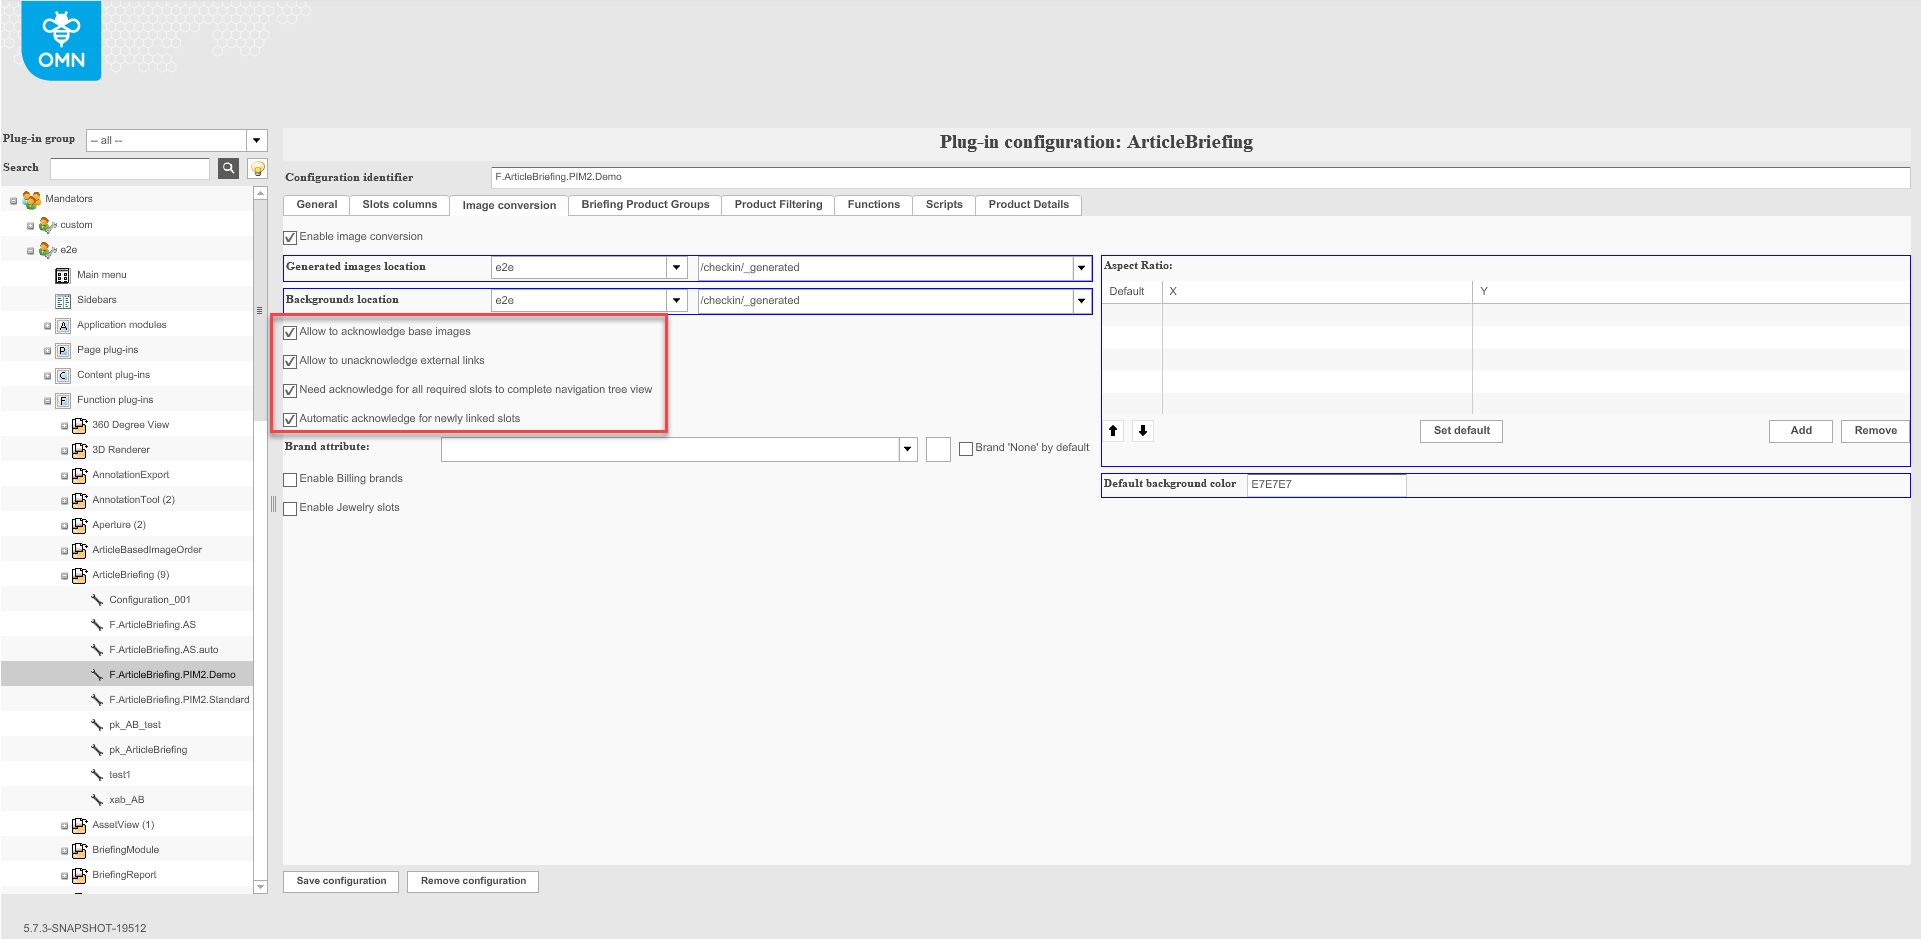
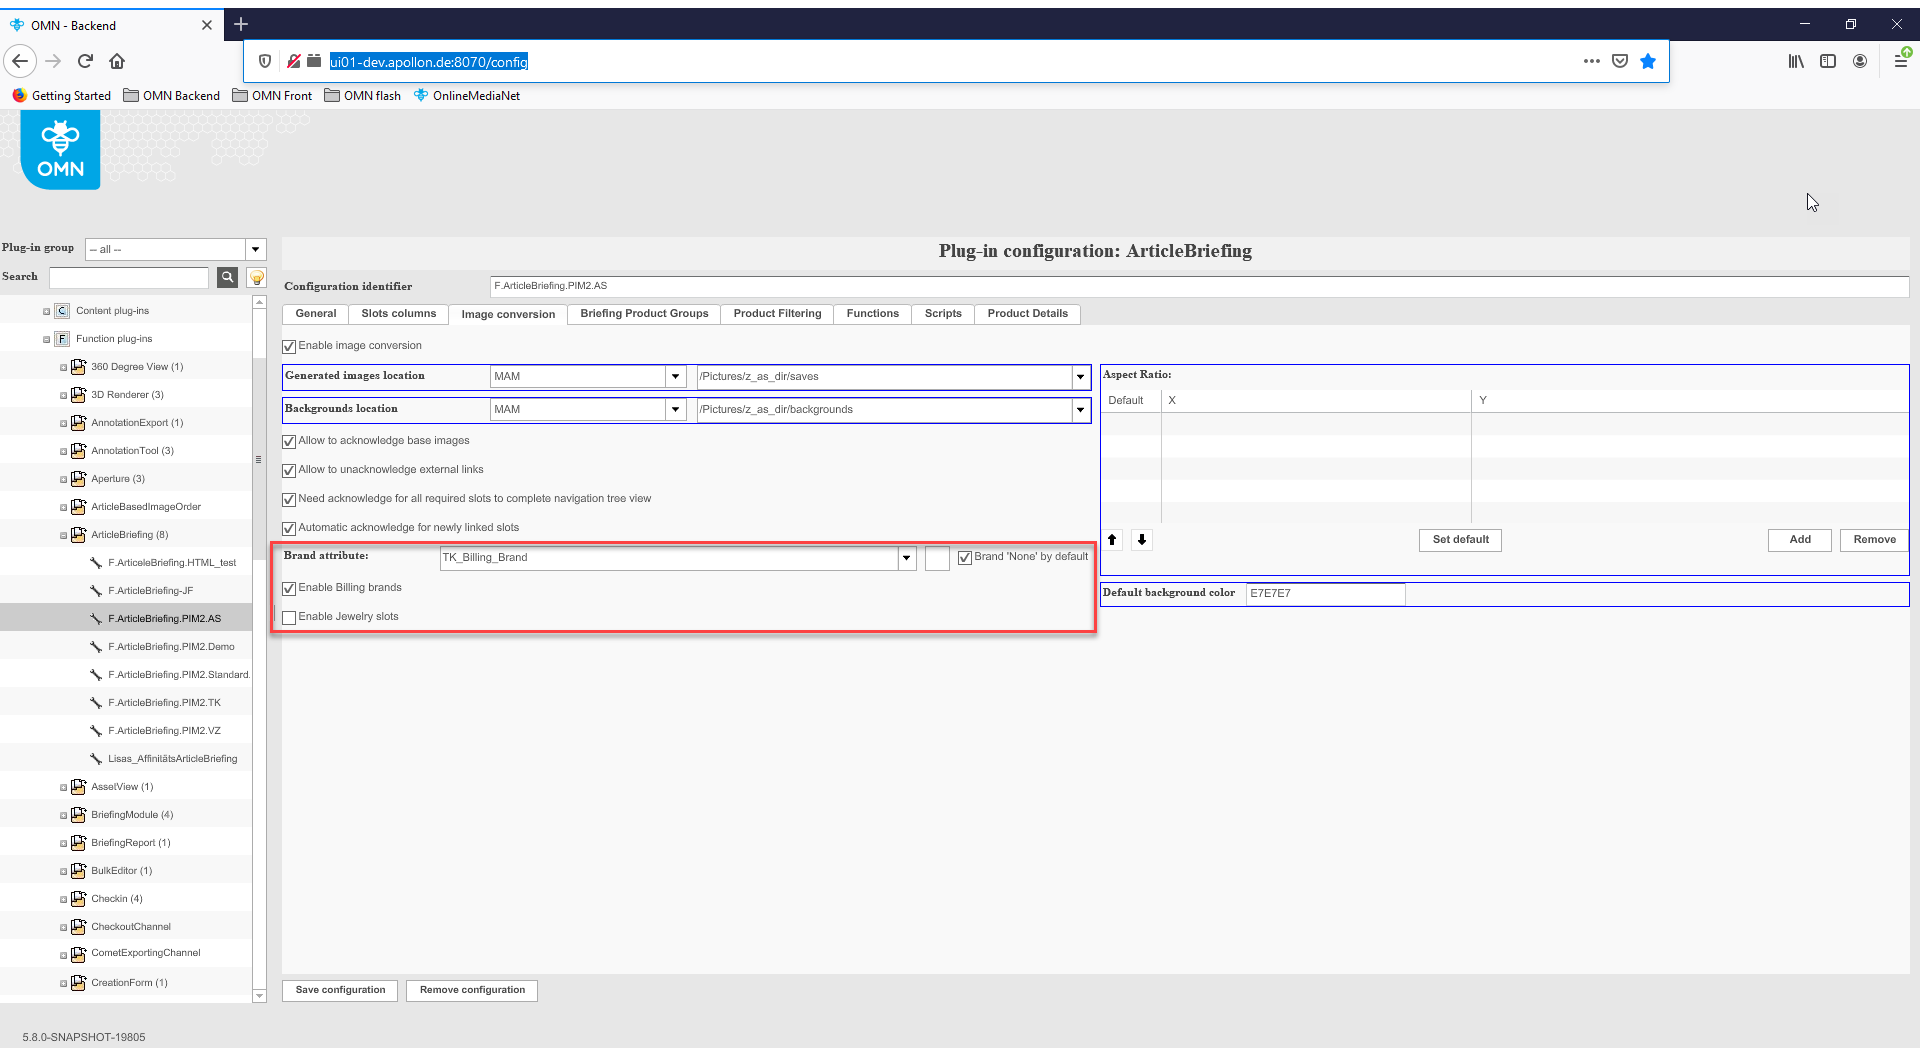
To set the Brand attribute select the required option from the dropdown. Use the "Clear"-button to clear previously made settings. A brand can be set as "None" by default if the corresponding box is checked. Billing brands function on the client is enabled by checking the corresponding boxes.
The brand attribute is shown as dropdown list in the left panel of Article Briefing. In case that none is selected "Billing Brand" dropdown is not sown.
| "Enable Jewelry slots" is not supported in the HTML 5 client. |
Briefing Product Groups tab
| The functional settings of this configuration tab are not applicable in the latest version. |
Product Filtering tab
| The functional settings of this configuration tab are not applicable in the latest version. |
Functions tab
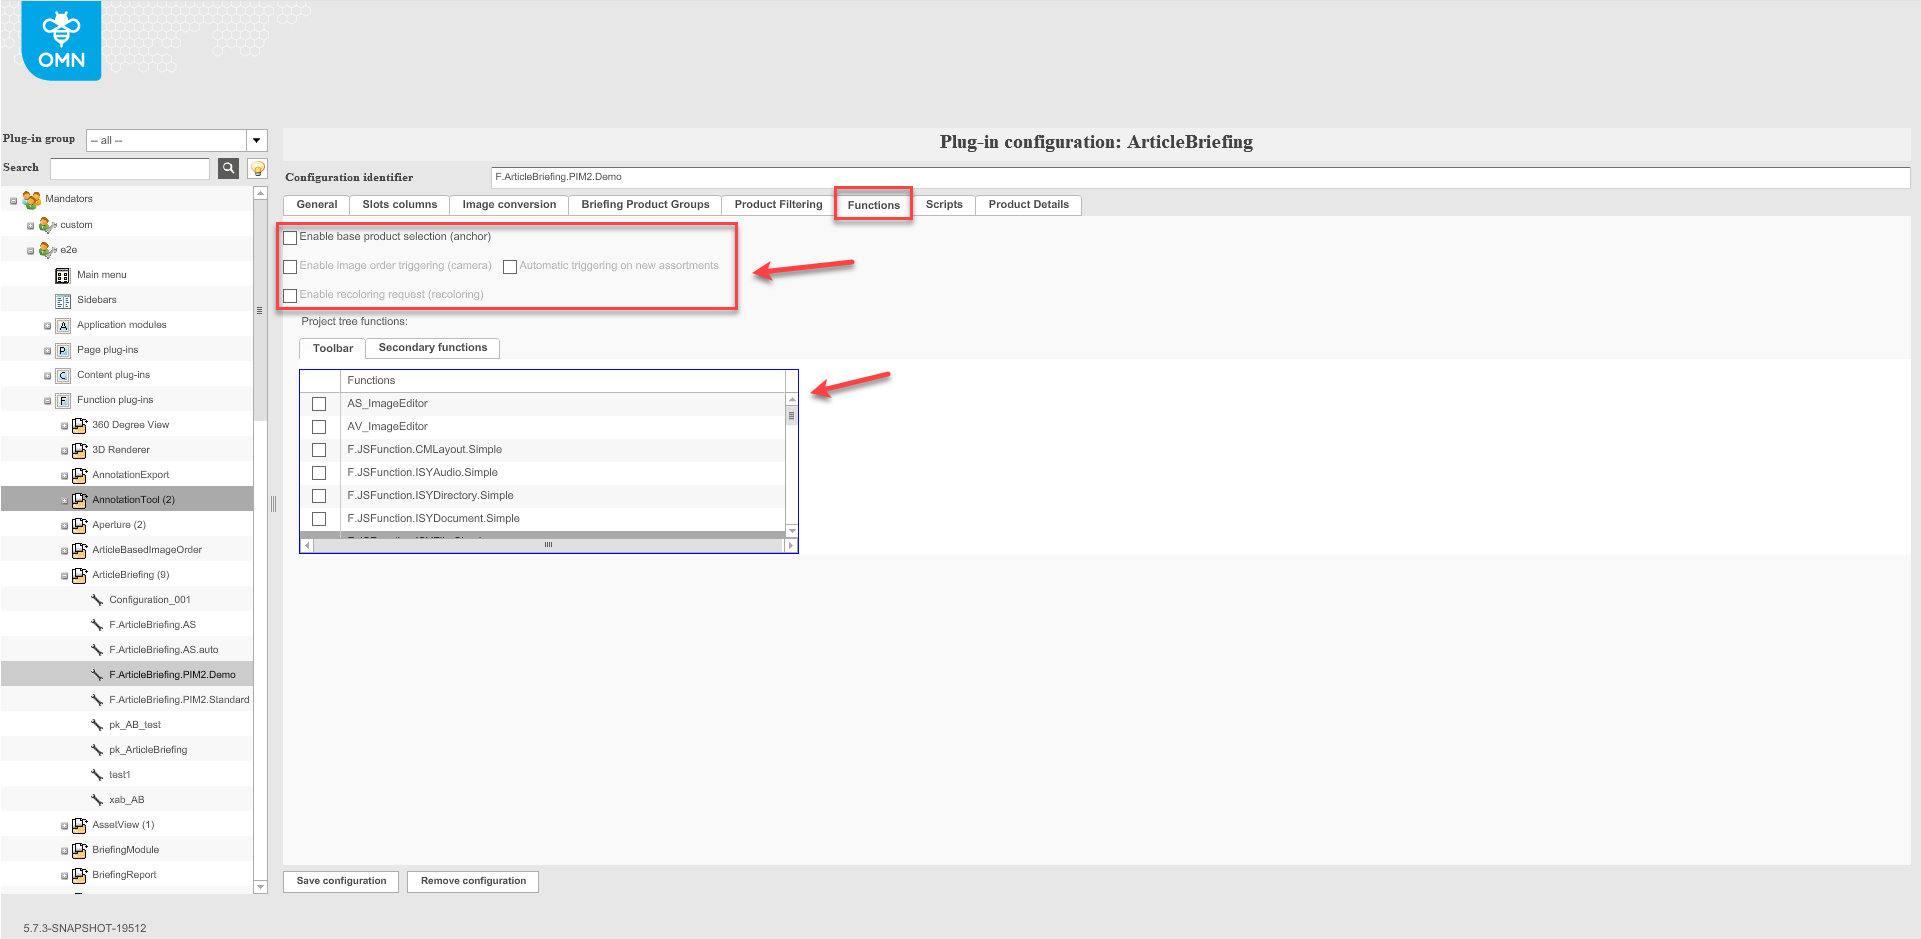
| "Toolbar" and checkboxes are not supported in the HTML 5 client. |
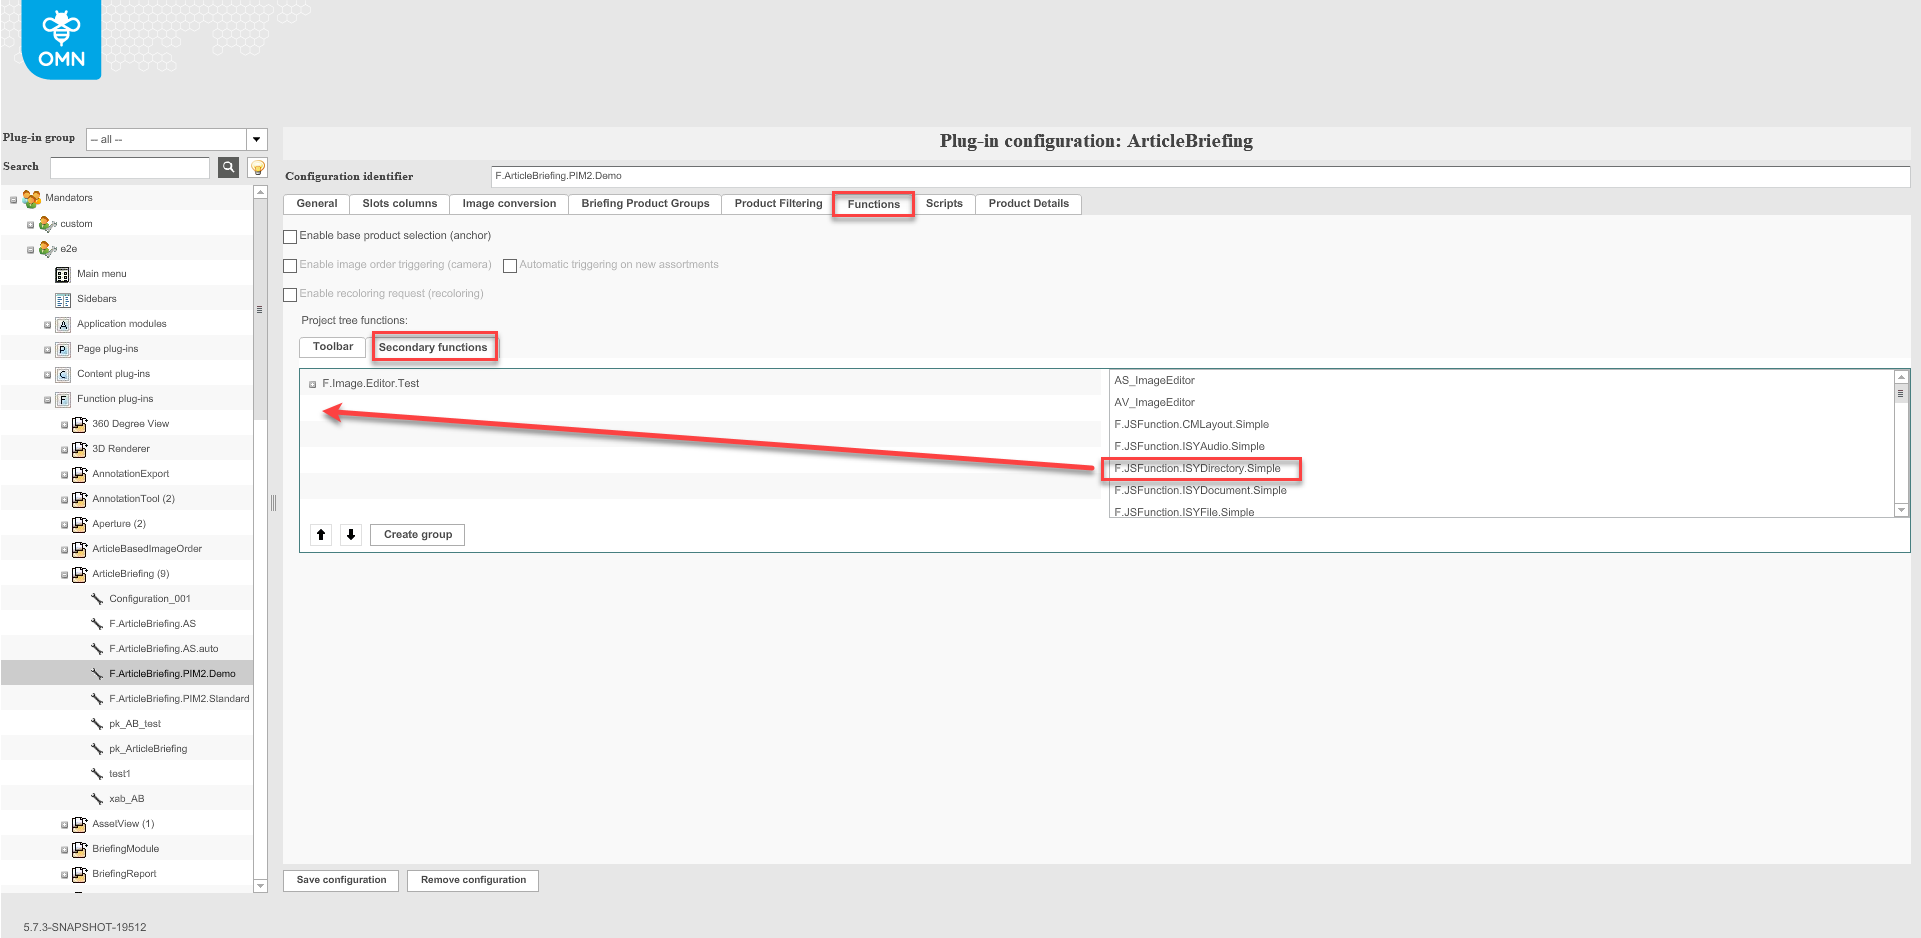
This configuration tab is used to set the secondary functions that are needed in the ArticleBriefing toolbar in the frontend. To configure the required set of secondary functions drag them from the right side and drop them on the left side.
To change the order of the secondary functions use the "Arrow up" and "Arrow down" buttons. To remove the added secondary function drag and drop it back to the right side.
To create a group click on the "Create group"-button and enter the name of the group to the input box that automatically appears on the left. To fill the created group secondary functions can be dragged and dropped from both left and right views.
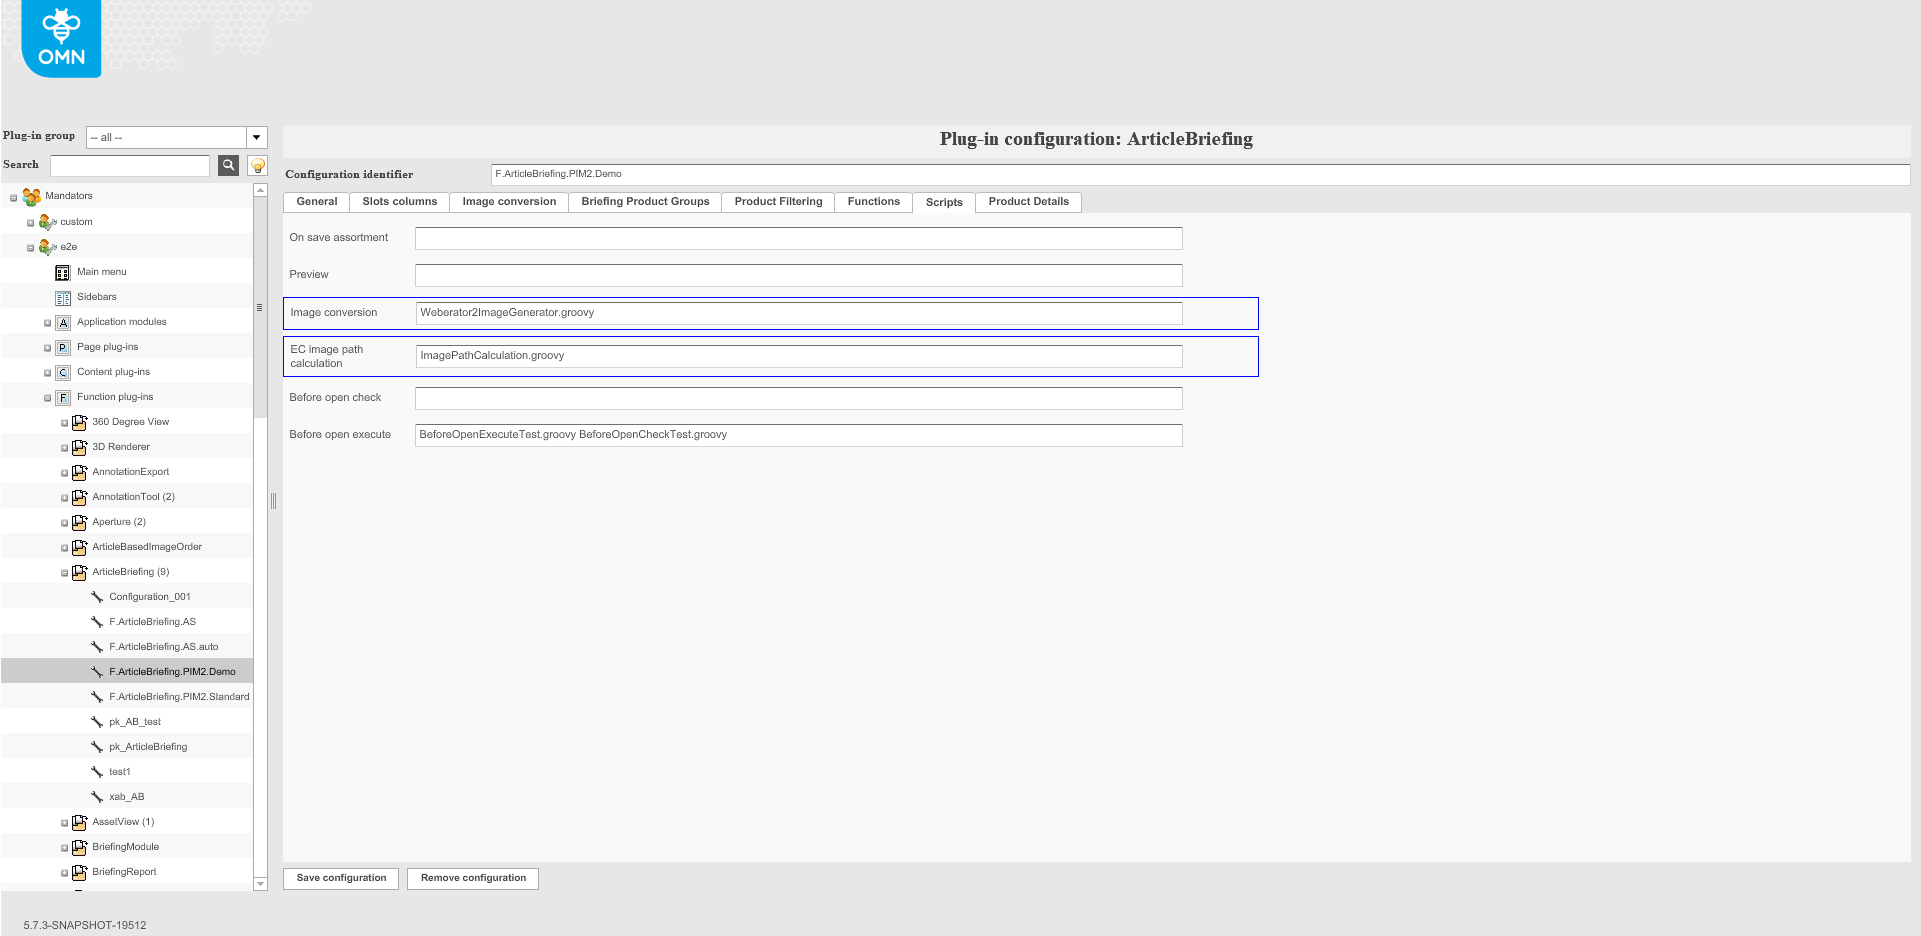
Scripts tab
The ArticleBriefing plugin allows executing pre- and post-actions using external scripts. Enter the script(s) path to be executed to a corresponding box.
"On save assortment" - script executes after execution of "Save assortment" button. (used e.g. for export, execute some functions after saving)
"Before open check" - script executes when the "ArticleBriefing" function button is clicked. (used e.g. to check if all data is migrated from the old client)
"Before open execute" - script executes automatically if "Before Open Check" script returns true (1) value
HTML5 client uses next scripts in its work:
-
On save assortment - performs post-processing for saving product assortment
-
EC image path calculation - calculates the image path using the information about project, product, reference type and asset. Used in only for copying image slots when image slot contains EC image
-
Before open check - Checks whether the images which should be processed exist. The script must return value of the either "int" or "Integer" data type.
-
result = 0 - no images should be converted;
-
result = 1 - there is at least one image that should be converted;
-
exception is thrown - the script is wrong or the exception is thrown
-
| HTML5 client uses this script for migration purposes. |
-
Before open execute - Execute some actions if images which should be processed exist. The script must return value of the either "int" or "Integer" data type.
-
result = 0 - images have been converted successfully
-
result = 1 - images have not been converted successfully
-
exception is thrown - the script is wrong or the exception is thrown
-
| HTML5 client uses this script for migration purposes. |
-
Preview script is deprecated and not used in HTML5 client
Scripts are managed in OMN Git in the next directory: omn/…/plugins/plugin-article-briefing/distrib/src/main/resources/config/articlebriefing/
Scripts are deployed with OMN (works out of the box). Target path: /usr/local/omn/config.samples/imageeditor/
Configuring ArticleBriefing scripts after deployment
After the application has been deployed, to enable scripts you need to perform the next steps:
-
Copy scripts from the default config directory (/usr/local/omn/config.samples/articlebriefing/) to application config directory: /usr/local/omn/config/groovyscripts/<mandator-name>/
-
Configure needed scripts on OMN config client
| "Preview", "Image conversation" and "EC image path calculation" are not supported in the HTML 5 client. |

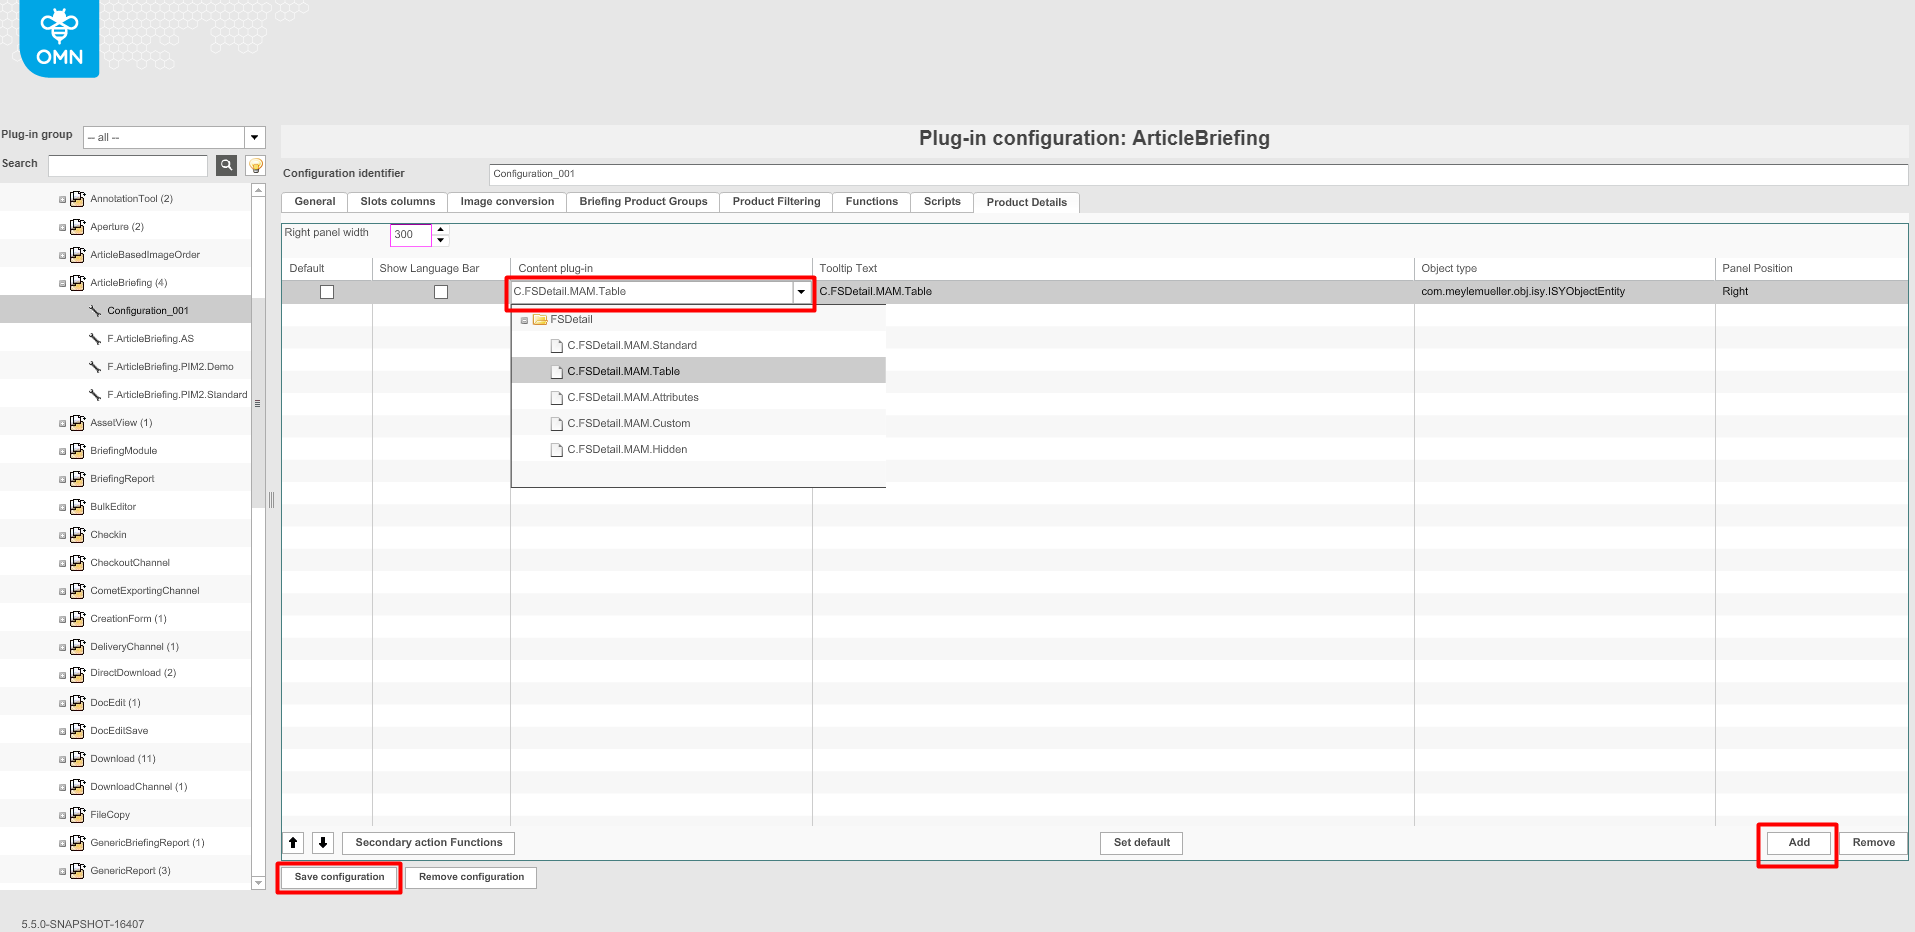
Product details tab
One or several FSDetail plug-ins can be added to the ArticleBriefing. To add a plug-in click on the "Add"-button, select the required content plug-in from the dropdown and save the changes by clicking the "Save configuration"-button.
Data in the "Tooltip Text", "Object type" and "Panel Position" columns are filled in by default (FSDetail plug-in can be added only to right position).
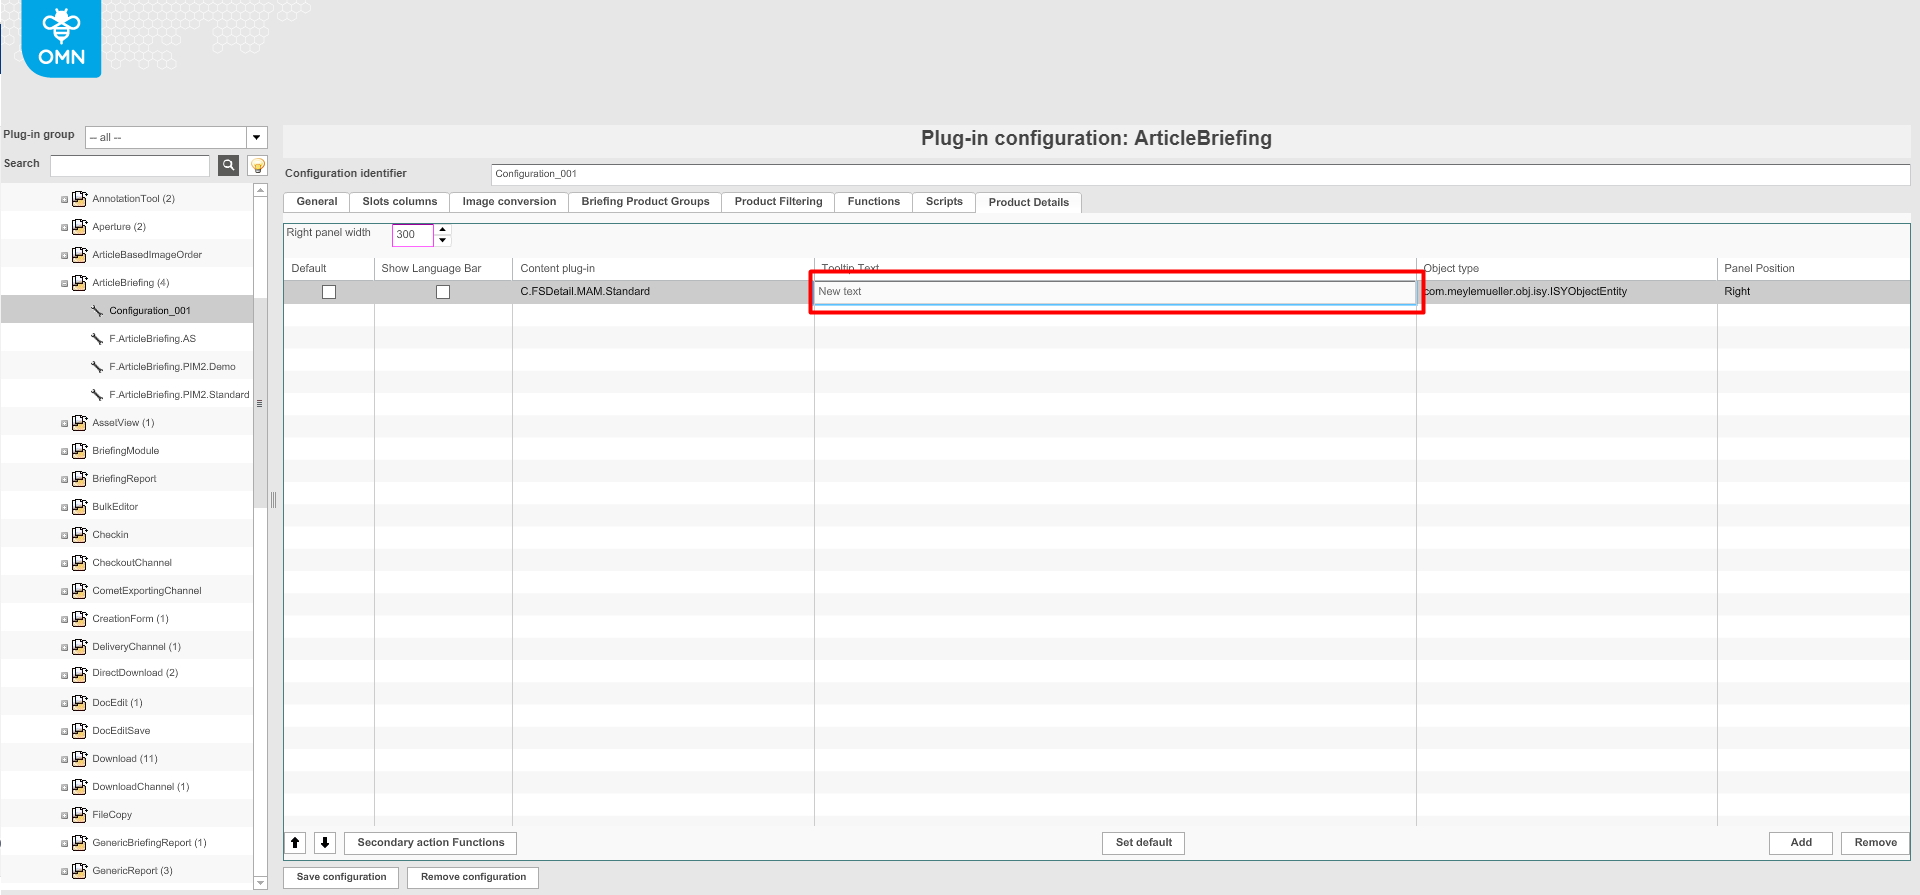
"Tooltip Text" data can be changed if necessary by clicking on the default text, removing it, and typing in a new text.
If several plug-ins are set and it is required to set the default plug-in, select the required plug-in from the list of already added plug-ins and press the "Set default"-button. The checkbox in the "Default"-column is then activated.
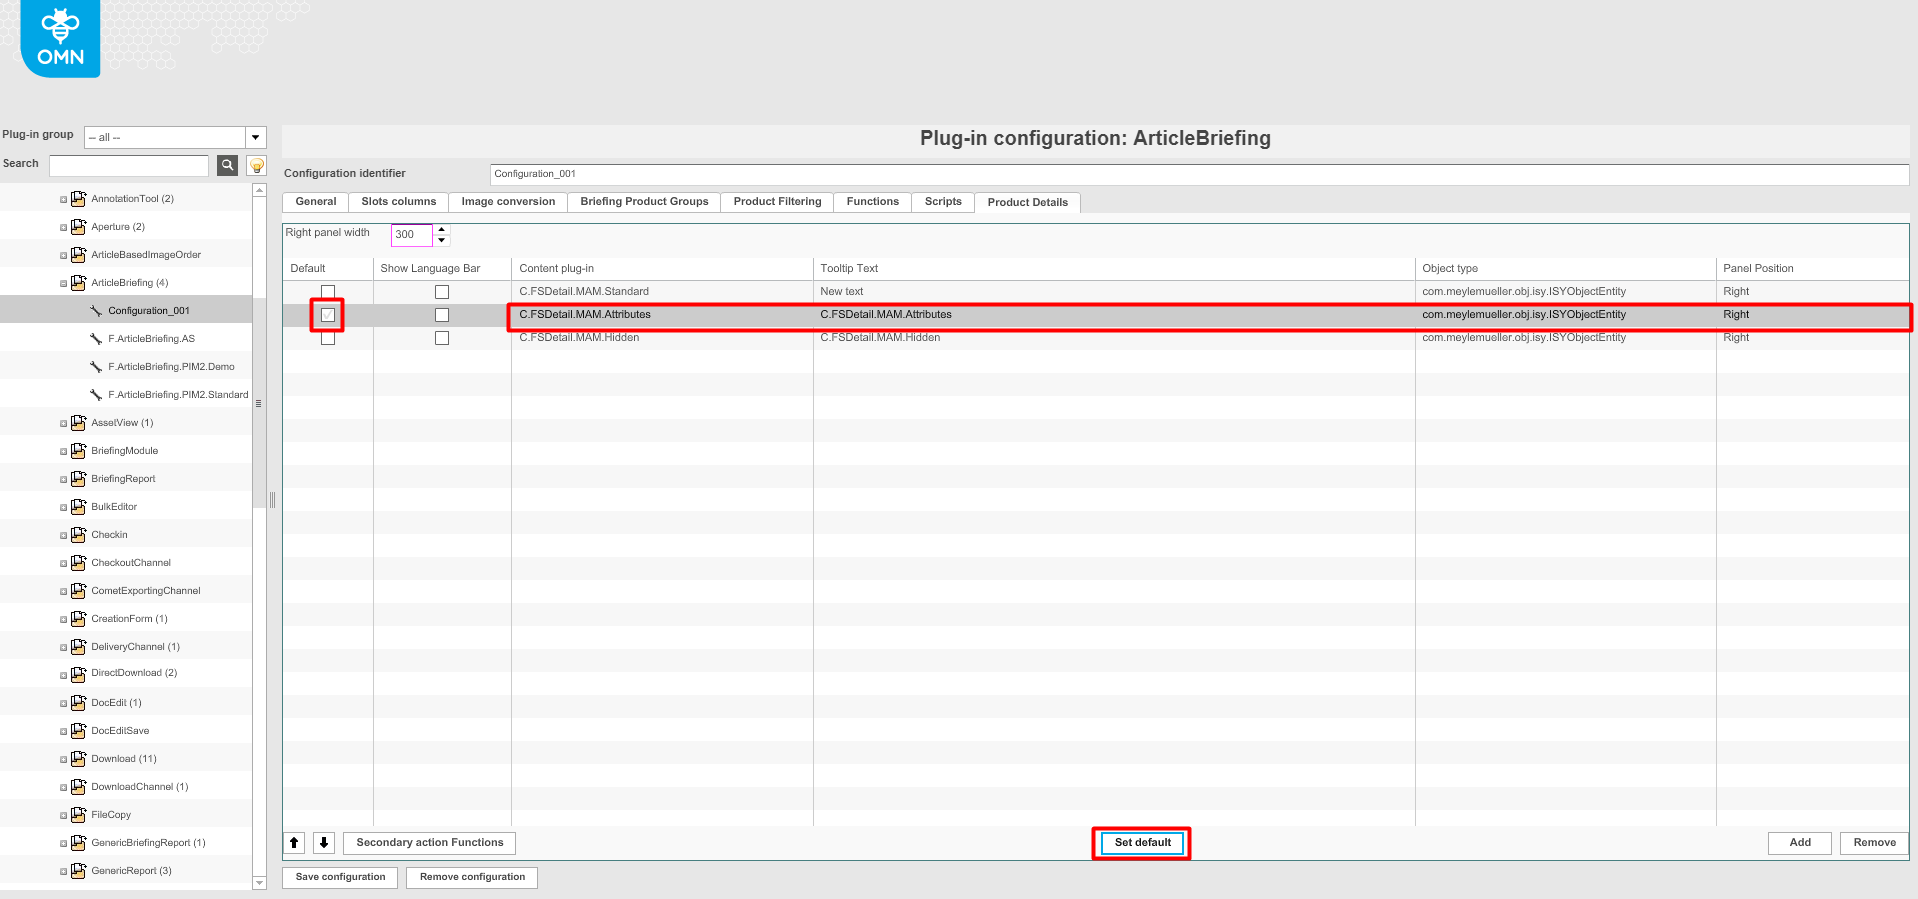
Press the "Save configuration"-button to save made changes.
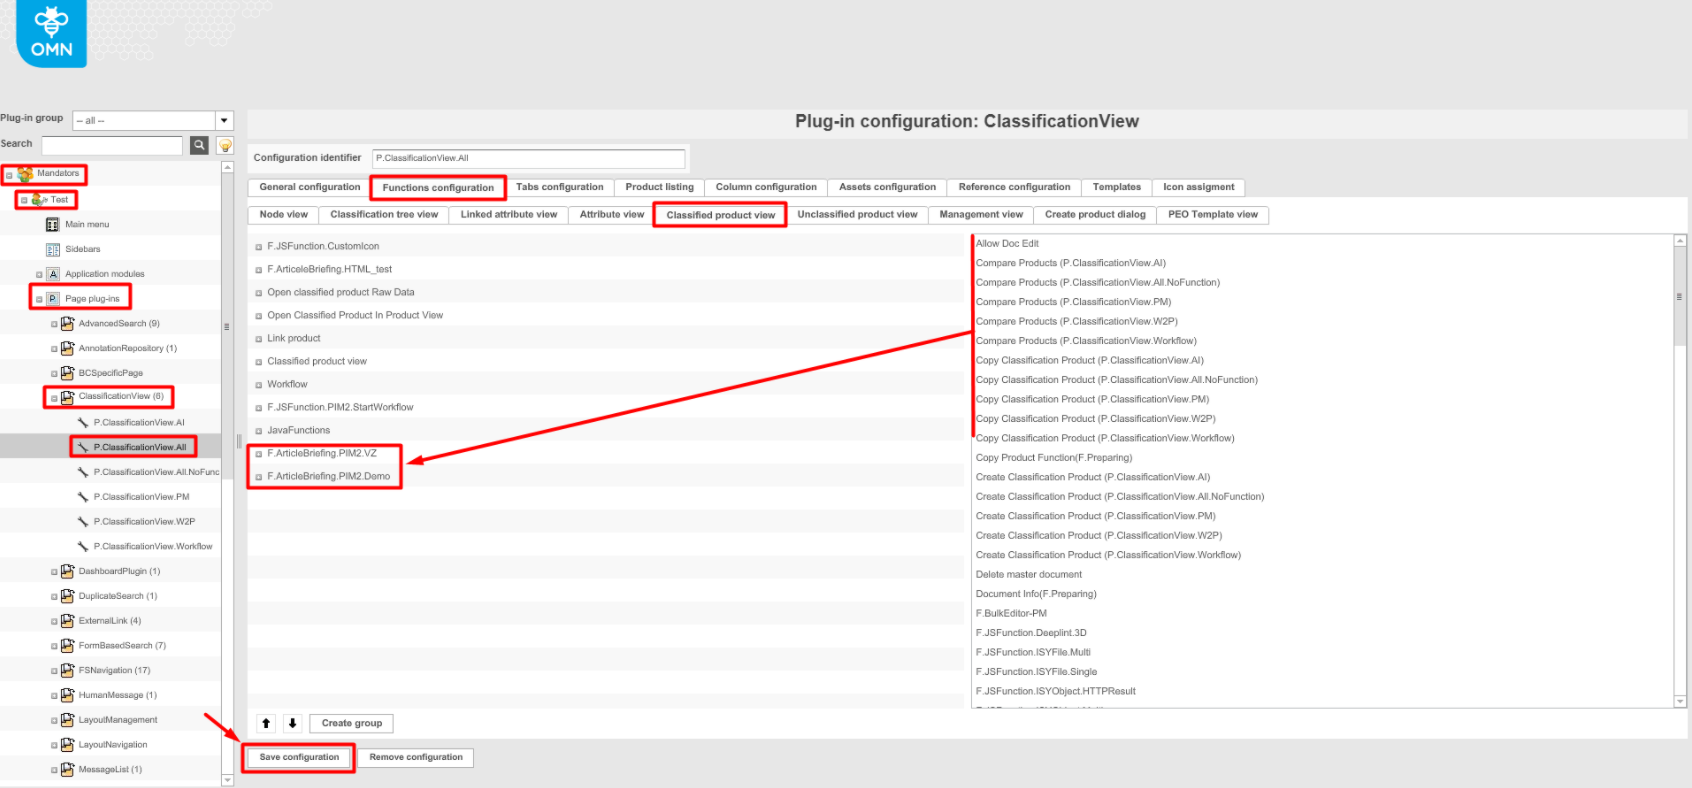
Configuration of ArticleBriefing for Classification View
-
To configure the created ArticleBriefing plugin in the classification view, navigate to the back-end configuration
-
In the left view expand "Mandators"→ "<Mandator name>" → "Page plug-ins" → "ClassificationView" → "P.ClassificationView.All" (or different if required)
-
Select the "Functions configuration" tab
-
Select the "Classified Product View" tab
-
Drag and drop the created ArticleBriefing plugin from the right panel to the left one and save the configuration
-
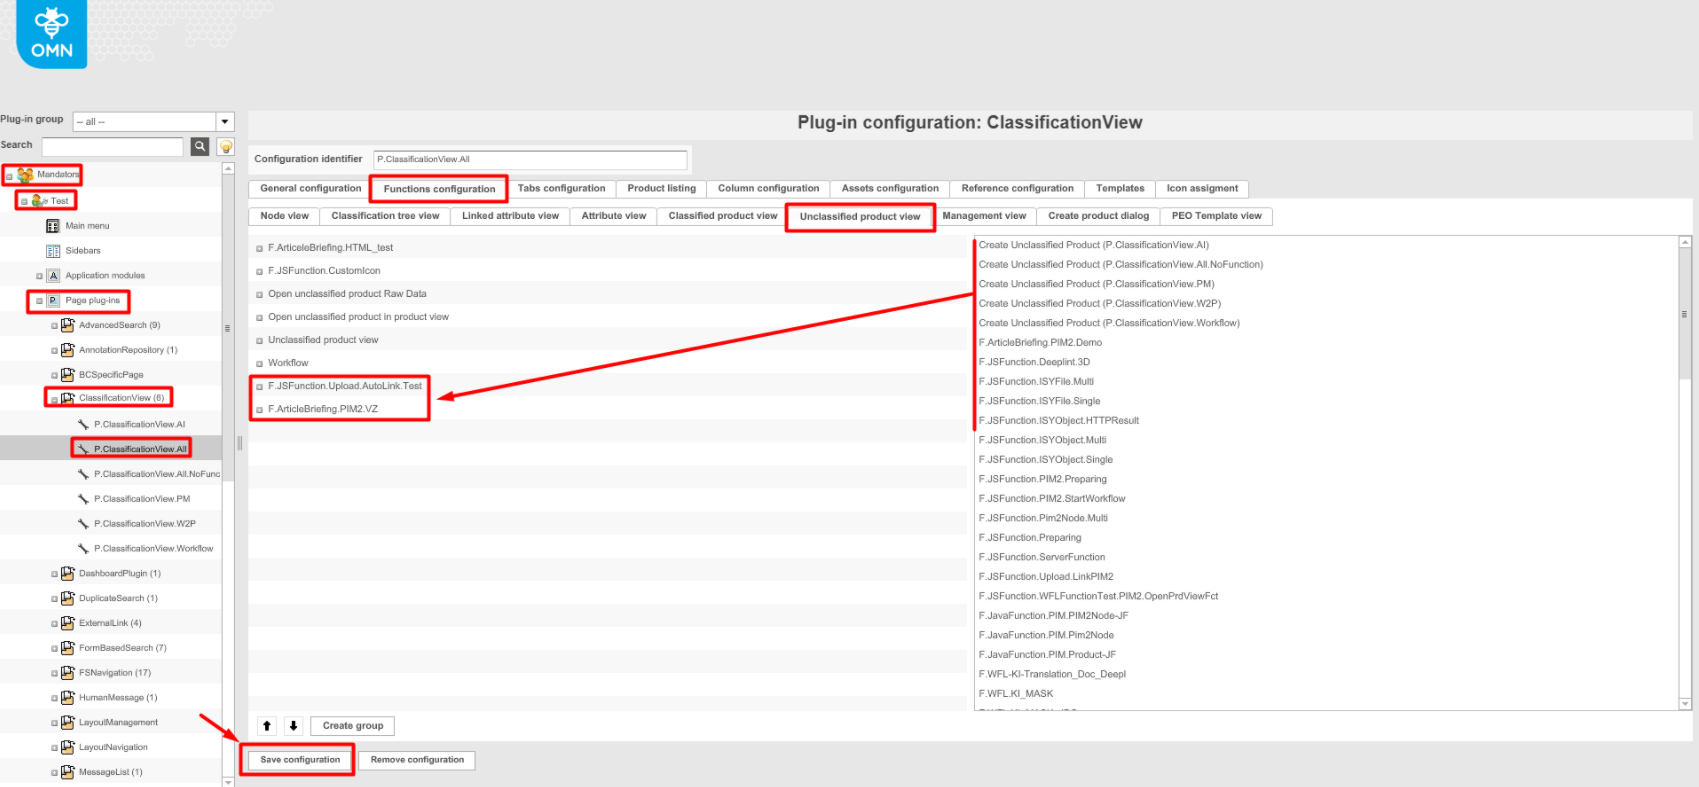
Repeat the same in the "Unclassified product view tab" and save the configuration
-
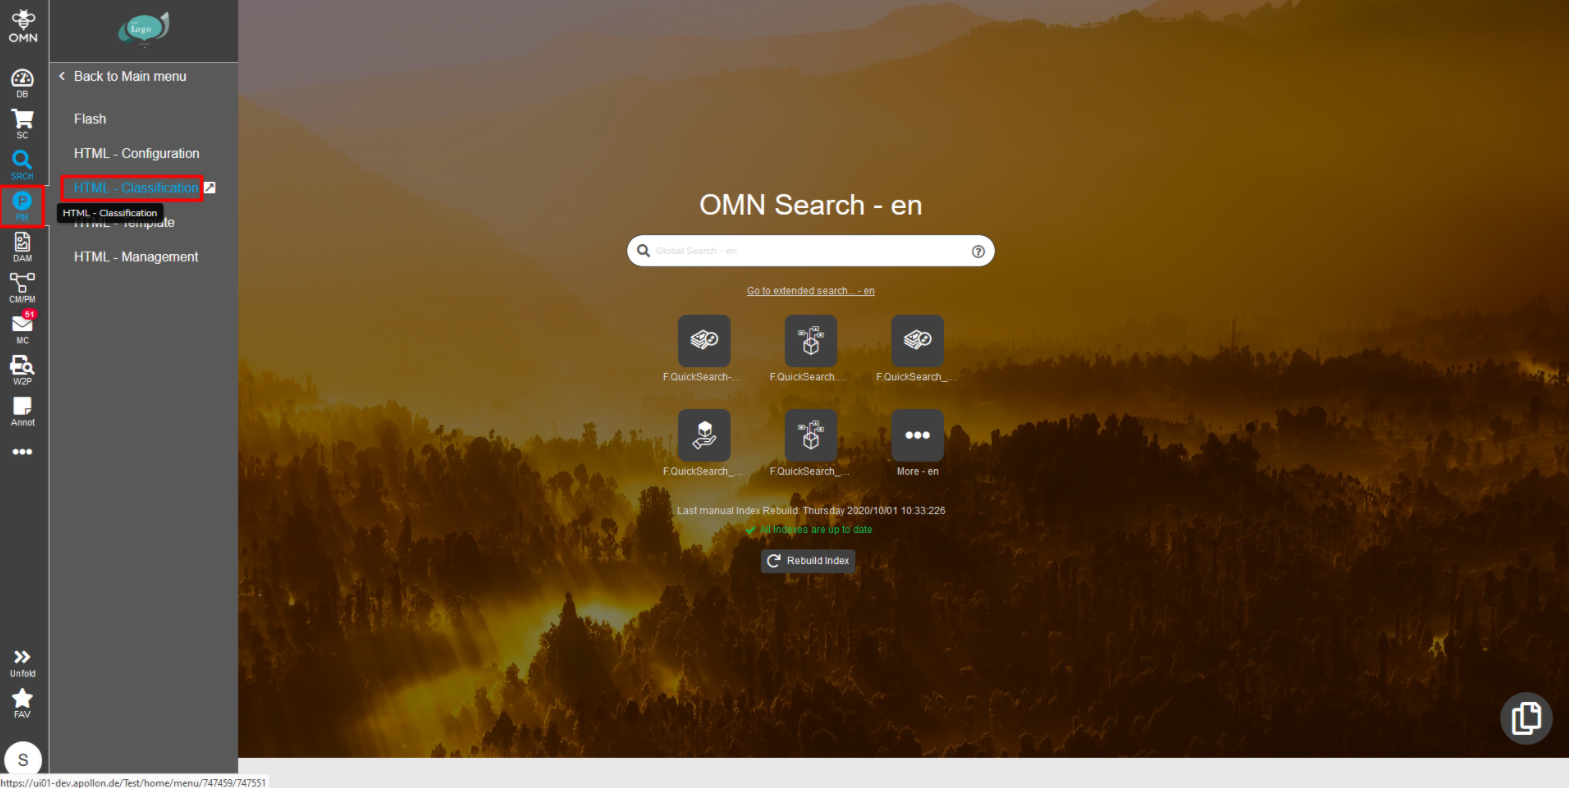
After configuration settings are done, re-login to the client and navigate to Menu → PIM → Classification
-
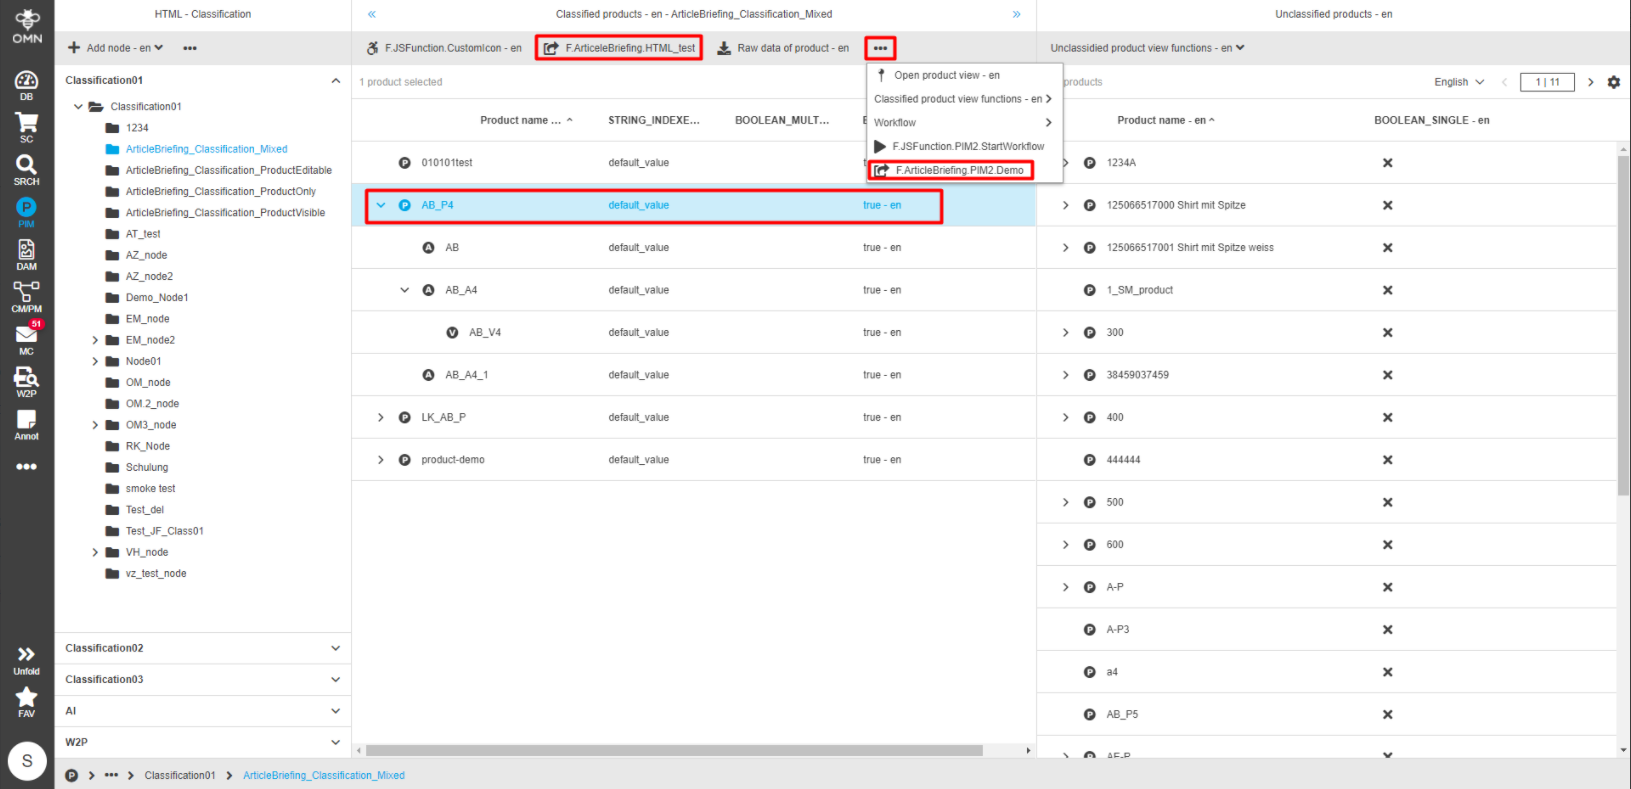
Open the required product
-
From the central view select the product and check the central view toolbar for a new ArticleBriefing plug-in to appear. It might be under the dots dropdown menu.
-
ArticleBriefing editor for the related object should open following a click.
Configuration of ArticleBriefing for ProjectProduct view
| ArticleBriefing for ProjectProduct can be configured in the back-end only if at least one project has been created. |
-
To enable ArticleBriefing for Product View plugin navigate to the back-end configuration
-
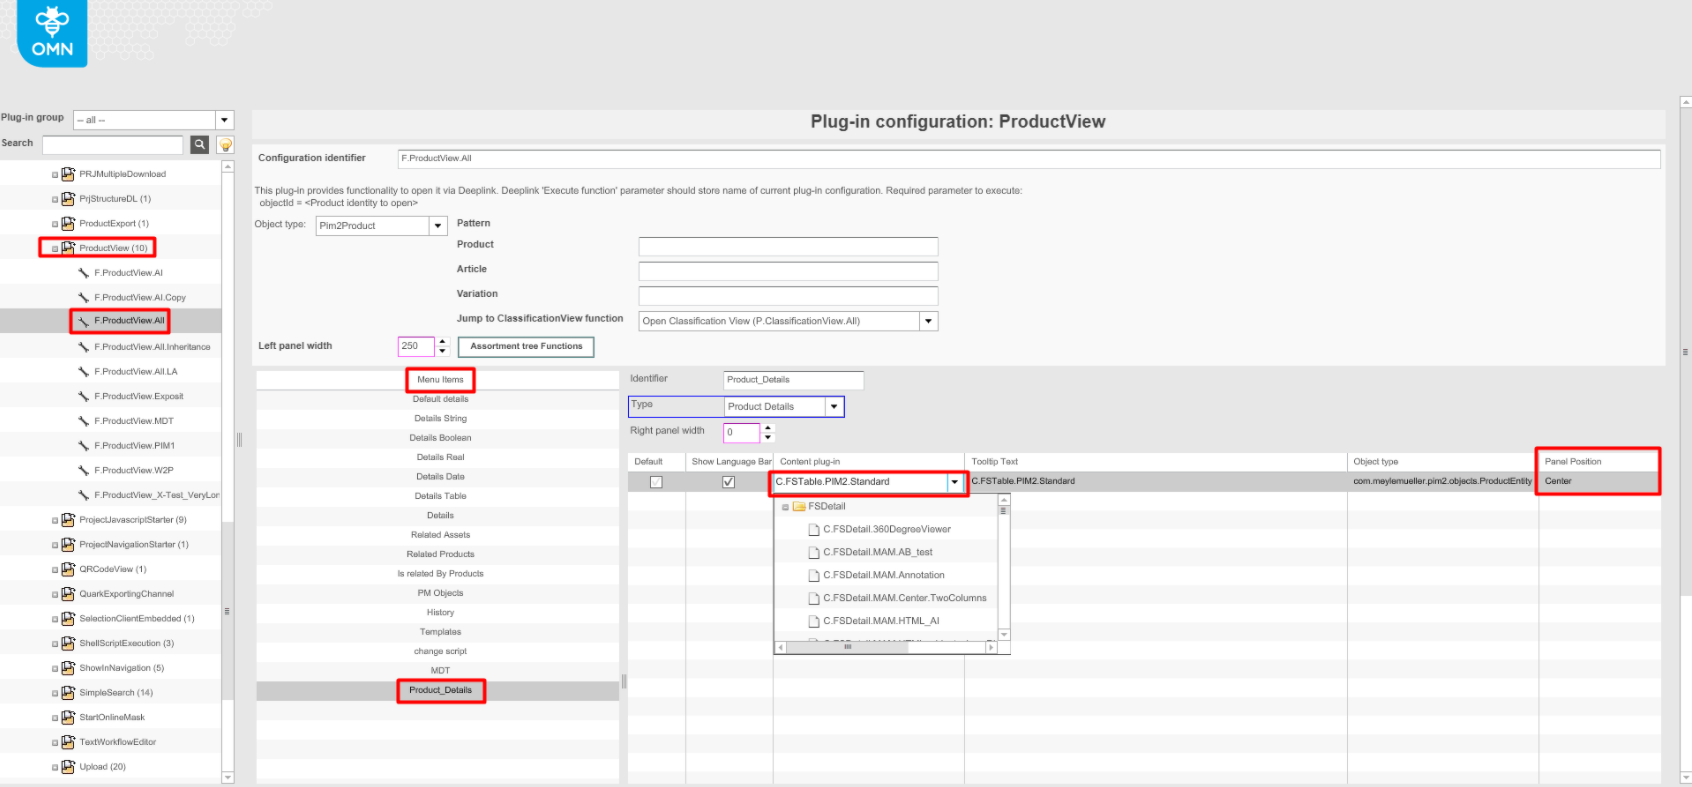
Expand "Mandators" → "<Mandator name>" → "Function plug-ins" → "ProductView" → "F.ProductView.All" (or different)
-
Select "Product_Details" from the "Menu Items"
-
Select "C.FSTable.PIM2.Standard" content plug-in from the list with "Panel Position" = "Center"
-
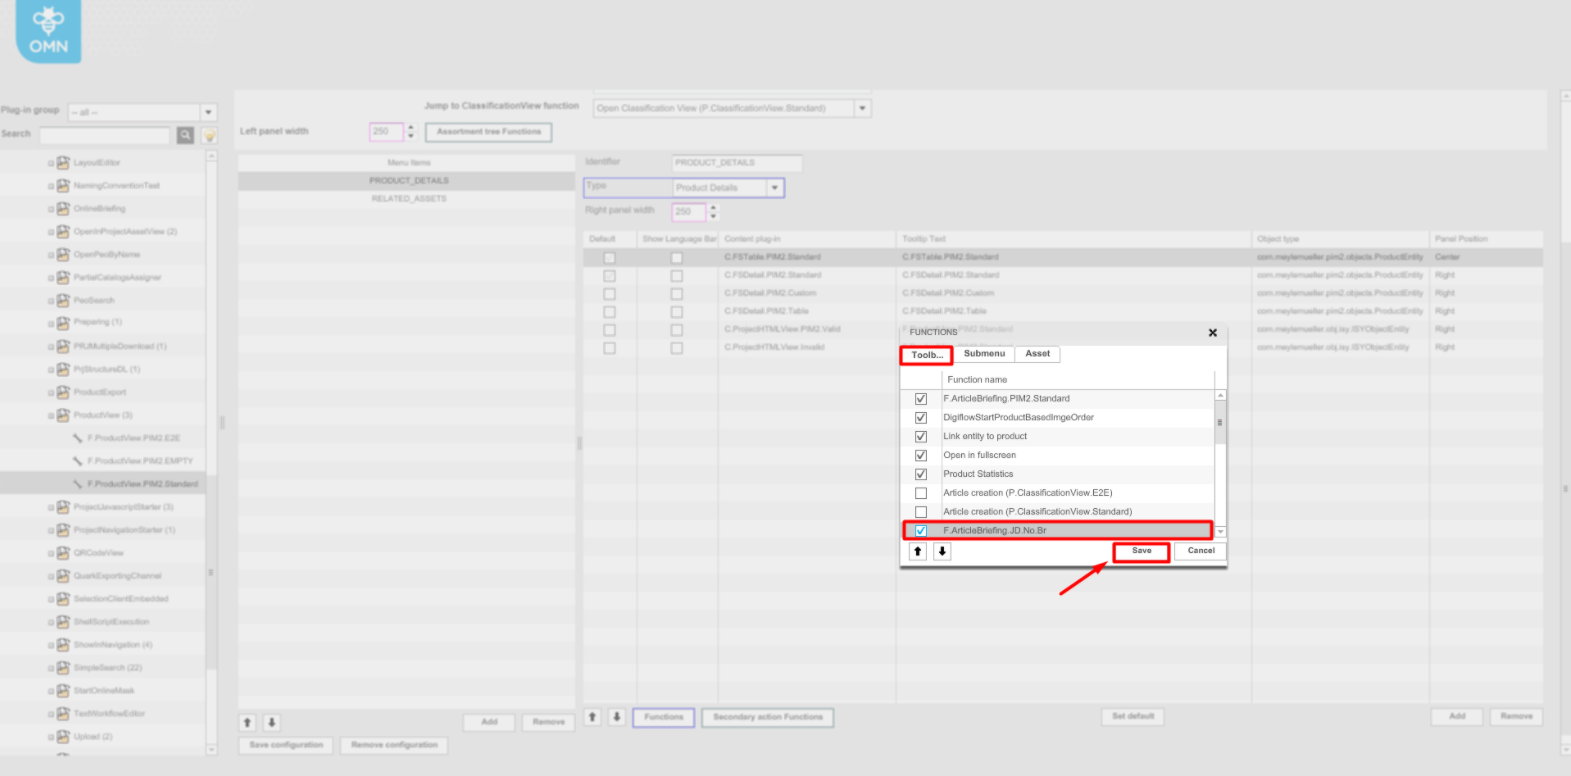
Scroll the page down and click the "Secondary actions Functions"-button at the bottom

-
In the modal window that appears automatically select the "Toolbar" tab, enable the "ArticleBriefing" plugin by clicking on the checkbox, and save changes.
-
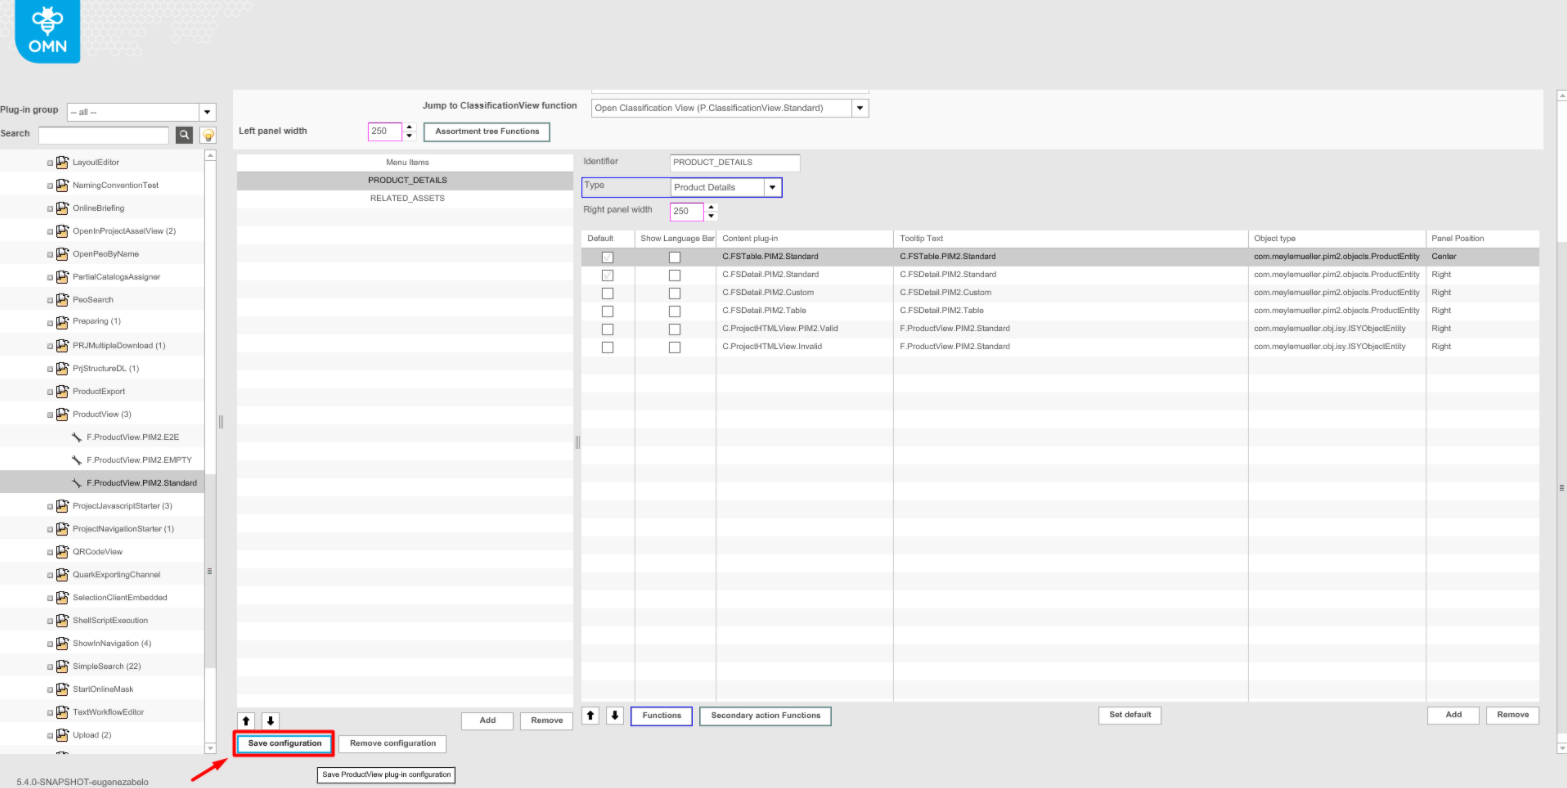
Save the plugin configuration
-
After all the settings are done, re-login to the client
-
Expand the required project
-
Select the product in the central view and check the central view toolbar for a new ArticleBriefing plug-in to appear. It might be under the dots dropdown menu.
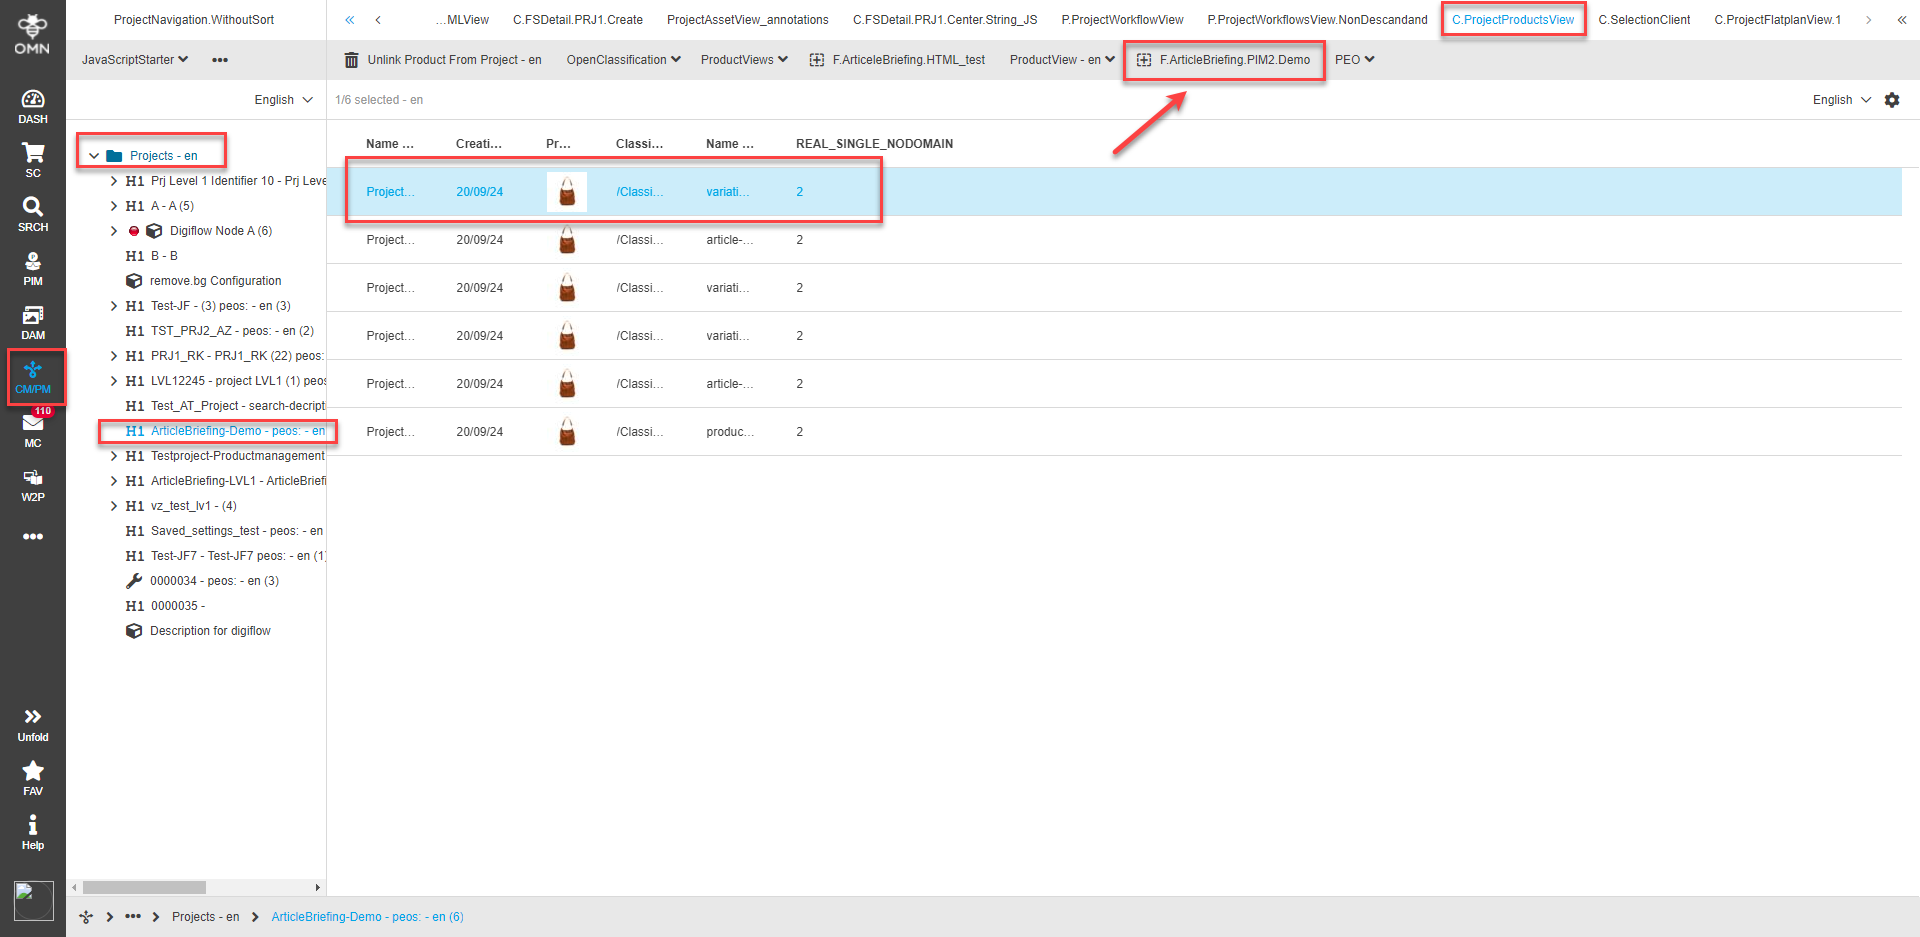
-
ArticleBriefing editor for the related object should open following a click.

Configuration of ArticleBriefing for ProjectNavigation
| Before ArticleBriefing can be configured for ProjectNavigation in the back-end there should be at least one existing project. |
-
Navigate to the back-end configuration
-
Expand "Mandators" → "<Mandator name>" → "Application modules" → "Projects" → "Project Types"
-
Select the required project type and open the "Functions" tab
-
In the Function tab find the ArticleBriefing plugin and enable it by clicking on the checkbox.
-
Save the configuration
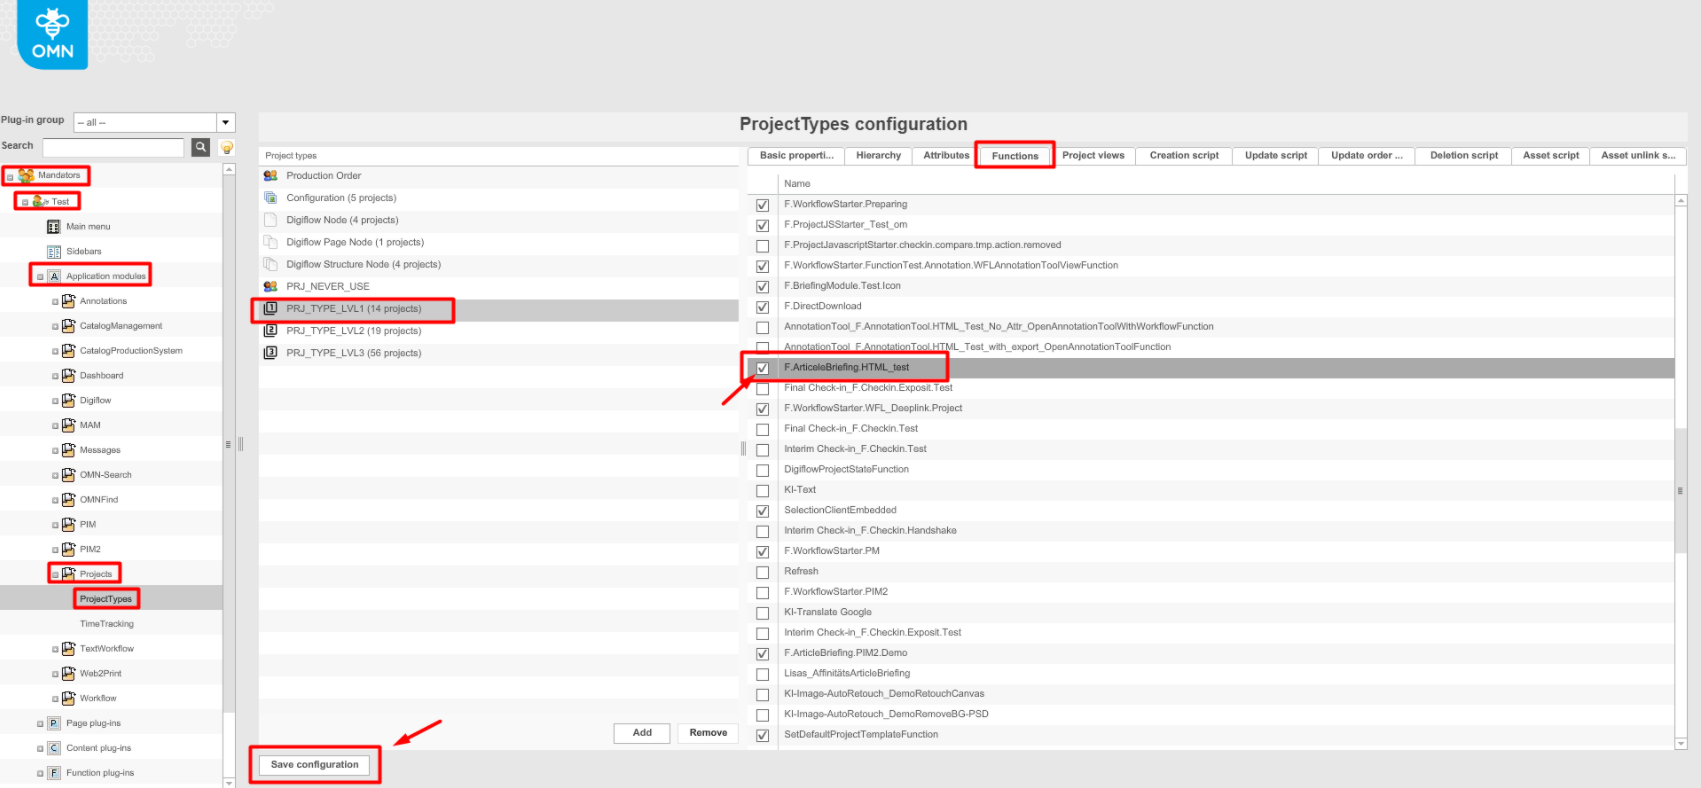
| ArticleBriefing plugin should be enabled for all Project types planned to work with. |
-
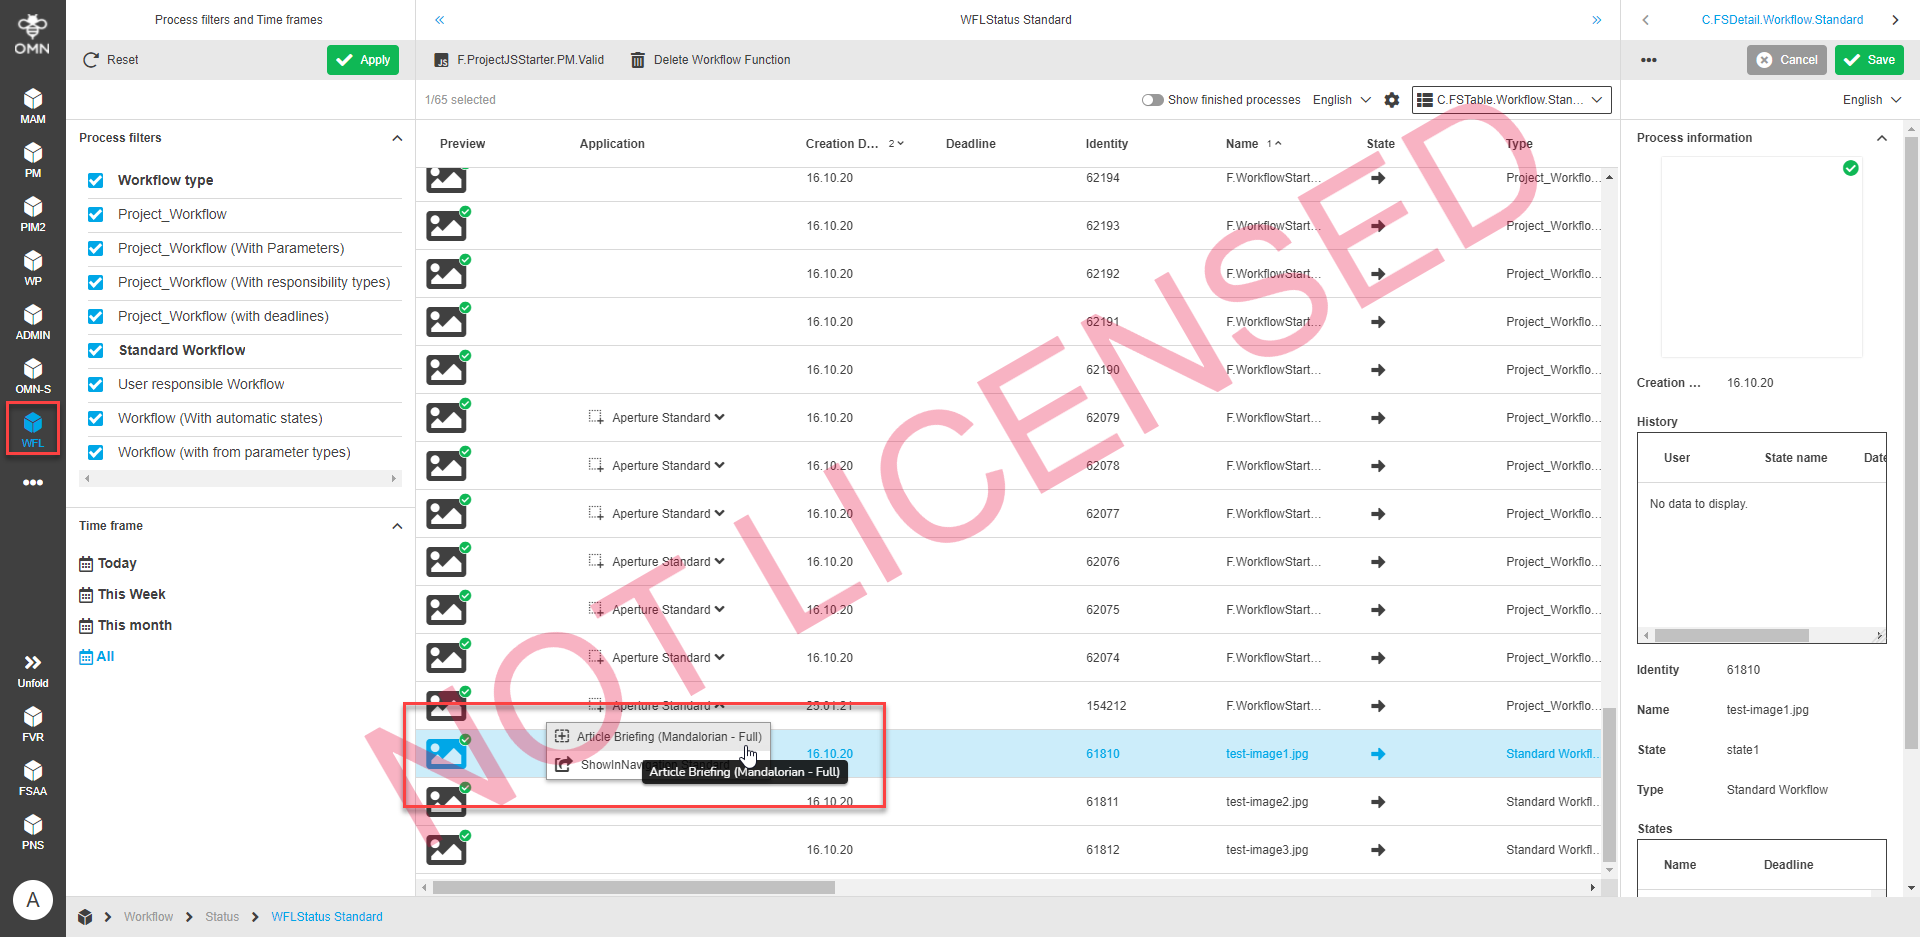
After configuration settings are done, re-login to the client and navigate to Menu → CM/PM → ProjectNavigation → Productmanagement
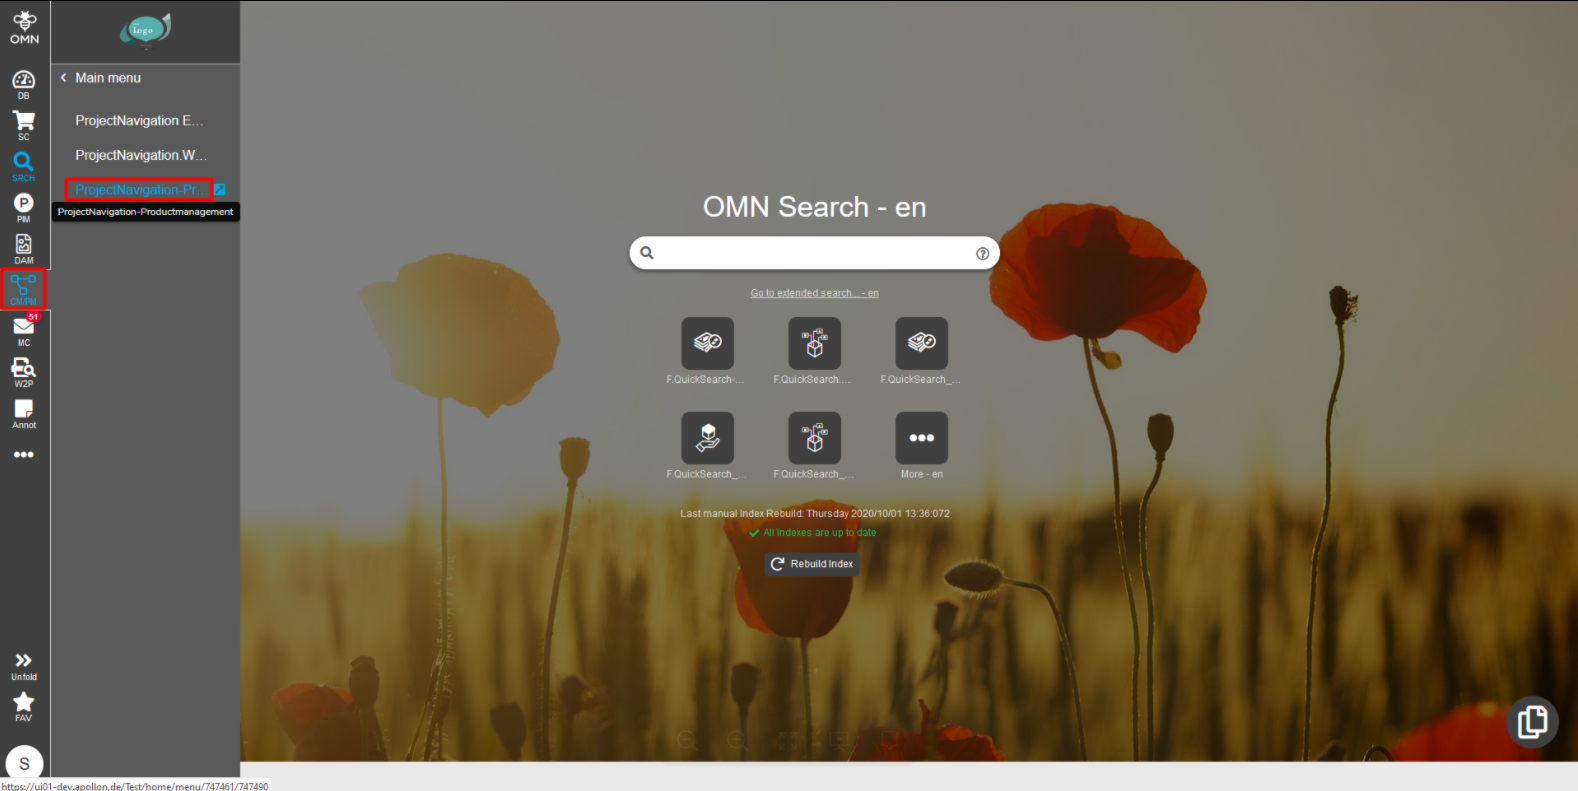
-
Select the required project and check if ArticleBriefing is available for a product in the central view. It might be under the dots dropdown menu.
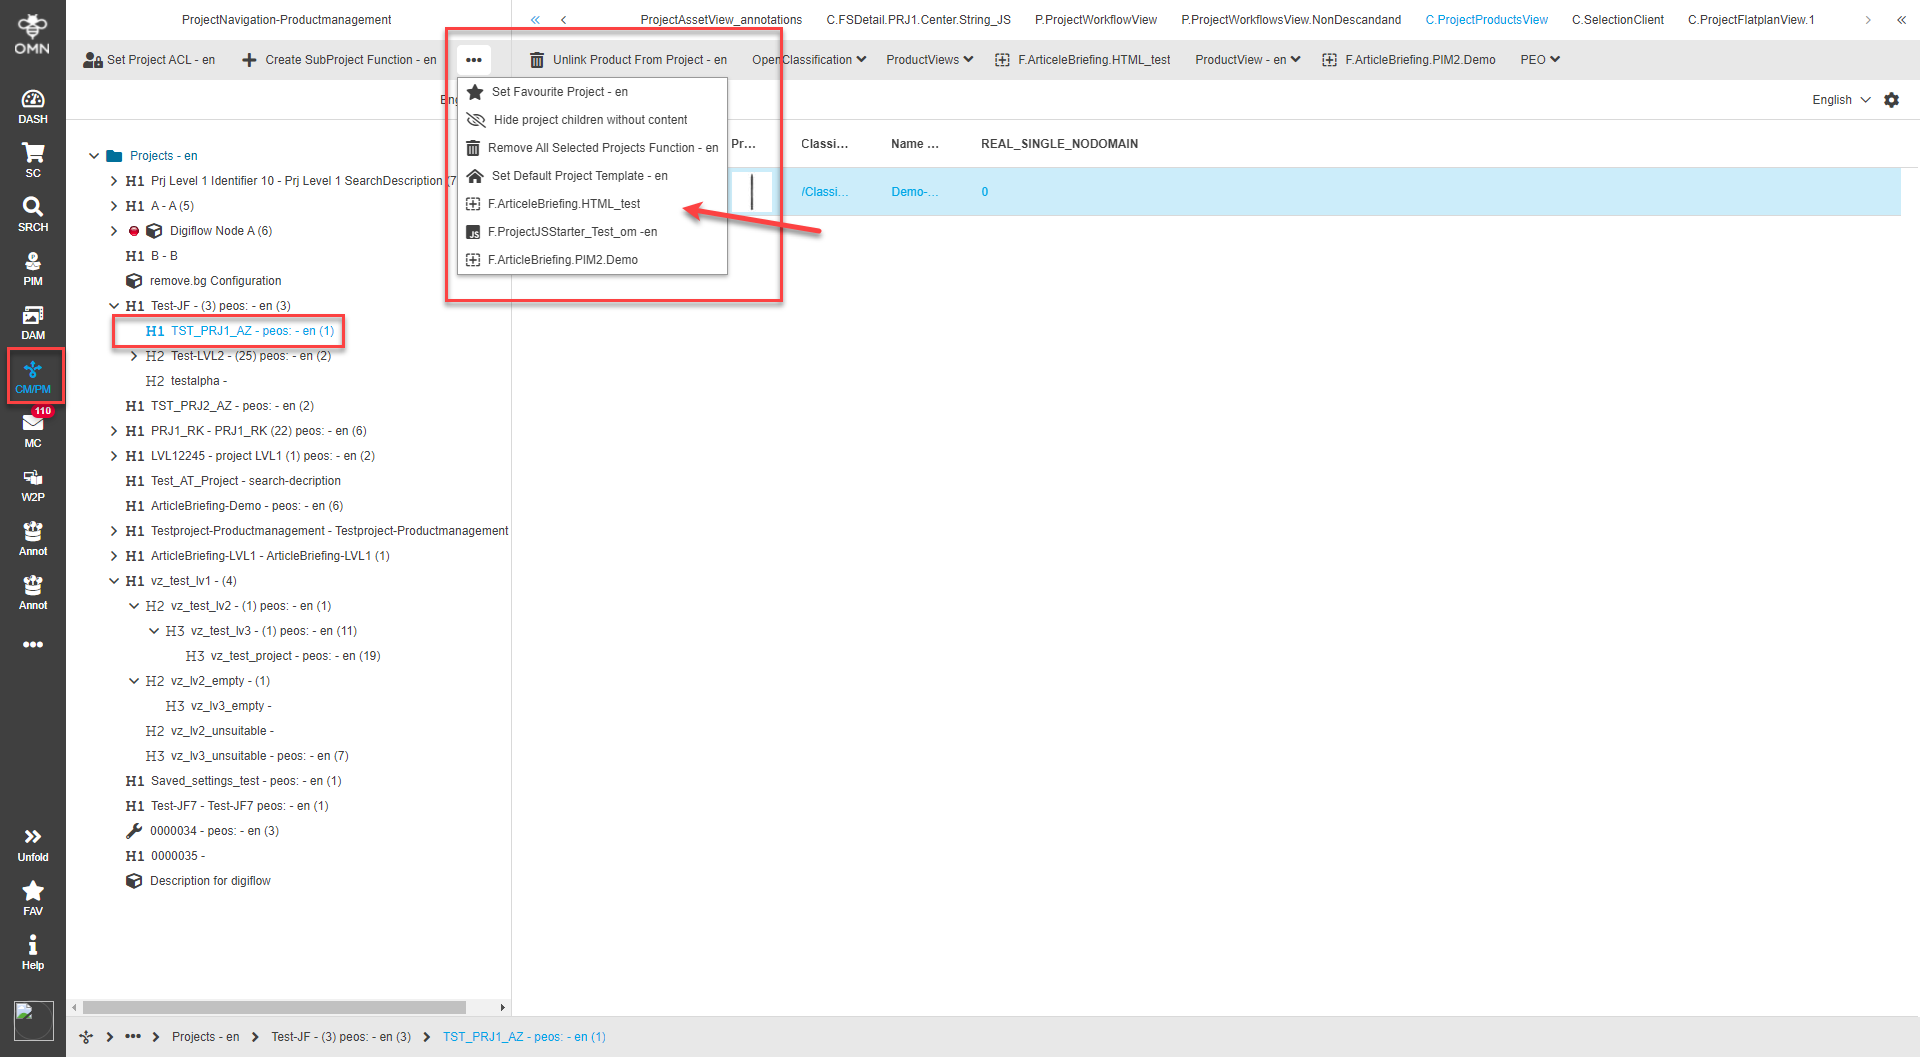
-
ArticleBriefing editor for the related object should open following a click.
Configuration of ArticleBriefing for Workflow
| Before ArticleBriefing can be configured for Workflow in the back-end a node, project\article\variation for this node should be created, the reference table should be assigned to the node, PEOs should be created for products. |
-
Navigate to the back-end configuration
-
Expand "Mandators" → "<Mandator name>" → "Functional plug-ins" → "ArticleBriefing". Create and configure a new ArticleBriefing plugin configuration or select an existing one.
-
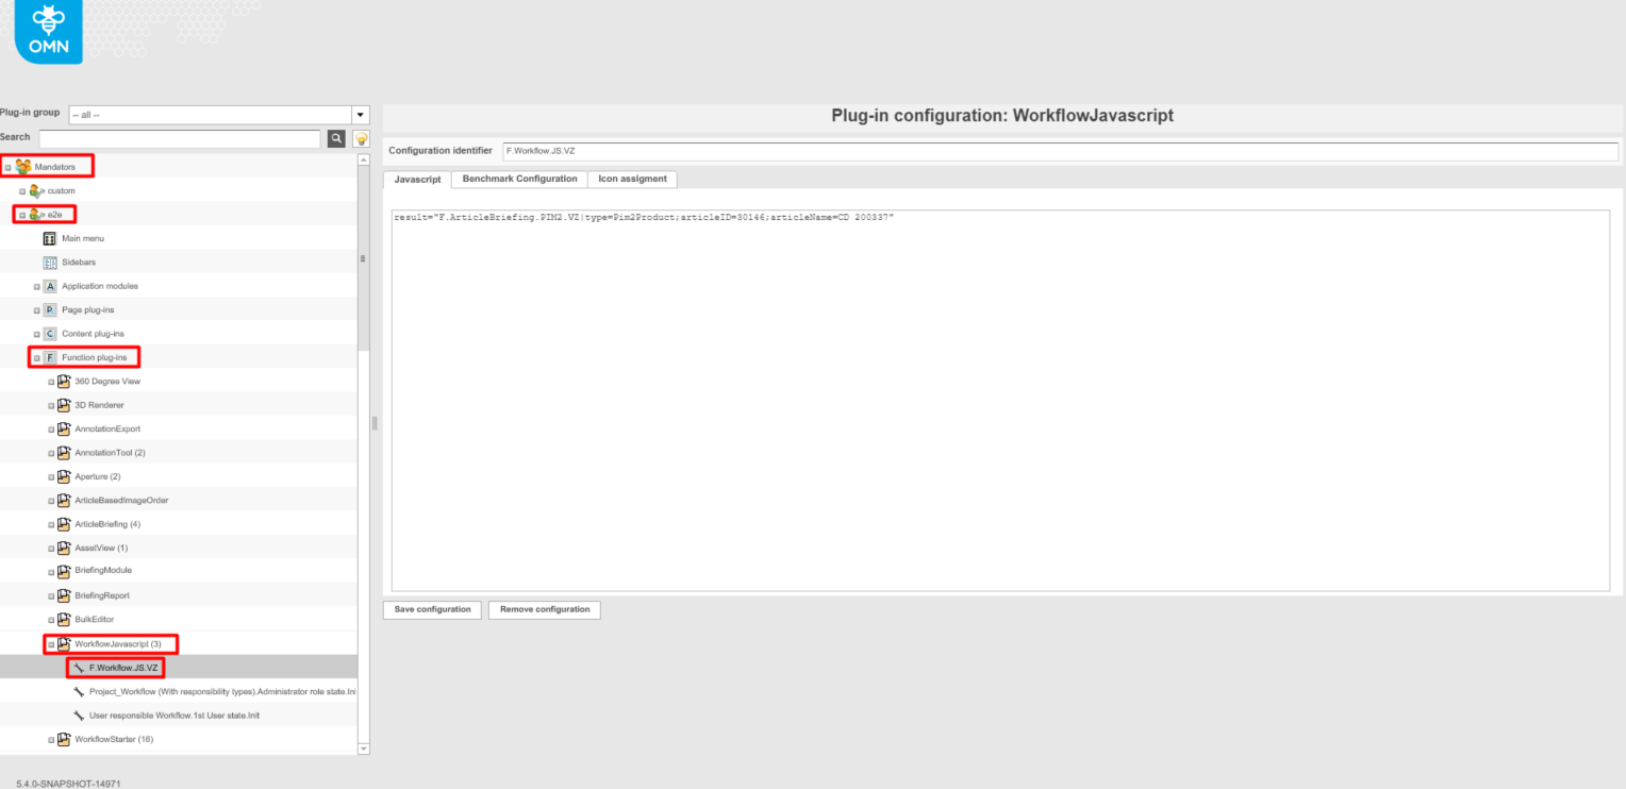
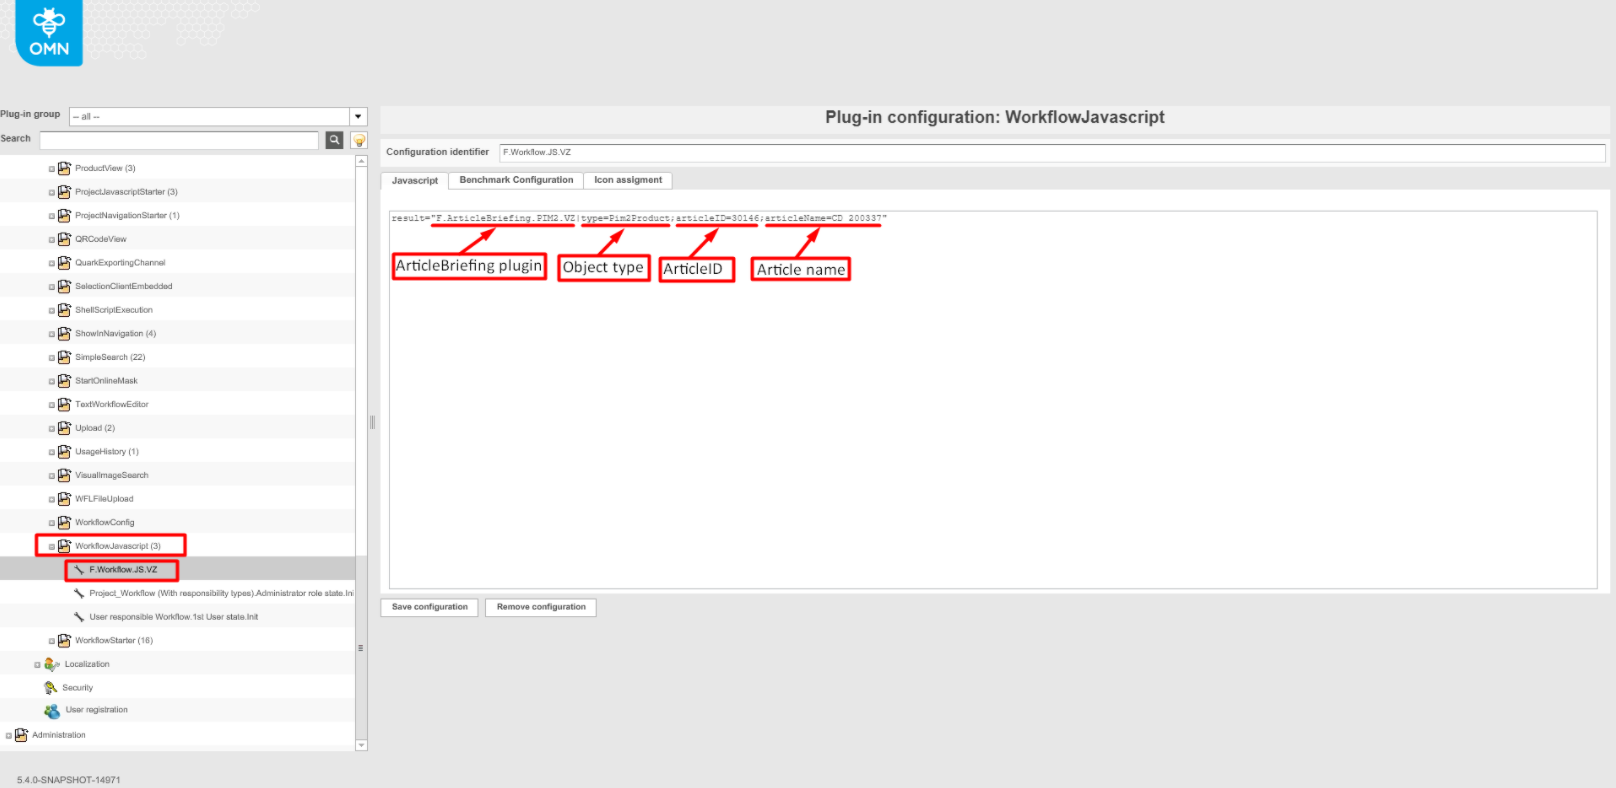
Expand "Mandators" → "<Mandator name>" → "Functional plug-ins" → "WorkflowJavascript". Choose one of the existing scripts, create a new script or edit the existing one with the ArticleBriefing plugin, object type, article id, and name. Include all the plugins to be available in the dropdown for an object.
The following parameters are required to open the "ArticleBriefing" plug-in from Workflow:
-
"type": the type of a product. The HTML5 client supports only the PIM2 products, so only the "Pim2Product" value must be set;
-
"articleID": the identity of a product (product/article/variation). The product and the "ArticleBriefing" must have the same classification/specialization;
-
"articleName": the name of a product. The HTML5 client displays the name in the title of the plug-in, so the name of a root product must be set.
-
Expand "Mandators" → "<Mandator name>" → "Functional plug-ins" → "WorkflowStarter".
-
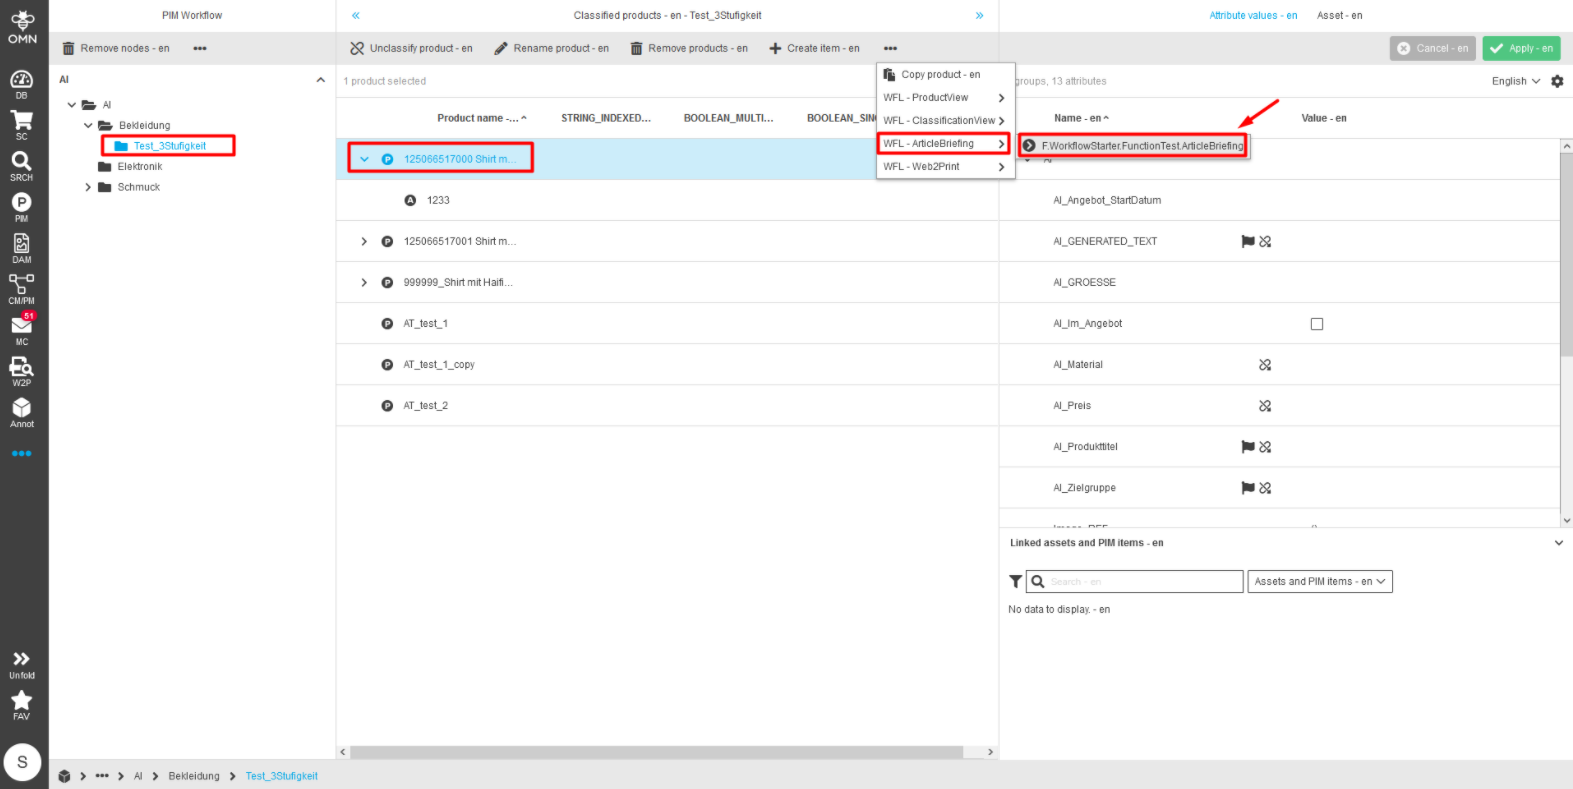
After configuration settings are done, re-login to the client and navigate to Menu → Workflow → PIM Workflow.
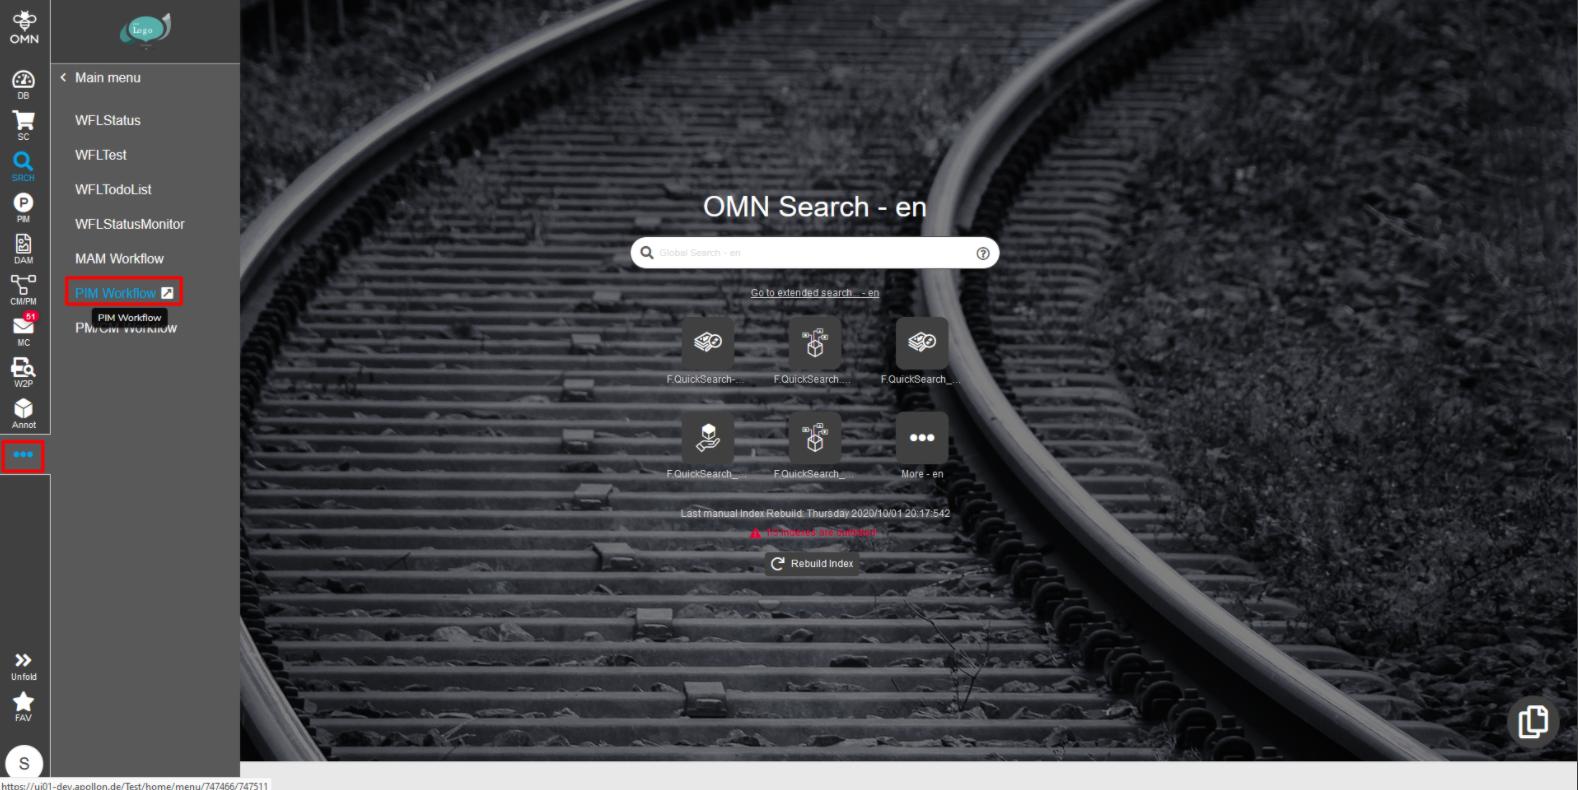
-
Select the required product and find the required workflow for ArticleBriefing in the top navigation. Start workflow by clicking on the workflow name. A green toast message should appear following a click.
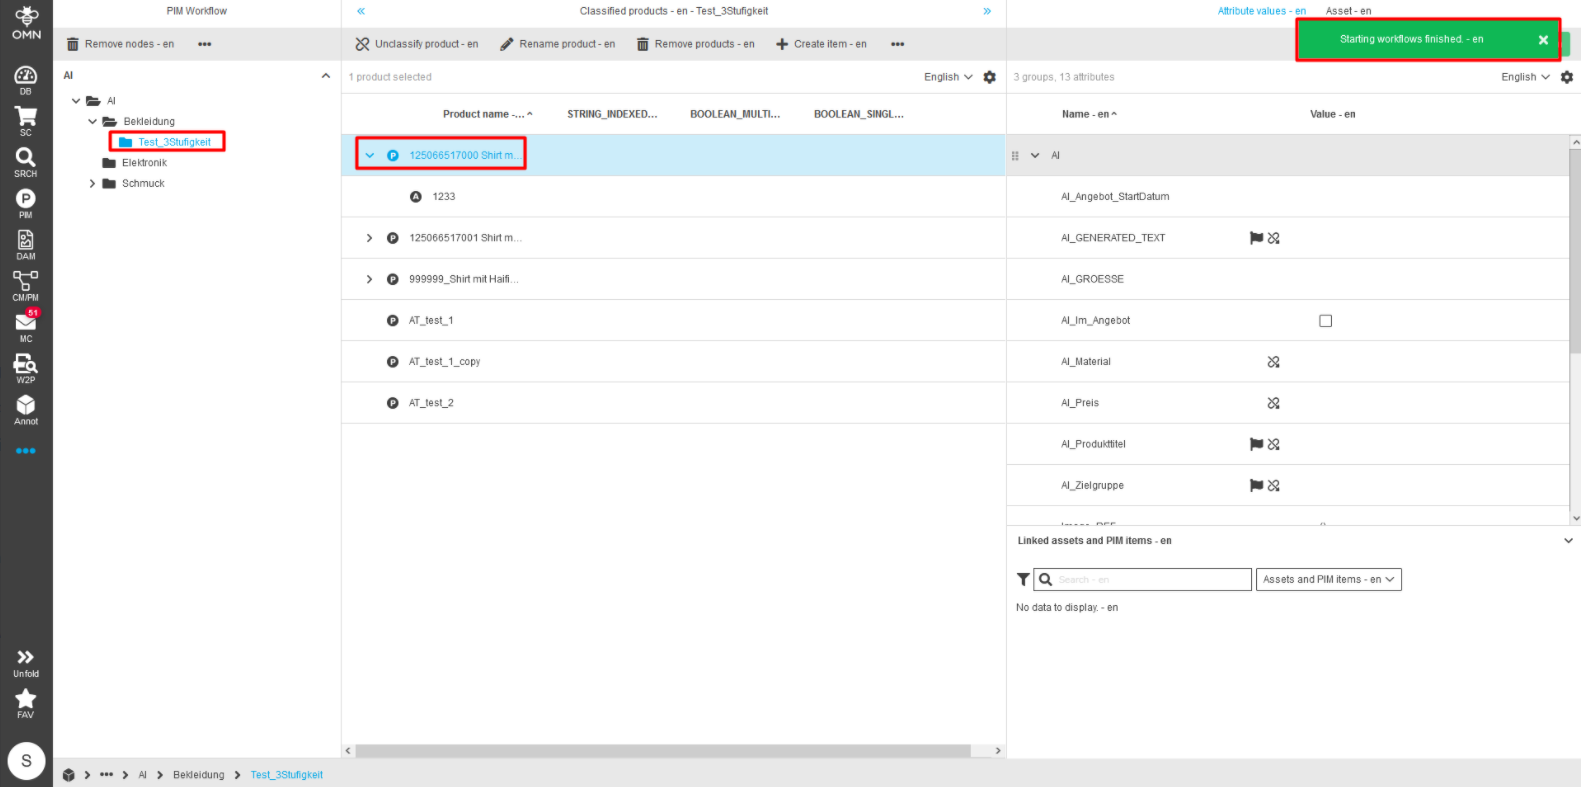
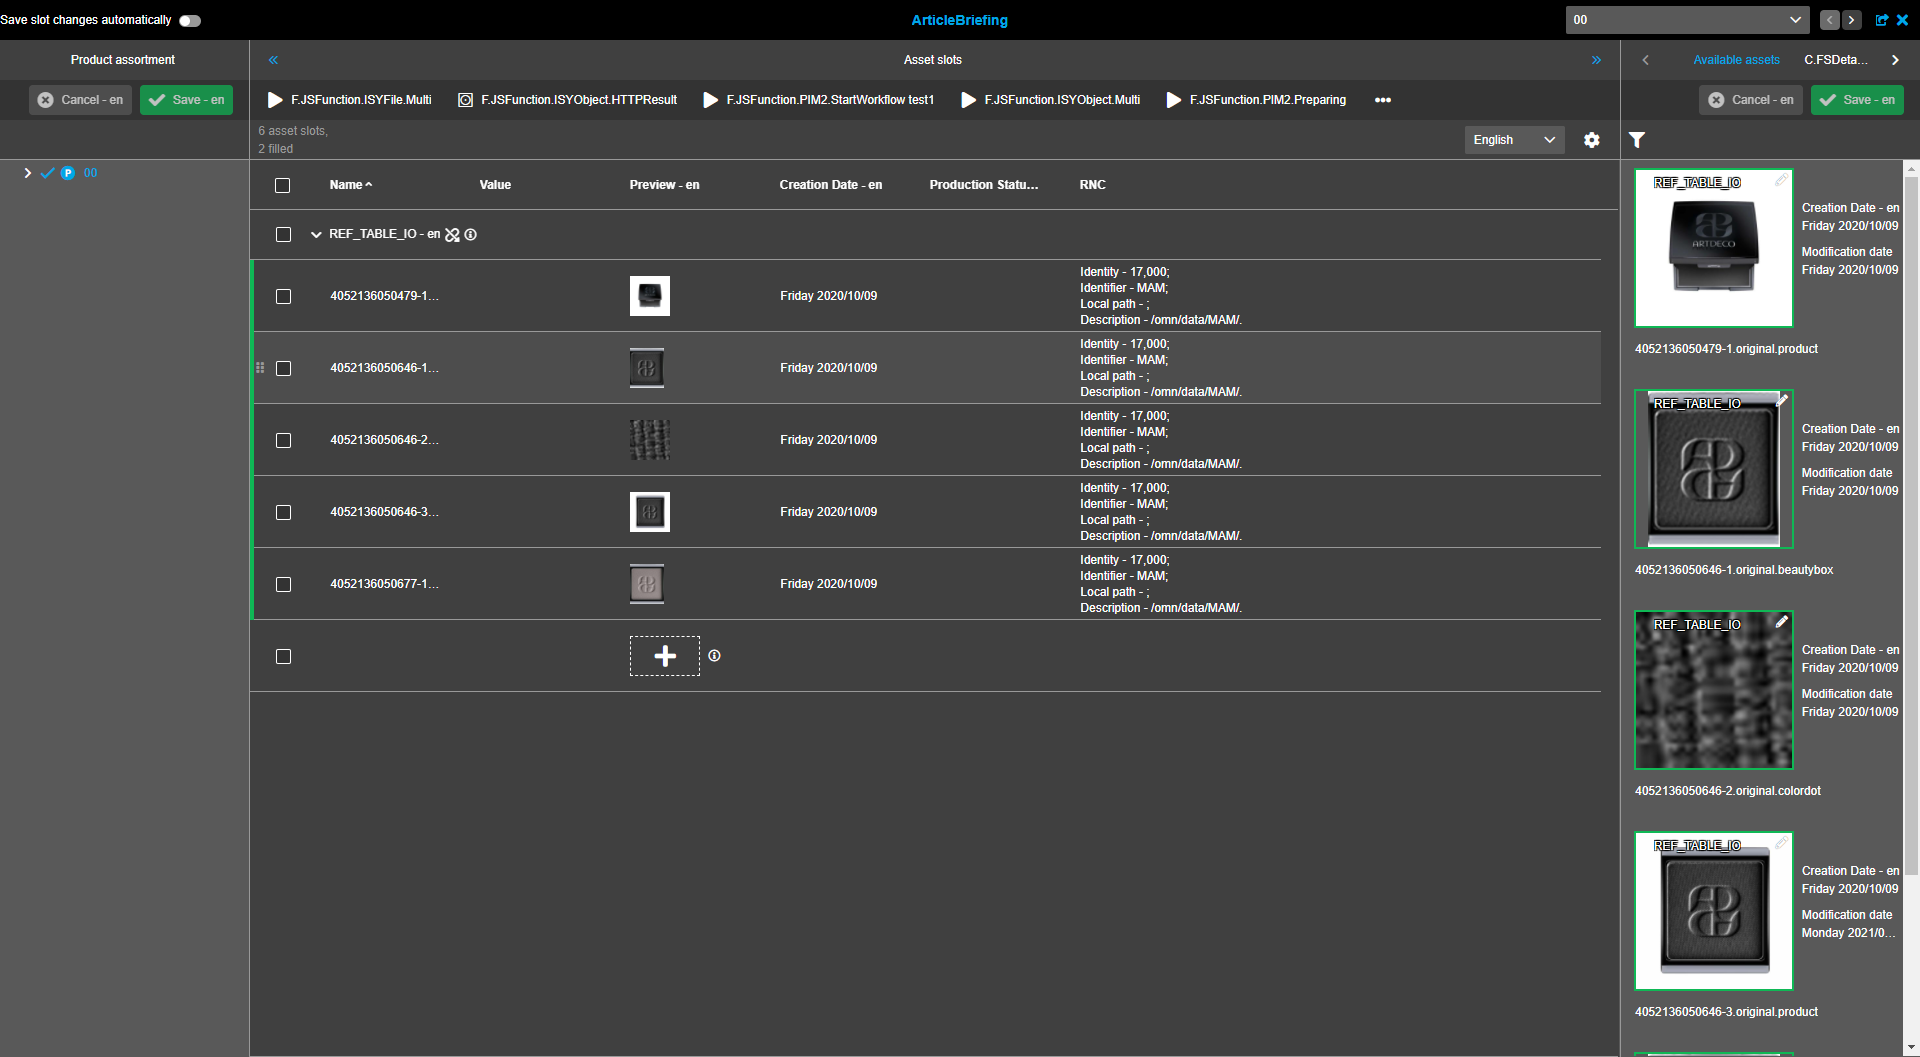
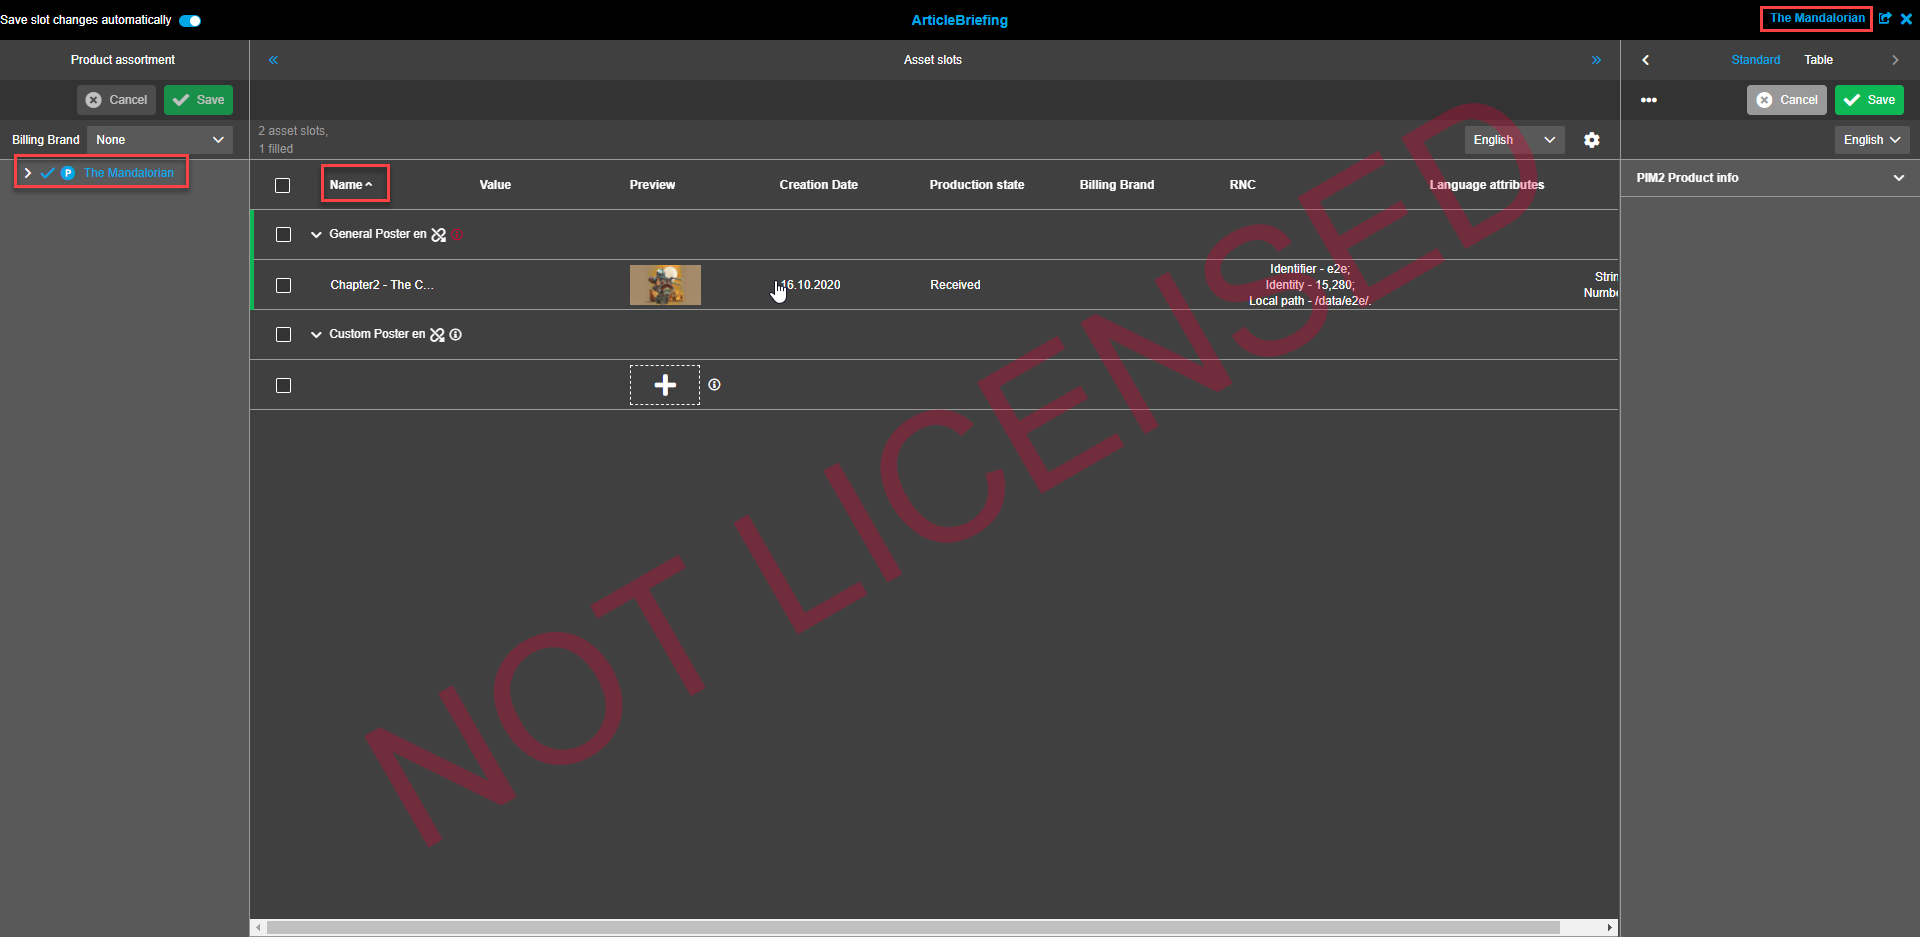
After the workflow runs and is finished successfully Article Briefing is opened:
-
assortment tree only contains one root item with all successors
-
sorting is done by the name
-
sorting of the assortment tree items should correspond to ProductView’s sorting
-
by default (after opening) the root item in assortment tree is selected
Configuration of ArticleBriefing for OMN-Search
| Before ArticleBriefing can be configured for advanced search in the back-end an ArticleBriefing plugin should be created and configured, a product is created and assigned with a reference table, several assets are set to the product via the reverence table attribute. |
-
Navigate to the back-end configuration
-
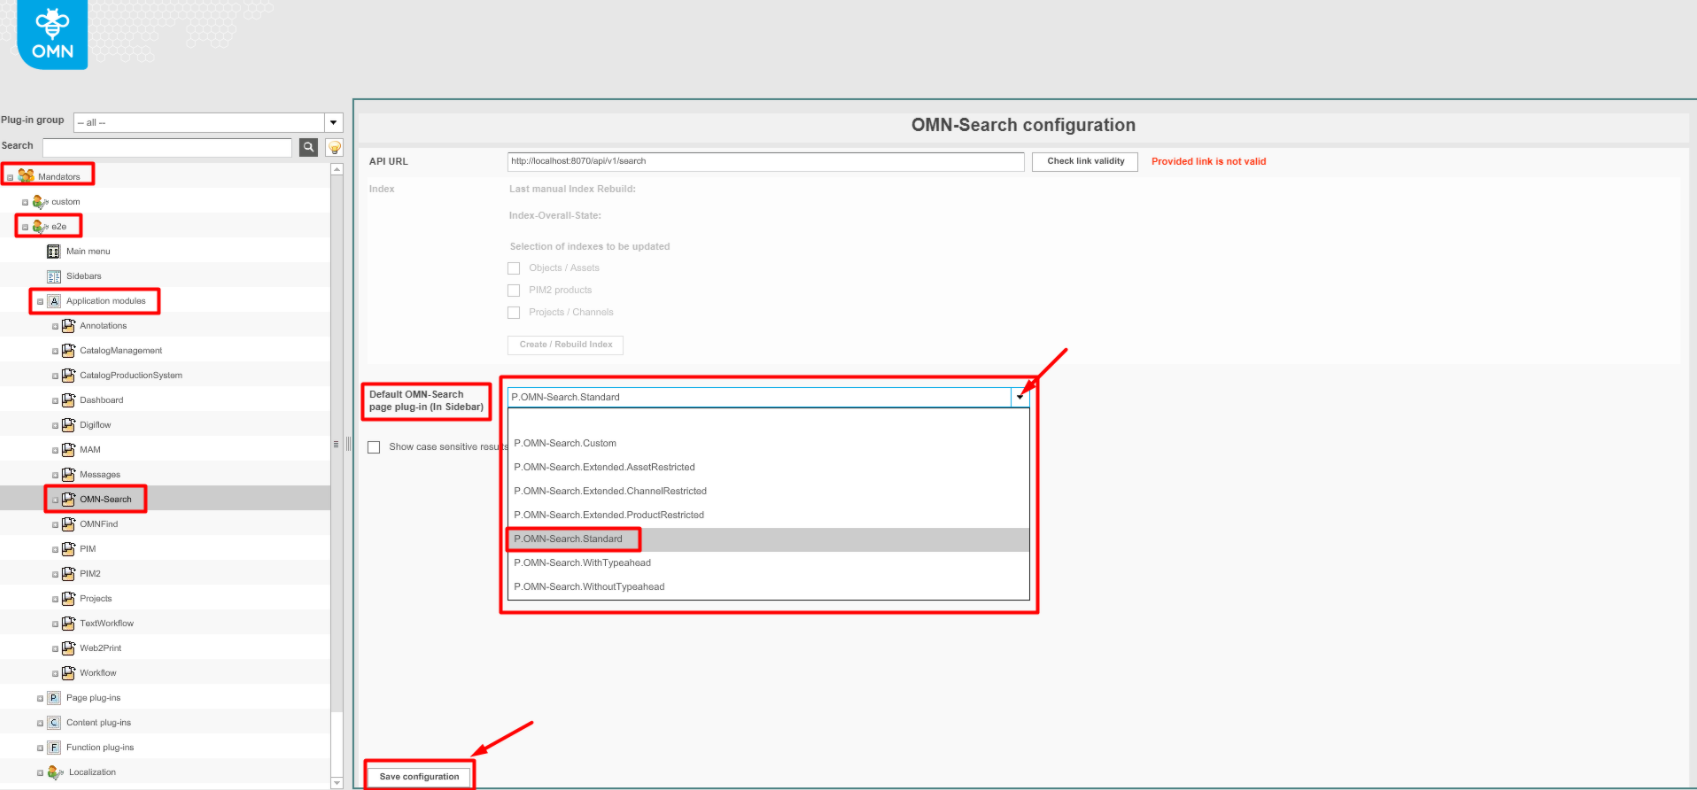
To configure the Search page plugin in the left sidebar expand "Mandators" → "<Mandator name>" → "Application modules" → "OMN-Search".
-
Choose the required plugin from the "Default ONM-Search page plug-in (In Sidebar)" dropdown list and click the "Save configuration"-button.
-
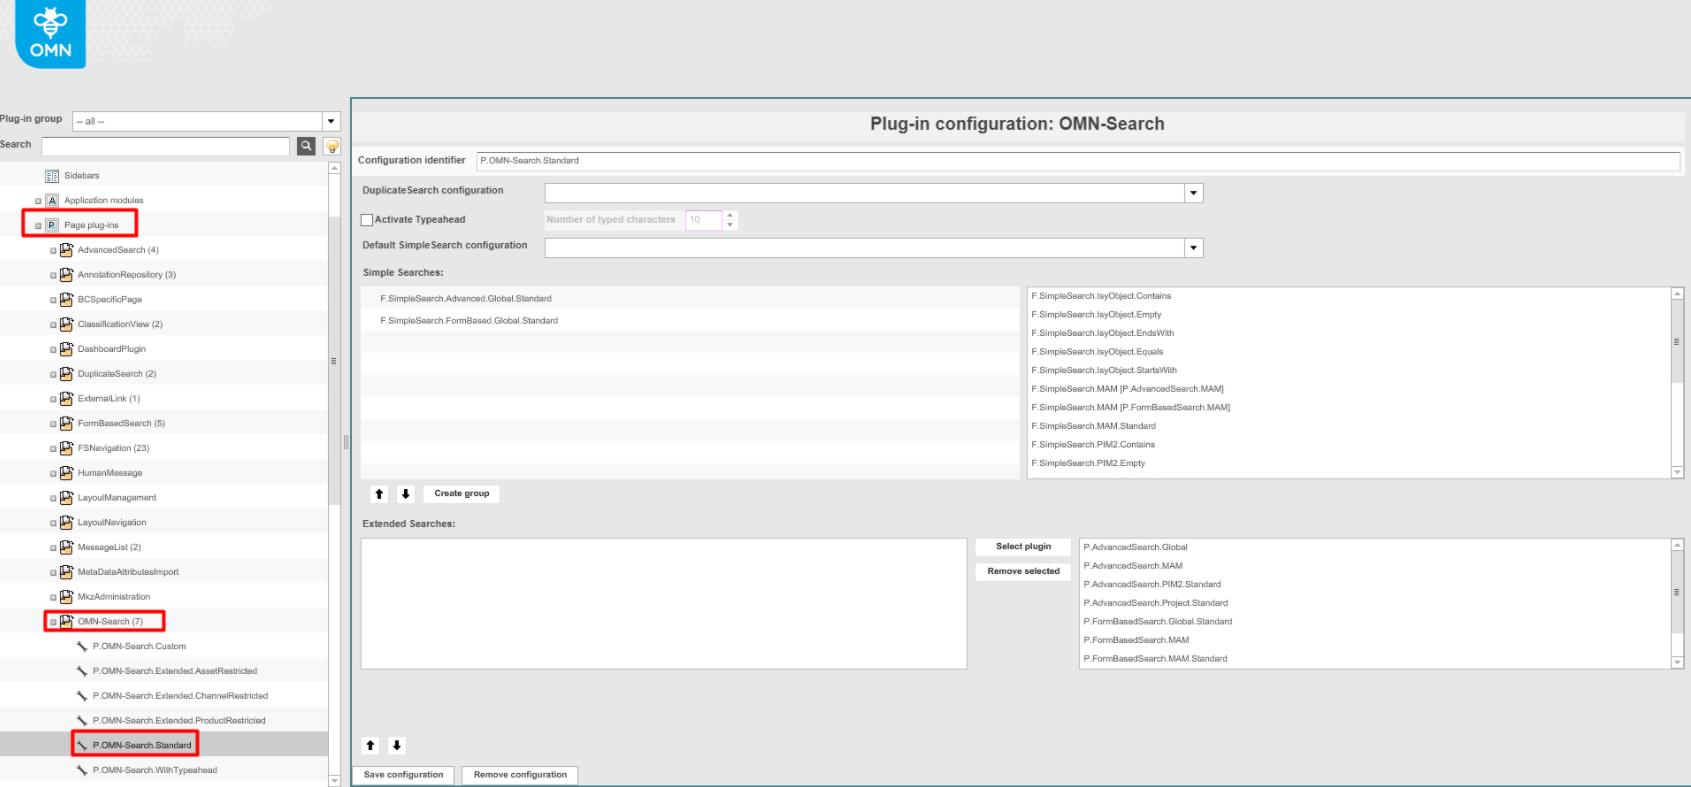
Expand "Mandators" → "<Mandator name>" → "Page plug-ins" → "OMN-Search" and find the same plugin as chosen from "Application modules" → "OMN-Search"
-
If required, add plug-ins for "Simple Searches" by dragging from the right and dropping to the left view. Save configurations when finished. To remove a plug-in drag it back to the right view and drop it there.
-
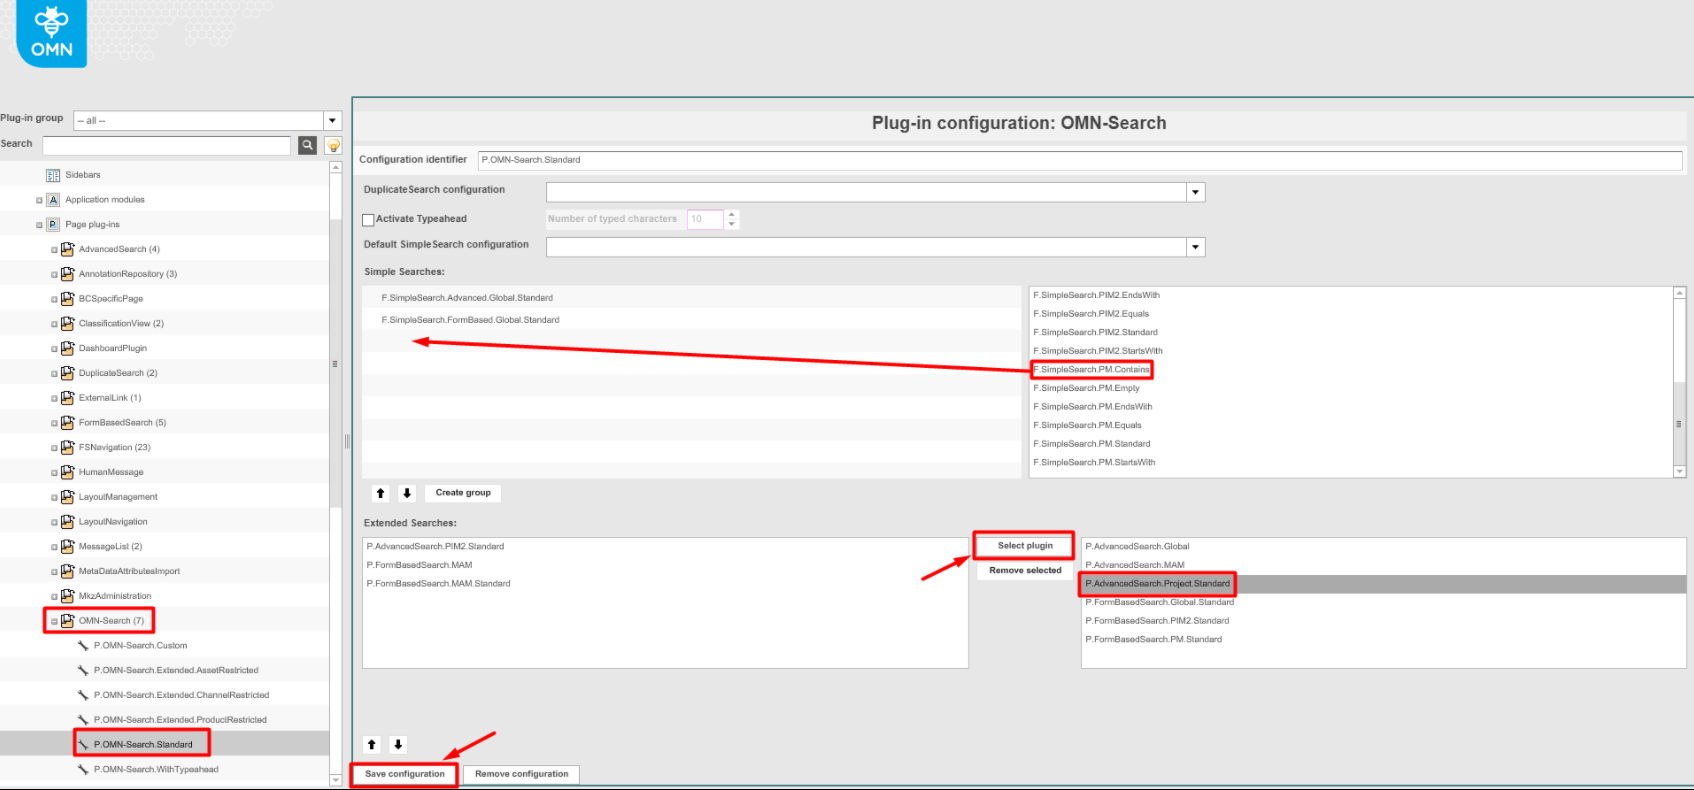
If required, add plug-ins for "Extended Searches" by choosing the required plug-in in the right view and pressing the "Select plugin"-button. To remove a plug-in select it in the left view and press the "Remove selected"-button.
-
Click on the "Save configuration"-button after all the required plug-ins are added.
-
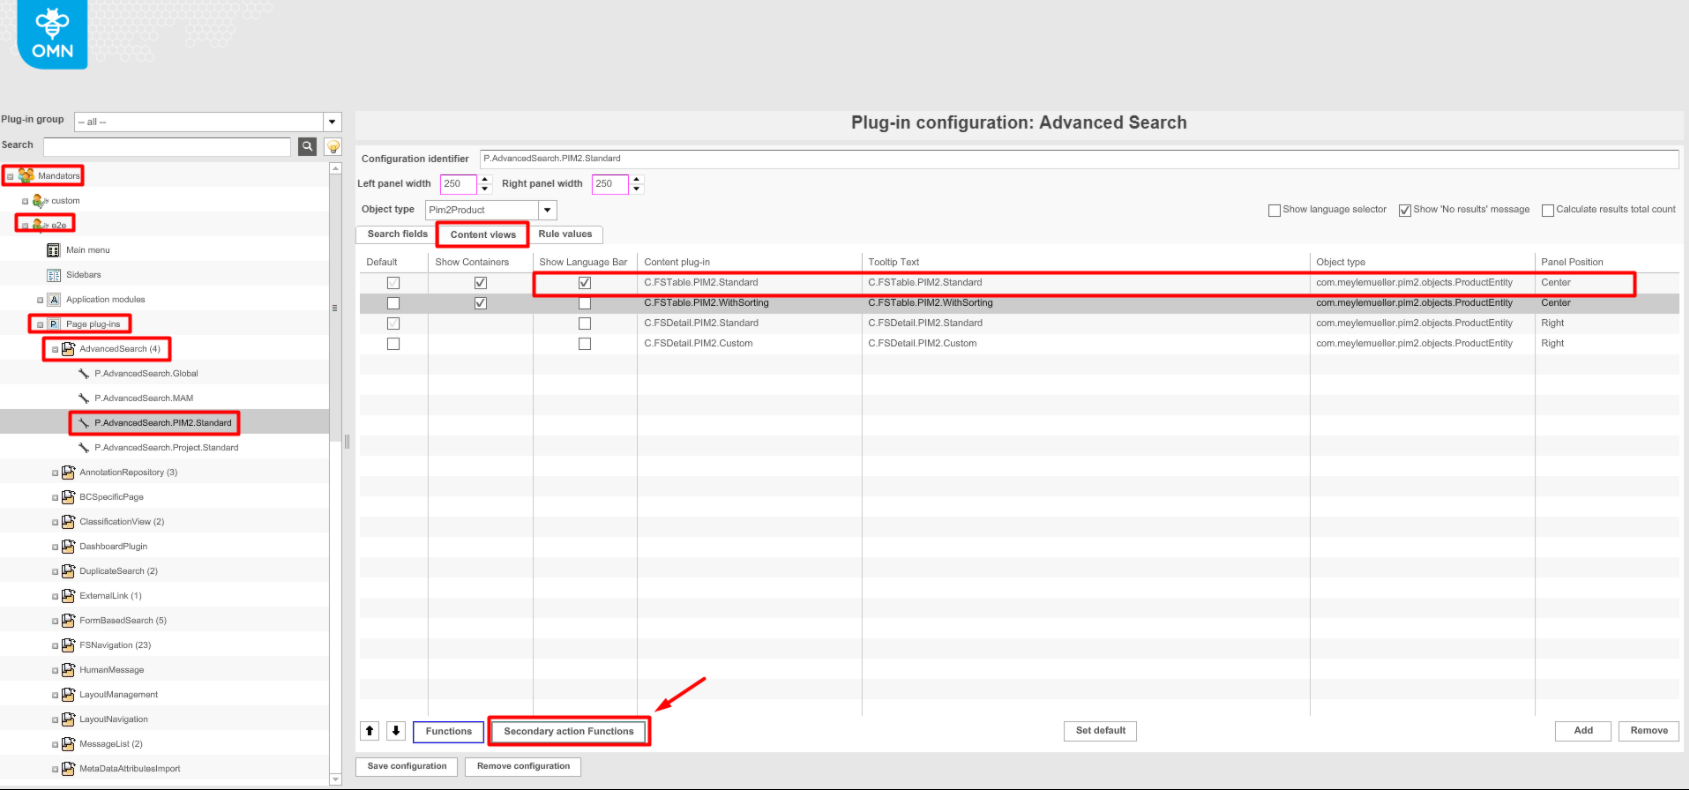
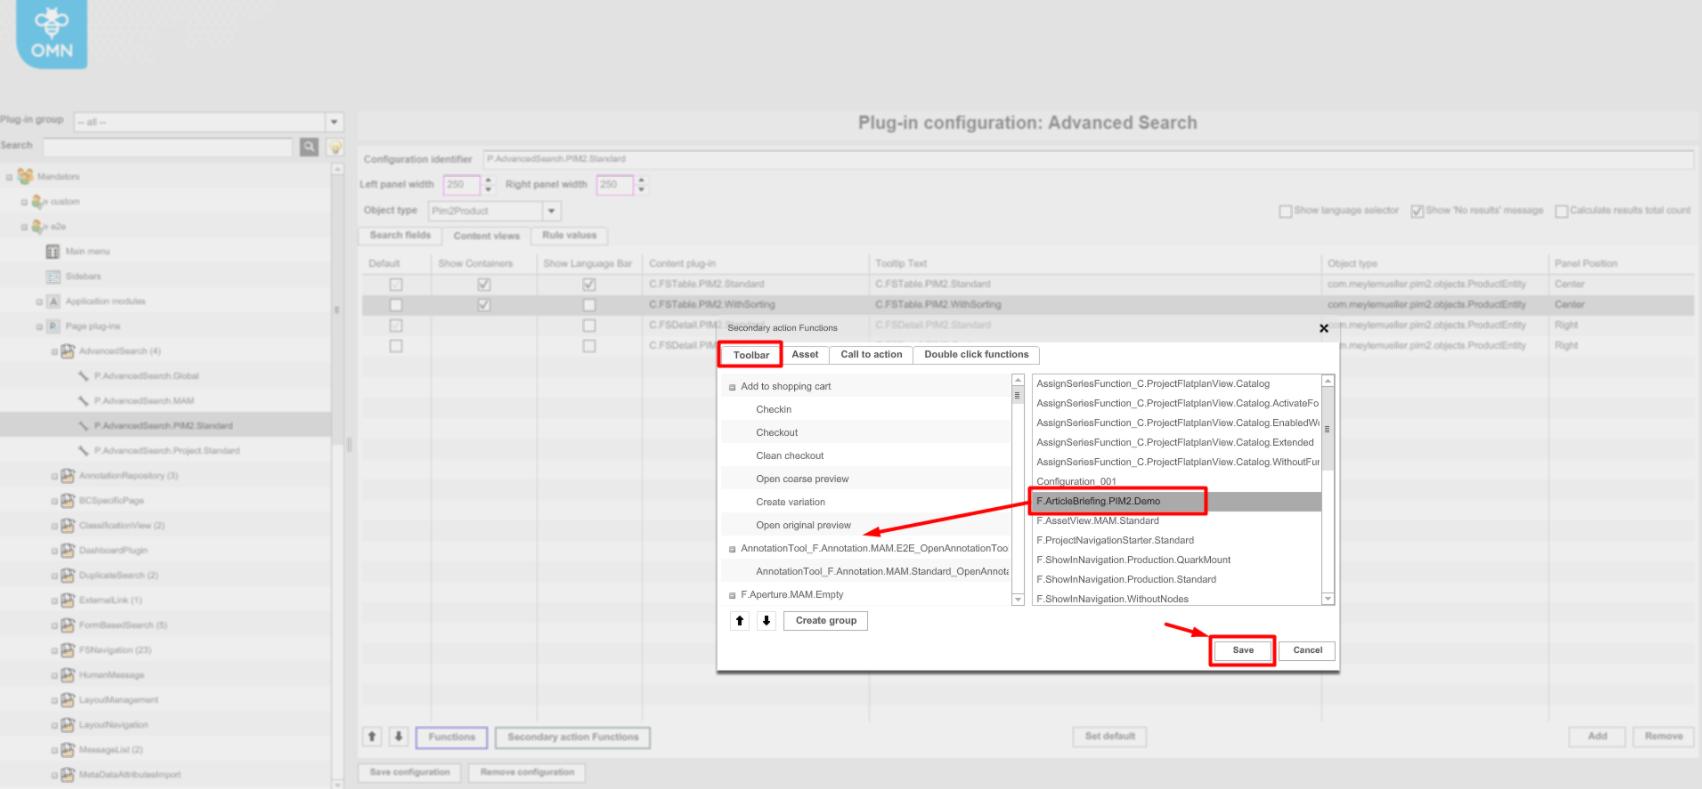
Expand "Mandators" → "<Mandator name>" → "Page plug-ins" → "AdvancedSearch" and open extended search plugins added within a previous step. Open the "Content views" tab, select a view with "central" panel position, and click the "Secondary actions functions".
-
Search the "ArticleBriefing"-function in the "Toolbar"-tab of the popup and drag it from the right view to the left view. Press the "Save"-button. Press the "Save configuration"-button to save configuration changes.
-
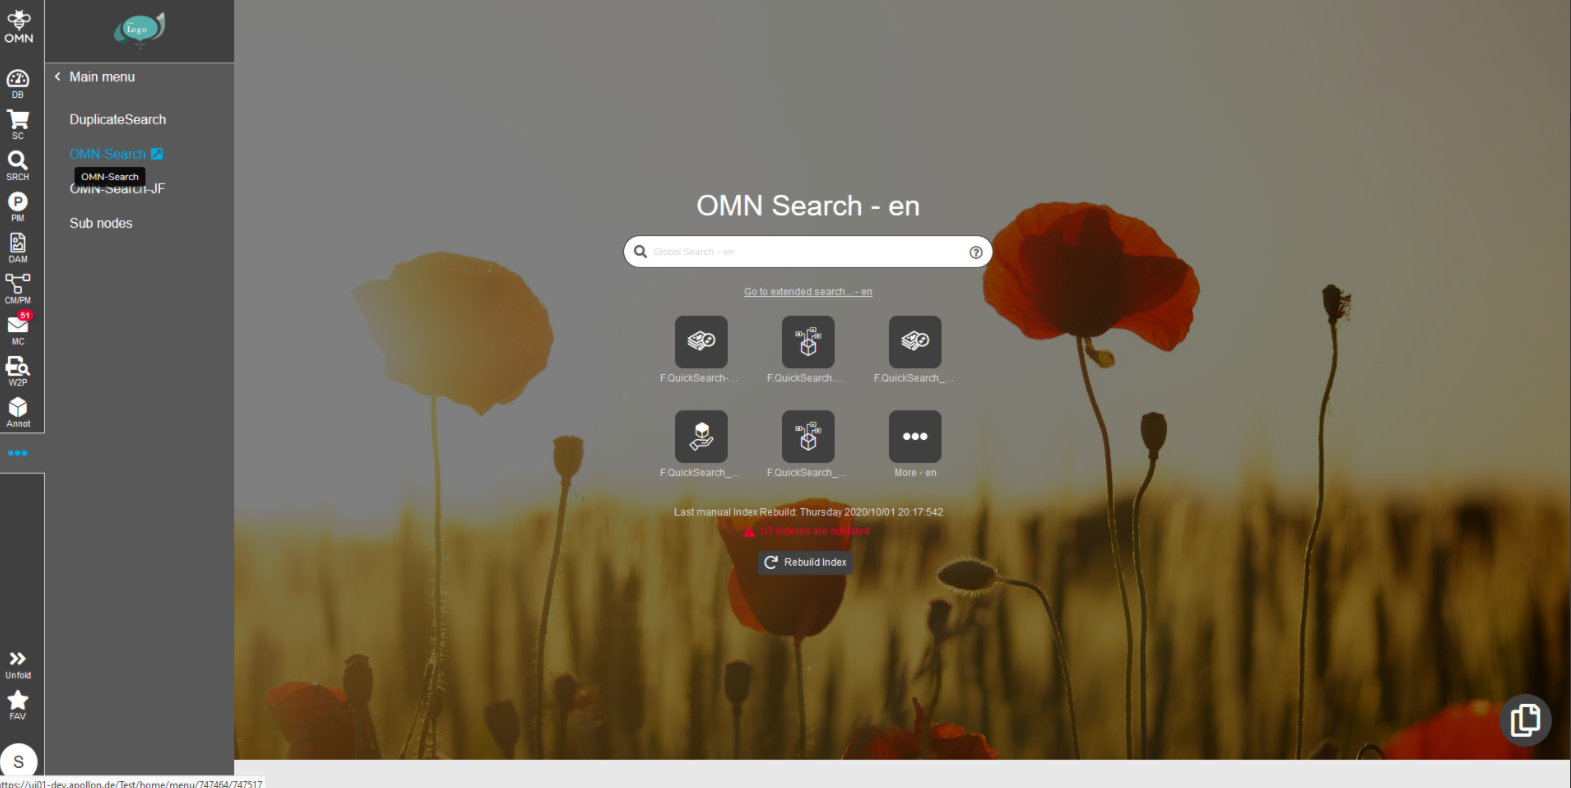
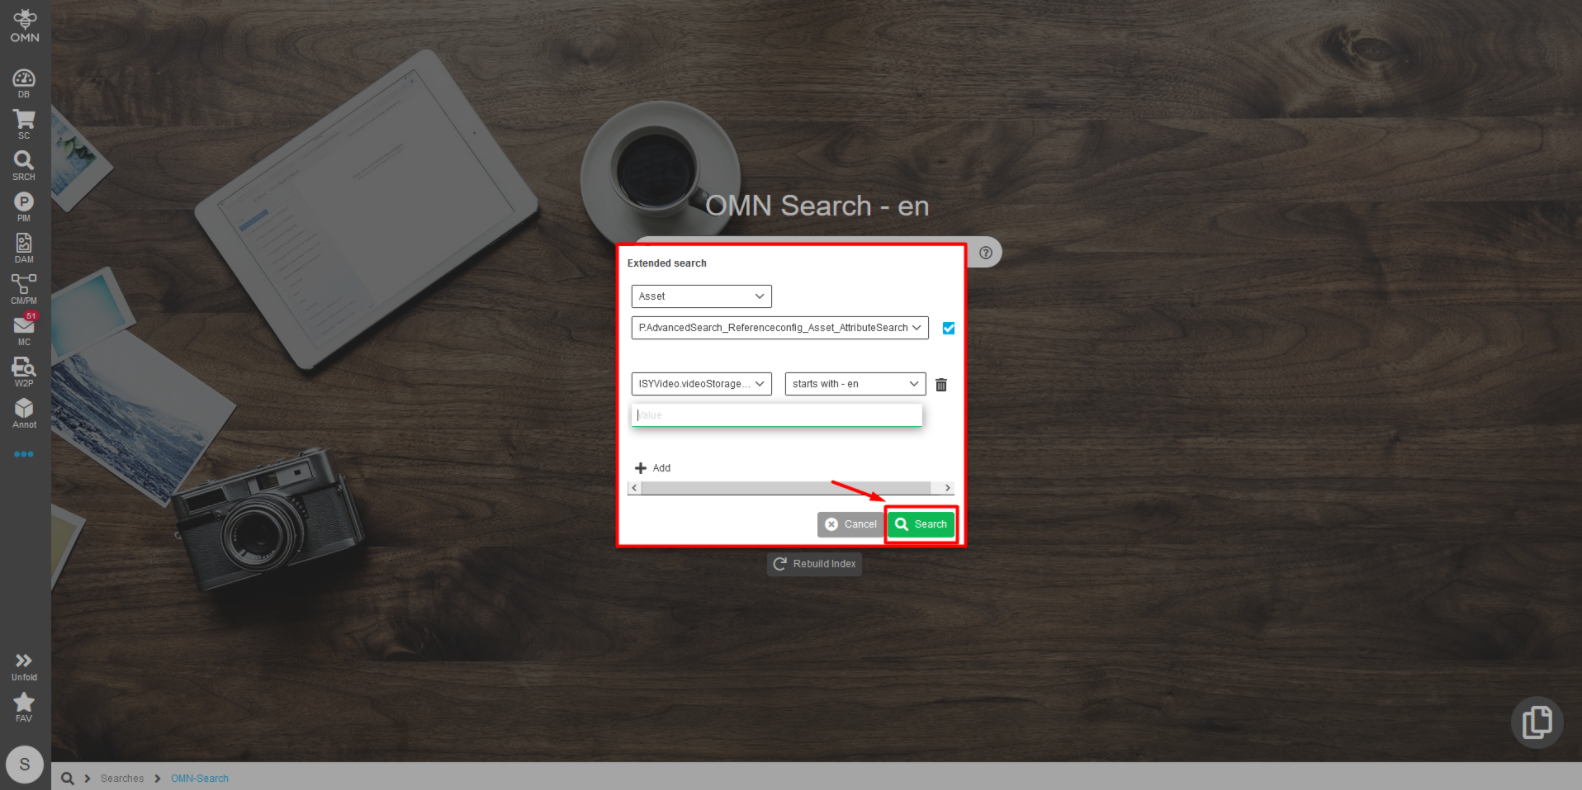
After configuration settings are done, re-login to the client and navigate to Menu → Search → OMN-Search
-
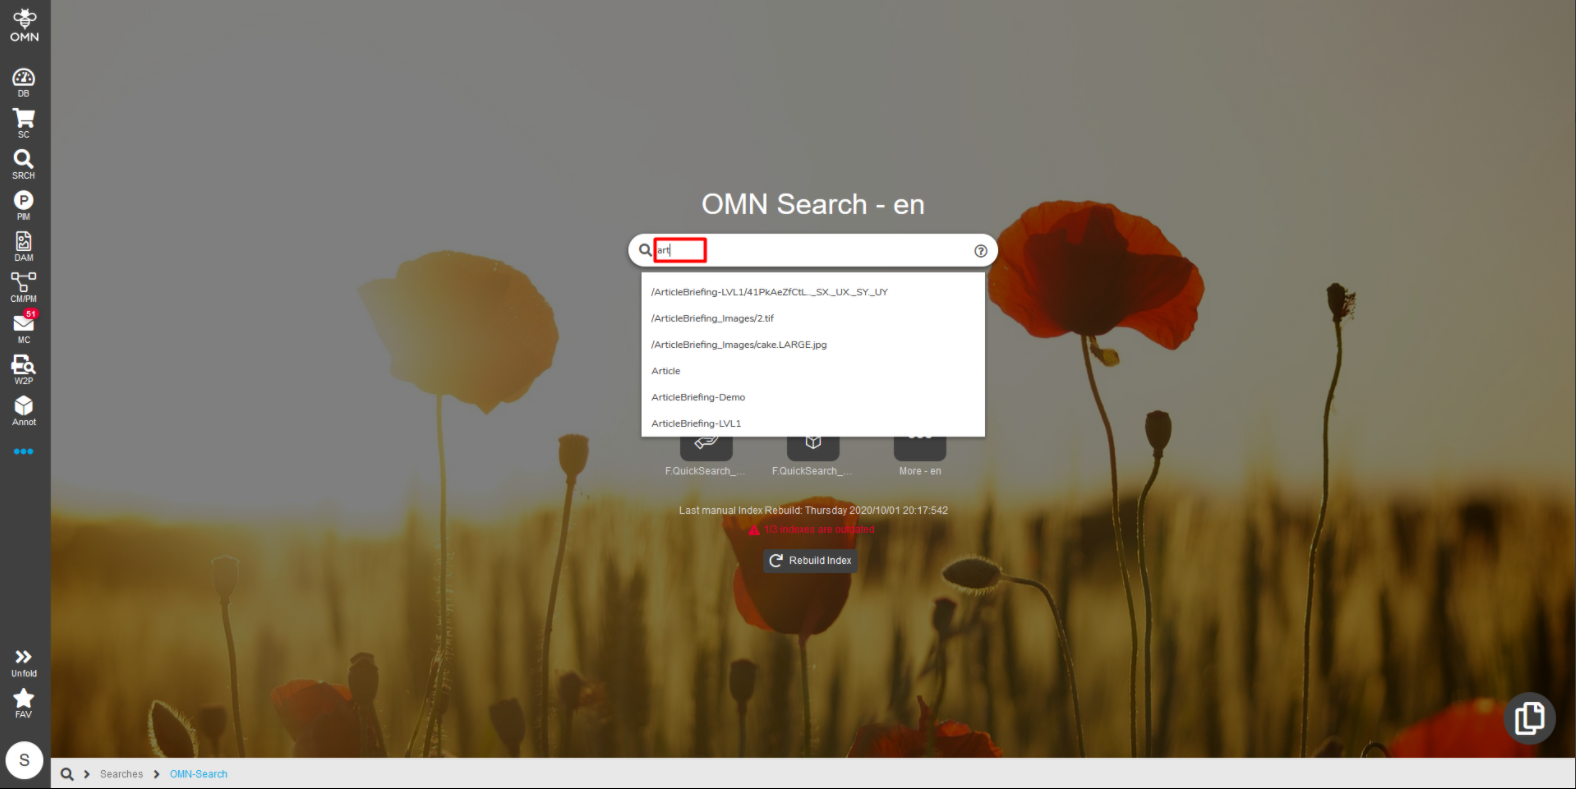
To use a simple search start typing in the search bar and choose the available option from the list.
-
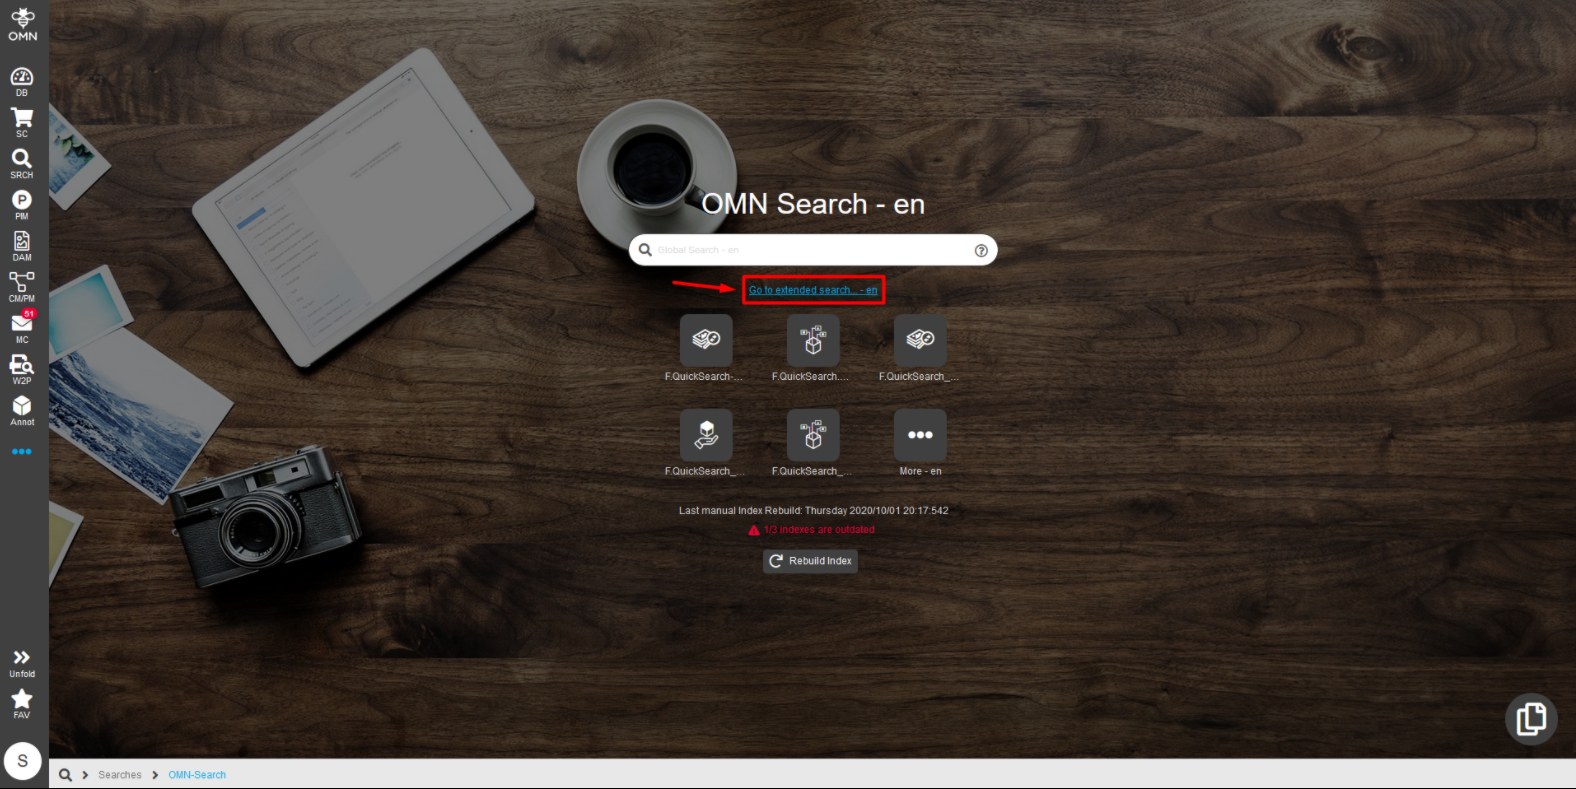
To use extended search click on "Go to extended search…" text. In the popup select search options and press the "Search"-button.
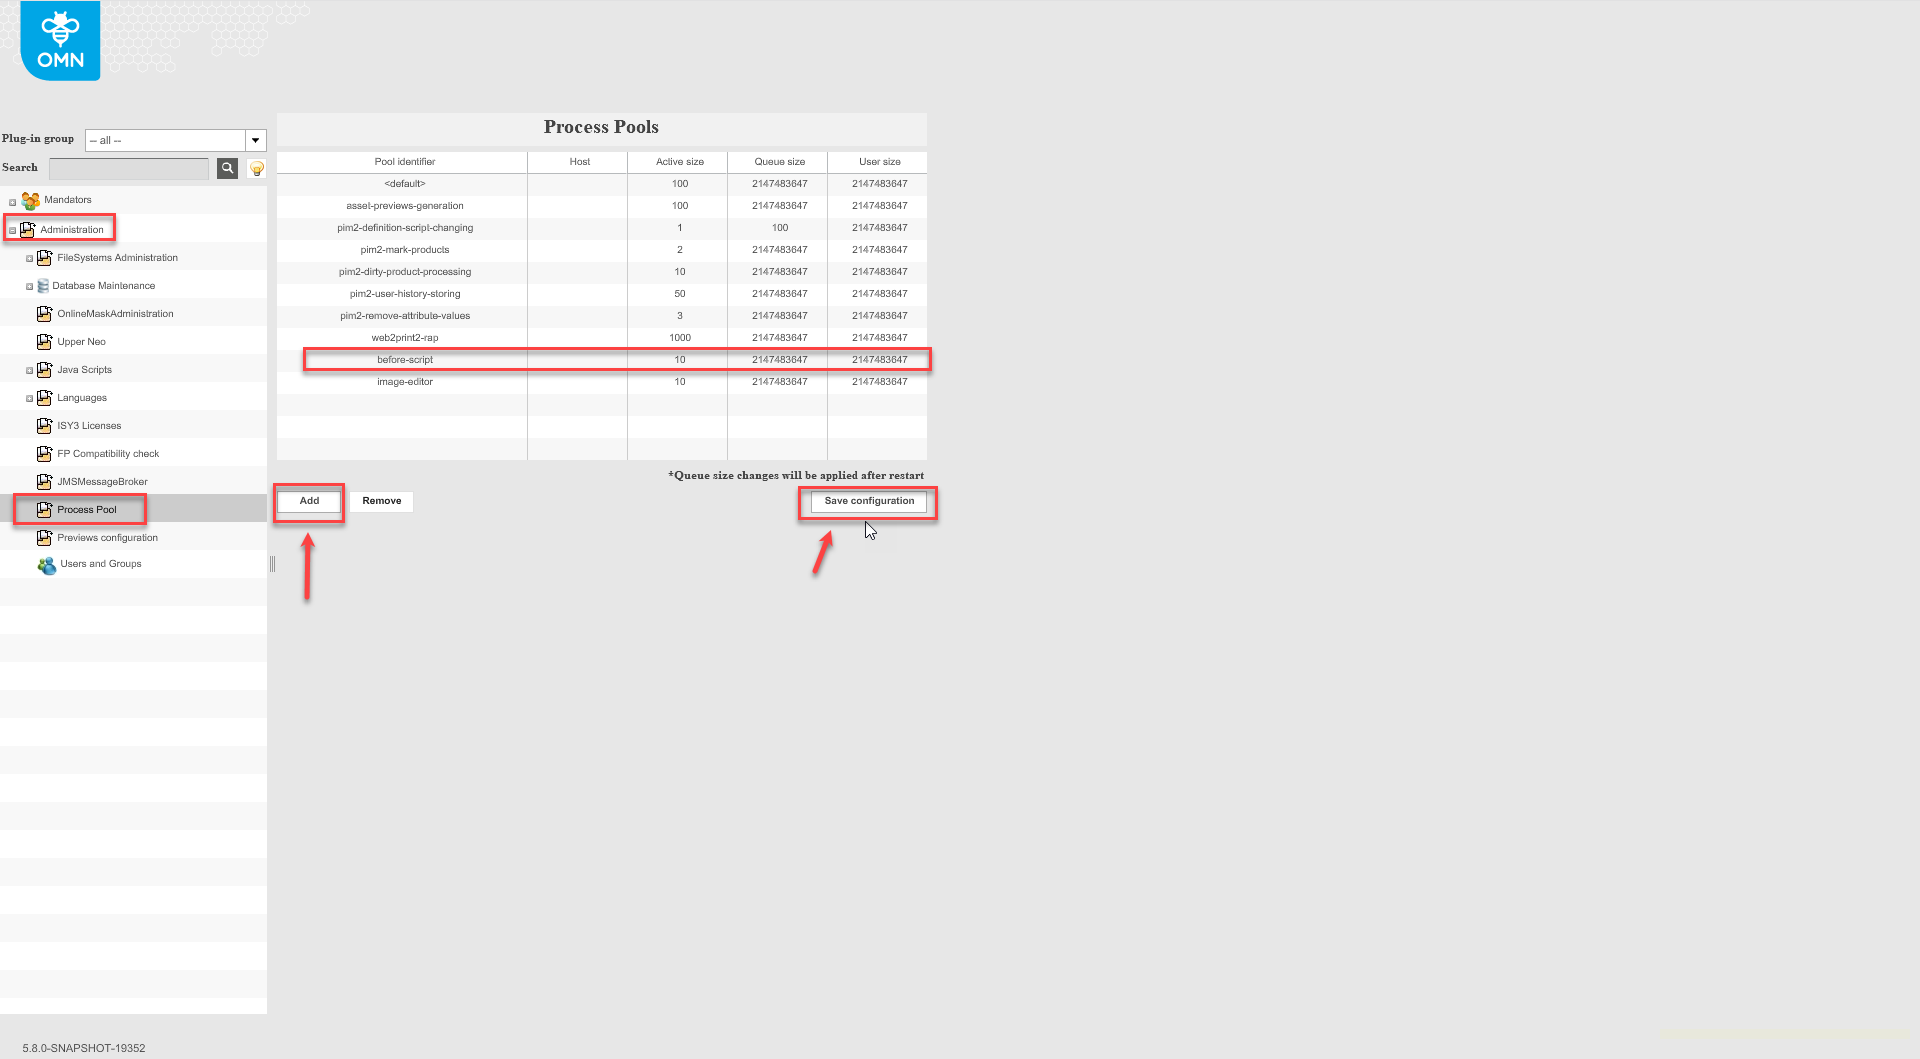
Process pool configuration
Before opening ArticleBriefing plugin, there is an additional functionality, which is being executed. It is used to fetch information about slots for a specific product, which requires a big amount of resources.
To reduce system load process pool should be configured to allow to execute the process remotely on a separate server or in parallel:
In the back-end configuration: expand "Administration" → "Process Pool" .
Click "Add" to add new process pool. Type "before-script" into "Pool identifier" column, set the needed host, set "Active Size"(number of threads) . Save configuration.