Terminology
Purpose of the plugin
With the Terminology module, corporate language, technical terms and other terms can be standardised. Terms can be created and maintained in a kind of terminology database in glossaries for better clarity, whereby a knowledge base is created that is accessible to every user.
Introduction
The Terminology plugin is a comprehensive plugin to work with custom translations.
Working with simple entities, such as entries and glossaries, a user is able to add or edit terms and sentences. With glossaries users can categorize the terms or sentences into various topics of different domains.
A search for specific entries can be performed by selecting several filters, such as glossary, entry type, source and translation languages. In addition, to simplify the process and making repeatable searches easier, a user can save his or her search settings for the future as so-called "saved searches".
Furthermore, the plugin provides the functionality to export created translations into csv files to ease the way of sharing or moving data. To support the same process backwards, the user can use the import functionality to import data from a csv file, which was adjusted in accordance to the acceptable format before.
The Terminology plugin has the ability to interact with the Metadata Translation plugin by providing a simple way to highlight terms and sentences provided by and stored in the terminology during the translation process. This allows the user to view and check given terminologies or translations during metadata translation usage and to decide which translations have been given by the terminology.
Prerequisites and relations to other modules
The module can be used in context of the Metadata Translation plugin - which is a tool for text translations - if the corresponding settings are made in the backend (also see here).
Terms and sentences will be highlighted there, so that a user has the possibility of direct access to the terminologies.
Additionally, users have the possibility to use DeepL glossaries, with which they can use an automatic translation service with the corresponding translations made within the Terminology plugin.
Open Terminology
The Terminology plugin can be opened via the sidebar. If it is not directly visible inside the main sidebar, it could be placed inside the further menu items.
Structure
Terminology is divided into a Terminology search results page (to find specific Terminology entries) and a glossary overview (to handle glossaries).
Terminology search results page
The Terminology search results page is divided into a left and center view and gives a user the possibility to search for specific entries (terms and sentences) within different glossaries.
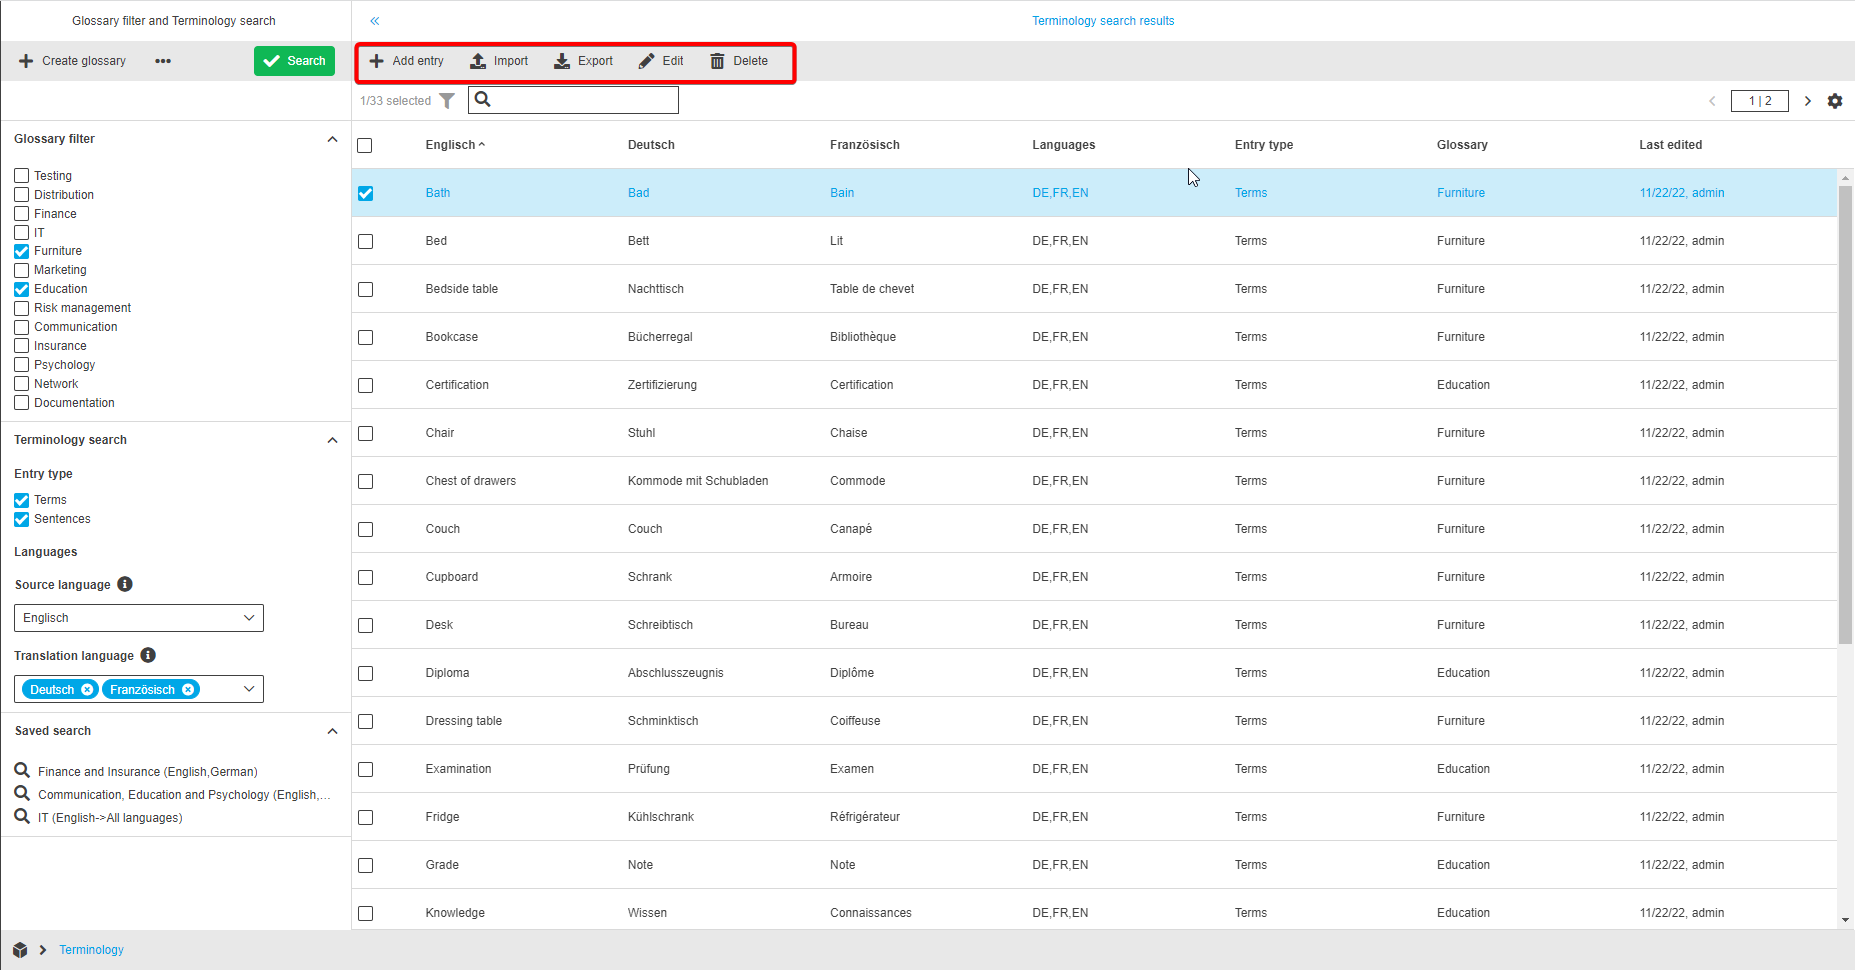
Left view - Glossary filter and Terminology search
The left view of the Terminology plugin is used to filter the content of the center view table so that the user can view a list of relevant entries (terms and sentences) for further management.
It is structured into three sections:
-
Glossary filter
-
Terminology search
-
Saved search
After a user has set the preferred filters/search options within the sections, he can click on the "Search" button inside the toolbar to update the center view and see the corresponding results.

Glossary filter
The first section of the left view contains a list of available glossaries. A glossary is a type of dictionary for specific categories and contains a list of translations.
It is possible to select one or more glossaries to find the preferred terms and sentences as search results.
At the first visit of Terminology there is always a default glossary available.
| Minimum one glossary must be checked/active. The checkbox for the first glossary in the list is checked by default when opening the page. |
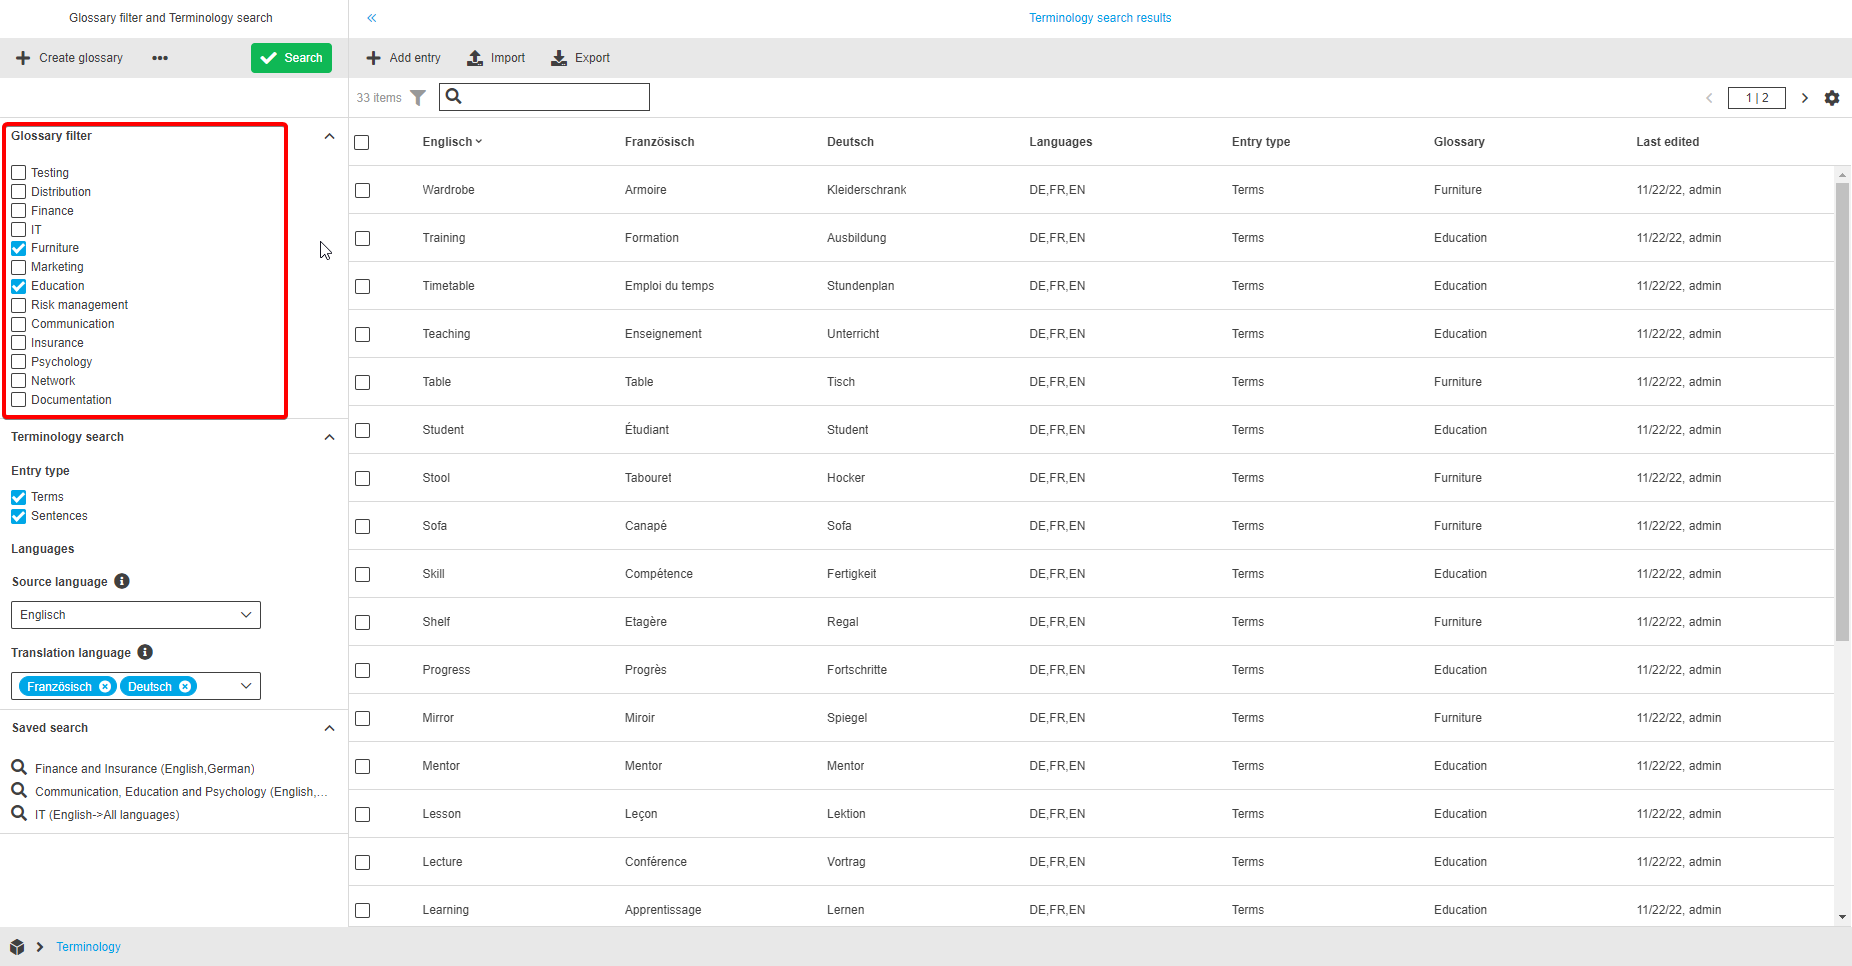
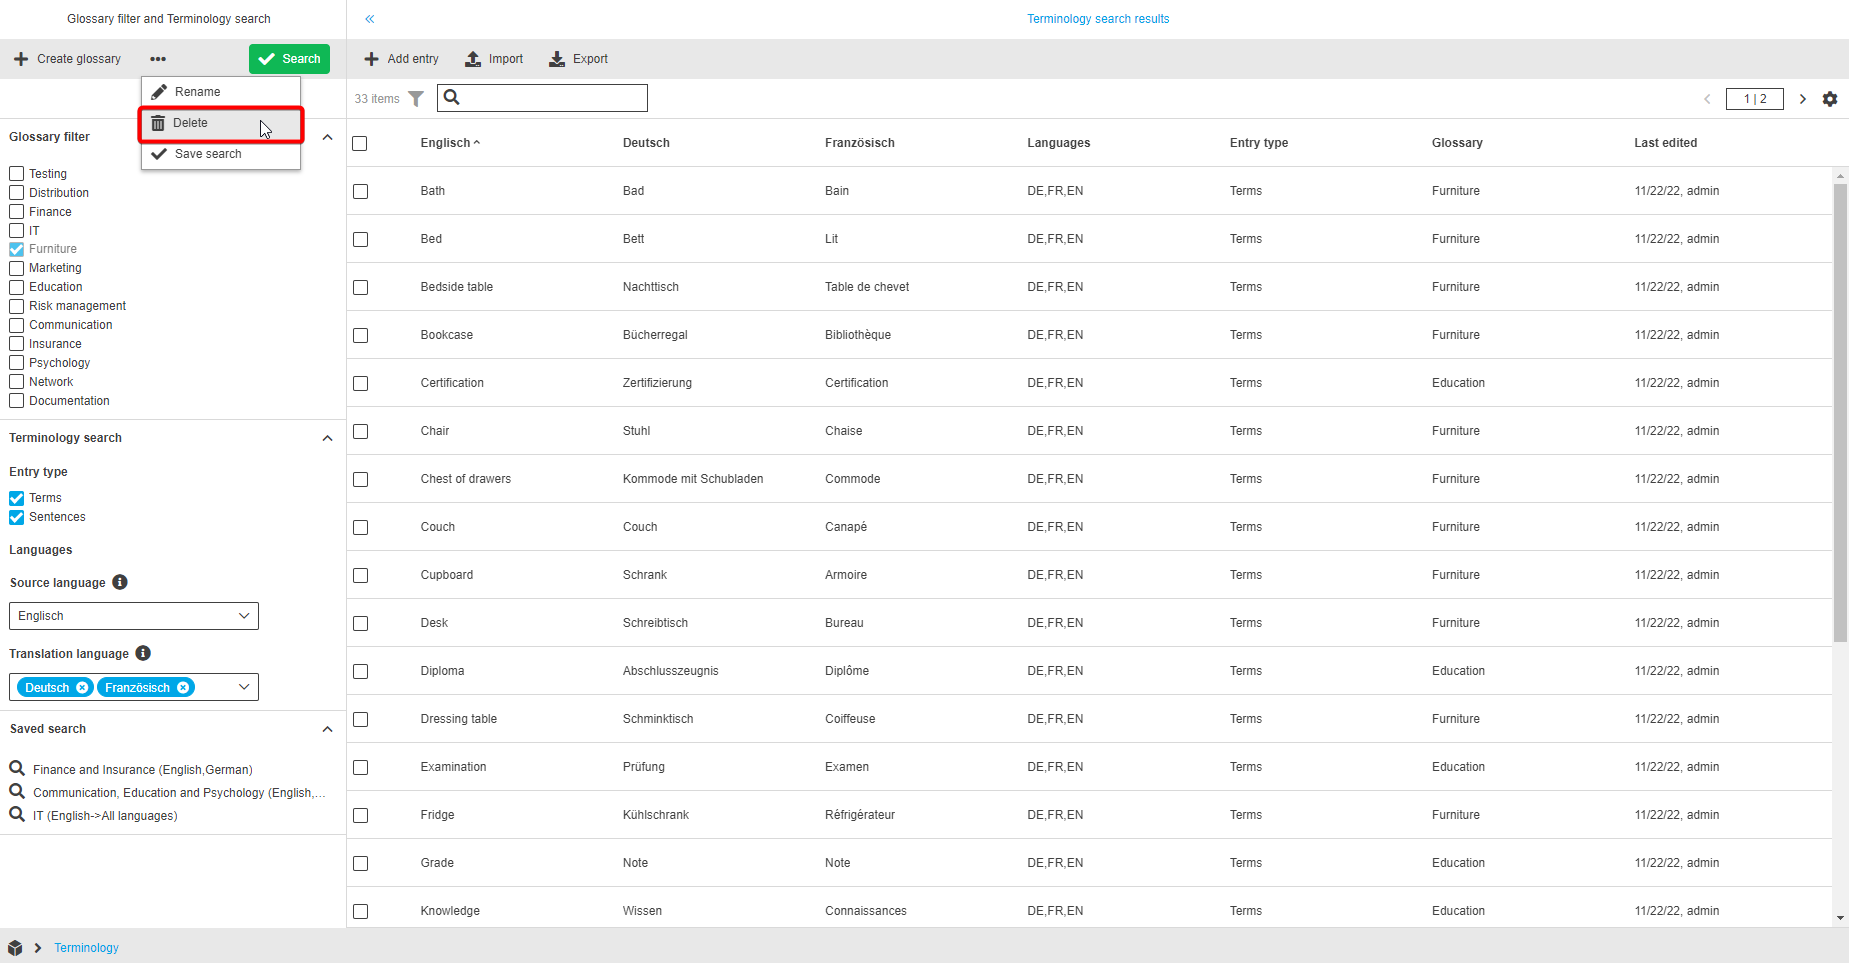
The user has the option to create, rename and/or delete glossaries.
Create glossary
To create a glossary, the "Create glossary" functionality is used.
Afterwards the “Create new glossary” modal will appear and the user can enter the name of the new glossary in the input field. After clicking on the “Save” button, the new glossary is created and shown in the “Glossary filter” section.
| Only unique names are allowed for glossaries. |

Rename
The "Rename" functionality is used for renaming a glossary.
After a click on the function, the “Rename glossary” modal will appear and the user can enter a new (unique) name for the selected glossary in the input field. After clicking the “Save” button, the name is changed.
The "Rename" function is only available in case of one selected glossary (no multi-selection).
Delete
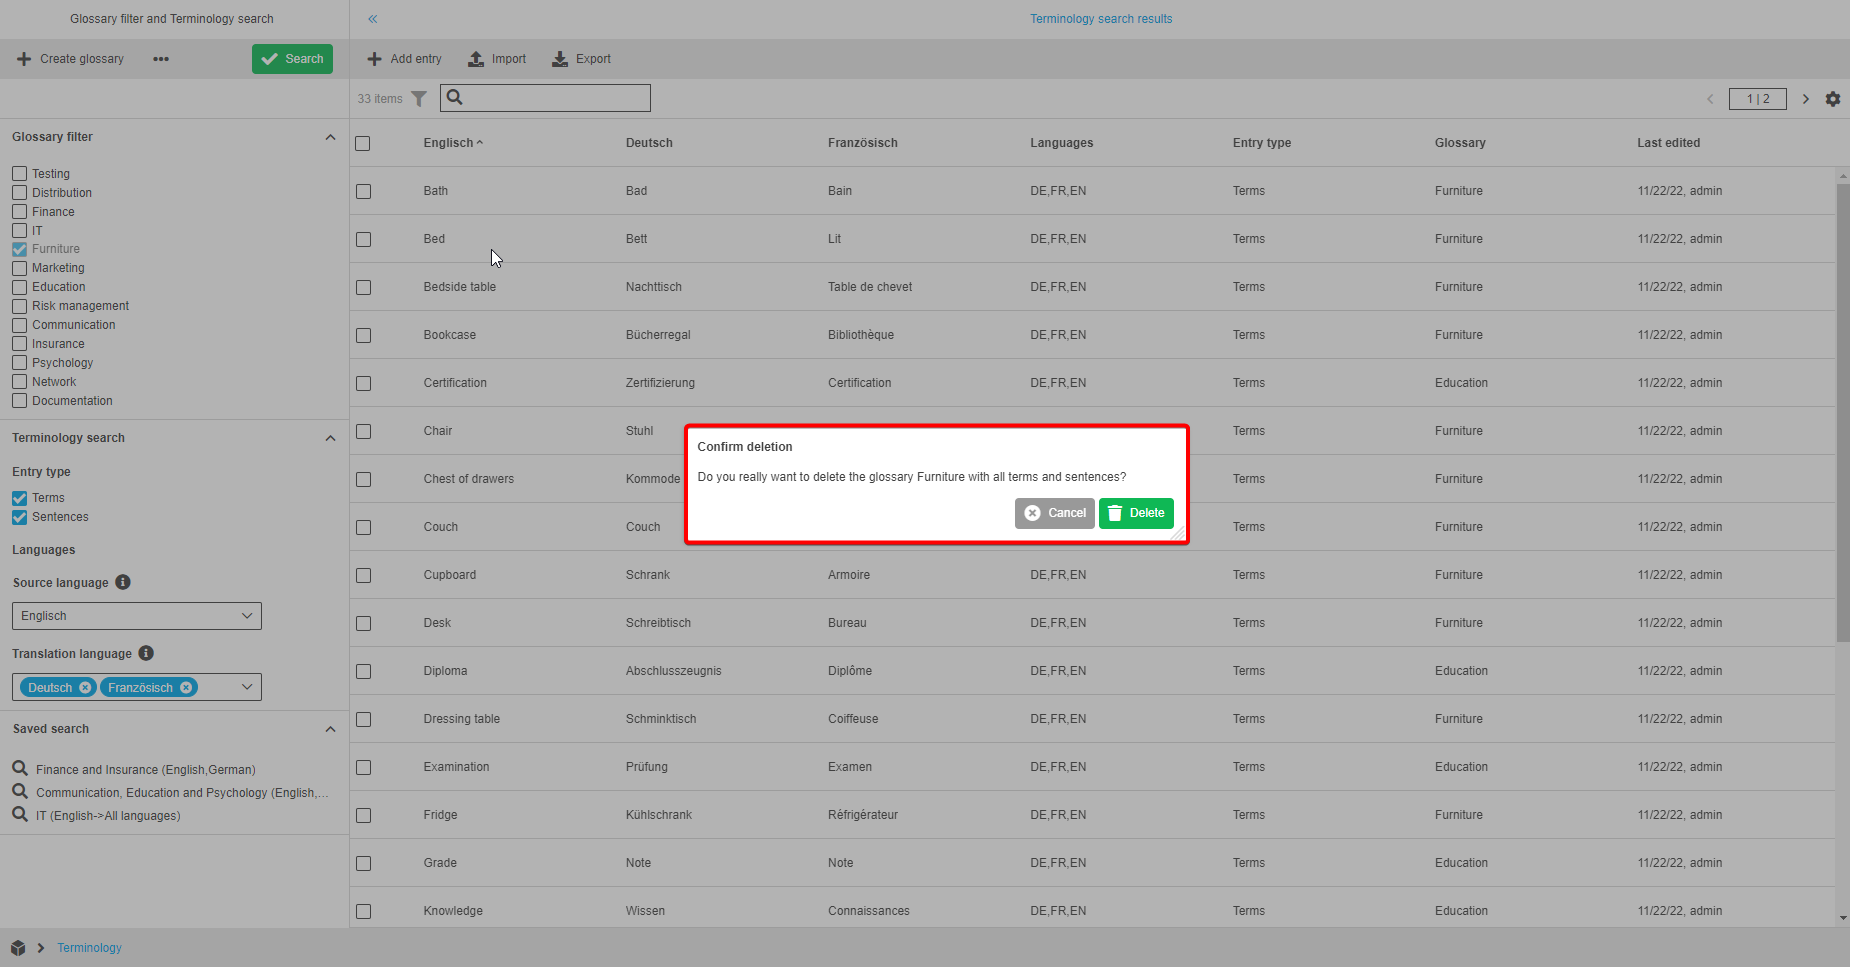
The "Delete glossary" functionality is used for deleting a glossary.
As soon as the function is executed, the “Confirm deletion” modal will appear and the user can delete the selected glossary by clicking the “Delete” button. Afterwards the selected glossary will be deleted with all related entries.
It is not possible to delete more than one glossary at the same time and all glossaries can be deleted except of the last available one (minimum one glossary must always be available).
| The "Default" glossary can be deleted, but only if there is at least one other glossary available. |
Terminology search
The second section is for refining the search of entries within the glossaries.
Users can define:
-
an entry type
-
a source language
-
a translation language
Entry type
The entry type settings are used for the selection of "Terms" and "Sentences" options.
| By default, the checkbox with “Terms” is marked. Minimum one option must be selected. Multiselect is allowed. |

"Terms" are primarily intended for individual words or fixed terms, "Sentences" for complete phrases. In general, the settings serve for the user’s own categorization and do not contain any rules (terms can also contain sentences, for example, the assignment is up to the user).
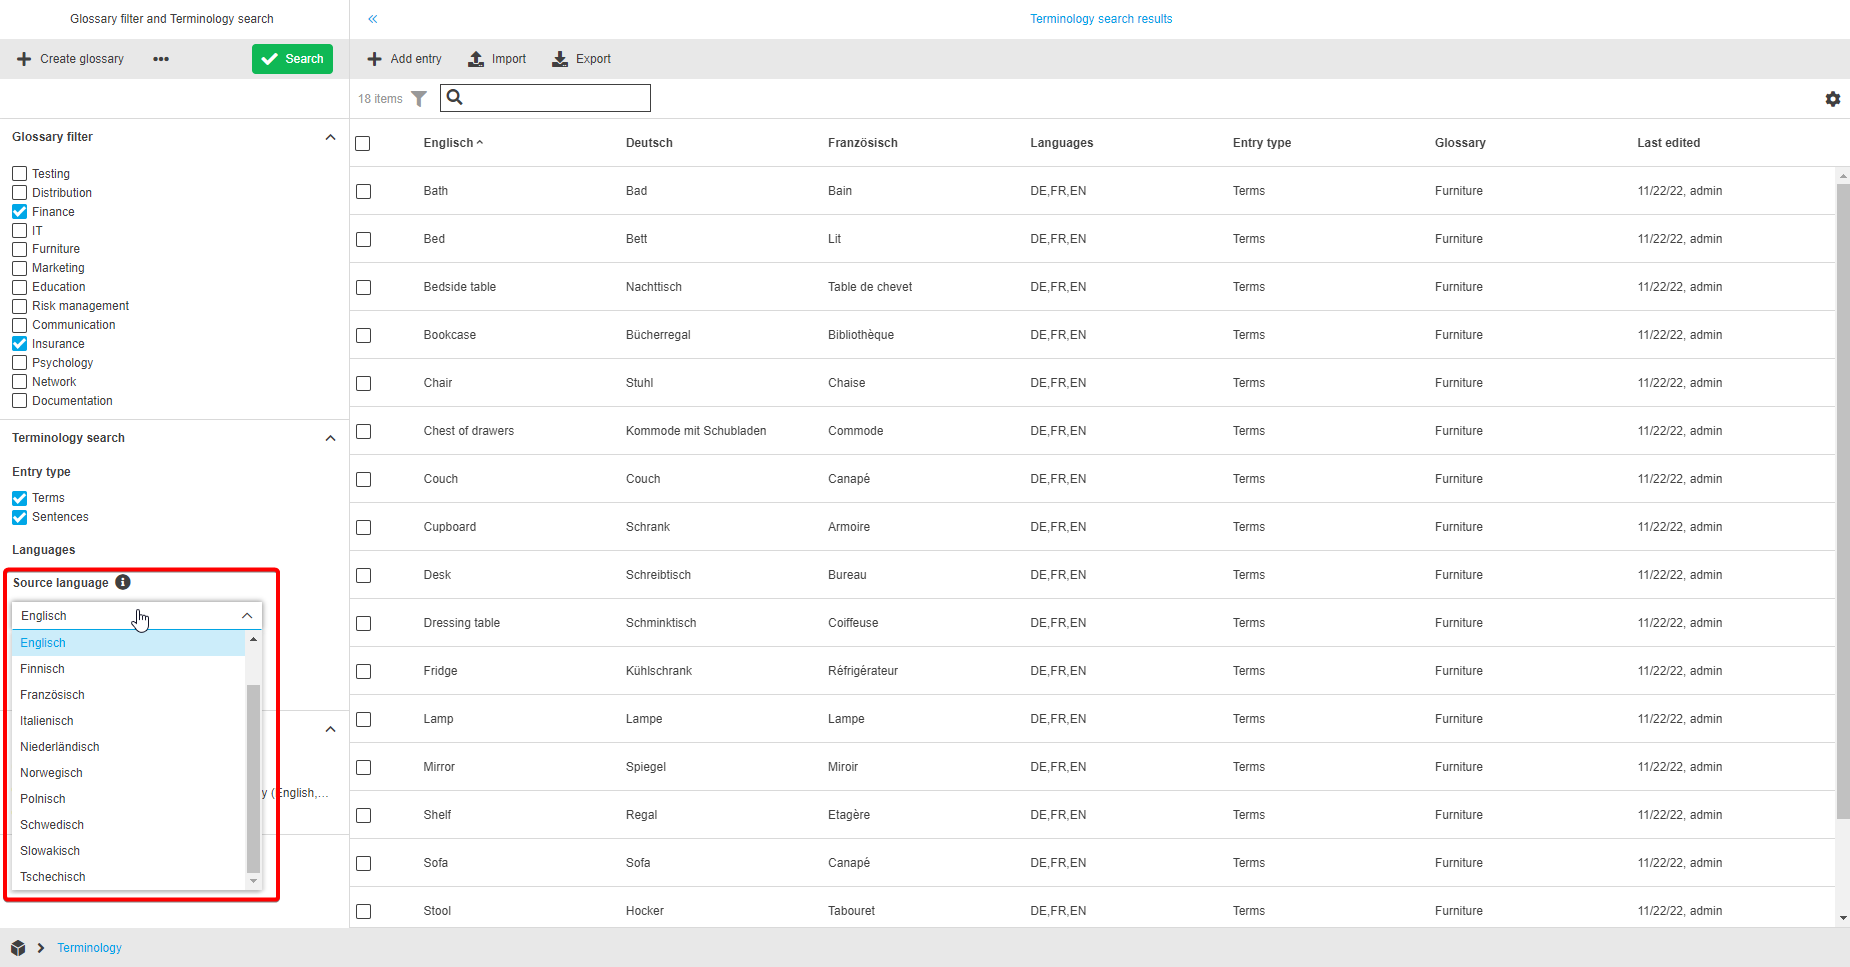
Languages: Source language
The source language is the language for which entries with the translations will be displayed and appears as the first column in the center view. It can be chosen via the searchable dropdown list “Source language“. This dropdown list contains content languages available in the system.
| Dropdown list “Source language“ cannot be empty. Content language from the user settings is selected by default. User can hover on the "information" icon to read the hint about the field. |
Languages: Translation language
The translation language is a searchable multiselect dropdown list and is containing all content languages which are available in the system (except the one which is chosen in the source language dropdown list).
It is possible to select single or multiple languages by click on the checkboxes or a user can select directly "All languages" inside the dropdown list, so that all available languages are selected without the need to select them manually.
Each selected translation language will be represented as a separate column in the center view after the search is performed.

Saved search
The saved search accordion at the bottom of the left view contains entries with saved criteria/filters that were set before, so that the user can easily and quickly have access to these settings at any time.
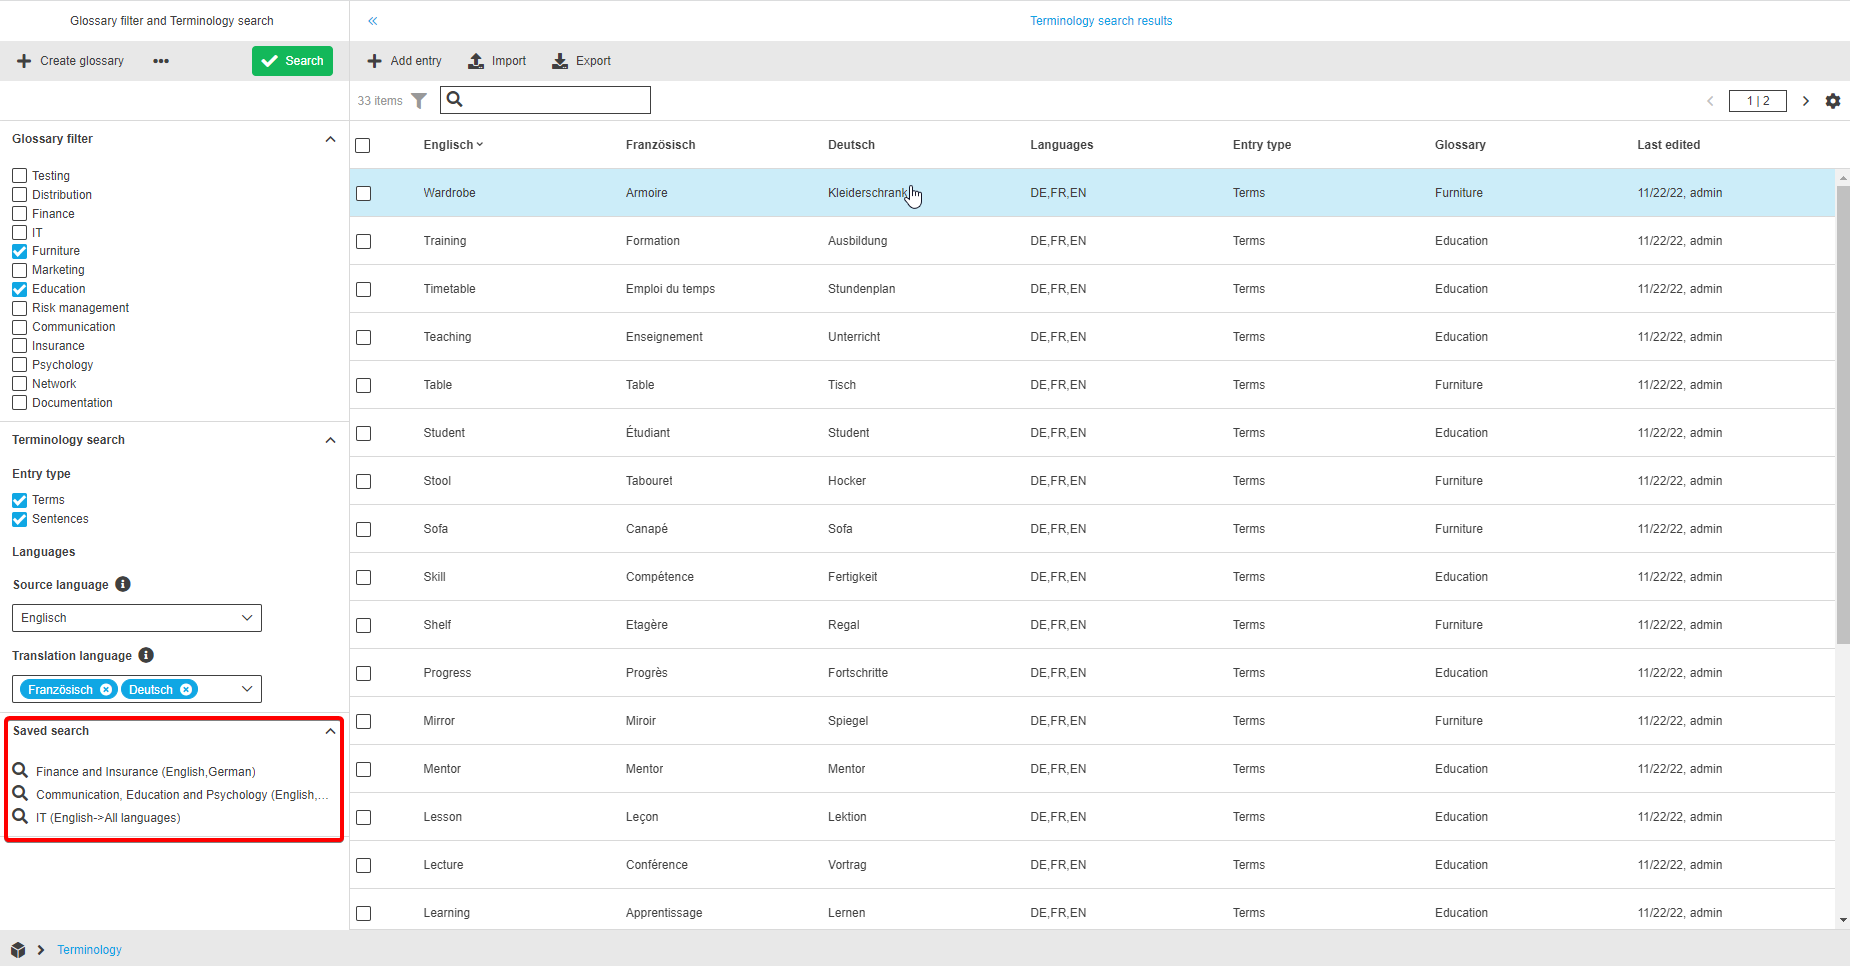
To create a saved search, the user needs to set the filters on the left view and click on the "Save search" function inside the toolbar. Now the “Save search” modal will appear and the user can enter a unique name for the saved search in the input field. After clicking on the “Save” button, the saved search will appear in the list of saved searches.
Afterwards the user can click on any saved search to apply the filters to the left view and after click on the “Search” button, the filters will be applied to center view.
A saved search can be renamed or deleted.
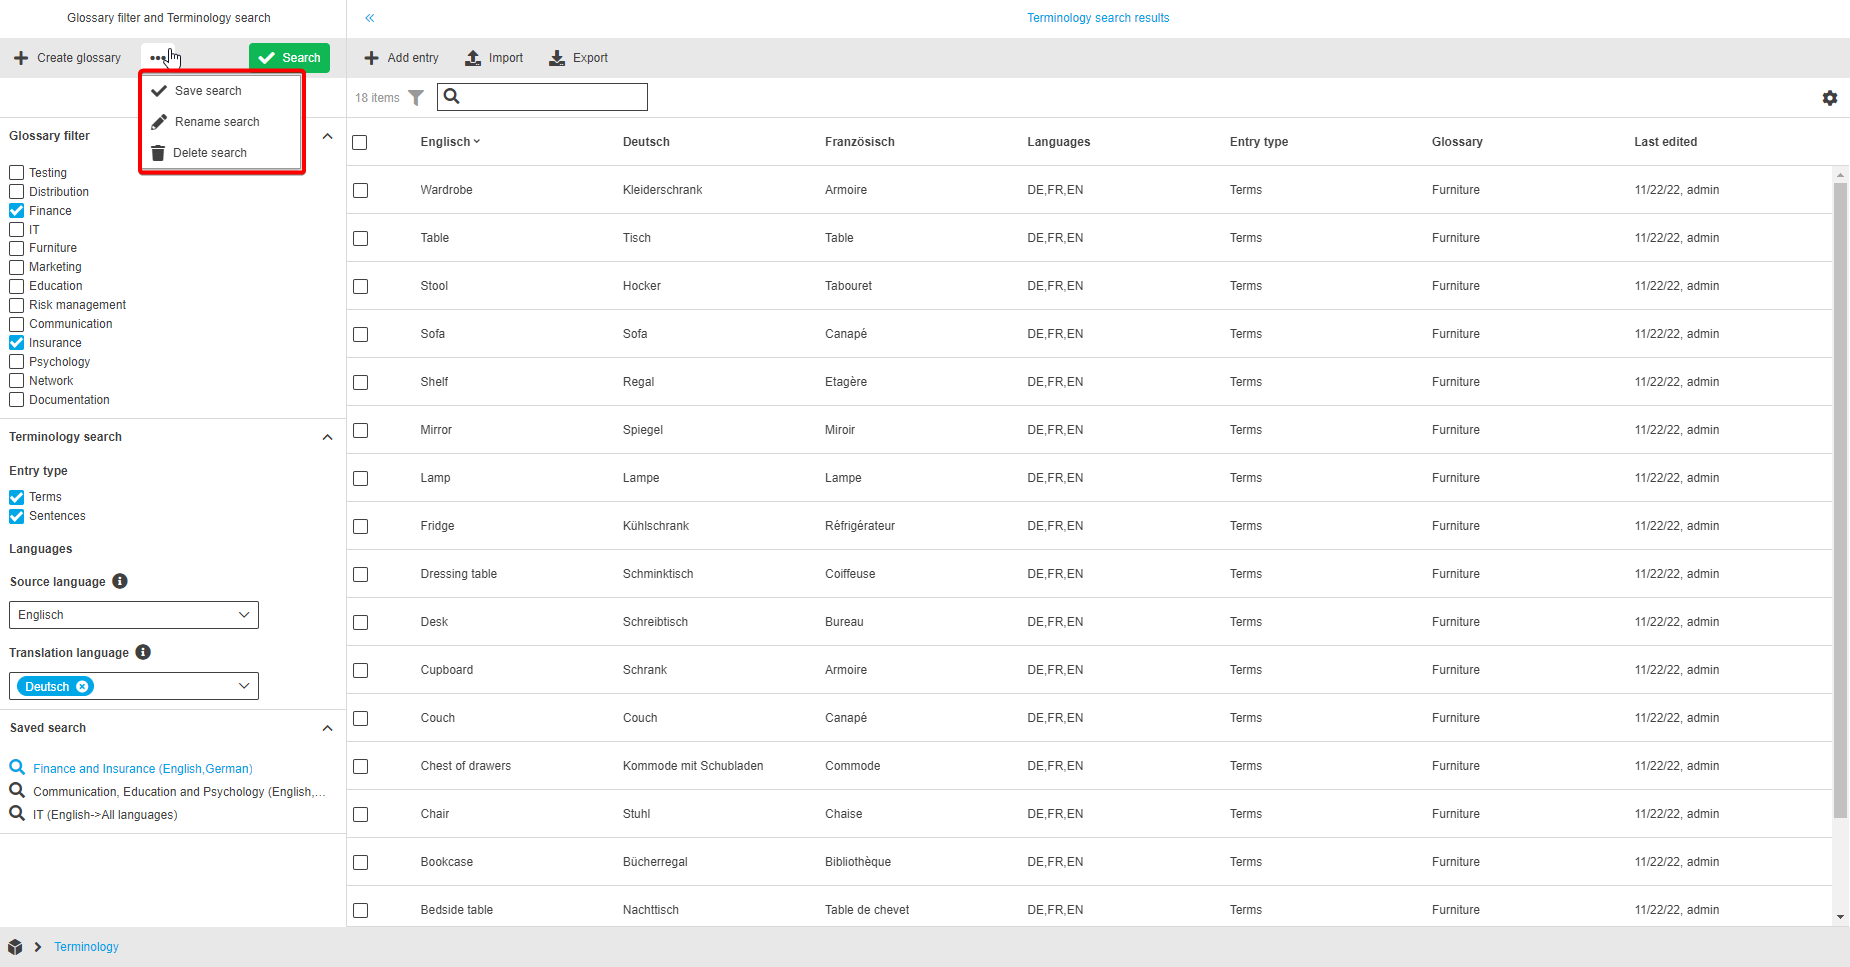
Rename search
The "Rename search" functionality is used for renaming a saved search.
After clicking on the function, a “Rename glossary” modal will appear and the user can enter a new and unique name of the saved search in the input field. After clicking the “Save” button, the name of the saved search is changed.
The function is only available in case that a saved search is selected.
Center View - Search results
The center view displays the search results, meaning all matching terminology entries that result from the filters in the left view.
Statusbar
In the statusbar of the center view a user can find different functionalities and settings options.

There is …
-
a counter for the number of entries shown in table. If the user selects some entries, the indicator will start showing the number of selected entries.
-
a quick search for filtering. If the user wants to find a specific entry, he can add the name inside, click on enter and the corresponding values are shown.
The filter can be activated or deactivated.
-
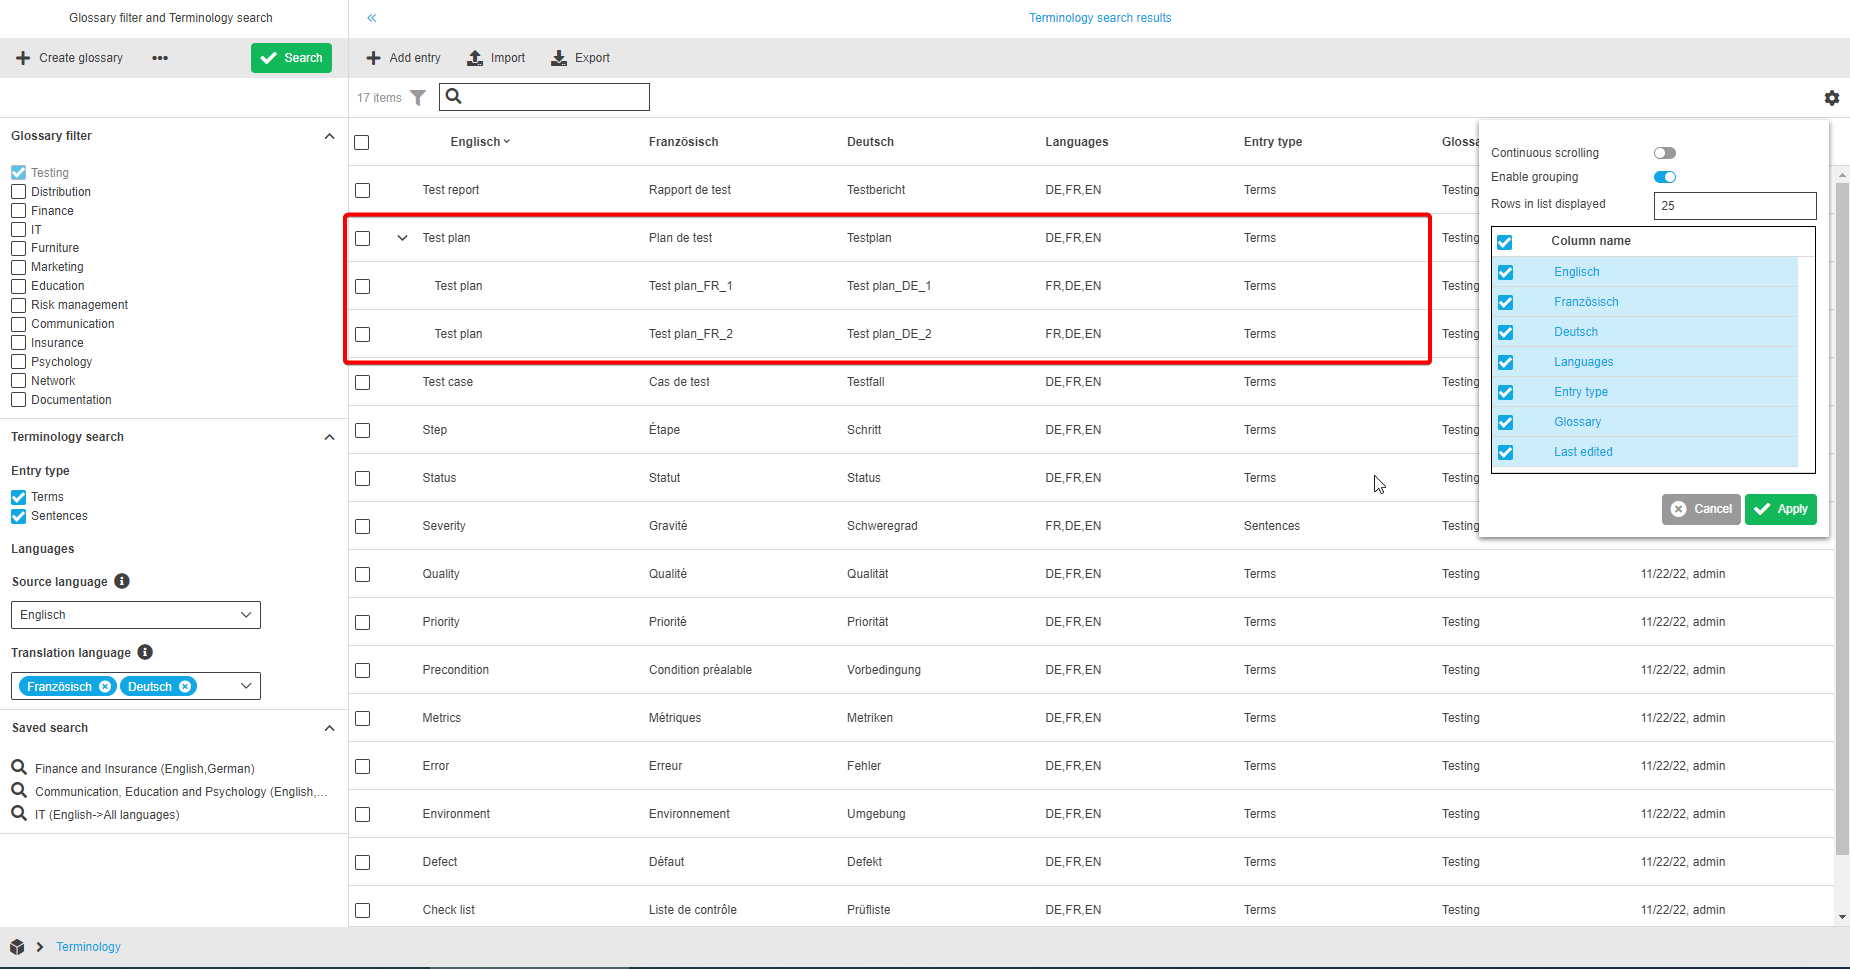
a statusbar settings icon. It is possible to configure the content display properties. After a click on the button, a pop-over appears where the user can set up:
-
Continuous scrolling. The user can enable this option to turn off the pagination functionality, so that all entries will be loaded continuously while scrolling the view instead of being split by pages.
-
Enable grouping. Entries which contain the same "Source language" value can be grouped together and appear as one accordion in the center view table.
Terms and sentences with the same "Source language" value appear under the same accordion when "Enable grouping" is activated. 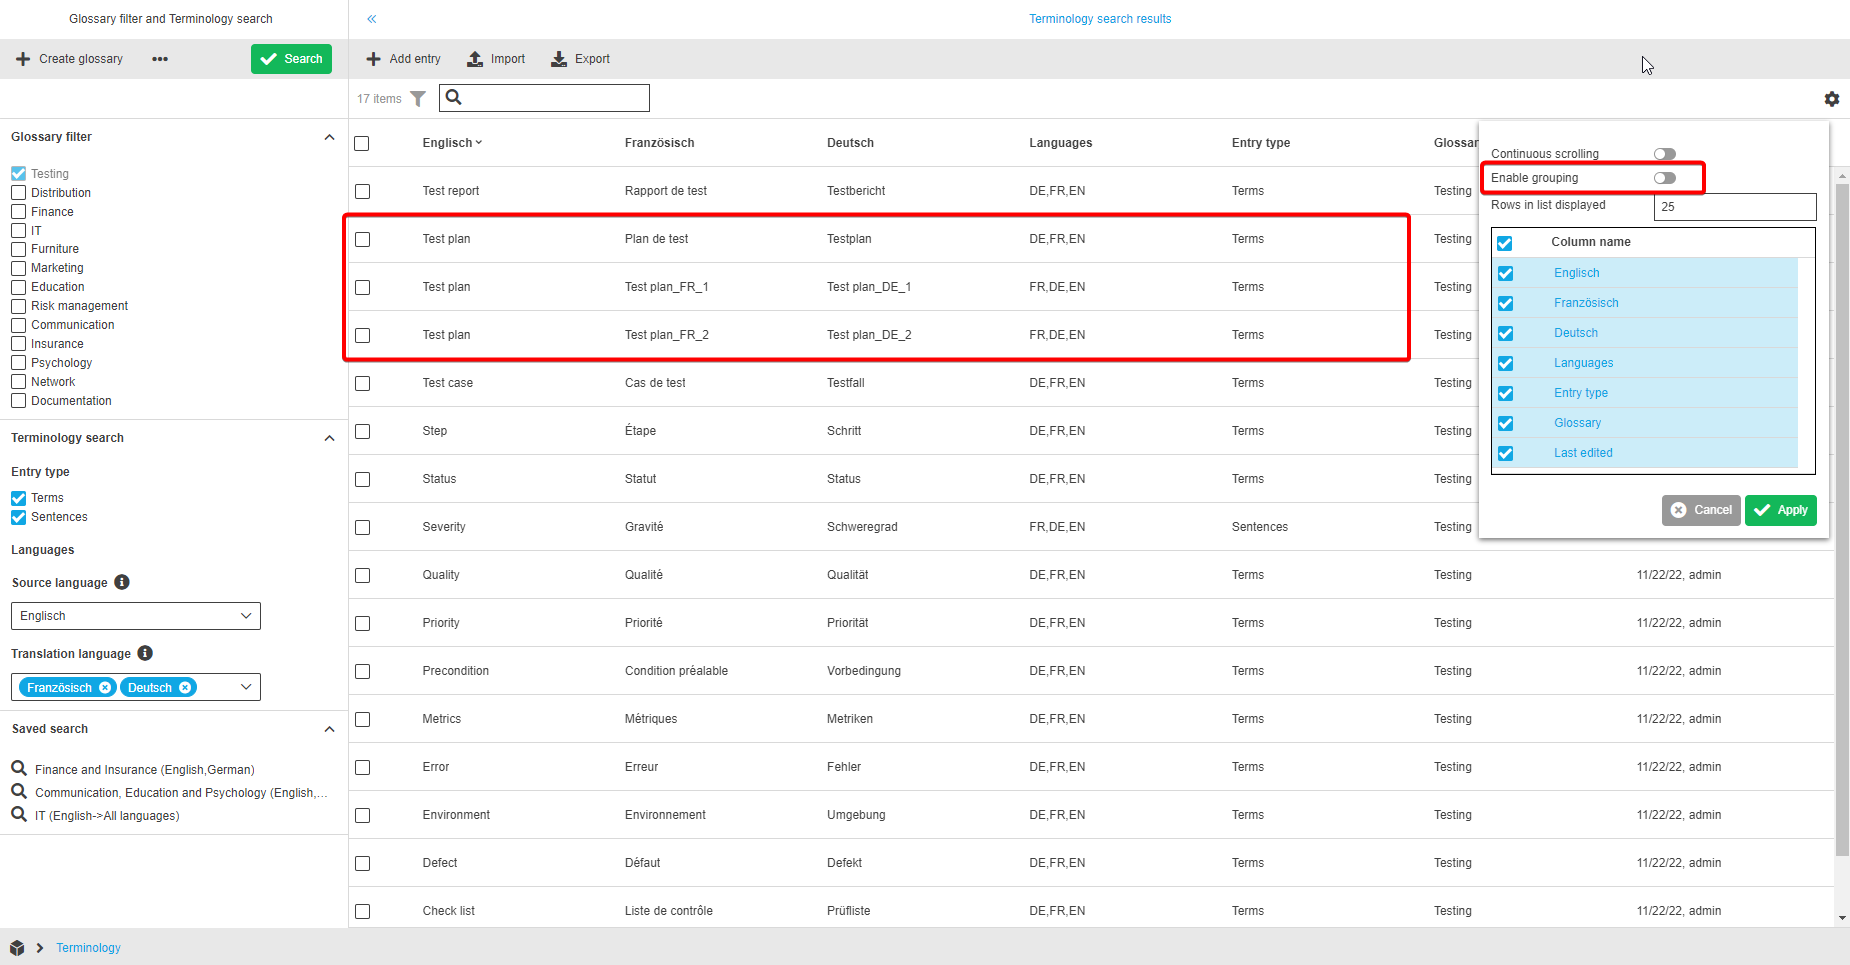
-
Specify the number of “Rows in list displayed”. By entering a number the user will set the amount of rows which will be displayed per page.
If the overall number of the entries to be displayed is more than the specified number in the field “Rows in list displayed”, the pagination element will appear. -
Enable or disable the display of columns in the table.
-

Table content
The center view table allows the users to see the list of terminology entries.
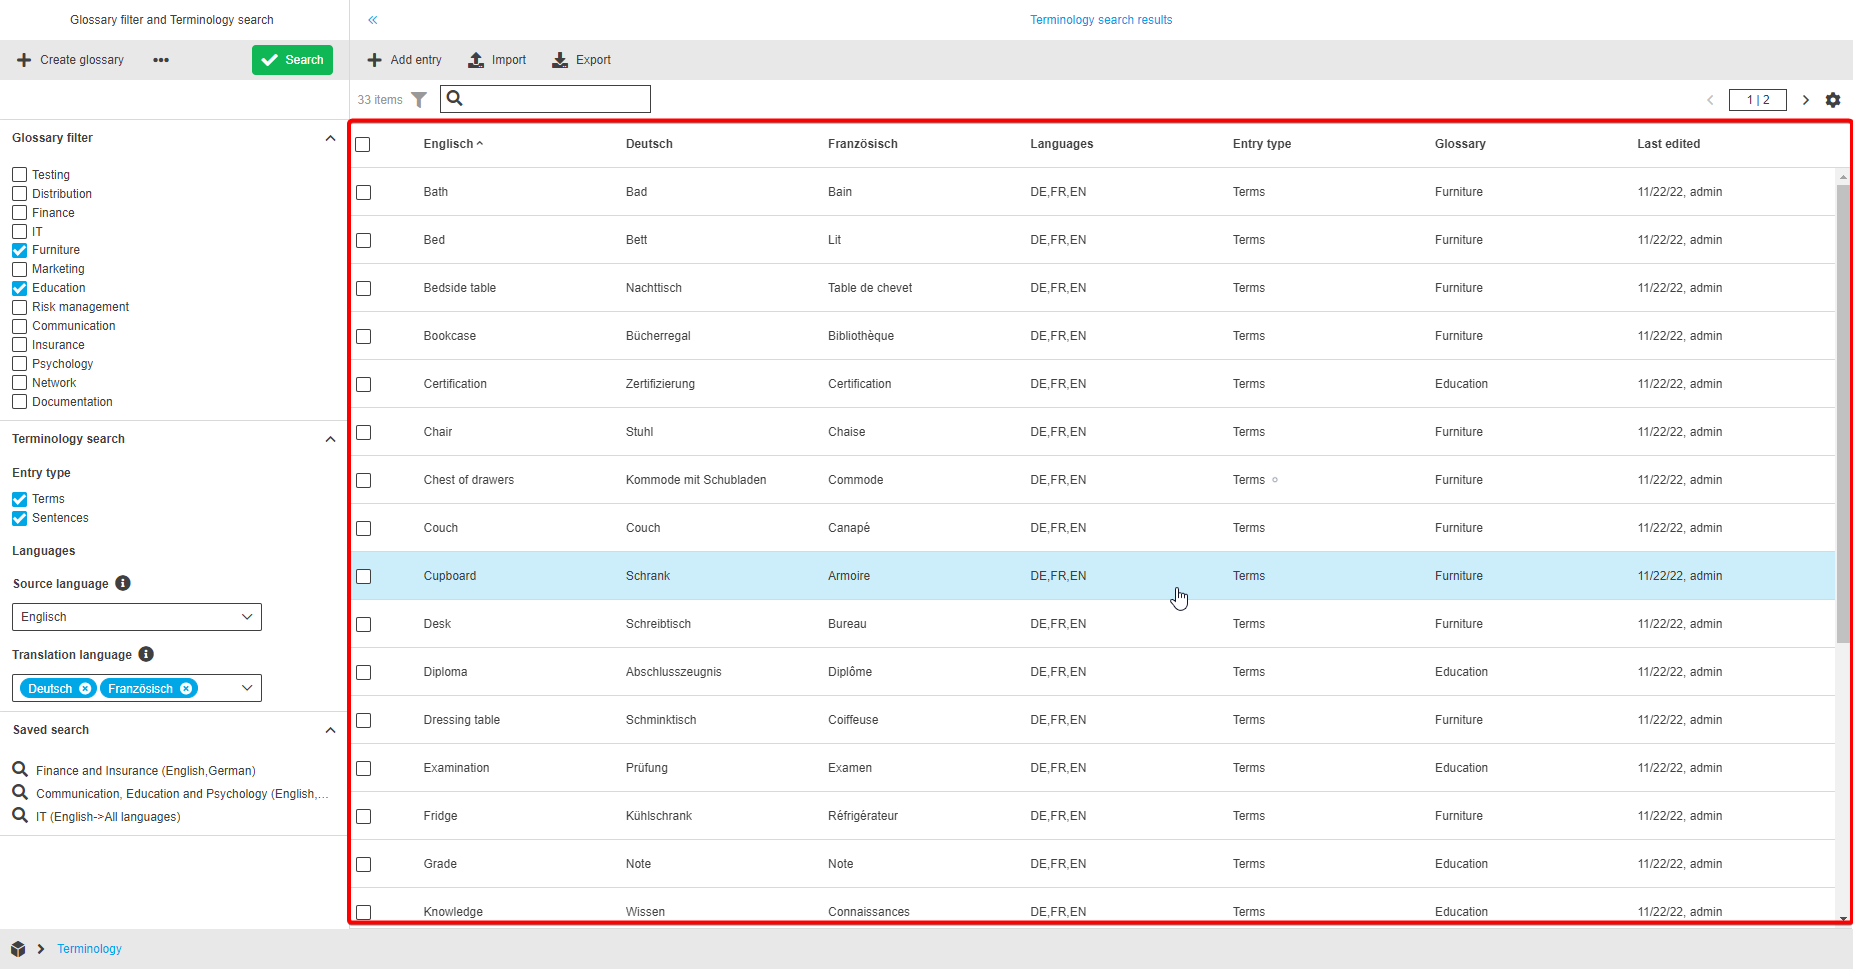
The table contains:
-
Columns with specific languages.
-
The first column contains the values in the language which is selected as "Source language" in the left view.
The name of the column is the selected language of the source language (e.g. German). -
The other columns depend on the "Translation language " value(s) from the left view.
-
-
The Languages column contains the list with abbreviations of languages for which translations are available. If the value is translated into several languages, all values are displayed comma-separated.
-
The Entry type column indicates if the entry is a term or a sentence.
-
The Glossary column indicates to which glossary the entry refers to.
-
The Last Edited column shows the date of the last changes of the entry and the user who performed them.
If Terminology is opened for the first time or there are no entries available for the set search filters, then an empty page will be shown.
Furthermore, both single and multi-selection, are available.
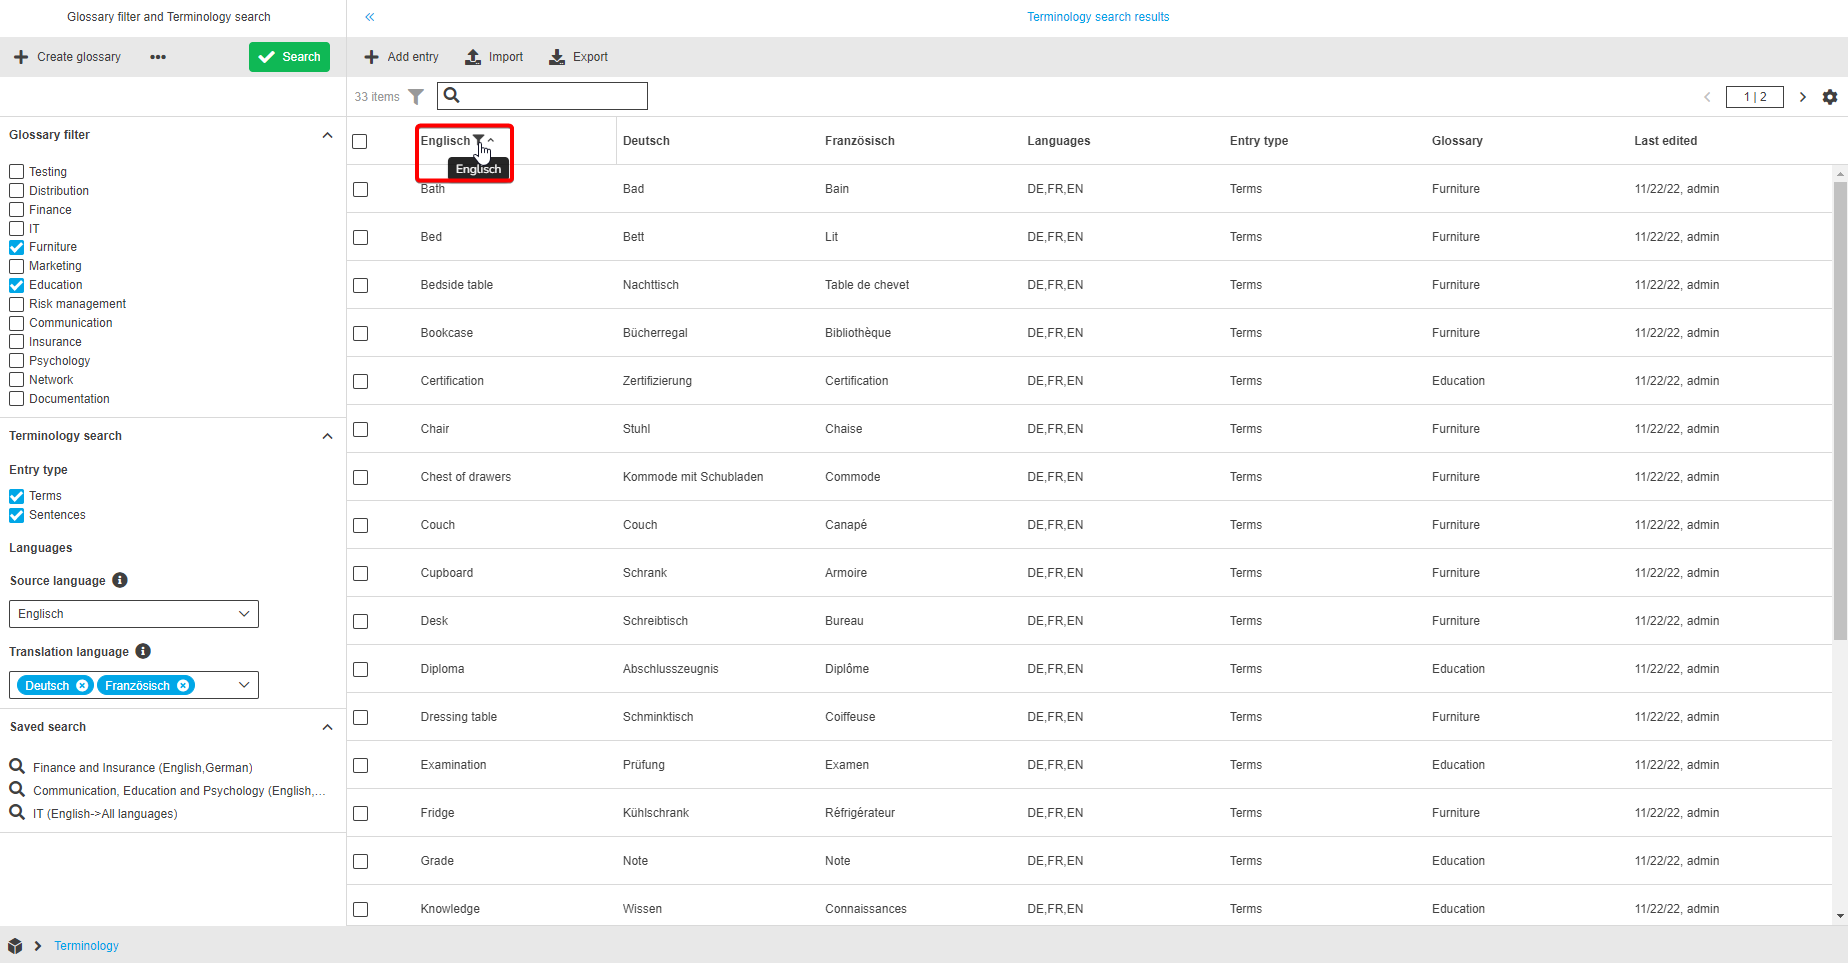
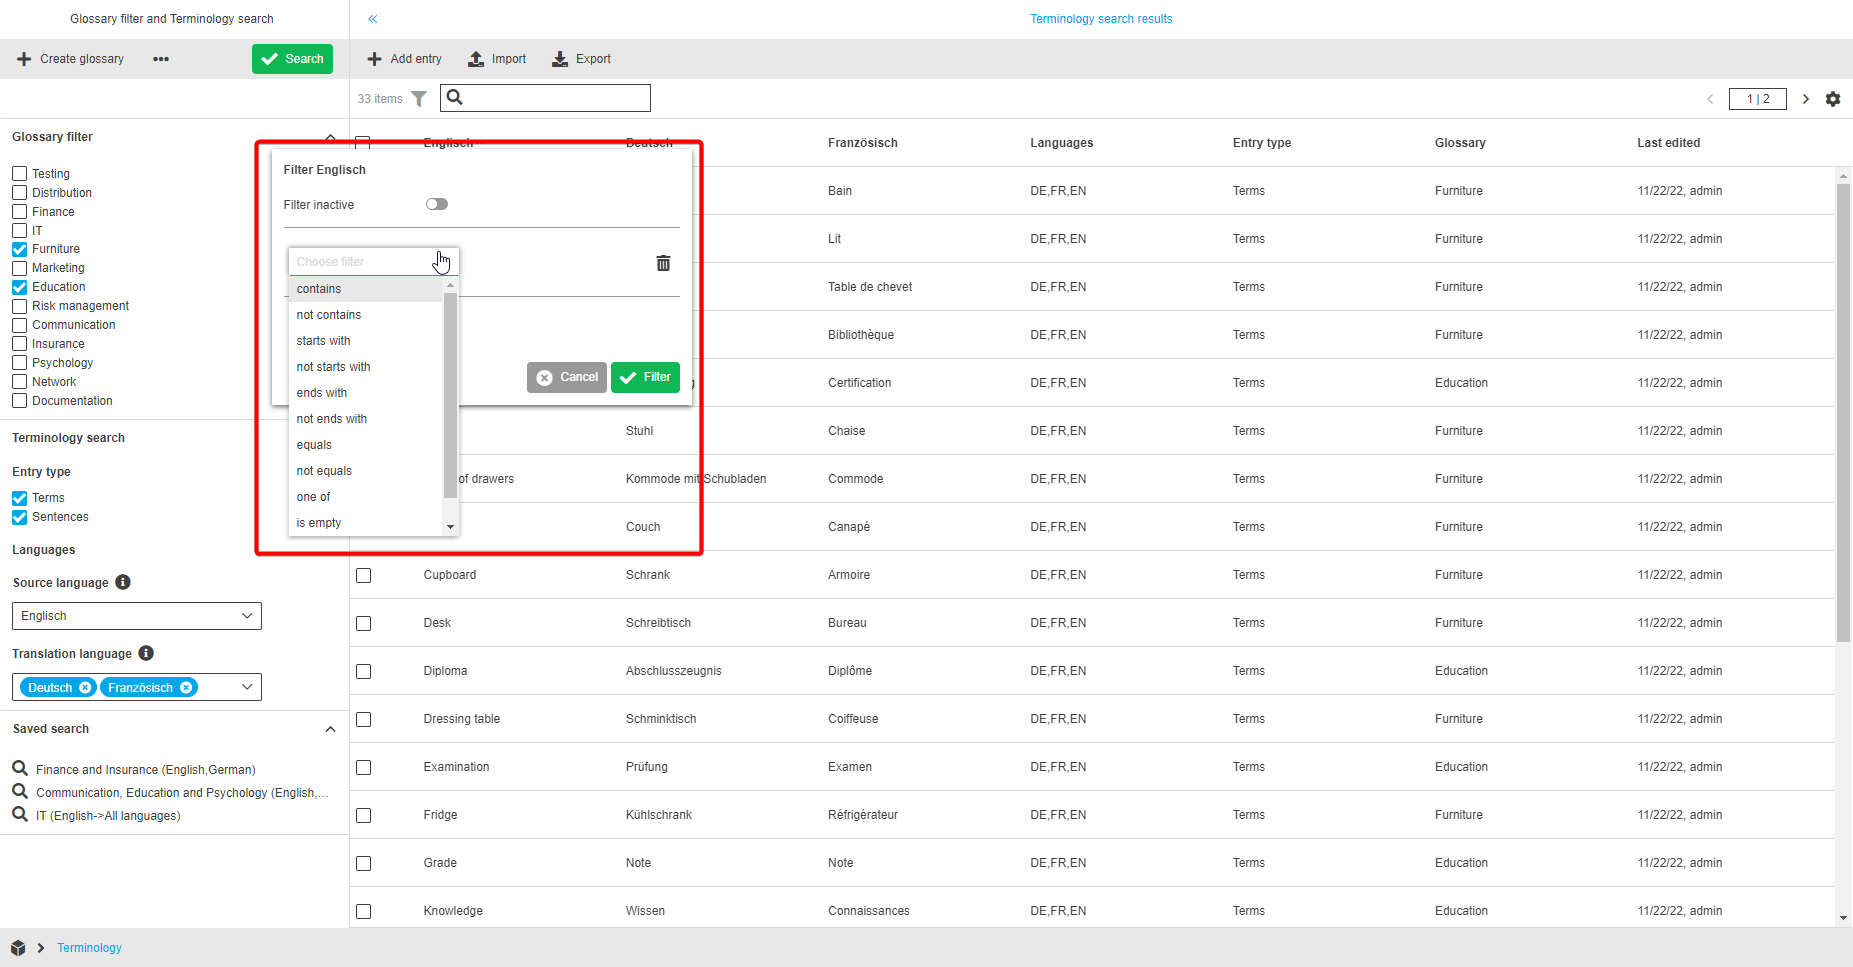
In addition, the table allows sorting and filtering by each column:
-
Sorting: the user can click on the column title to perform ascending or descending sorting.

-
Filtering: the user needs to hover over the column title and wait for the filtering icon to appear. By clicking on the filtering icon a pop-over with filtering options will be opened. In the appeared pop-over the user can activate filters and then select the filtering operator and value. By clicking on the “Filter” button the pop-over will be closed and filtering is performed.
Toolbar functions
The toolbar of the center view contains the following functions:
-
Add entry
-
Edit
-
Delete
-
Export
-
Import
Add entry
The "Add entry" functionality is used for adding entries in the terminology table to keep the terms list up-to-date.
The terms and sentences can be used in translation process later.
The user is able to create a new entry by clicking on the "Add entry" function. Afterwards the “Add entry” modal will appear and the user has the following options:
-
select the entry type within the first dropdown. “Term” or “Sentence” can be chosen.
-
select the preferred glossary (where the entry should appear) inside the second dropdown.
-
enter values for source and translation languages. The source language must be filled in, the translation languages are optional.
-
Optionally, the user has the possibility to select the "forbidden for usage" option for all inputs by hovering over the row/terminology and clicking on the “forbidden” icon.
-
The visibility of languages is depending on the selection on the left view. Only the selected source and translation languages are shown.
-
After clicking the “Save” button, the entry will be added to the corresponding glossary. If an entry is saved successfully, a green message box appears.
| The button “Add entry” is only shown if a user has the corresponding access rights to edit terminology content. |

Edit entry
The "Edit" functionality is used for editing already existing entries in the terminology table and to update the terms/sentences list.
By clicking on the "Edit" button, the “Edit entries” modal will appear and the user can:
-
edit the entry type within the first dropdown. “Term” or “Sentence” can be chosen.
-
edit the preferred glossary inside the second dropdown.
-
enter or edit values for source and translation languages. The source language must be filled in, the translation languages are optional.
-
Optionally, the user has the possibility to select the "forbidden for usage" option for all inputs by hovering over the row/terminology and clicking on the “forbidden” icon.
-
The visibility of languages is depending on the selection on the left view. Only the selected source and translation languages are shown.
-
| It is possible to use the function in context of multi-selection. In this case a pagination stepper in the top right corner of the modal (one "page" for one terminology) will appear. |
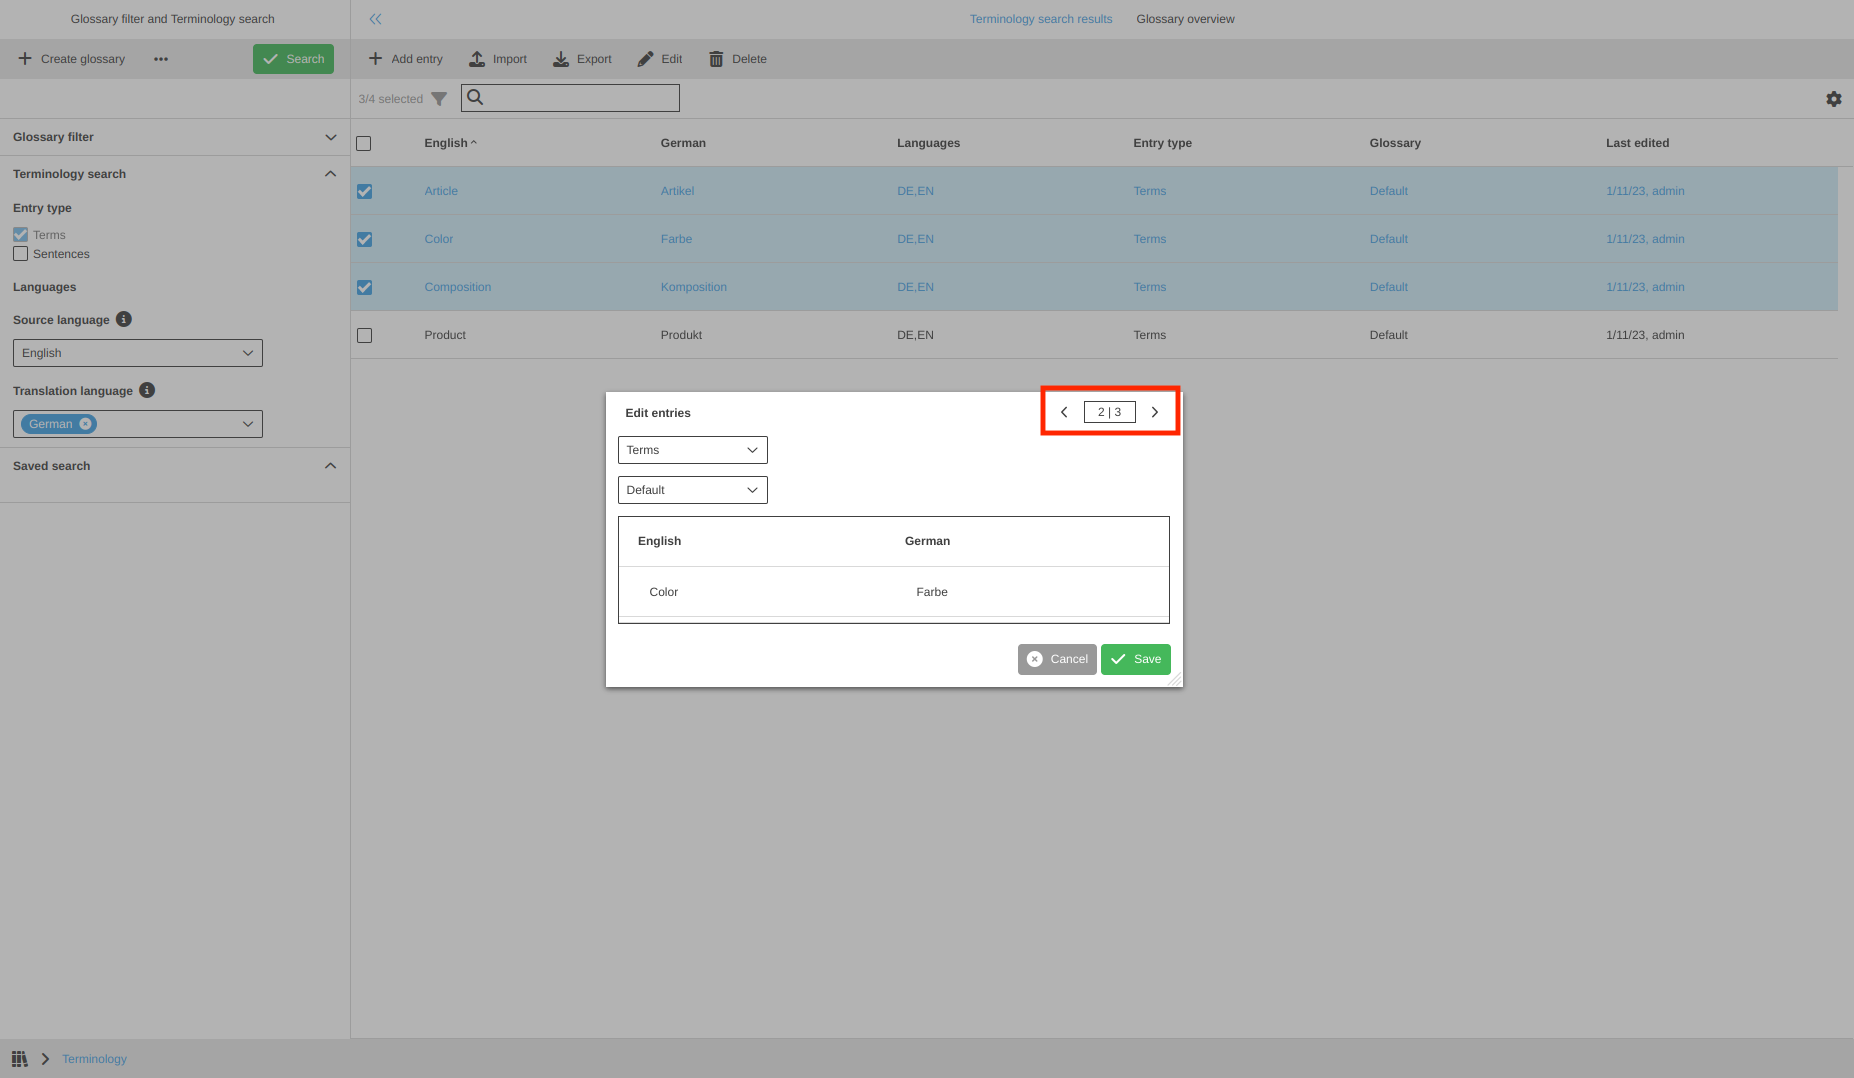
After clicking the “Save” button, the entry will be updated within the corresponding glossary. If an entry is saved successfully, a green message box appears.
| The function “Edit” is only shown if a user has the corresponding access rights to edit terminology content. |

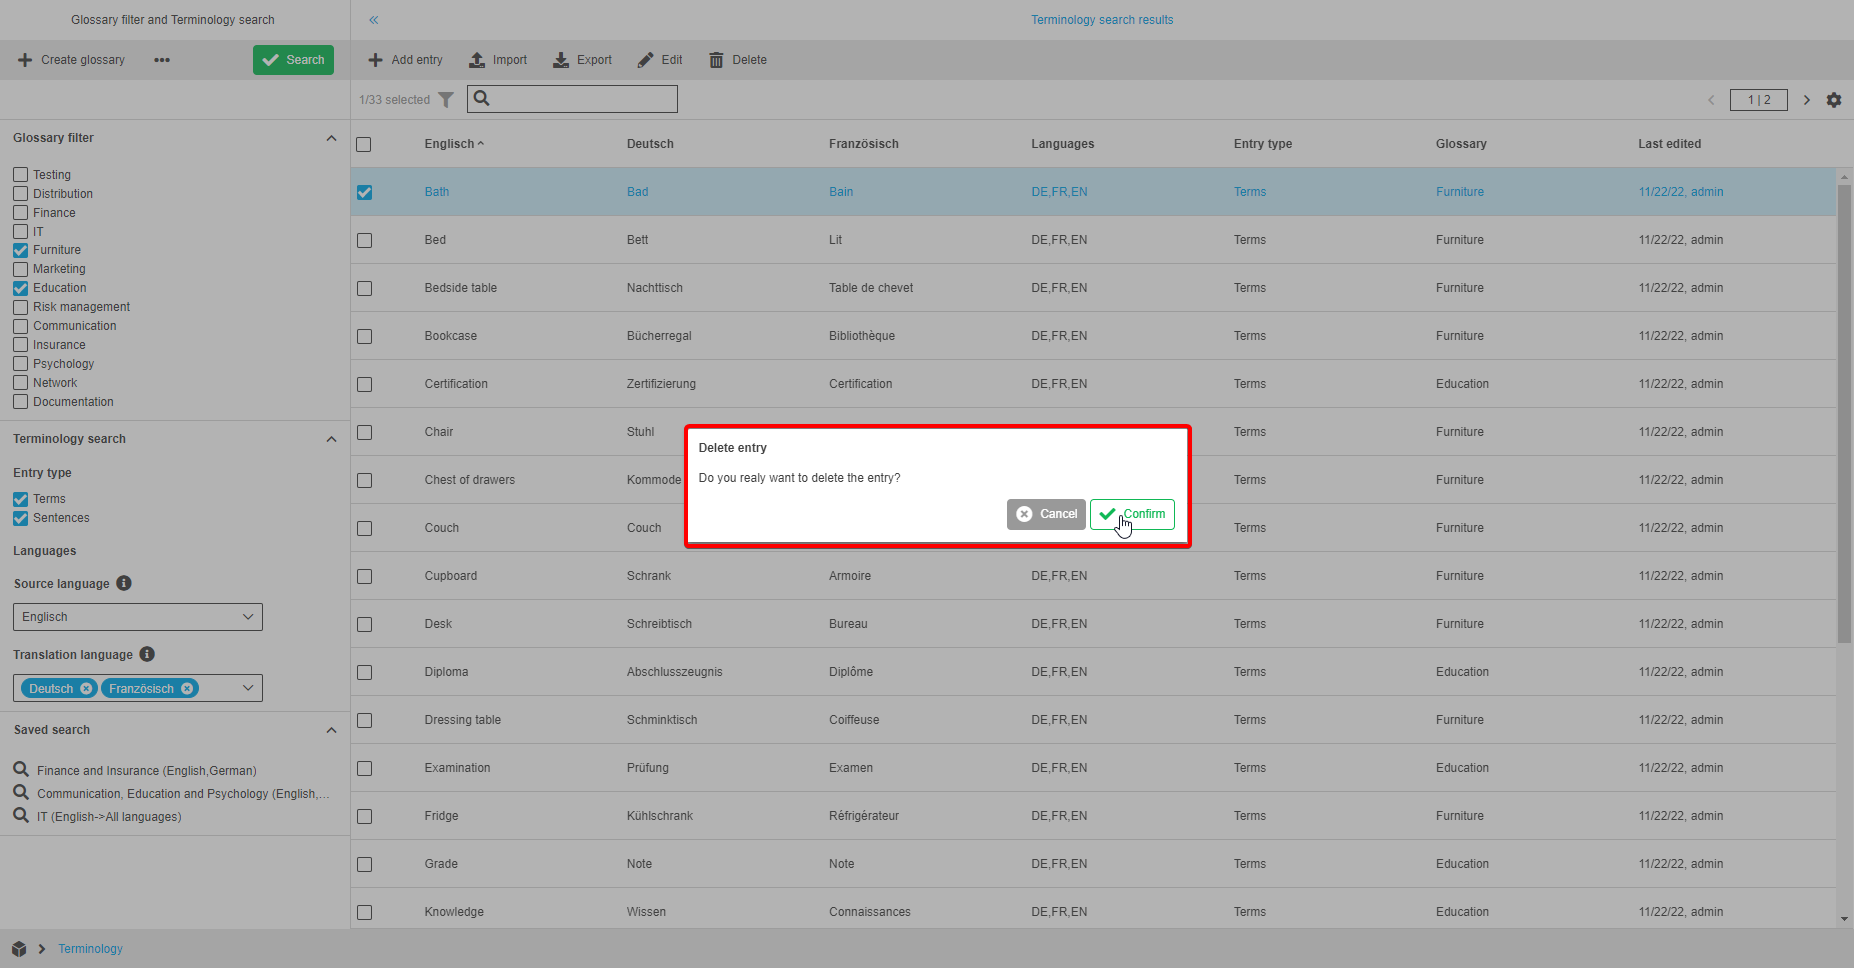
Delete entry
The "Delete" functionality is used for deleting entries. A user is able to delete one or more entries at the same time by clicking on the "Delete" button inside the toolbar.
Afterwarts, a “Delete entry” modal will appear and the user can delete the selected entry by clicking the “Confirm” button.
If entries are removed successfully, a green message box appears.

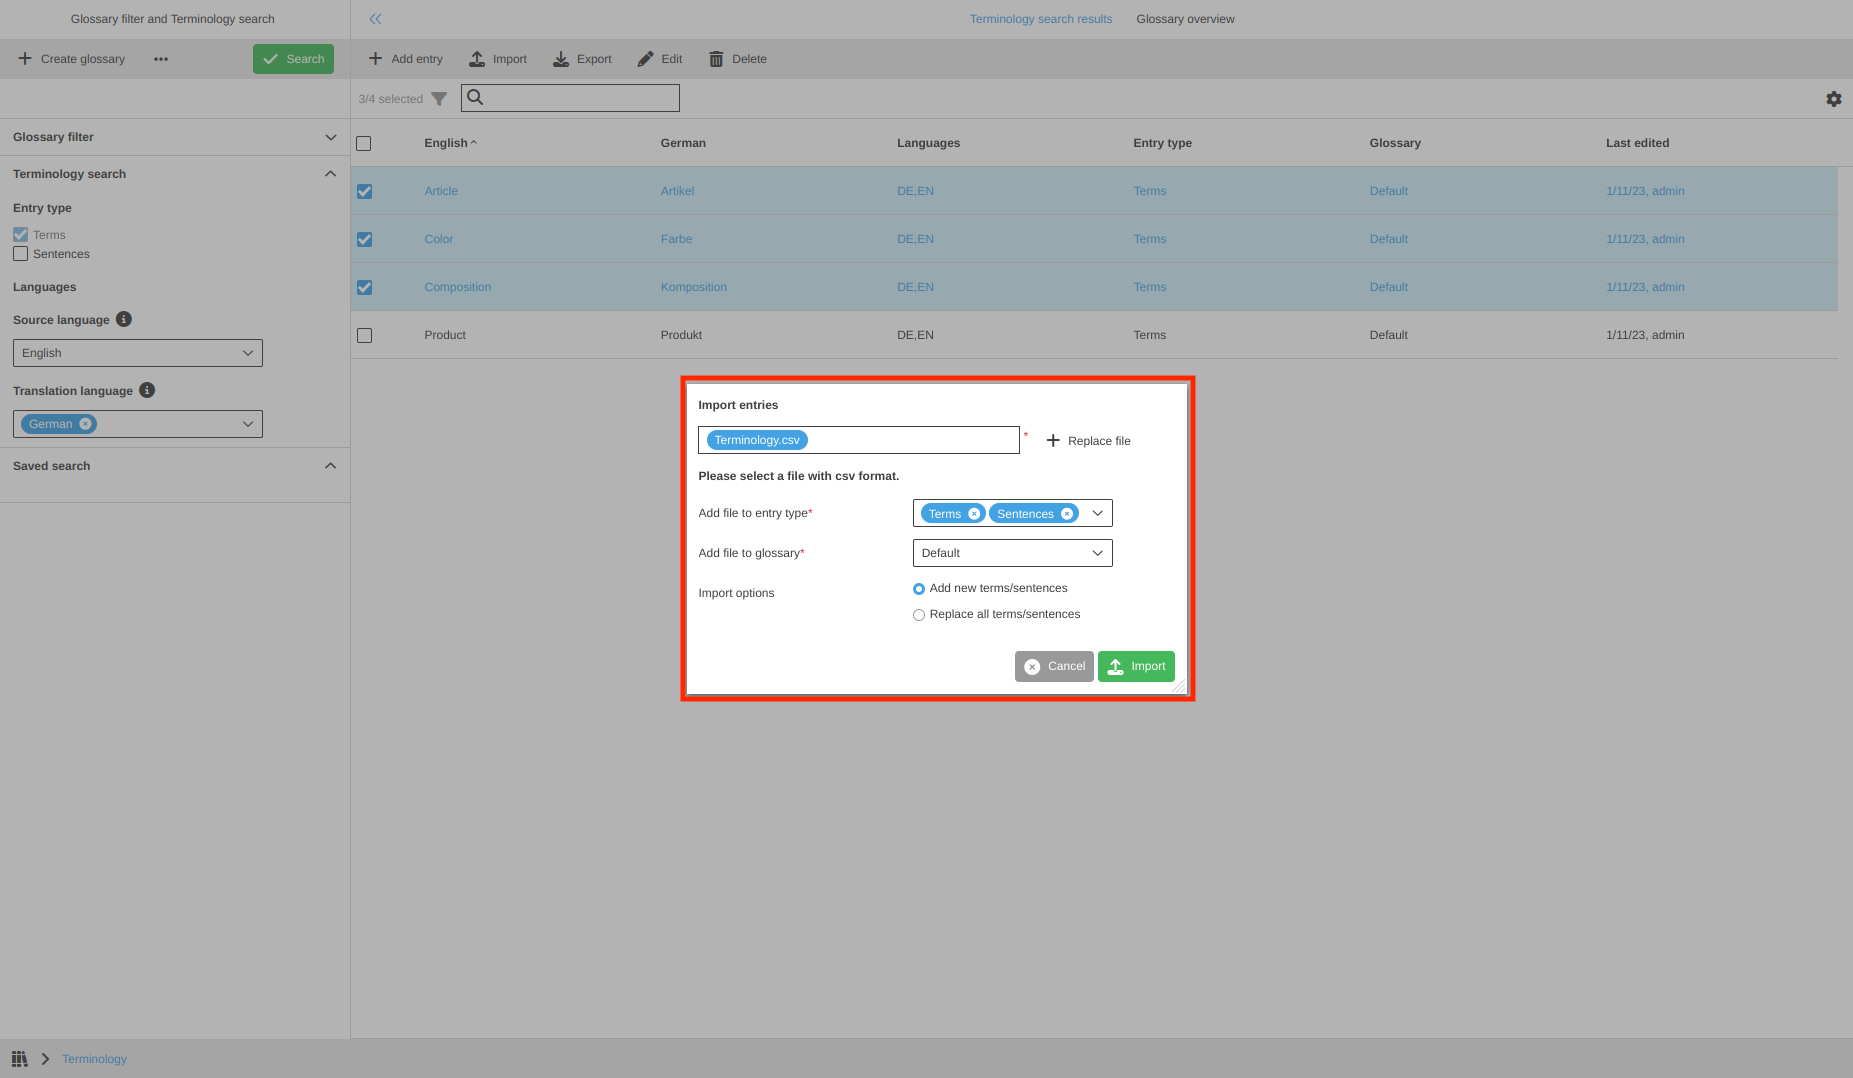
Import
The import functionality is used for importing csv files with translated entries.
The user is able to reuse translated entries from another Terminology instance or translation application by clicking on the "Import" button.
After execution, the “Import entries” modal will appear and the user has the following options:
-
click on the "Add file" button to open a file selection modal and choose the preferred csv file.
Only one file with the format csv is allowed. All other files will be disabled. -
Add file to entry type: users must select if they want to add “Terms” or/and “Sentences” (regardless of what is present in the file). "Terms" is selected by default.
-
Add file to glossary: via this dropdown users must select a target glossary where all the entries from the csv file will be imported.
It is also possible to create a new glossary within this dropdown. -
select Import options. Two options are available for users to determine the way the import will be performed:
-
Add new terms/sentences (default)
If the option is selected, the entries from the csv file are imported to the glossary in addition to the entries which were stored in the target glossary.
To avoid having duplicates, the check is performed for each entry from the csv file and if there is the same entry saved in the system or the saved entry includes all translations from the imported entry, then such entry won’t be imported. -
Replace all terms/sentences
If the option is selected, then all entries are deleted from the target glossary and the entries from the csv file are imported.
-
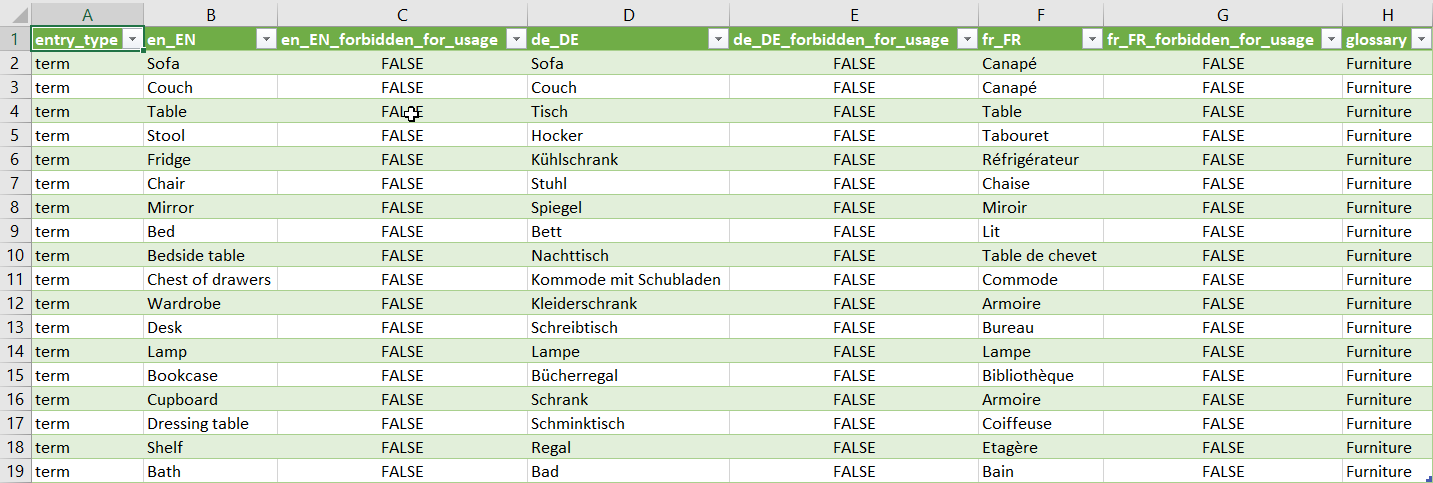
So that the csv file can be imported, the file must have a specific format. It must contain the following columns in exactly this order:
-
Entry type: The first column header must be "entry_type". It can either contain the entry "term" or "sentence". What is imported is depending on the modal selection (see "Add new terms/sentences").
-
Afterwards the terminology entries can be set with the following two columns:
-
List of languages: Follows a specific naming convention, such as en_EN, de_DE, nl_NL, etc.
The column contains the specific terms or sentences. If fields are left blank, they might not be imported. -
Forbidden for usage: There is a separate column for each language and follows a specific naming convention, such as en_EN_forbidden_for_usage.
"true" (= forbidden) or "false" (= not forbidden) values are applicable (optionally)
-
-
Glossary: The last column is the "glossary" column. It has no effect on the import.
| The count of language columns can be different, but the code of the language should be presented in the Terminology. |
An example/template for such a CSV file can be downloaded here:
| The user can also download the template by using the "Export" function. |
| Users must ensure that the file to be imported only contains the languages that are preset in the left view/are displayed in the center view. Otherwise, an error message will be displayed and the import will be aborted. |
Export
The export functionality is used for exporting the data from the Terminology plugin to a csv file, so that the translations can be reused for further work (another Terminology instance or translation application).
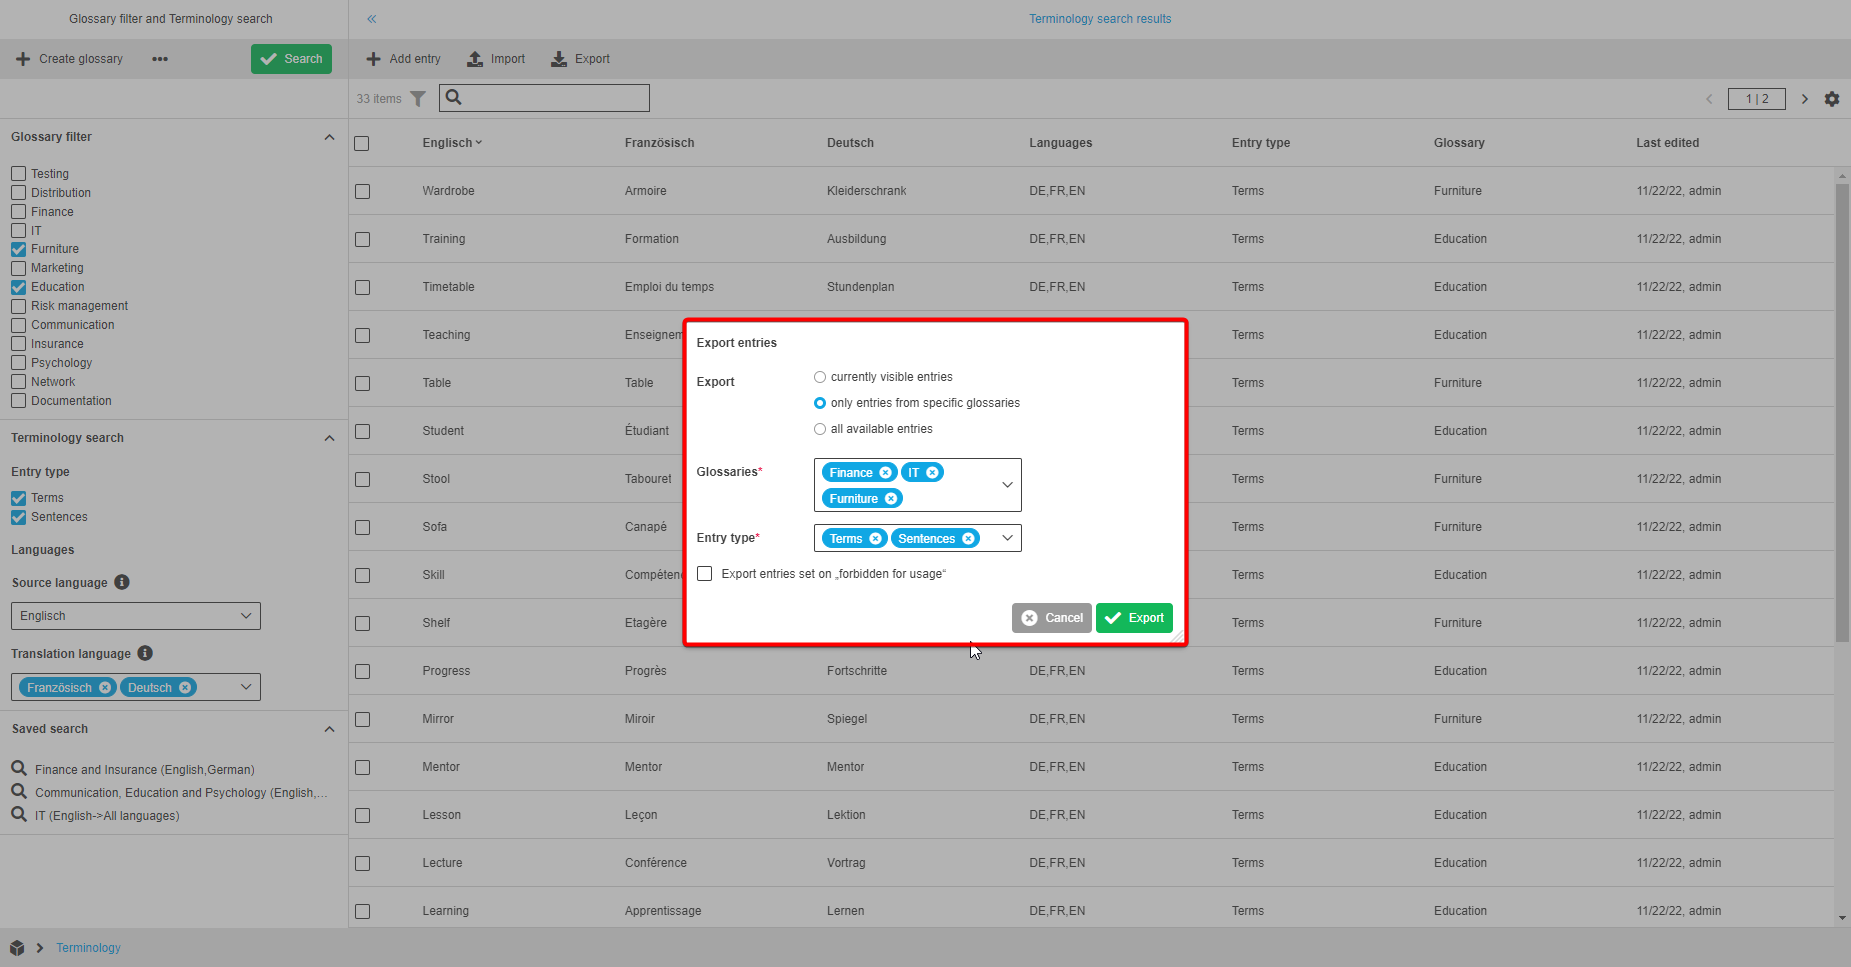
The user is able to export entries by clicking on the "Export" button. Afterwards, an “Export entries” modal will appear and the user can:
-
select one of three export options:
-
Export currently visible entries
Only the entries which appear in the center view will be exported. There are no additional parameters for this option. -
Export only entries from specific glossaries
This option allows a user to select specific glossaries and entry types to be exported by using the corresponding multiselect dropdowns (they appear after selection of the option). -
Export all available entries
With this export option all available entries in the Terminology plugin will be exported. This option contains an "Entry type" multiselect dropdown which allows the user to export “Terms” or/and “Sentences”.
-
-
select the "Export entries set on 'forbidden for usage'" checkbox. In case when it’s checked, the exported file will contain terms/sentences which were marked as "Forbidden for usage". Otherwise, the export file will not contain terms/sentences marked as forbidden for usage.
| If an entry contains several translations in different languages and some of the translations are marked as "forbidden for usage", the export file will contain the entry but without the translations forbidden for usage if the user does not activate the checkbox "Export entries set to 'forbidden for usage'". |