Working with DAM
Basics
Working with a Digital Asset Management (DAM) system is essential for companies to efficiently organize, manage and access digital content.
A DAM provides a central platform for storing and managing media, such as images, videos, documents and audio files, and facilitates their search, use and archiving.
By implementing DAM solutions, work processes can be optimized, collaboration improved and the reusability of assets maximized.
Digital Assets
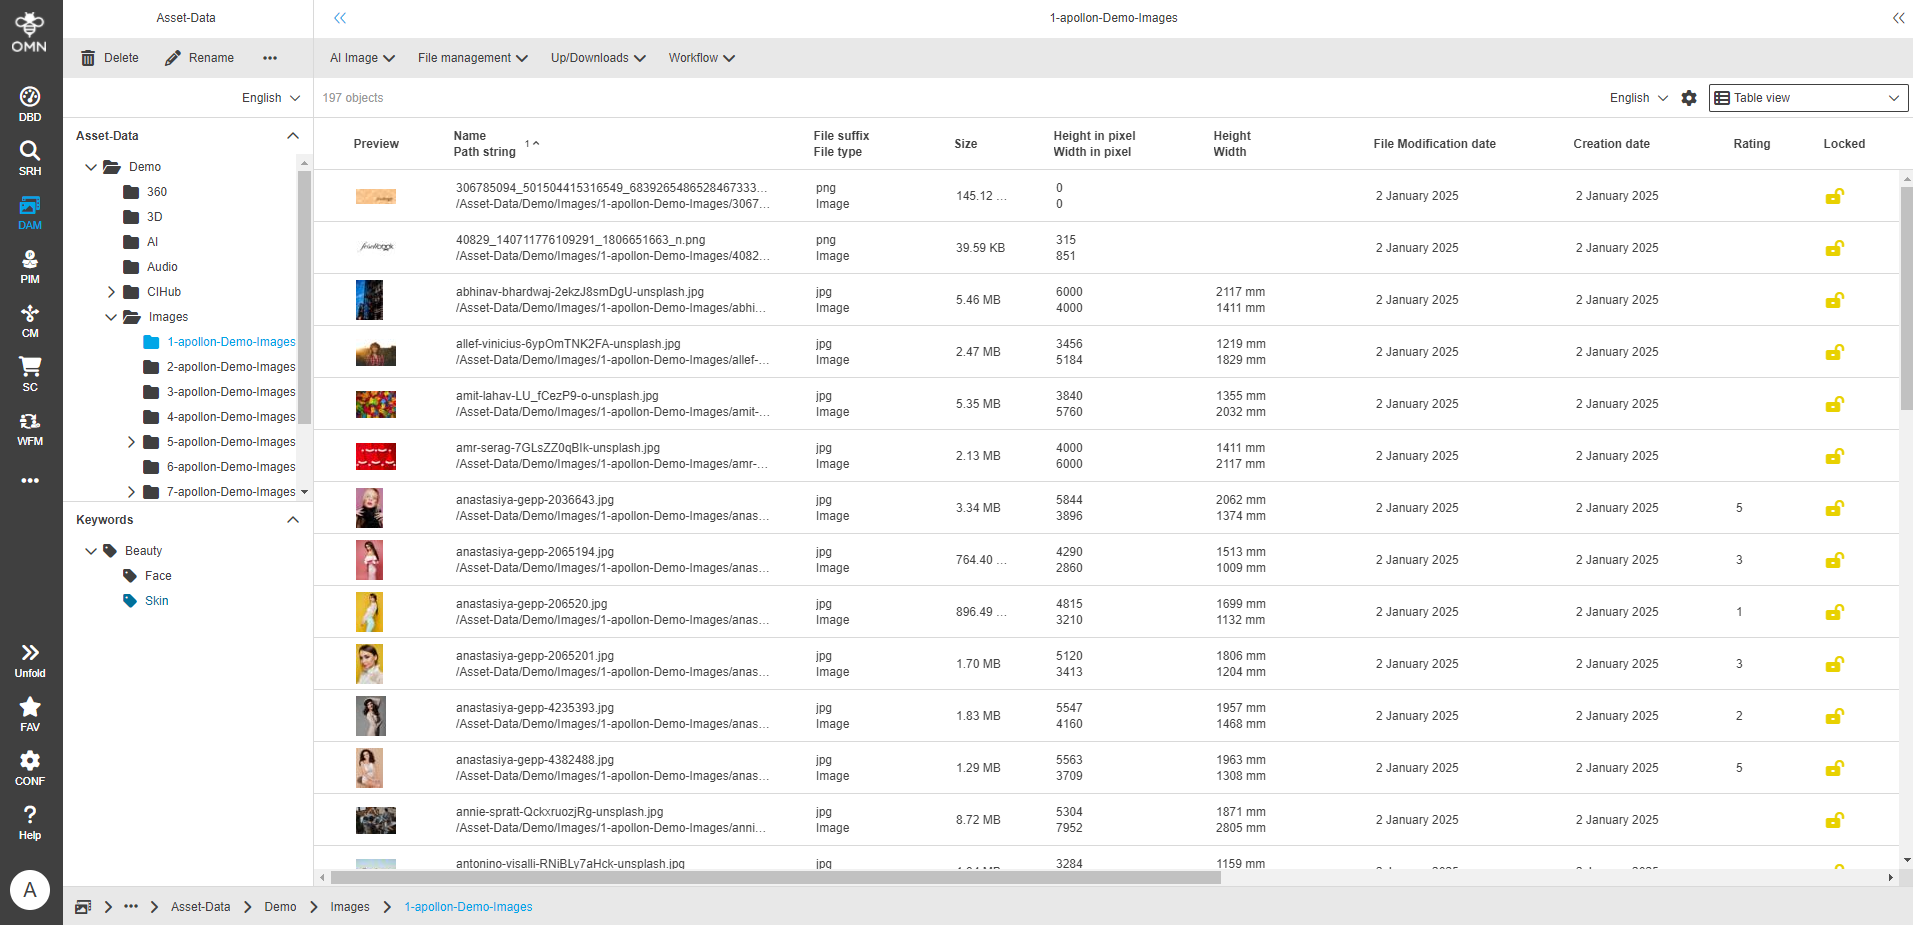
Online Media Net (OMN) manages all digital assets, including images, graphics, videos, audio files, layout files and much more. In simple terms, assets are media files or data. These digital resources represent a significant corporate asset and should therefore be centrally managed and easily accessible.
For all assets whose file formats are supported by OMN, previews are automatically generated and visible in the browser when the file is imported or updated.
In principle, OMN can also manage and provide data for which no preview can be calculated.
See also Supported file formats.
Data Storage (File System)
Digital assets are physically stored on a data storage system. This data storage can either be a traditional file system, such as Windows or Linux, or a modern, object-oriented system, such as Amazon S3. OMN can integrate both types of file systems as data storage and display the data stored on them in the browser, making them accessible.
It is possible to make only certain areas of the file system accessible via the browser or to integrate several different file systems by configuring them accordingly. If a file system is connected to OMN, it is also possible to upload files via the OMN web interface and thus physically store them on the underlying file system.
Data Record
When an asset is imported into OMN, a data record is created in the OMN database. In the OMN web client, each asset is always displayed as such a data record.
A data record contains not only the reference to the asset, but also additional information about the asset. This information is either read from the file during import, e.g. file size, file type, storage location and creation date, or it is entered manually in OMN or generated using AI.
In OMN, custom record fields can be configured as needed to capture almost any type of information. These are called tagging fields or metadata fields.
For more information, see the Metadata chapter.
Metadata
Metadata is descriptive information that represents the context, structure and details of digital assets in the DAM system. It forms the basis for effective organization, searchability and retrievability of digital assets.
In the DAM environment, metadata usually refers to the properties of an asset, such as the title, keywords, descriptions, creation date, file type, author and usage rights.
The term “metadata” is made up of the Greek word “meta”, which means “about”, and “data”. Metadata describes other data and provides it with the necessary context.
In the context of DAM, metadata is the information that describes an asset and facilitates its identification, search and reuse. A dataset can generally be seen as a collection of metadata.
Metadata is specific to digital assets and enables efficient management and search within a DAM system.
Metadata View
OMN can represent metadata in various views, such as the table view, the light table view and the detail view, in read or write mode. Which metadata is available in which view depends on the configuration of the views as well as the roles and rights defined by the administrator. In certain views, e.g. table/light table, the user also has the option of deciding for themselves which metadata fields are displayed and where. These settings are saved in the user’s profile - see also User settings.
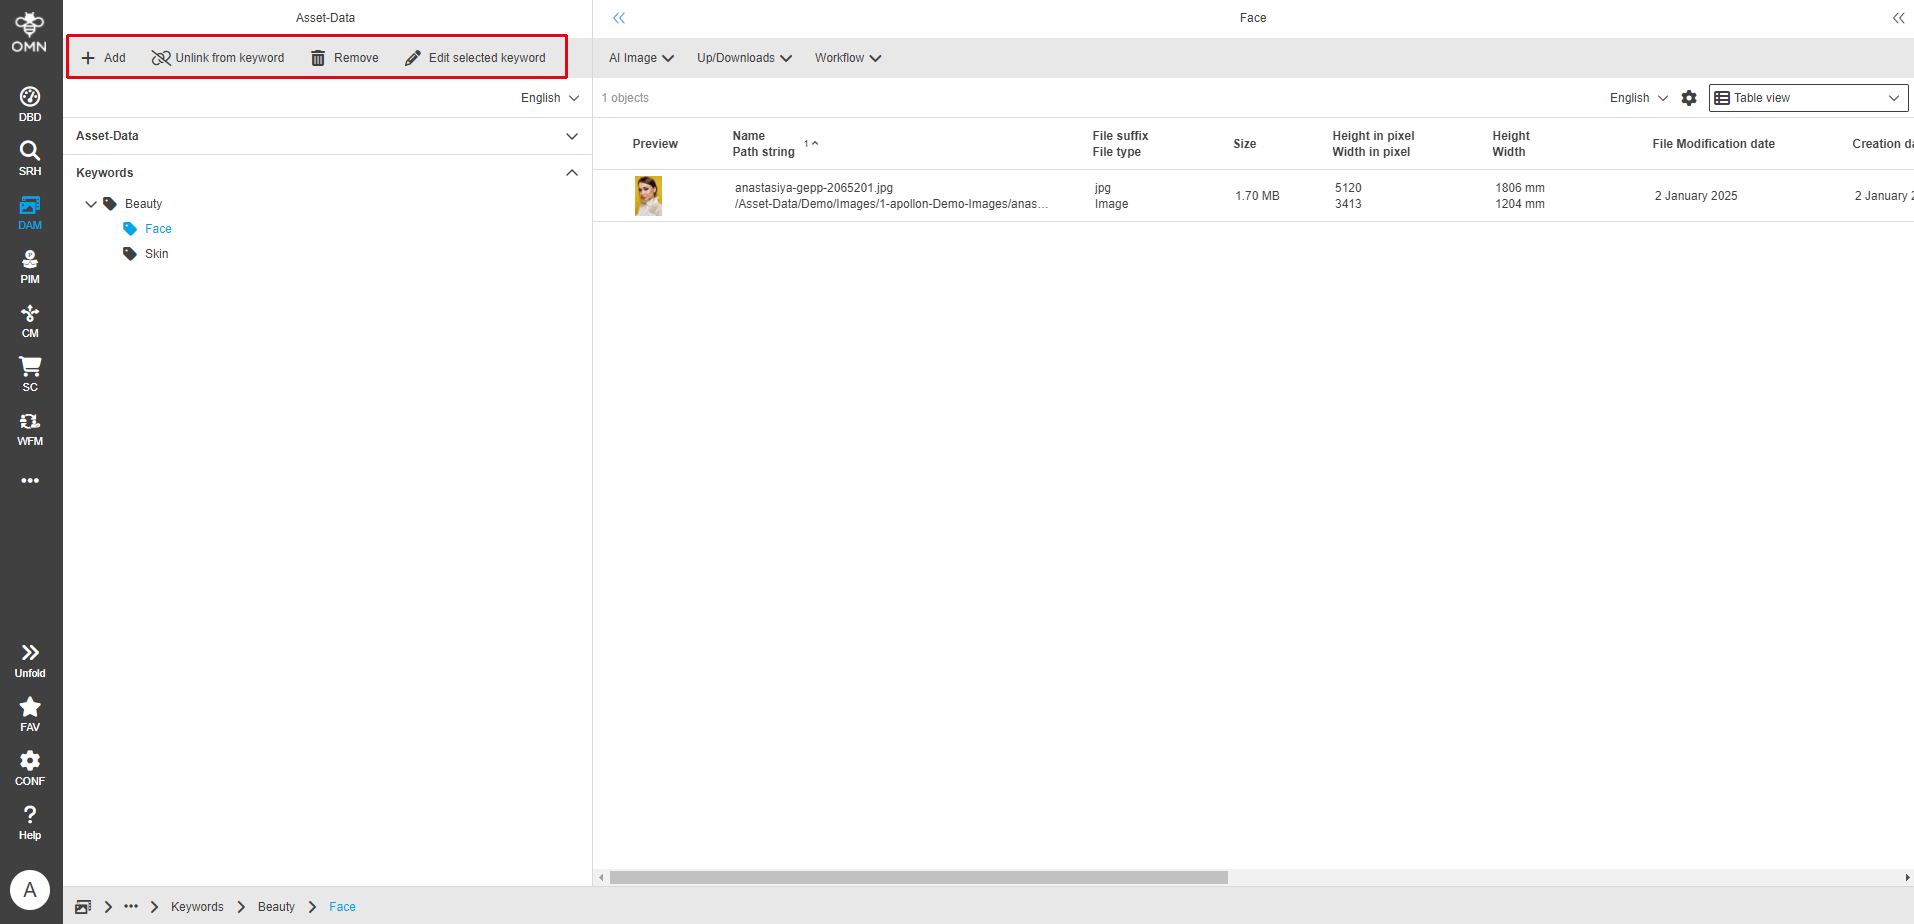
Keywords (= categories)
Keywords - also known as categories - can be used to categorize and organize assets that are physically stored in a specific location in the file system. Assets can be assigned to multiple categories by referencing them without having to duplicate the file.
See also Keyword structure (virtual structure).
Shopping carts (= collections)
Shopping carts - also known as collections - are collections of digital assets in OMN that can be organized by users like a clipboard. Baskets help to group and manage digital assets. They enable efficient organization and quick access to related content. Assets can be added to or removed from shopping carts without having to move or delete the physical data.
Further explanations can be found in the Shopping Cart Download chapter.
Asset Types
OMN has an internal object model for assets that distinguishes between different asset types and classifies the supported file formats into these.

| Asset Types | Formats (Extract) |
|---|---|
Images |
EPS, JPEG, TIFF, PNG etc. |
Videos and Animations |
MP4, AVI, MK4 etc. |
Documents |
PDF, INDD, etc. |
3D files |
OBJ, COLLADA, etc. |
|
To obtain previews of layout documents in OMN, they must be saved with the “OMN Page Preview Plugin”. This is a free plugin for Adobe InDesign developed by apollon which, once installed, sets the appropriate flags in the background to generate a preview in OMN when the document is saved. The user does not have to take any additional steps or expect any other restrictions. Further information on the plugin can be found at OMN Page Preview Plugin. |
Shortcuts and Help
Shortcuts can be used in OMN, especially in the DAM module. An overview of the supported shortcuts and the link to the documentation can be found in the sidebar menu under Help. Comprehensive help can also be found in the FAQ section of the OMN software documentation at FAQ & Help
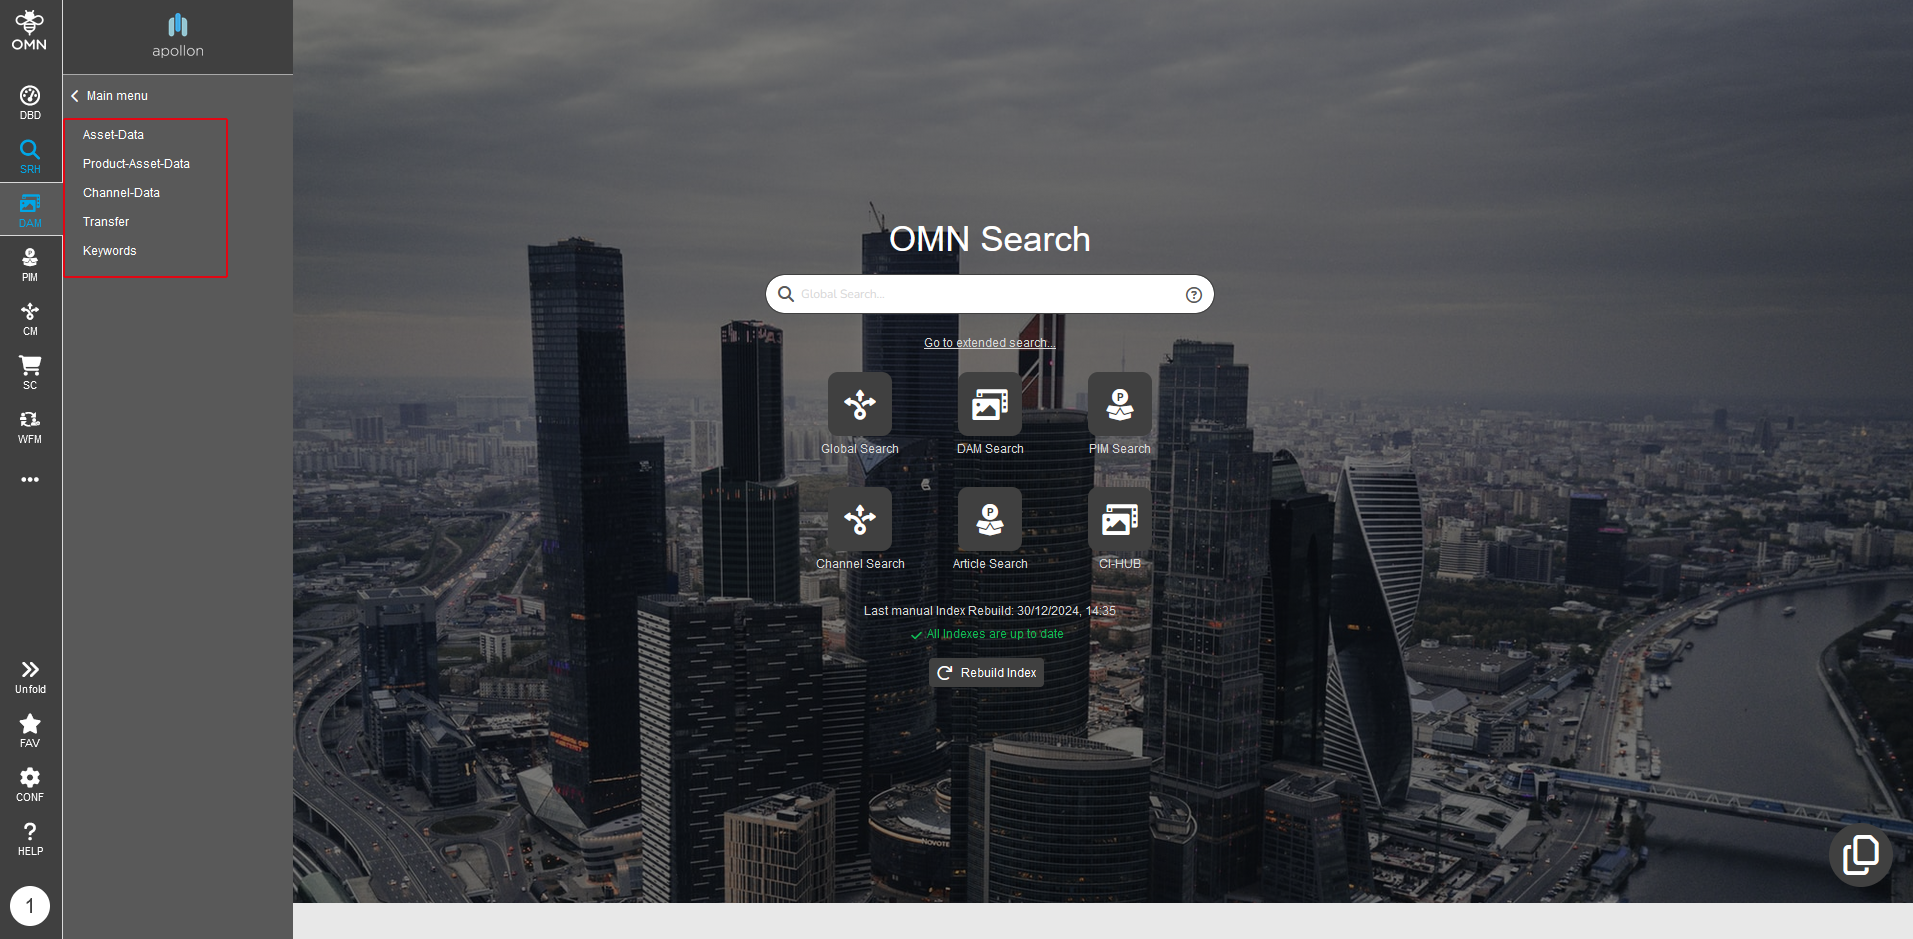
Asset areas in the Accelerator Standard
In the Accelerator Standard, various asset areas are available in the sidebar for data organization.
| Area | Usage |
|---|---|
Asset-Data |
For storing general assets, e.g. stock images, logos. |
Product-Asset-Data |
For storing product-based assets, which are usually organized and named by article number. |
Channel-Data |
For storing channel-related assets, which are usually organized according to the output medium, e.g. layout files for an insert, banners for a website, … |
Transfer |
This data area is intended for temporary data storage or data exchange between different users. |
Keywords |
This data area visualizes the virtual keyword structure - see also chapter Keyword structure (virtual structure). |
Overview of the DAM user interface
The general structure of the UI corresponds to the general principles (division of the interface into left, center and right view) and is described in more detail in the chapter General Structure.
Some special features of the DAM module are described here:

-
Toolbar: provides the available functions (depending on the access rights) in the respective area (left, center, right).
-
File system structure: displays a physical image of the file system integrated in OMN and its folders, see also Data Storage (File System).
-
Keyword structure: displays category trees in which assets can be (virtually) organized independently of their physical storage, see also Keyword structure (virtual structure).
-
Dataset/content area: displays the files of the selected folder or the selected keyword.
-
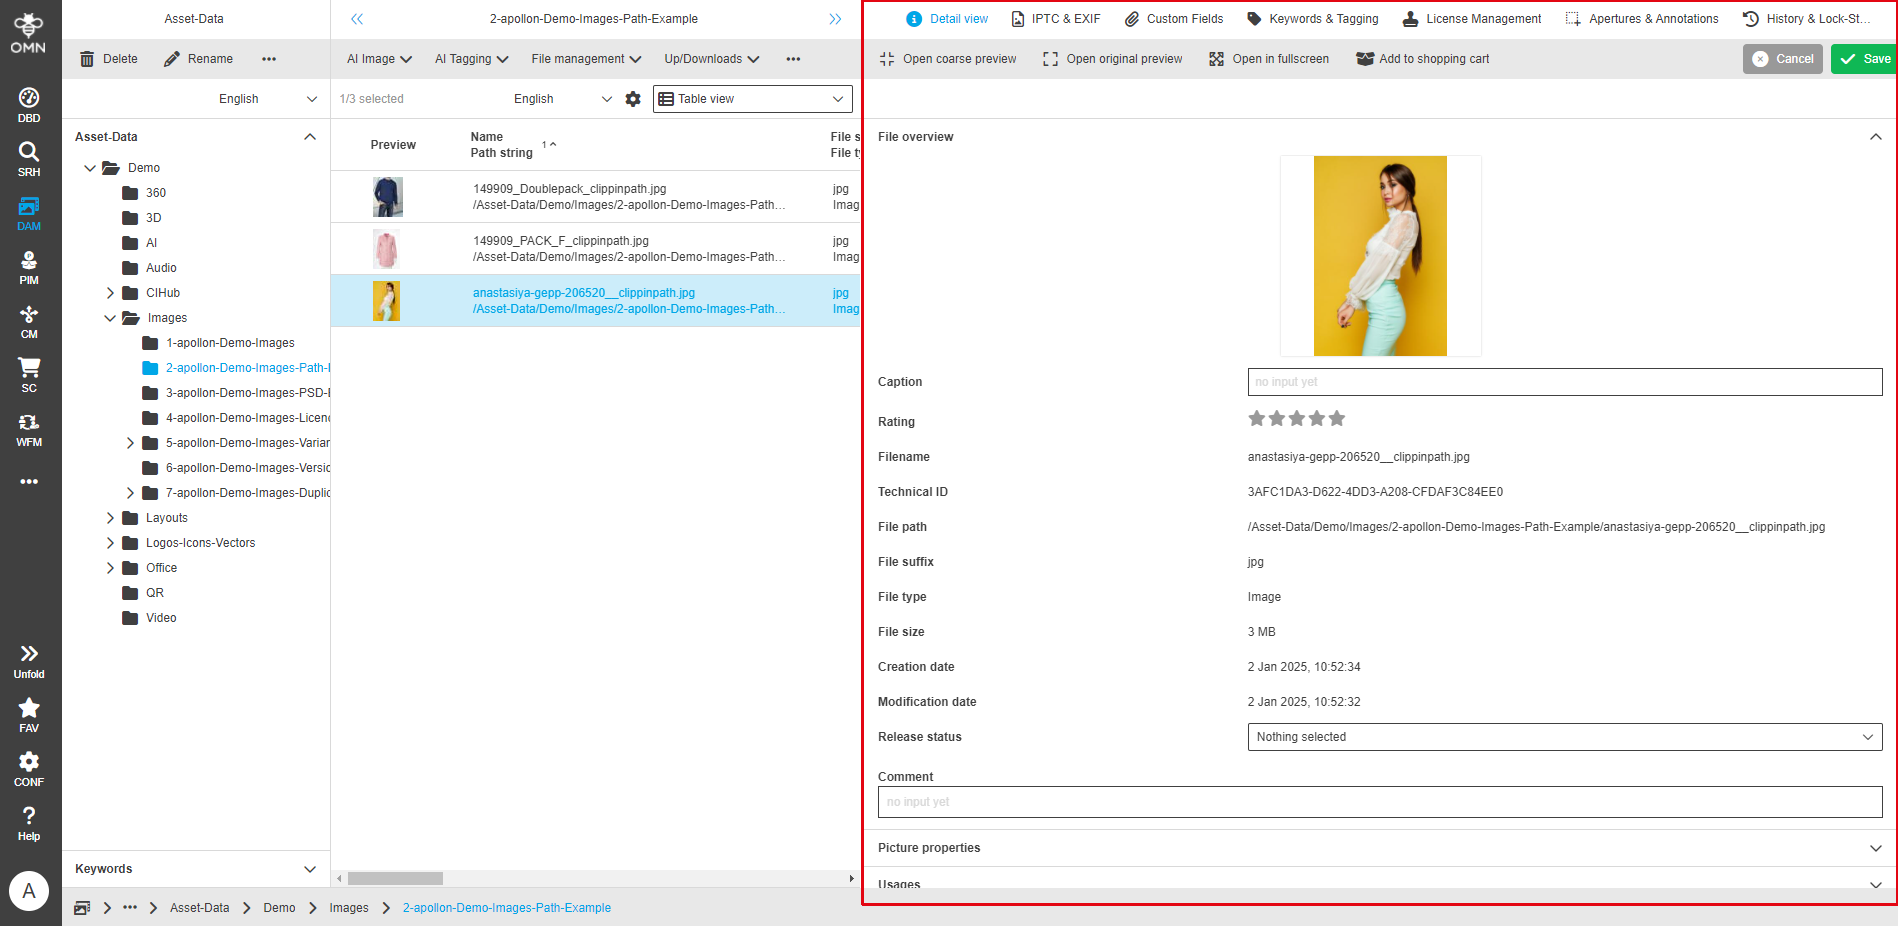
Info/detail area: displays additional information on one or more selected files. The info areas are organized in configurable tabs, e.g. details, custom fields, etc.
Navigation
Navigating the file system and keyword structure is a central aspect of working with the DAM.
While the file system structure reflects the physical organization of files in folders and subfolders, the keyword structure provides a virtual, metadata-based structure that links assets across keywords and categories.
Both structures play an important role: the physical structure enables files to be stored logically and clearly, while the keyword structure allows content to be searched for flexibly and quickly, regardless of its physical storage location.
File System Structure (physical structure)
The file system structure shows a physical image of the folders created on the file system and the files they contain.
Using the web interface, you can create, rename, move and delete folders on the file system and organize files within these folders, for example by drag and drop or cut and paste.
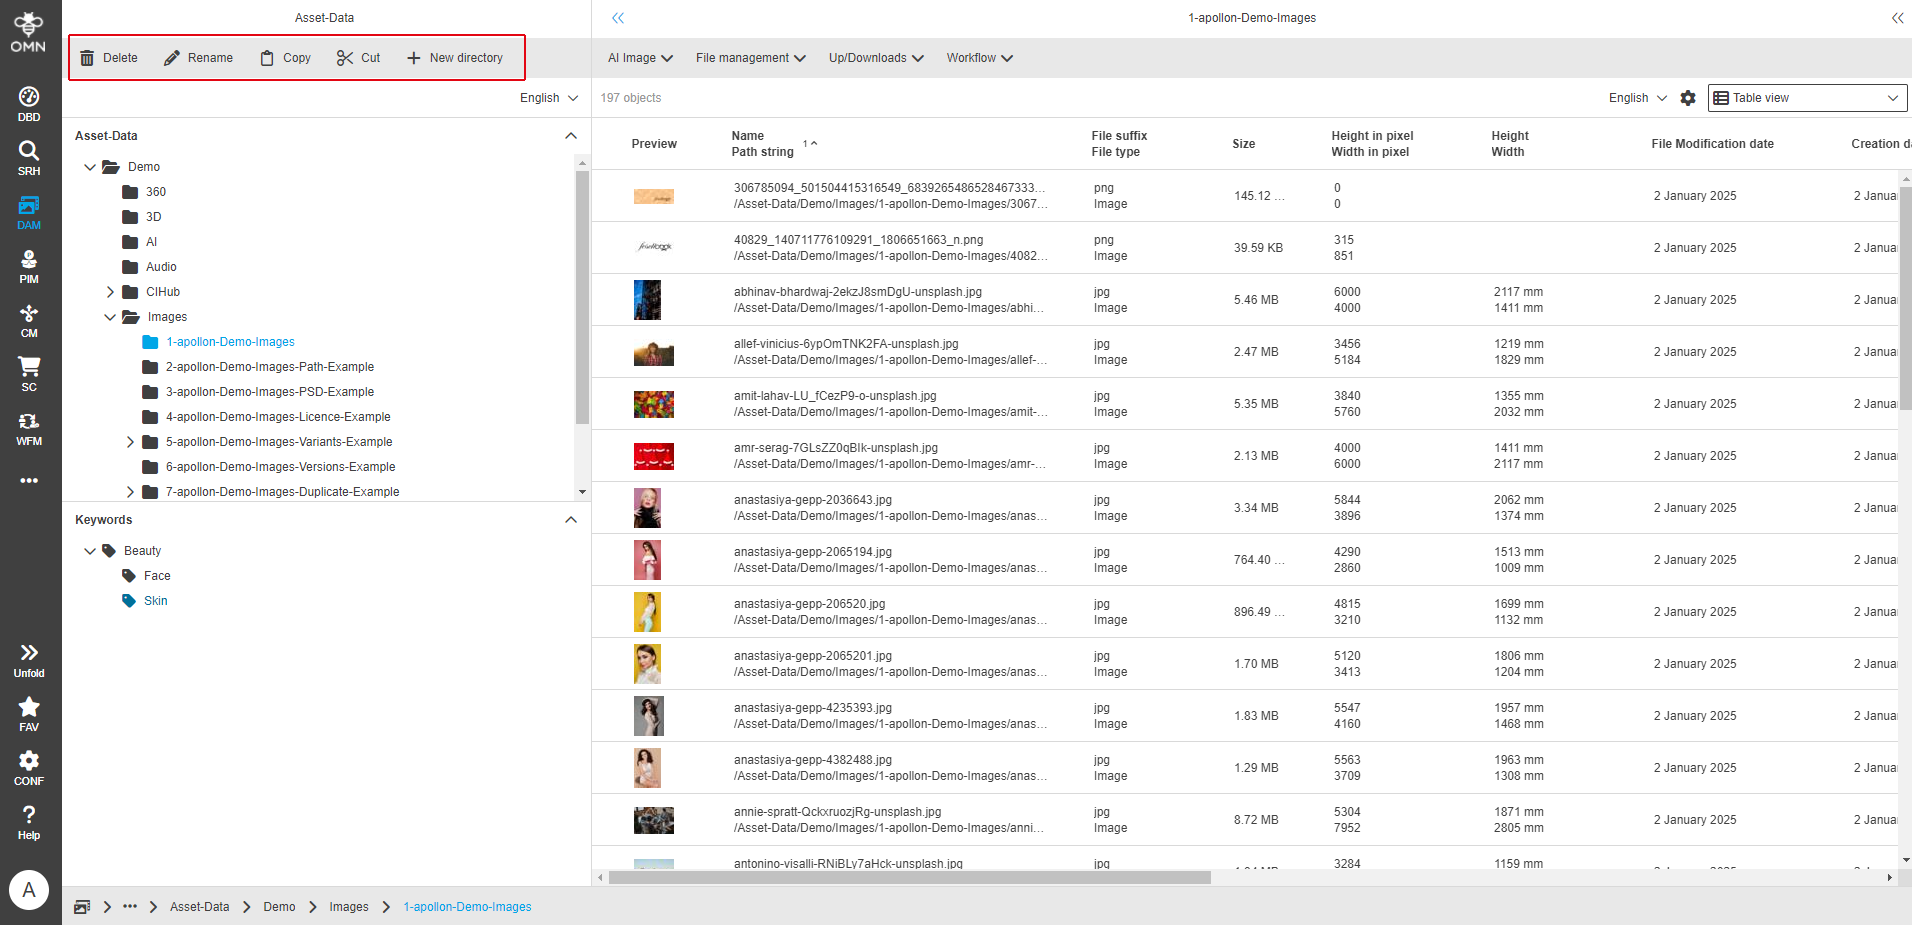
Actions such as moving, copying or deleting folders or files via the web interface always have a direct impact on the underlying file system.
When files are imported into Online Media Net via the web client, they are physically saved on the file system - see section Upload/ Data provision.
Keyword structure (virtual structure)
In addition to the physical folder structure, you will also find a virtual keyword structure in OMN to further categorize your files.
The keyword structure is set up in a single to multi-level hierarchy, which can be organized via the web interface.
Previously selected files can either be assigned directly to a keyword using drag and drop, e.g. from the search or file system navigation. Alternatively, the keyword can be selected via the “Keywords & Tagging” tab in the right view.
Keyword strings can be created and deleted via the web interface. Existing links can also be removed or keywords edited.
Upload and Download functions for files
The upload and download functions for files are essential components of the DAM that enable digital content to be exchanged efficiently between different users and systems.
The upload process allows new files to be integrated into the system, while the download process allows these files to be retrieved and saved on local devices or in other applications.
Both functions play a crucial role in collaboration and access to required resources, especially in large teams and across different platforms.
Upload/ Data provision
To upload data to OMN via the web client and make it available there, the following procedure is recommended:
-
Select upload area:
Select the area to which the files are to be uploaded, e.g. asset data - see section Asset areas in the Accelerator StandardThe upload can only take place via the file system structure - see section Data Storage (File System) -
Select folder:
Once the asset area has been selected, you can select the file folder to which you want to upload your data in the navigation structure on the left. -
Add files:
Once you have selected the desired folder, you can upload files to this folder by clicking on the “Upload files” function.
The function is located in the Center View under the menu item “Up/Downloads”.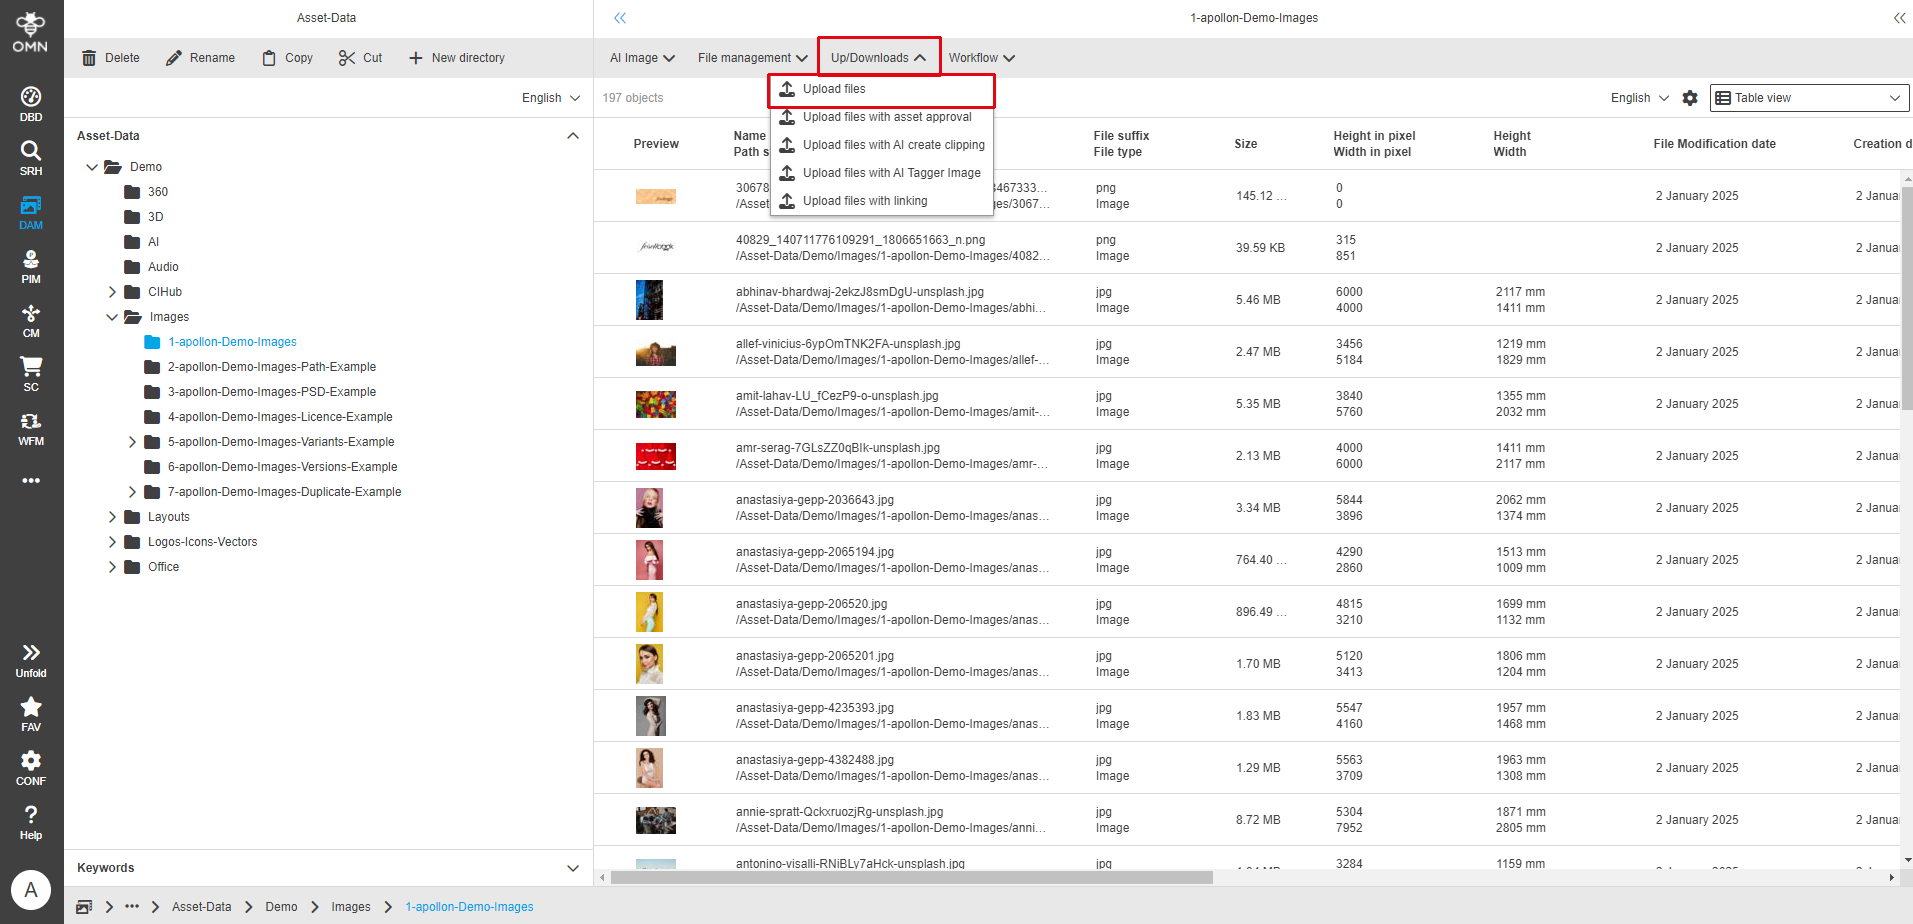
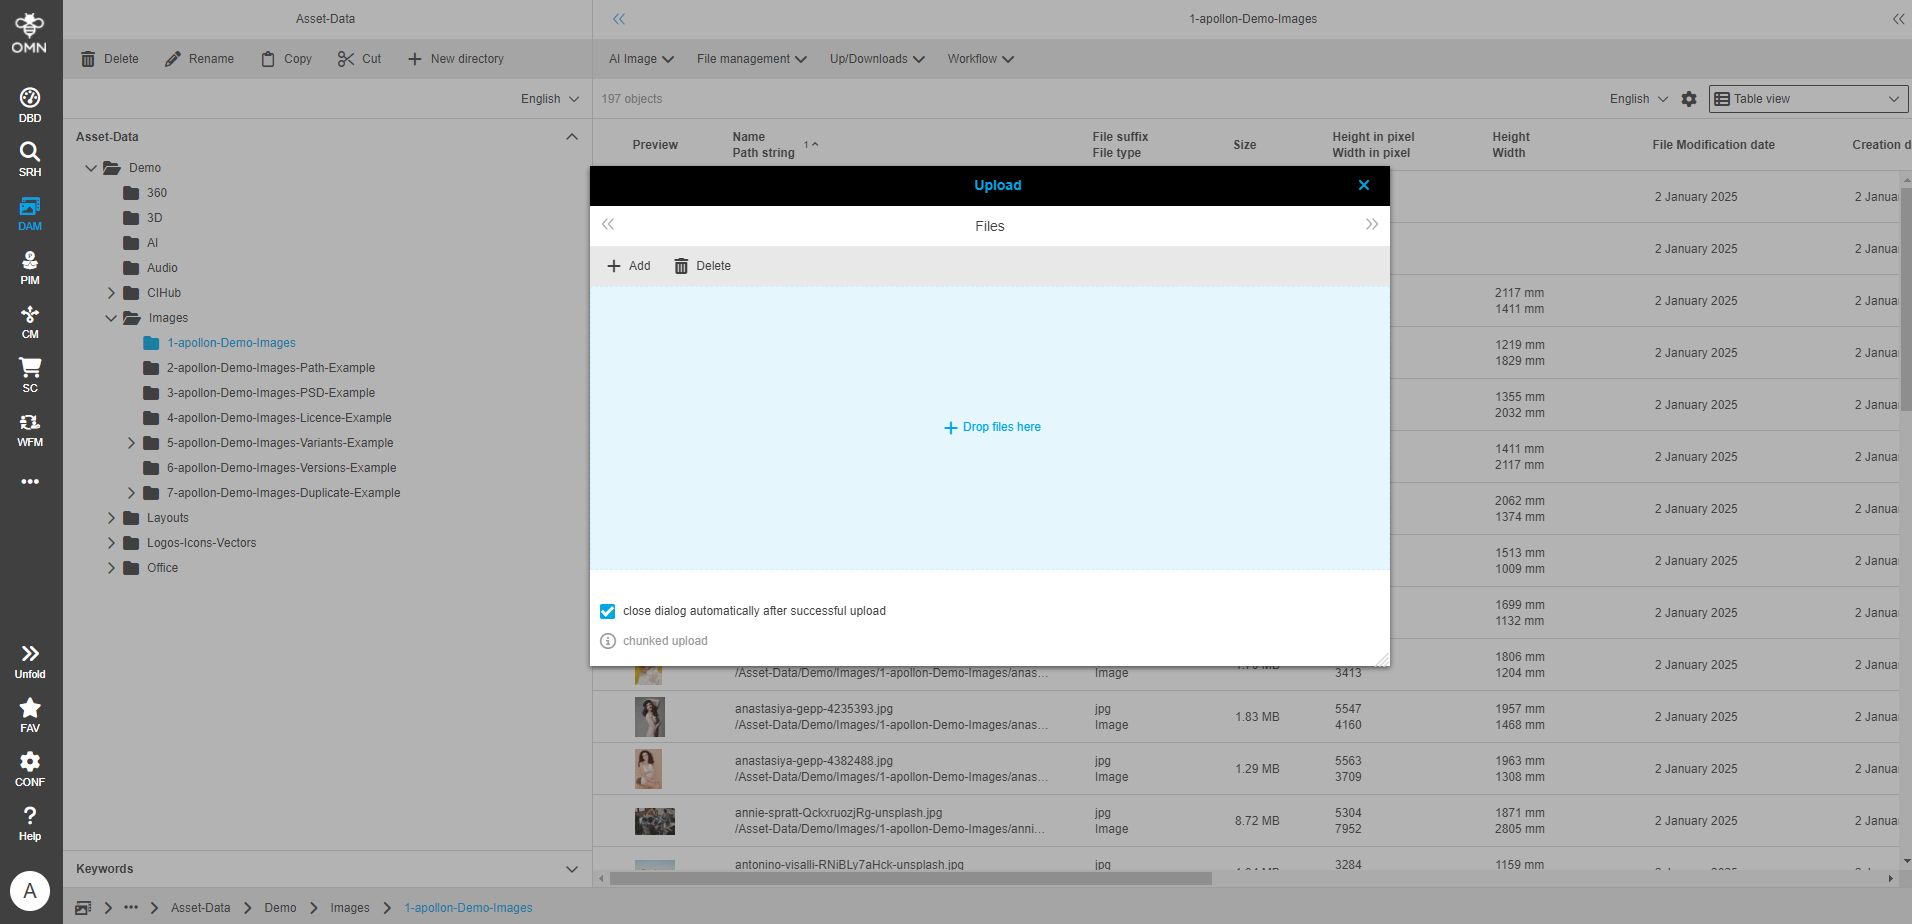
After clicking on the function, a window opens in which you can either drag and drop files or alternatively select them using the “Add” button.
-
File selection:
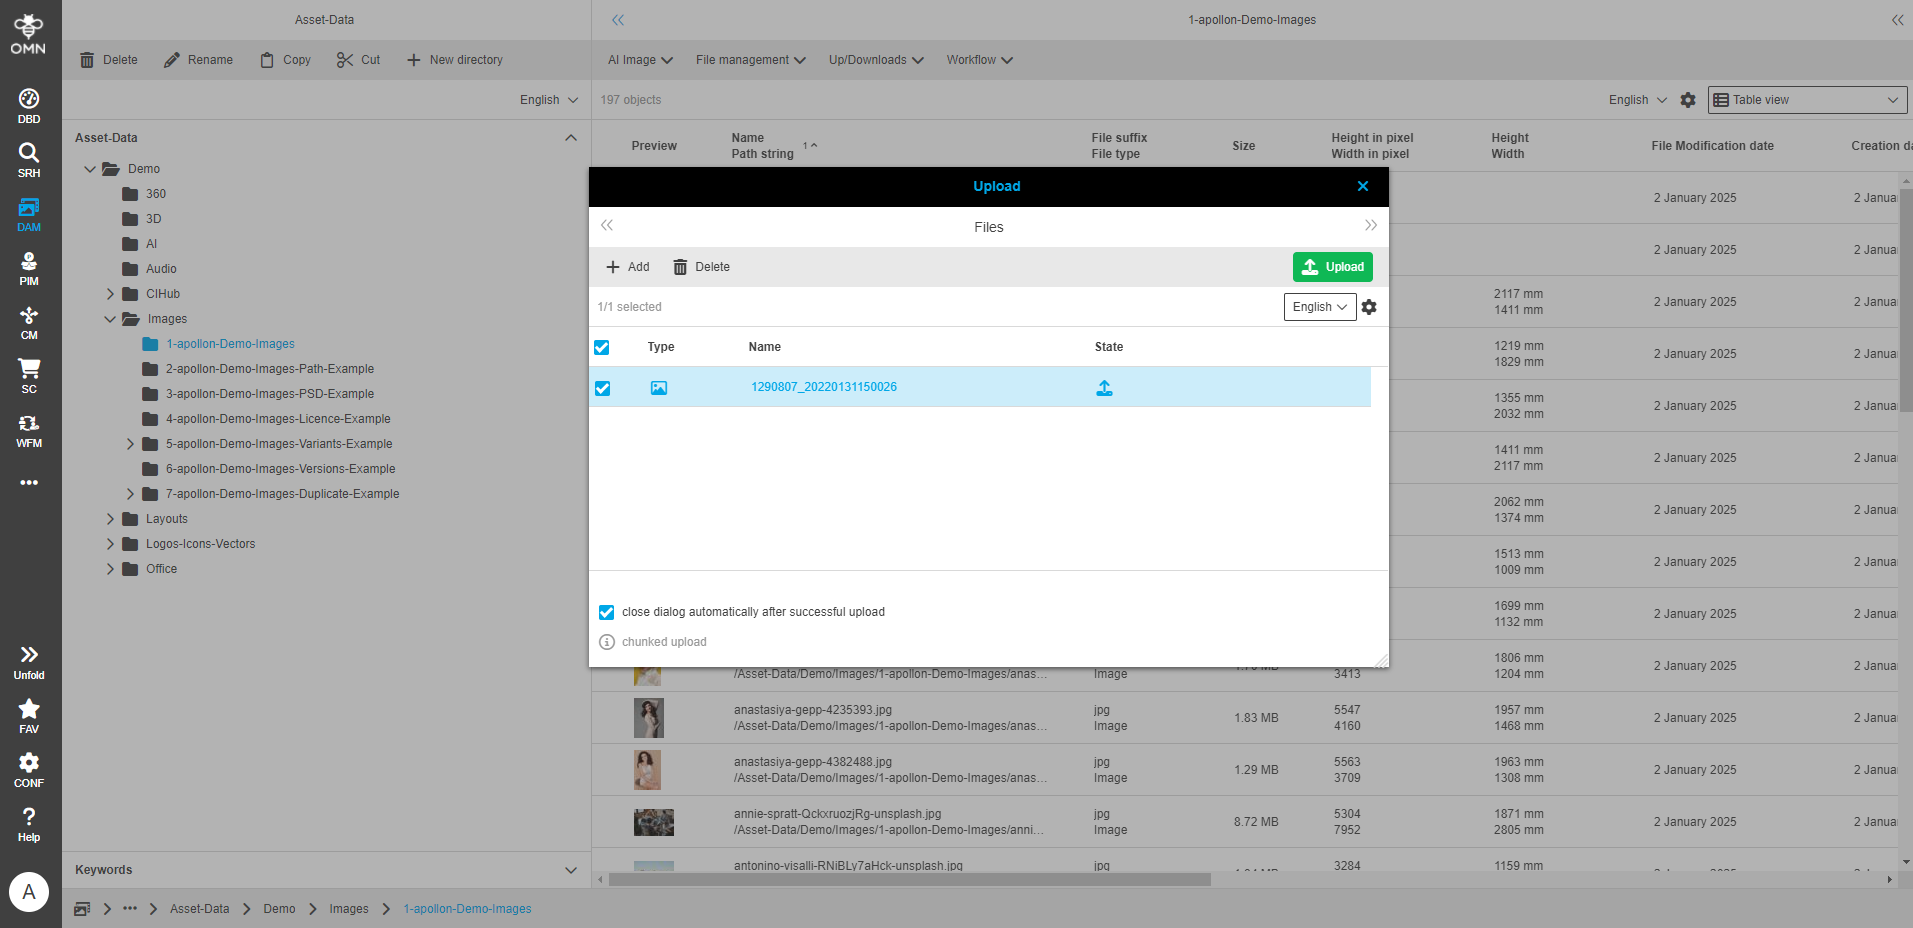
If you want to select files for upload using the “Add” function, the file browser of your operating system will open in a separate window. There you can select the files you want to upload. -
Start upload:
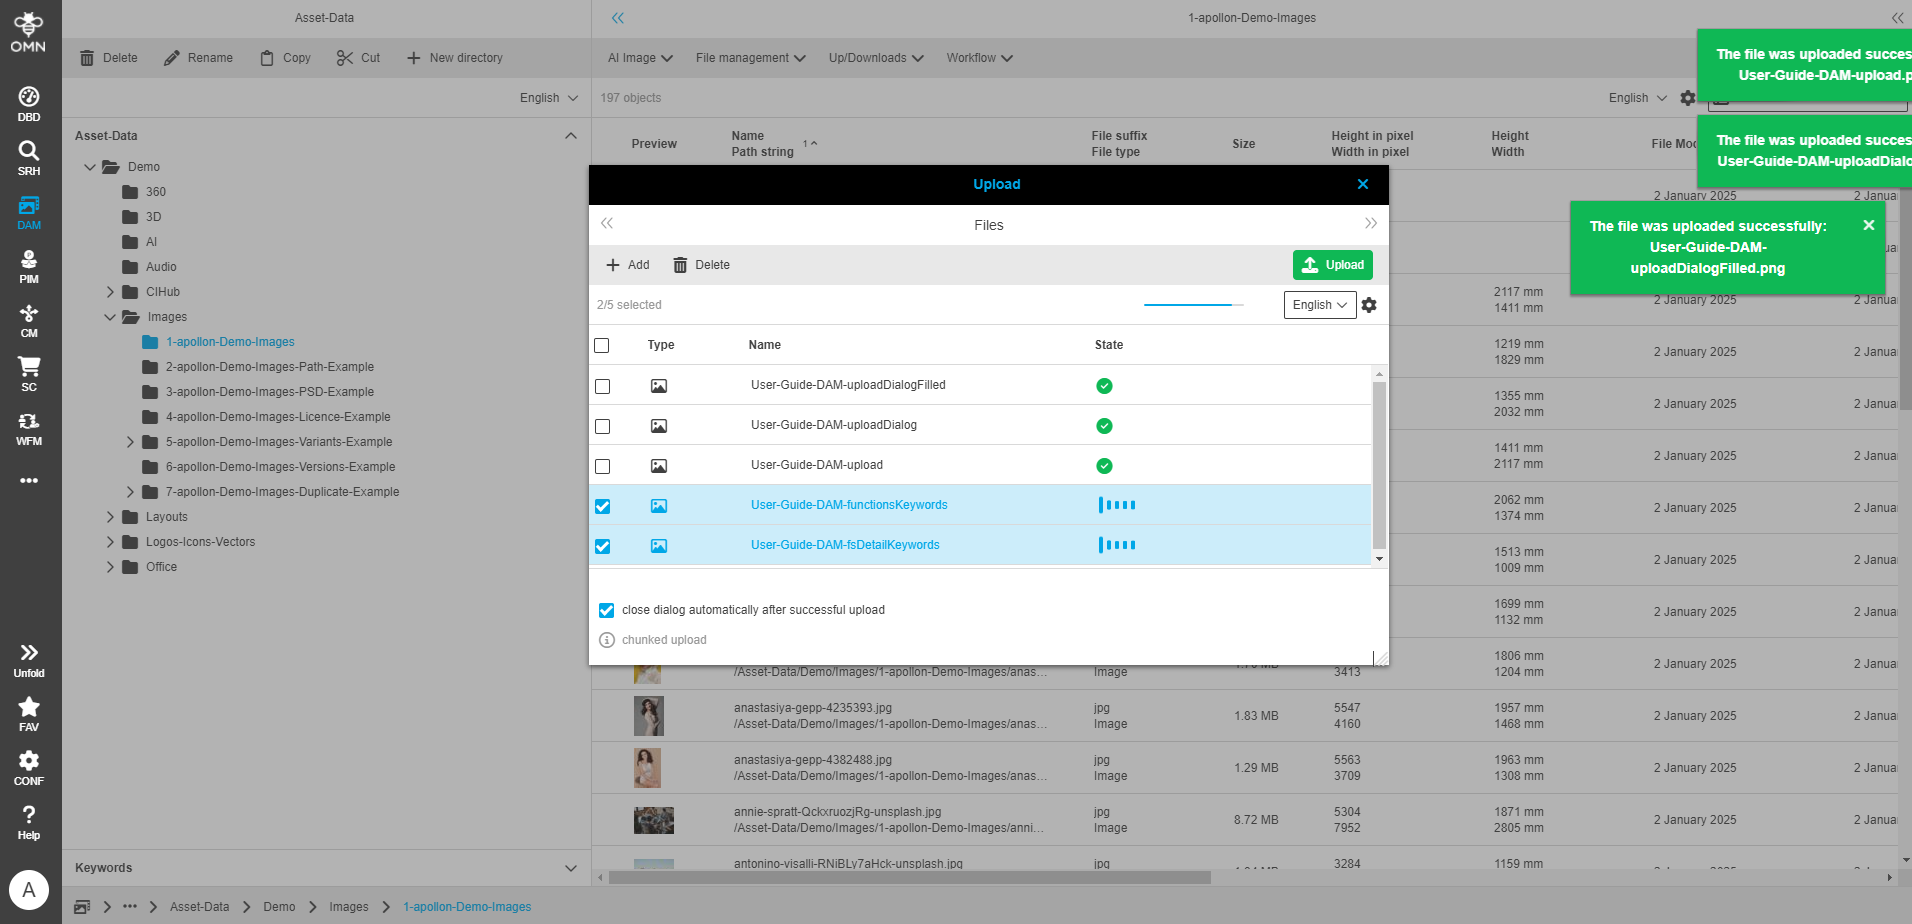
Once you have selected the files, they will be listed in the upload window by name. Start uploading the files to OMN by clicking the “Upload” button.The progress of the upload is displayed via corresponding symbols in the “State” column.
In general, further toolbar functions are available in the upload window:
-
Add files for upload
-
Delete files from upload
| Further information and functionalities on the topic of uploading can be found here. |
After a successful upload, the entries are marked with a green OK icon and removed from the overview after some time.
In addition to the successful upload, there are other status messages that you can find on the following page: Upload Canvas.
You can now close the upload window by clicking on the “X” if you have not selected the “Close dialog automatically after successful upload” checkbox.
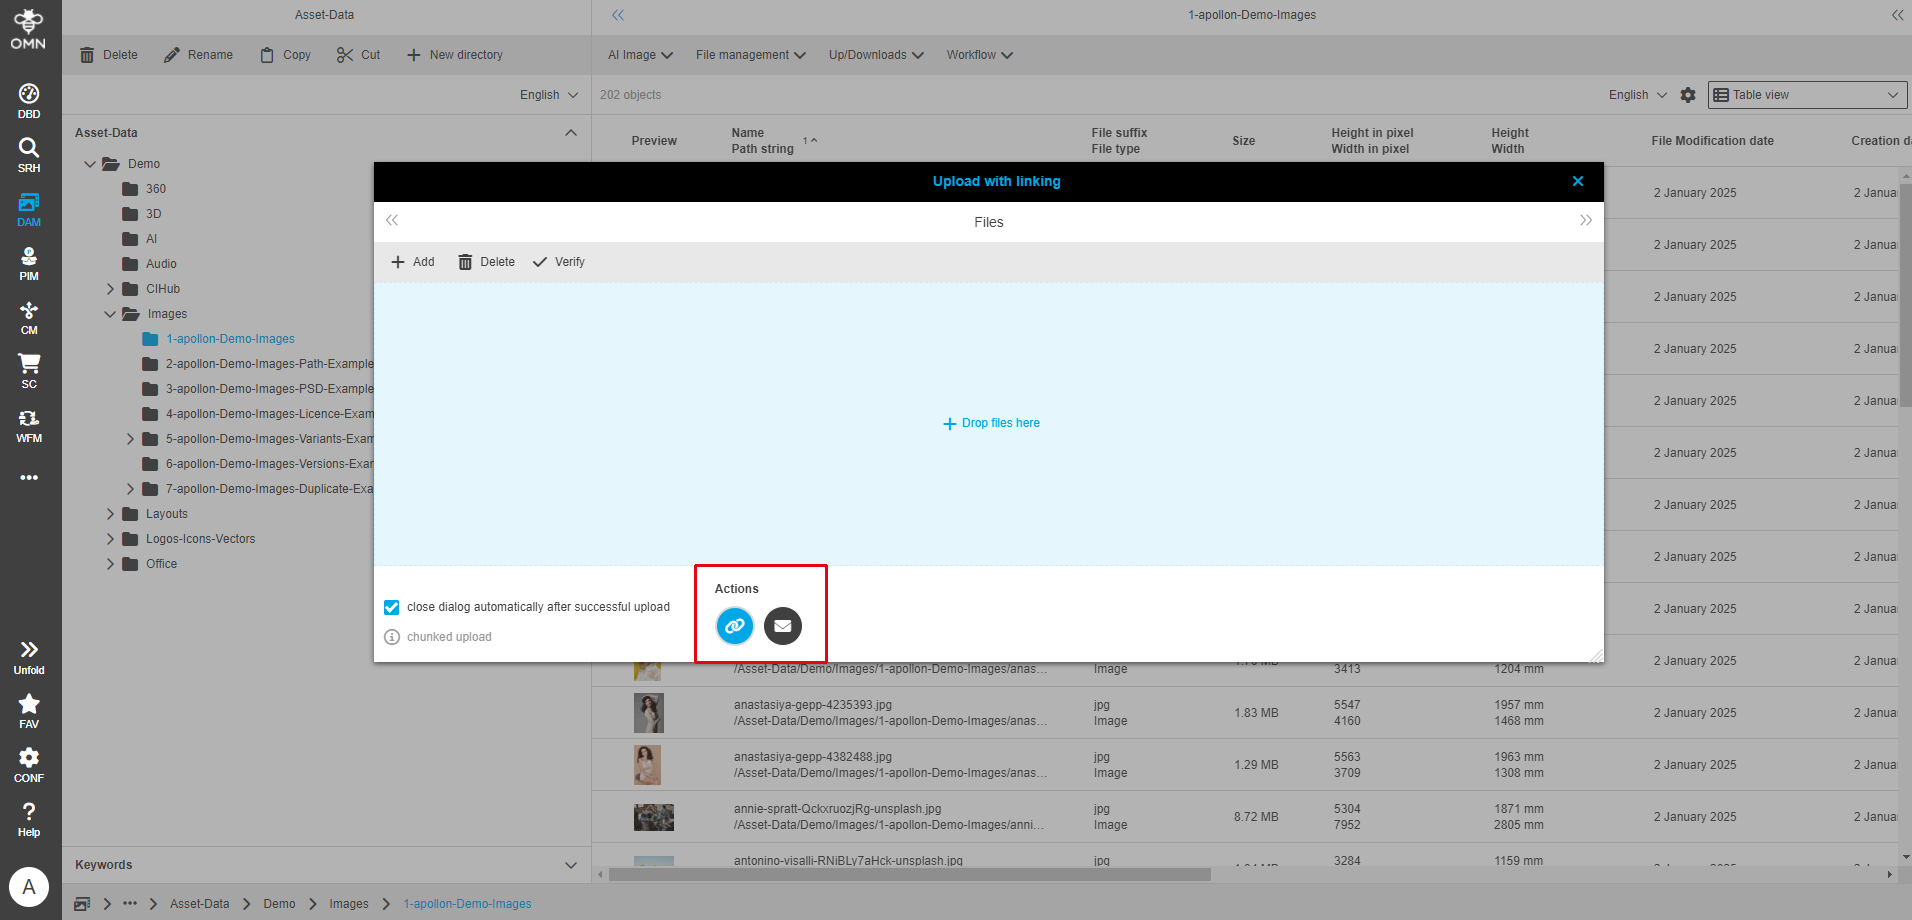
Upload with linking
In the Accelerator Standard, an additional upload function is available in the toolbar.
The “Upload files with linking” function links the selected files directly to existing products, provided they meet the configuration conditions.
These conditions can be customized in the configuration.
The available actions are displayed at the bottom of the upload window, in our case “Automatic Linking” and “Send E-Mail”.
The active action is highlighted in blue. The deactivated action, in this case “Send E-Mail”, can be activated directly in the window.
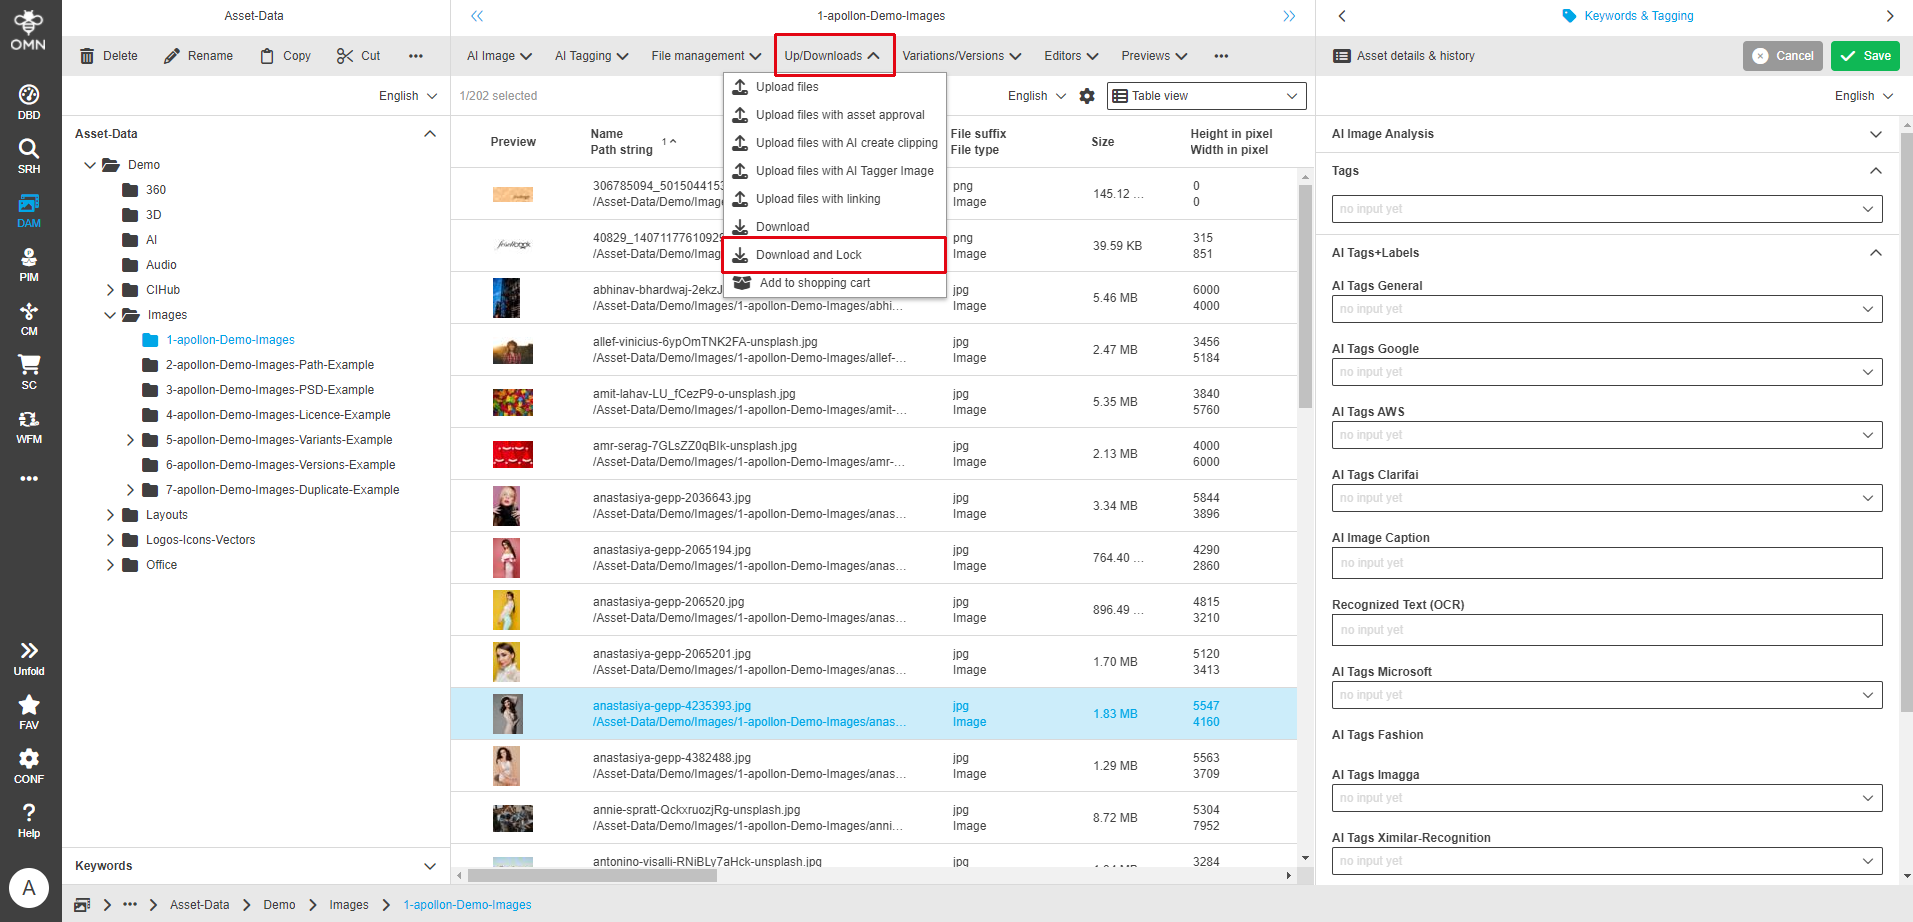
Download (direct download)
You can use the “Download” function to download selected files in their original format.
First select the desired files and then click on the “Download” option in the "Up/Downloads" menu of the toolbar.
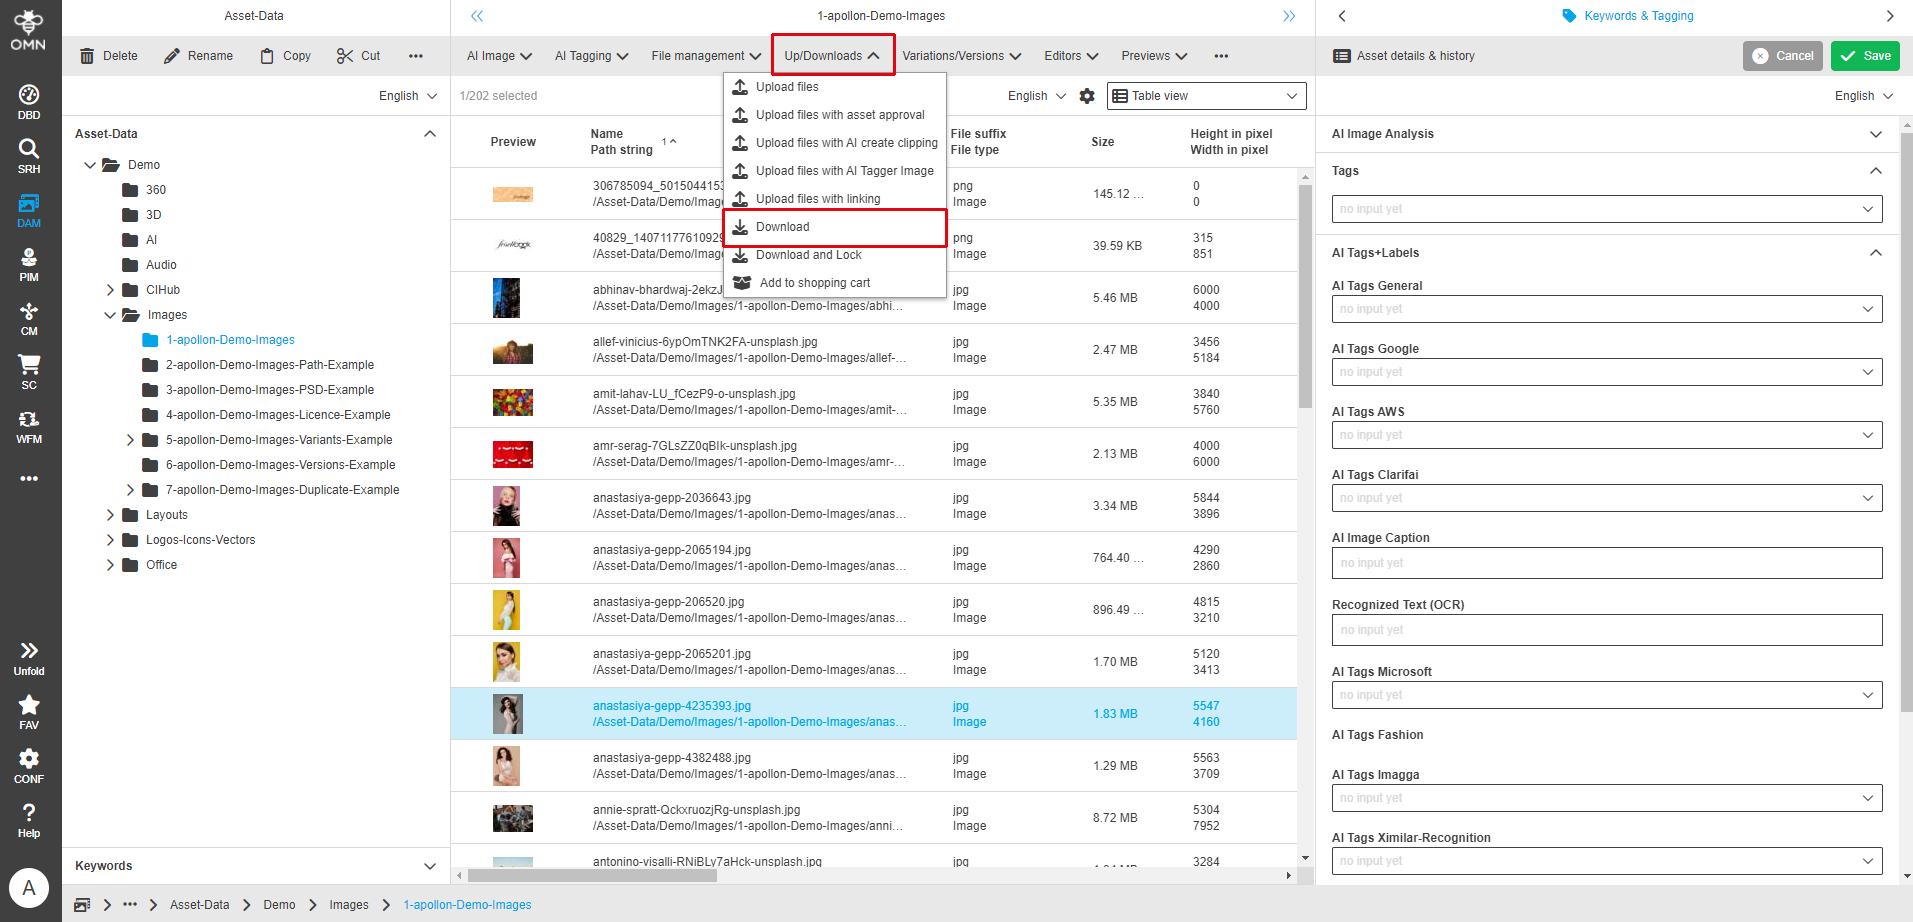
|
If you only select one file, it will be downloaded directly in its original format. If you select two or more files, the system will pack them into a zip archive and make them available for download. Depending on the size of the files, this may take a few seconds. If the download does not work, check whether downloads are allowed in your browser settings. The shopping cart download function is more suitable for downloading larger amounts of data and for downloads with conversion. |
Download and Lock
With the “Download and Lock” function, you can download selected files in their original format and lock them in OMN for other users. The files can then no longer be edited until you unlock them again.
To do this, first select the files you want to download and then click on the “Download and Lock” option in the Up/Downloads menu.
Shopping Cart Download
The shopping cart download is a practical function in the DAM that allows users to download several files at once.
The desired files are first collected in a virtual shopping cart before they can be downloaded in one step.
This function facilitates the efficient retrieval of content, especially when large quantities of files are required.
General functionality
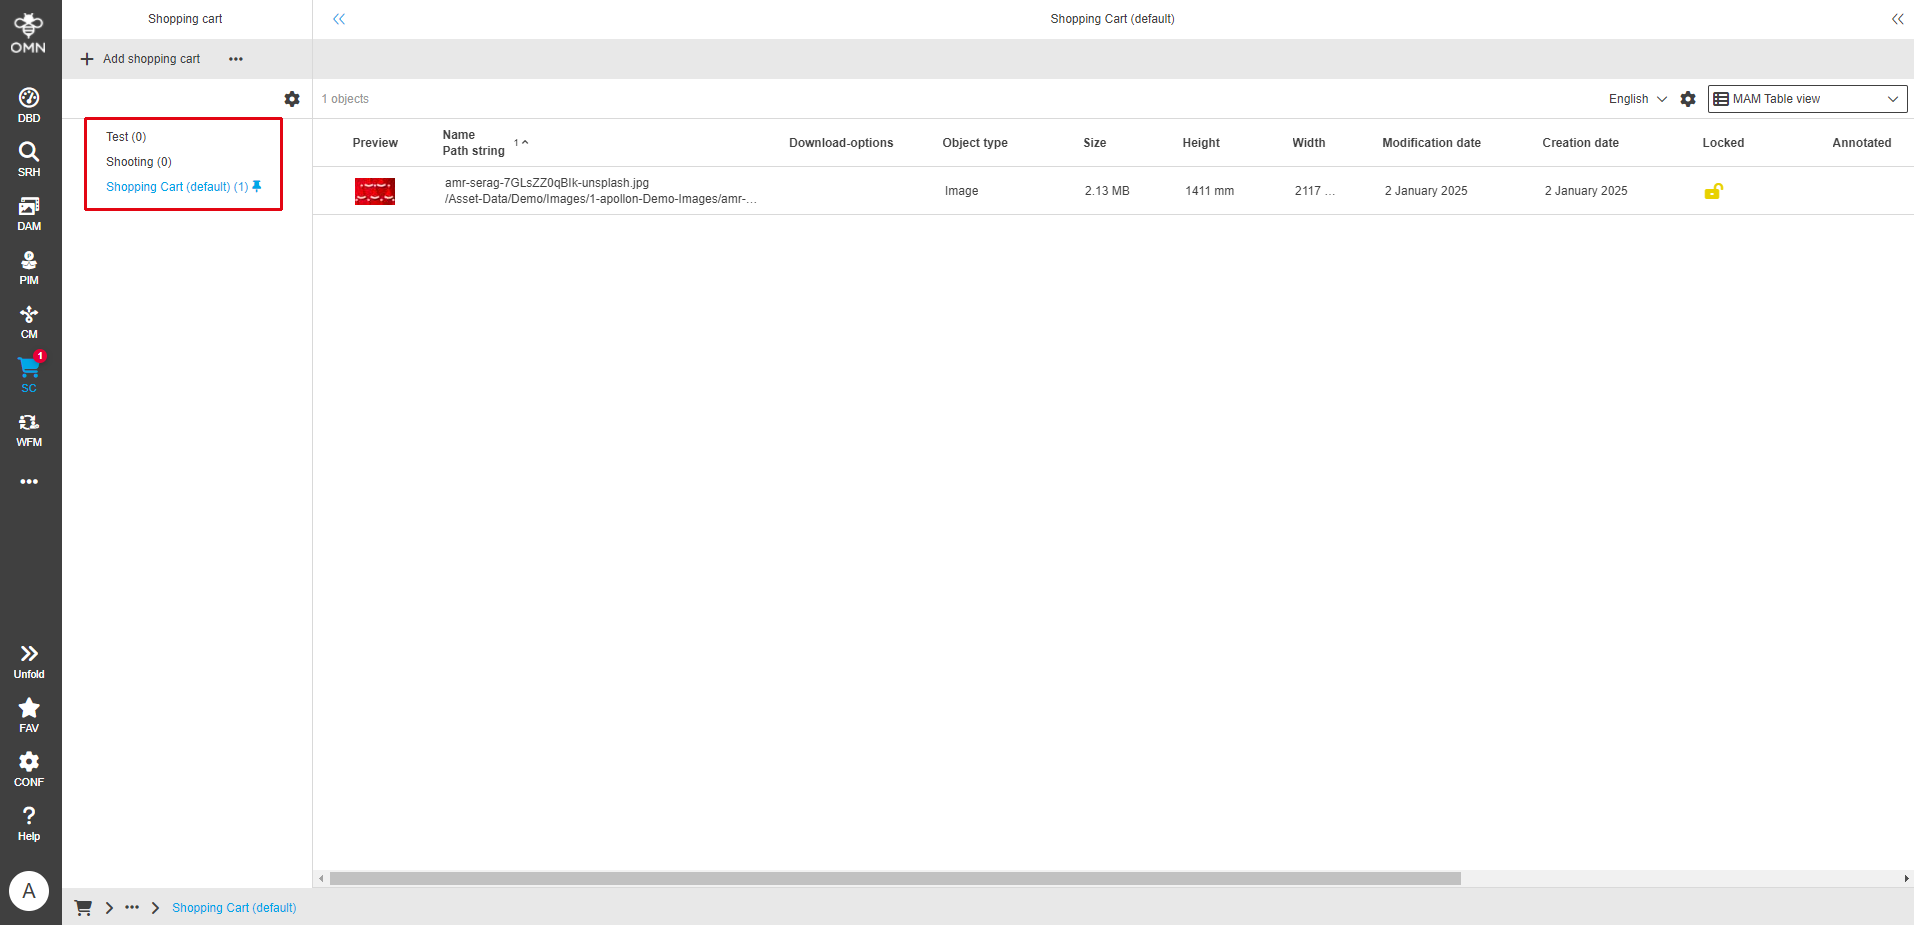
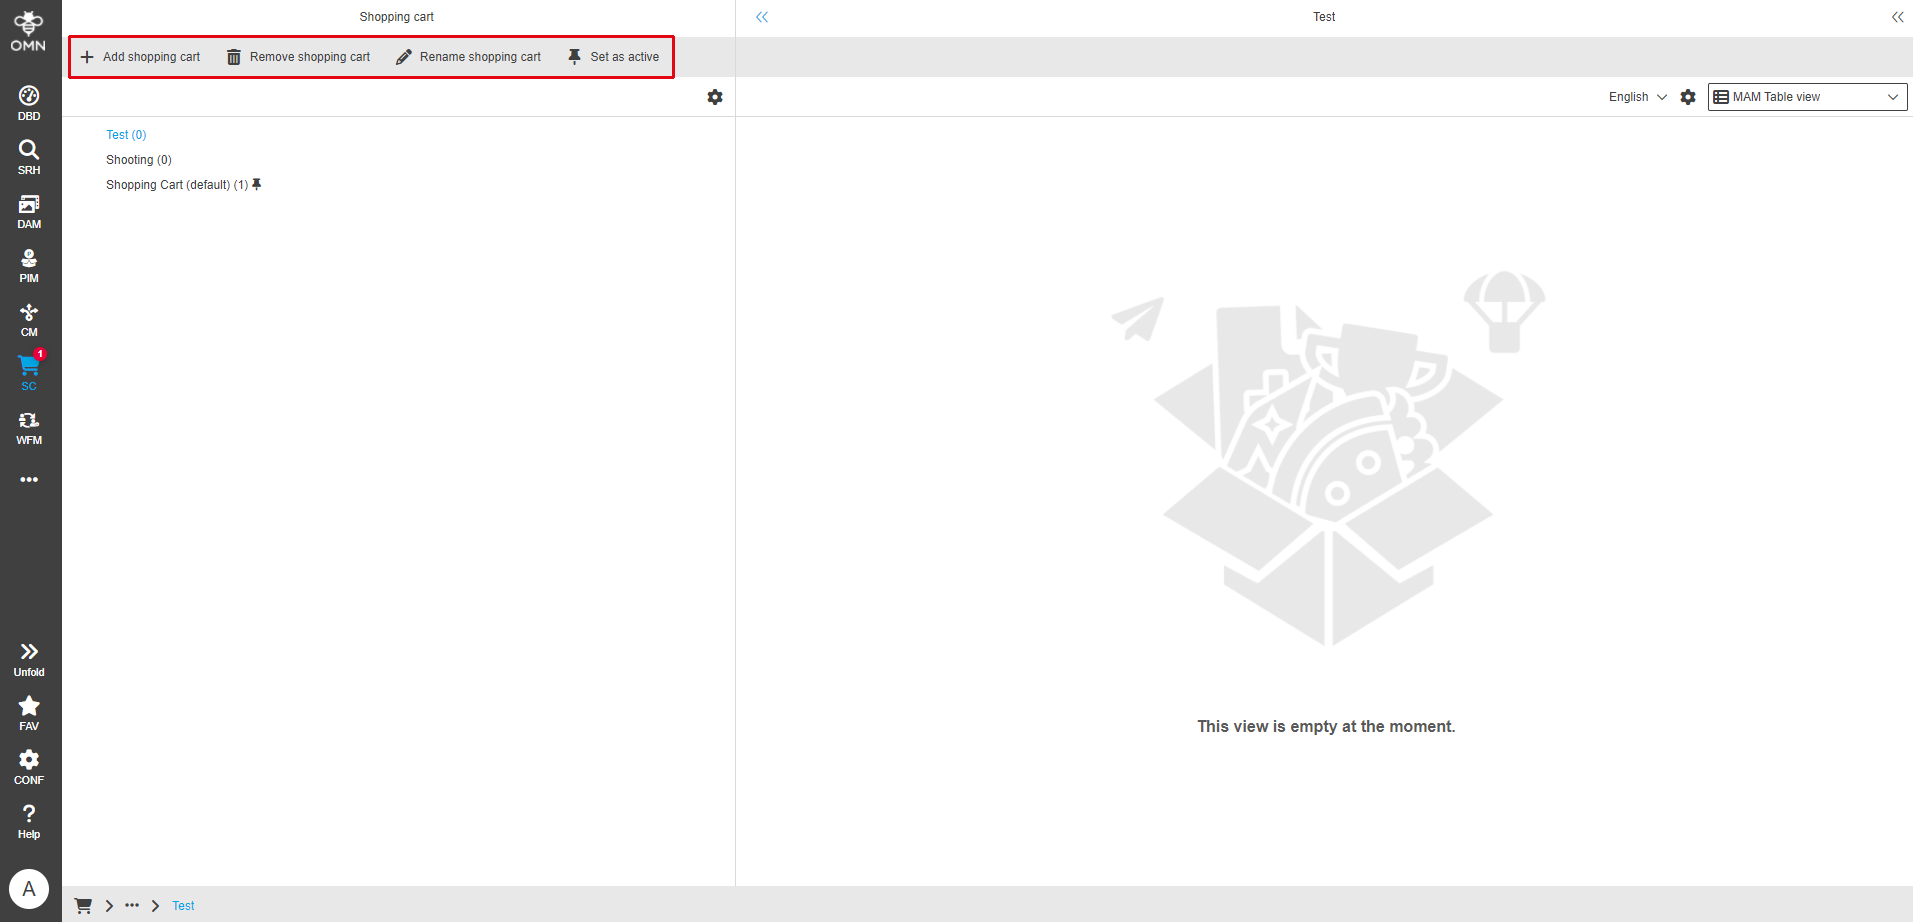
A shopping cart is used to collect files that have been found via navigation or search, for example, and to trigger processes (downloads).
The shopping cart area is accessible via the “Shopping cart” icon in the sidebar. Clicking on this icon opens the shopping cart module, in which all of the user’s existing shopping carts are displayed as a list in the left view.
The active standard shopping cart is marked with a thumbtack symbol. Among other things, this enables files to be placed in the shopping cart directly by DnD on the shopping cart symbol.
Using the toolbar functions, you have the option of
-
Add shopping carts
-
Rename shopping carts
-
Remove shopping carts
-
When deleting, the assets assigned to the shopping cart are not physically removed, only the link to the shopping cart is removed.
-
-
reset/change the active default shopping cart
To add files to the shopping cart, you can drag them from the DAM, CM, Search or PIM Management to the “Shopping cart” icon in the sidebar using DnD.
| Drag and drop via the sidebar only works if an active standard shopping cart has been set. |
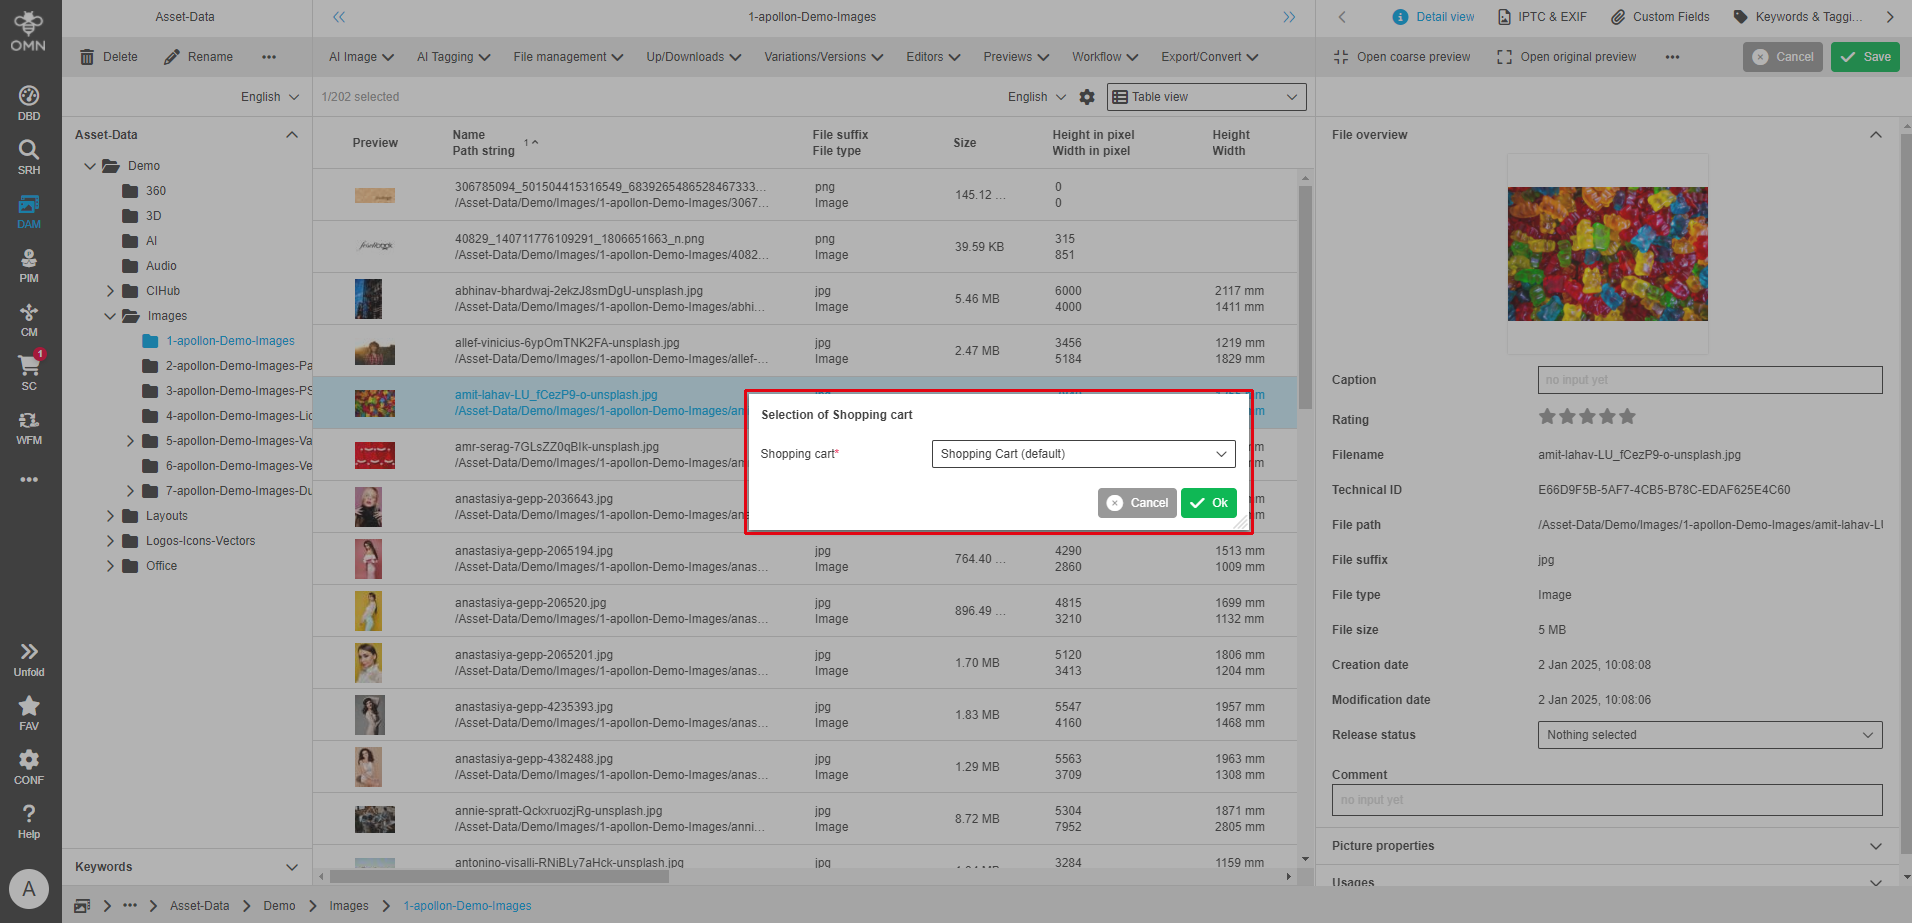
Alternatively, you can add the files via drag and drop across two browser windows or via the “Add to shopping cart” function in the Up/Download menu. In this case, a dialog opens in which you can select the desired shopping cart.
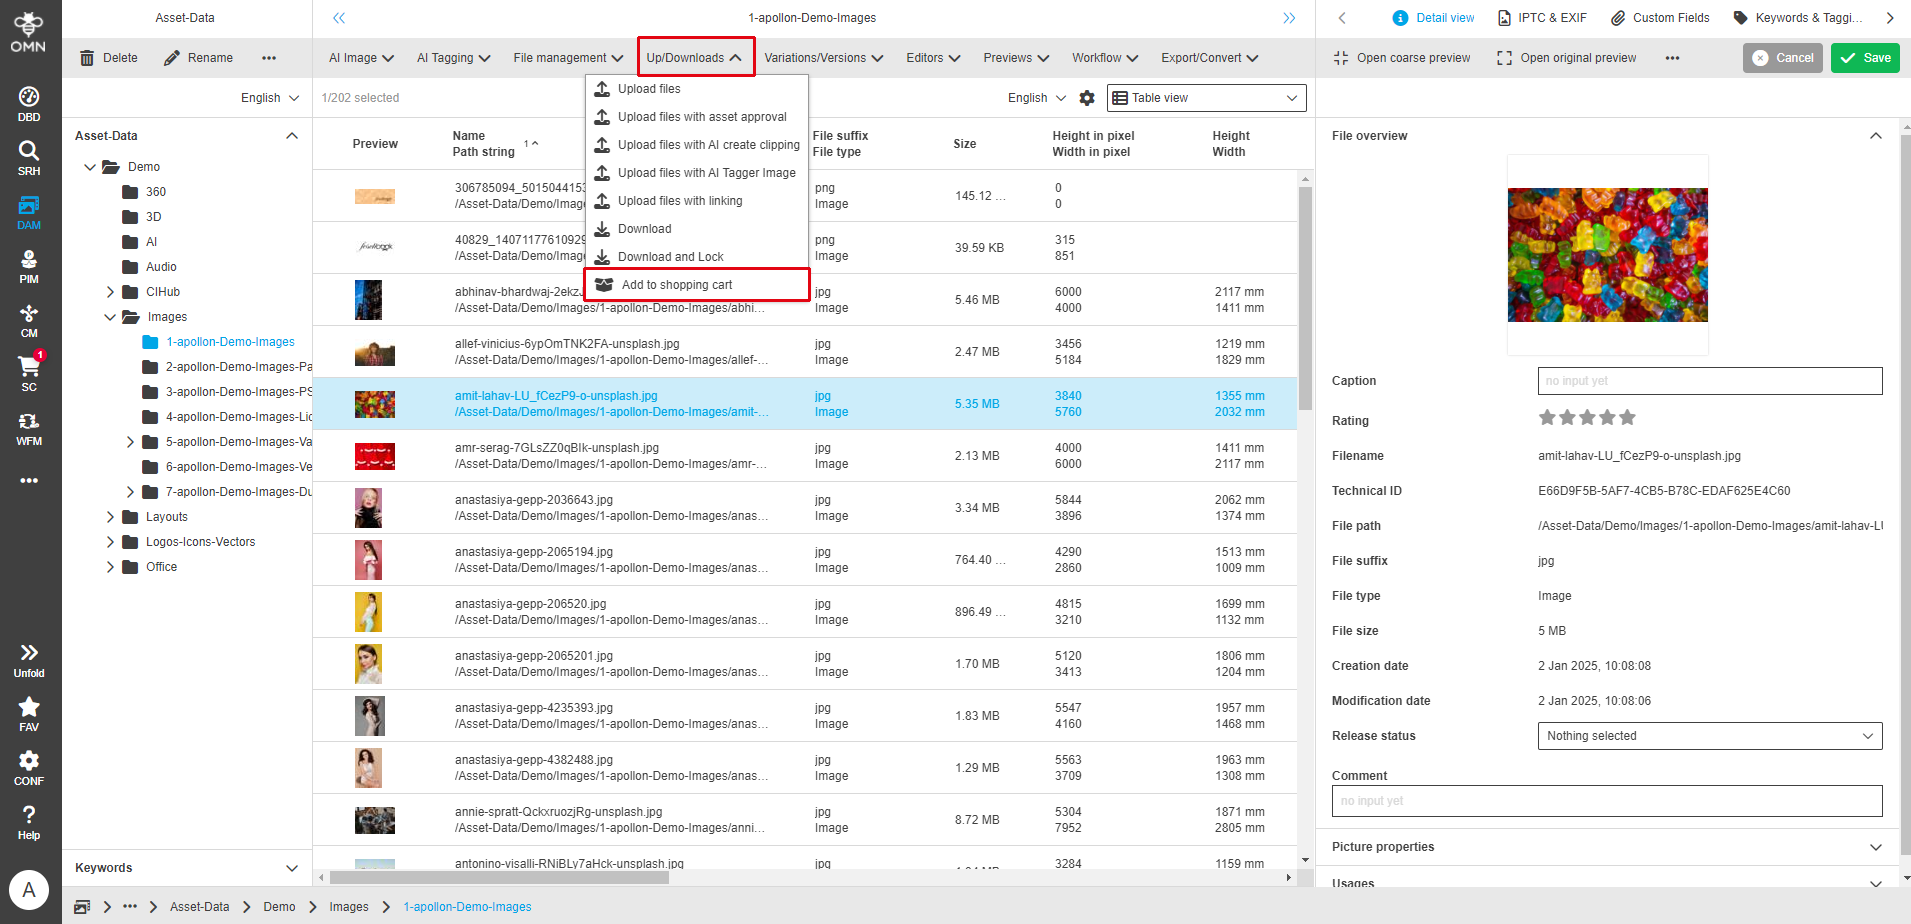
If you select one or more files and use the “Add to shopping cart” function, a dialog appears in which you can select the desired shopping cart.
If an active standard shopping cart is set, this is displayed. If no active standard shopping cart is set, a shopping cart must be selected.
As soon as files are placed in the shopping cart, they are displayed in the table view and can be copied between the different shopping carts using drag and drop.
Any number of shopping carts can be created.
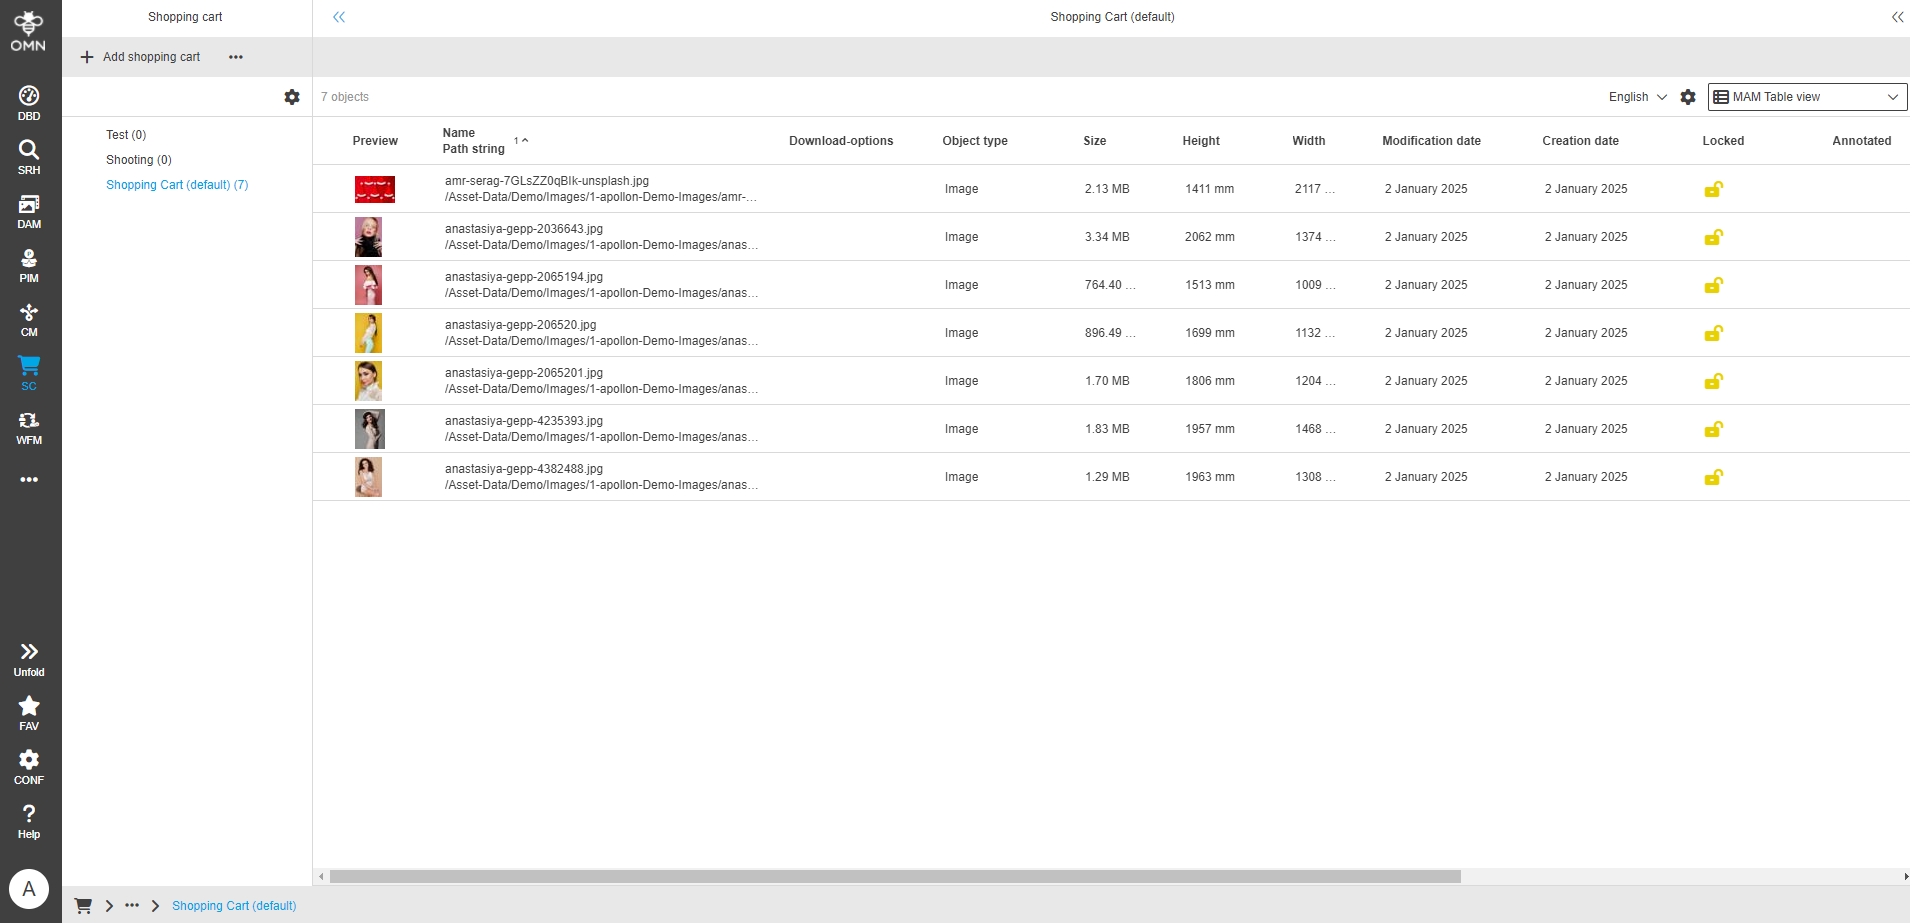
File download via the shopping cart
To download files via the shopping cart, we recommend the following procedure:
-
Select shopping cart:
Select the desired shopping cart to display all files in the table view. -
Select files for download:
Select the files you want to download. Multiple selections can be made using the checkboxes (if activated) or using the familiar key combinations “SHIFT” and “CTRL/CMD”.
All files can be selected using “CMD" + A or "CTRL” + A. -
Select download function:
Then select the desired download function(s) under “Download”.
A download function is a type of filter that specifies how (e.g. in the original, as a PDF, print-optimized, etc.) the respective file is to be downloaded later.
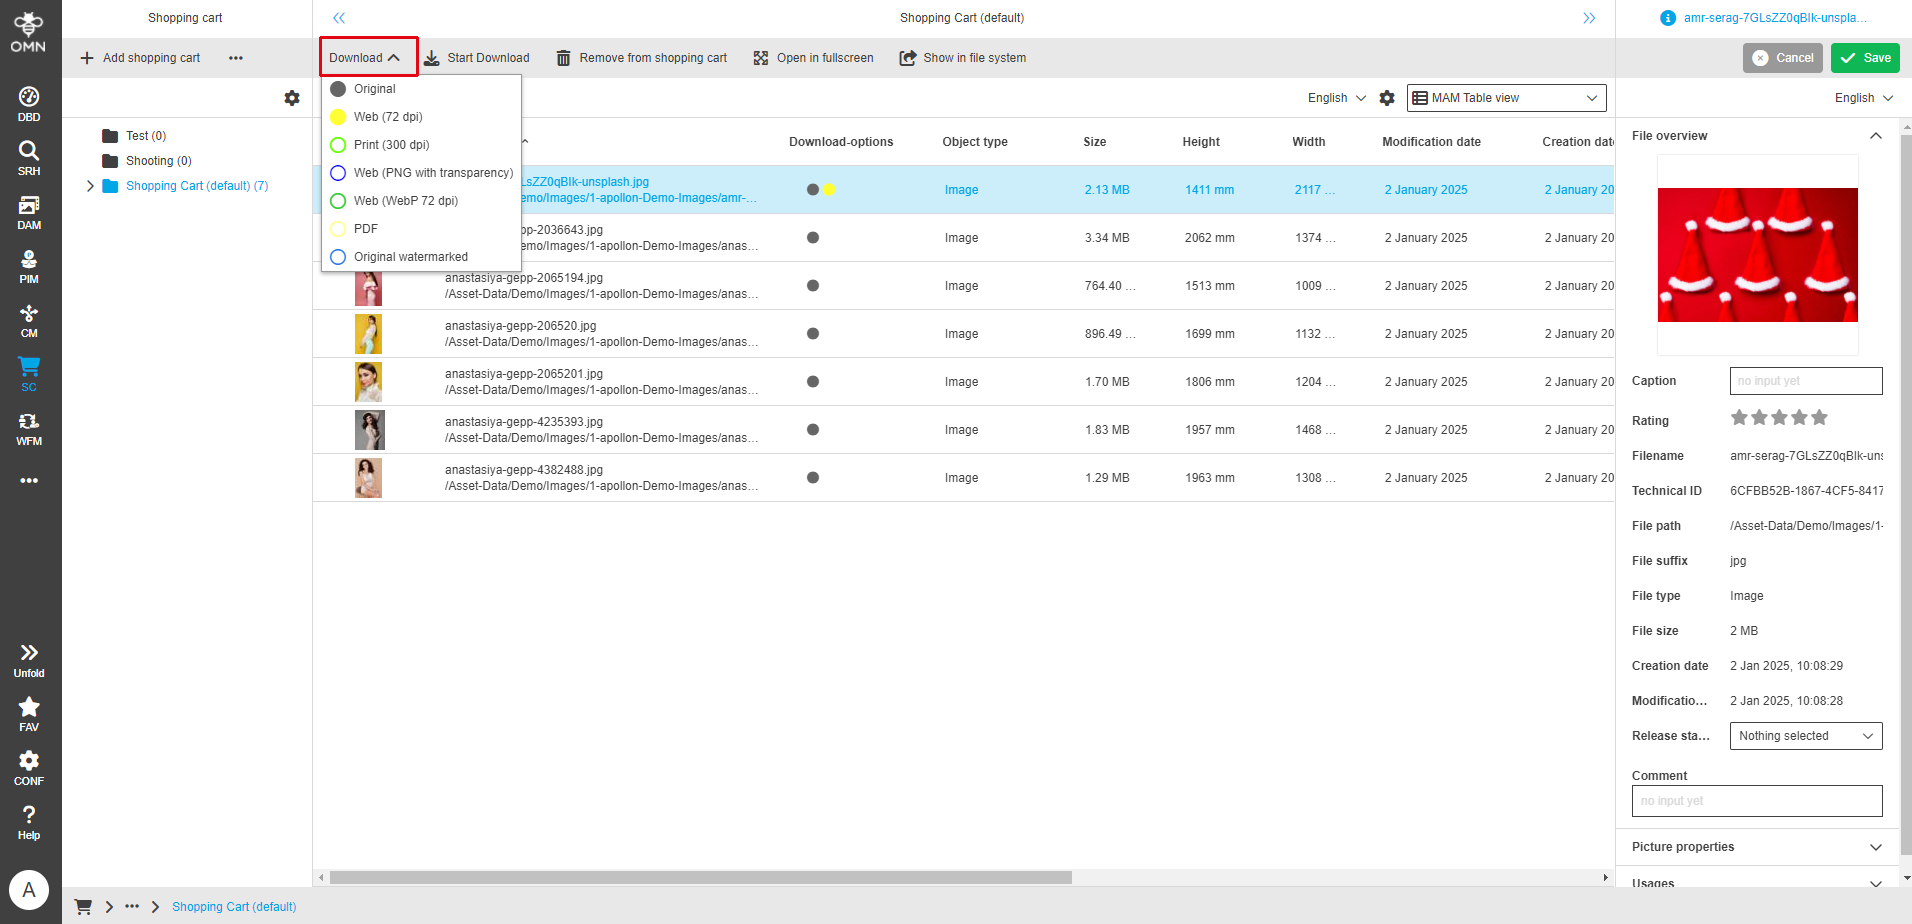
Different download functions are offered depending on the file format or role. For easier assignment, each option is assigned a color (as a circle). You can find these in the following places:
-
in the table column “Download options”
-
below the selected and expanded shopping cart
-
the shopping cart can only be expanded if a download filter has already been set
-
-
-
Start download:
Start the download via the “Start download” button.
A dialog box opens in which the e-mail address of the recipient for the download must be entered.
The download can then be started.
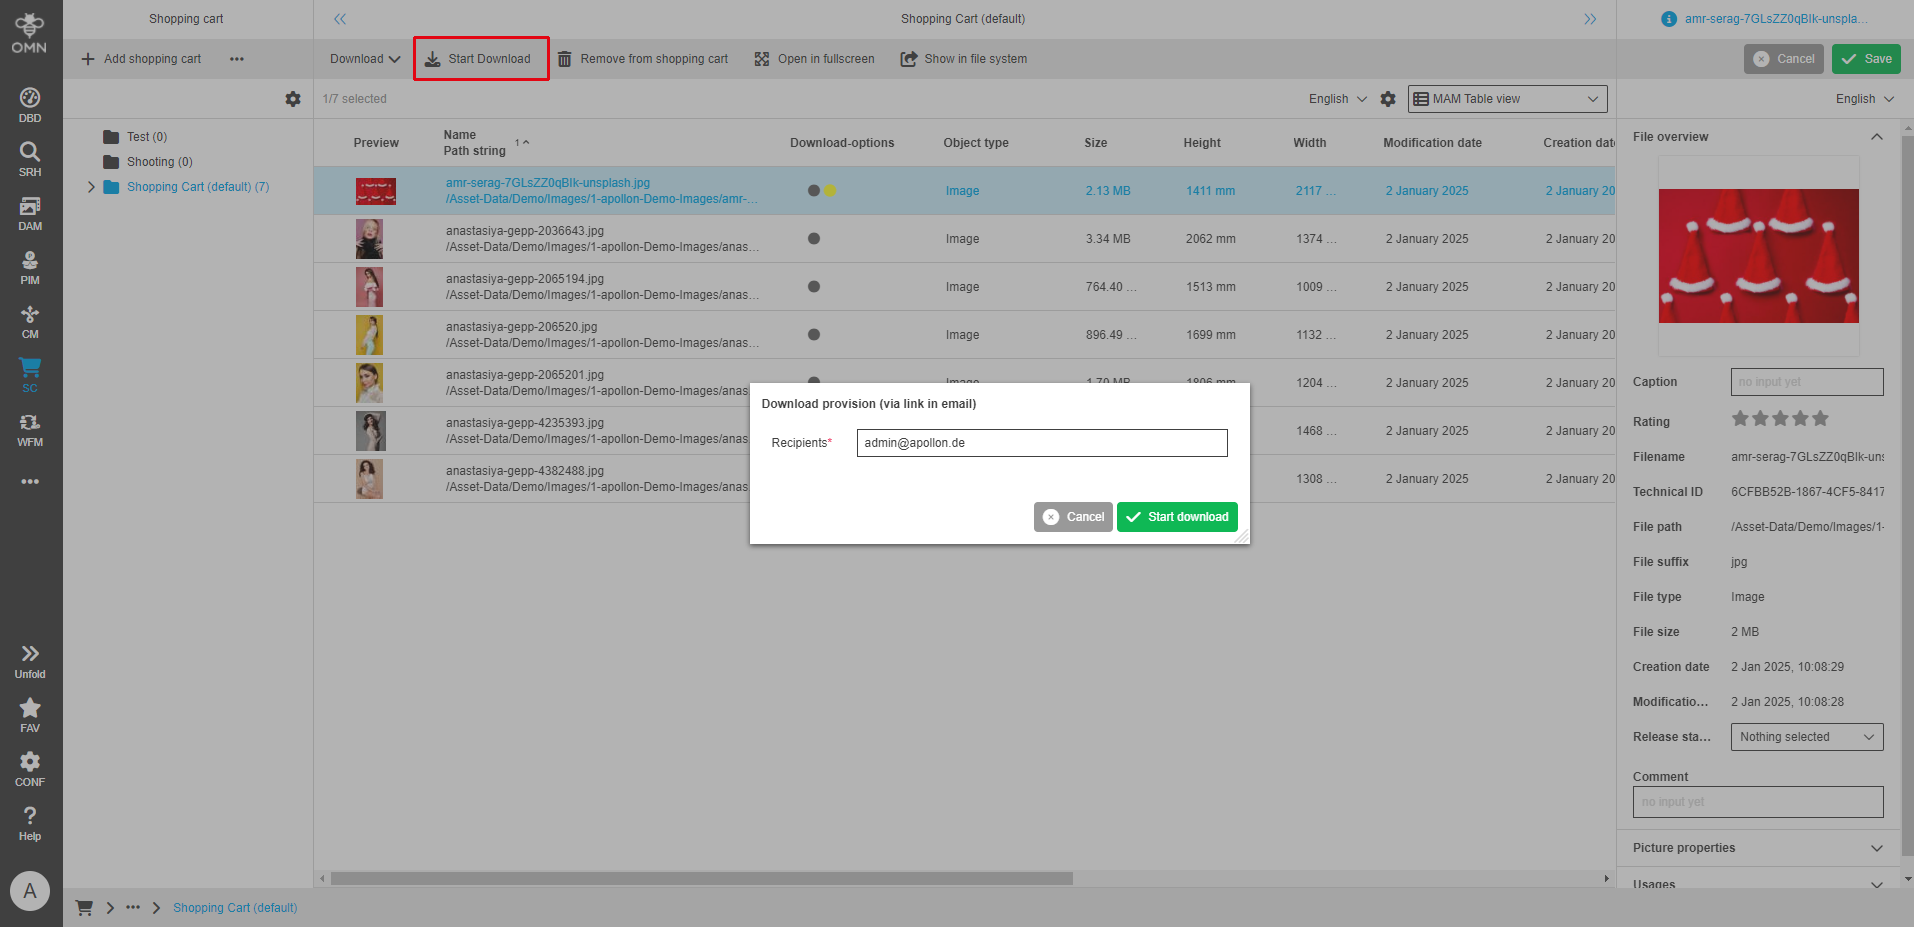
If the e-mail address of the logged-in user is stored in the user data, this is automatically entered in the input mask. Once the download has been successfully prepared, a message with the download link will be sent to the e-mail address provided. This link can be used to start the download as a ZIP file.
The e-mail makes it possible to forward data to external agencies or persons who do not have access to the Online Media Net.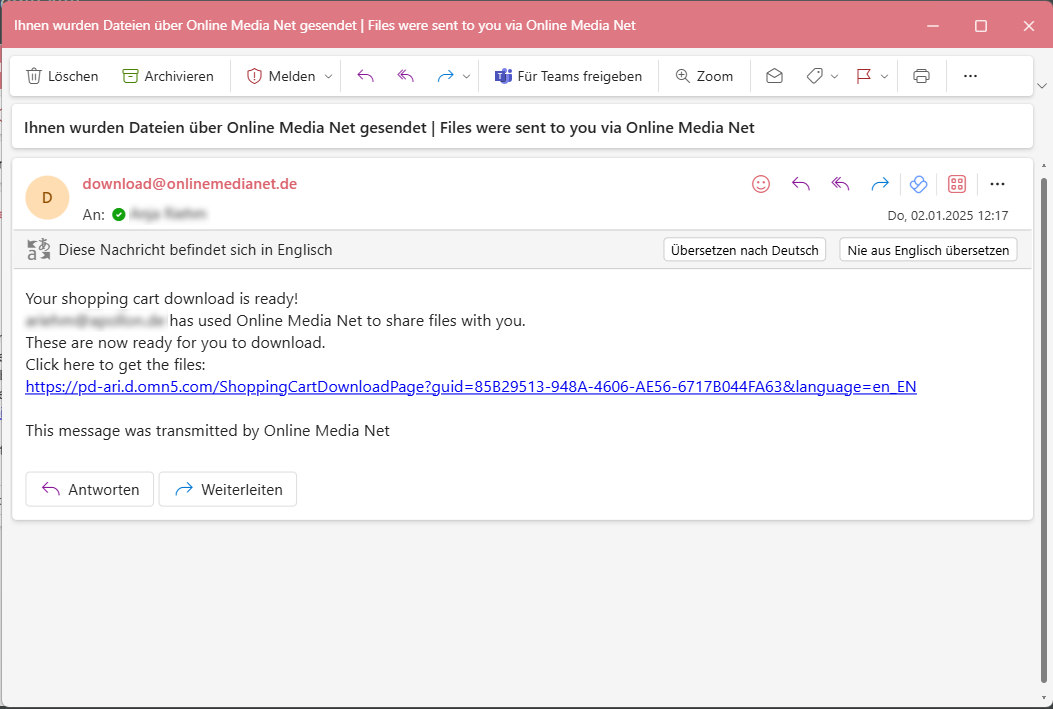 Figure 18. Download e-mail notification
Click on the link contained in the e-mail to start the download of the shopping cart.
Views, editors and functions
Editors and functions in the DAM enable users to edit and adapt digital content directly within the platform.
They offer a wide range of possibilities without the need for additional software. These integrated tools promote efficiency by enabling seamless editing of media directly within the DAM.
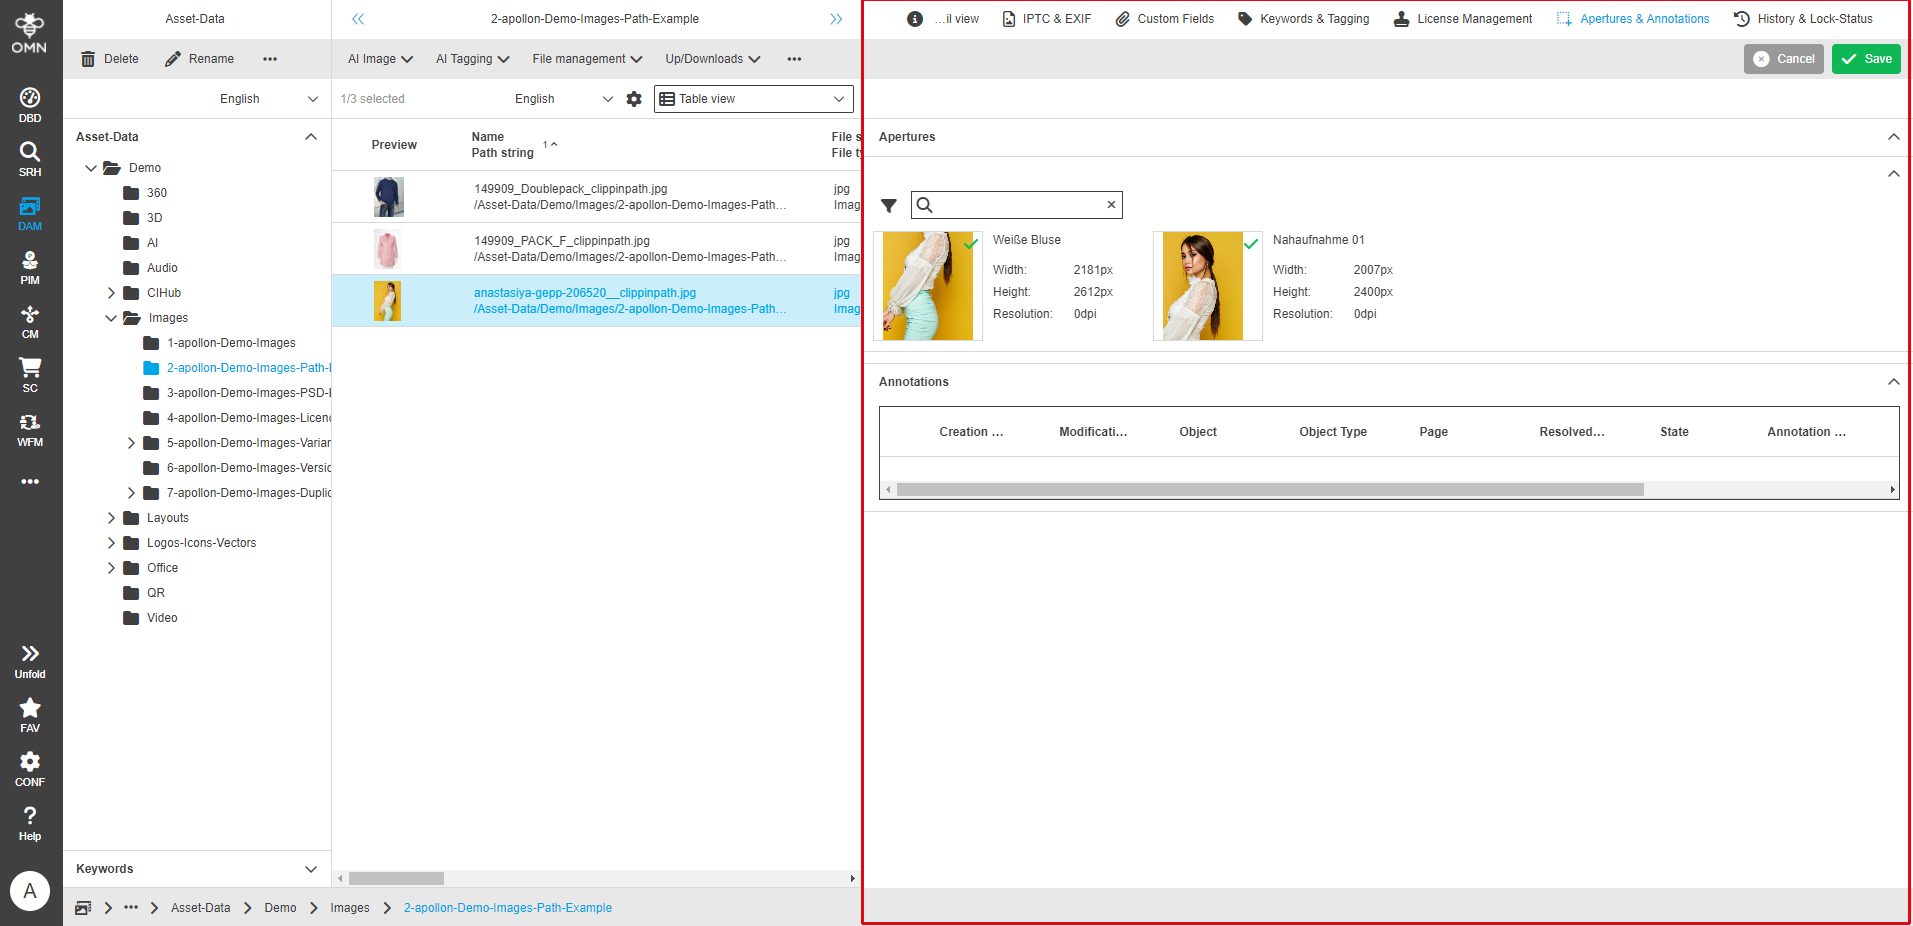
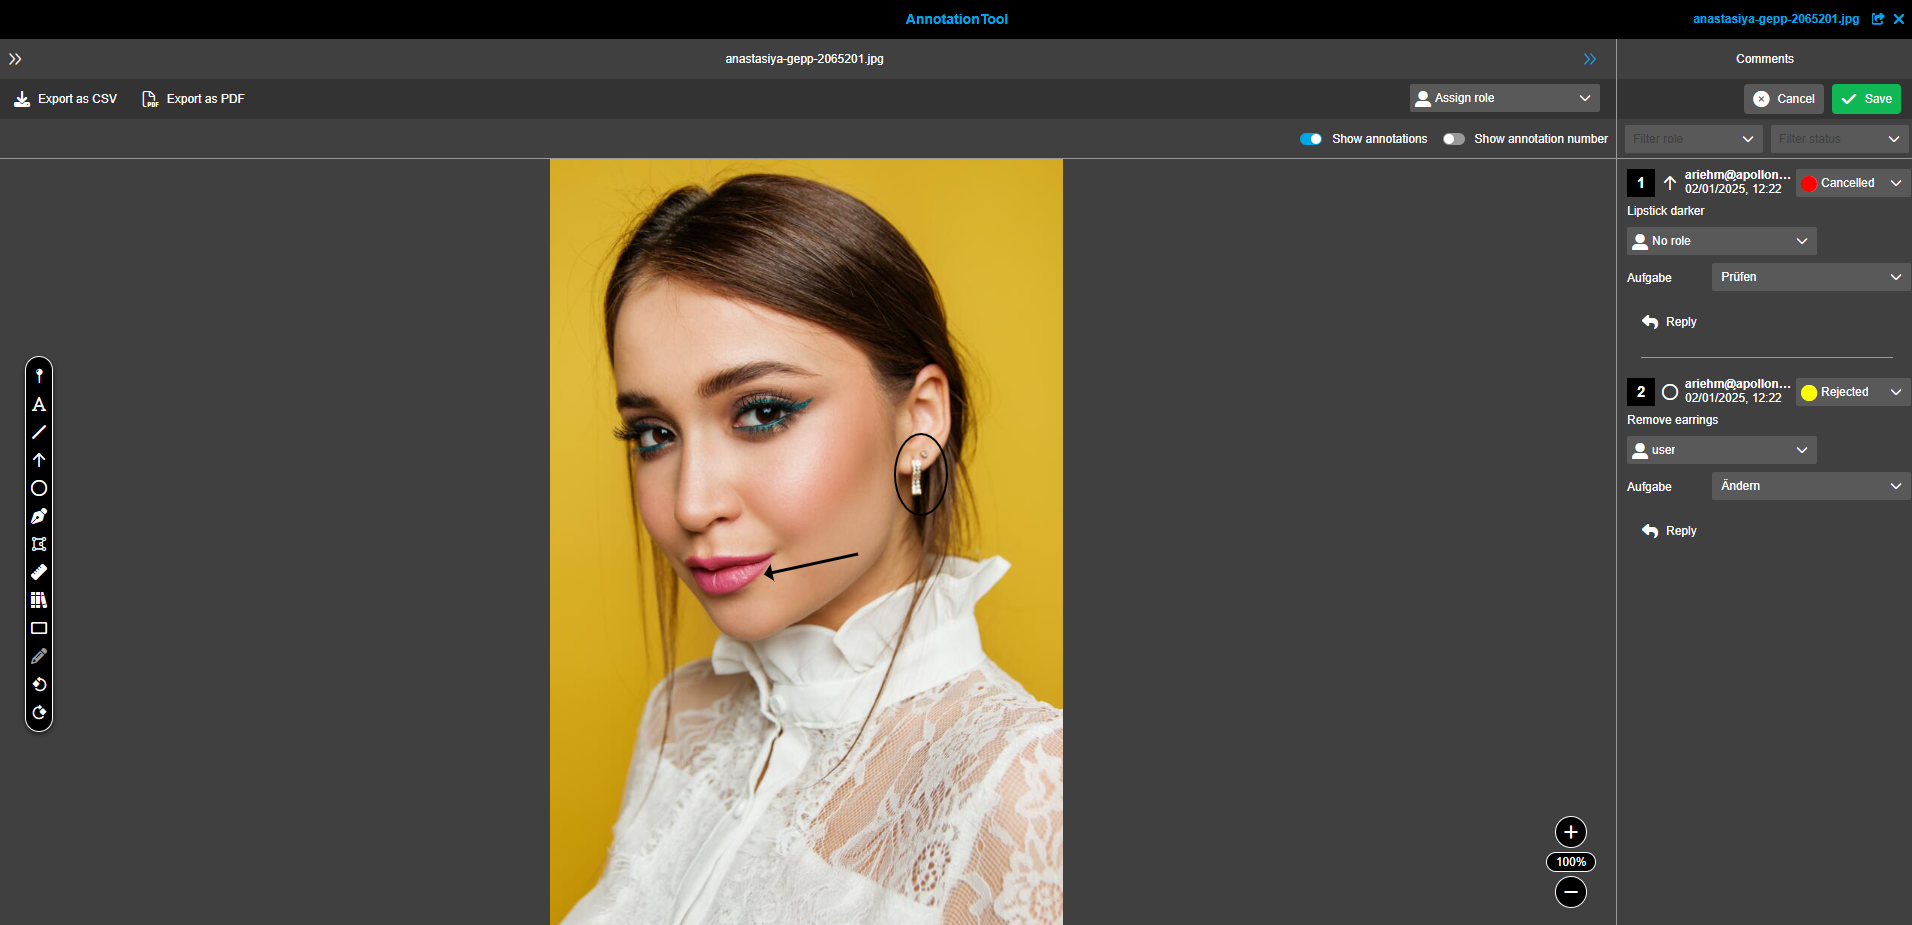
Annotation-Tool
You can use the editor Annotation Tool to annotate and comment on catalog and document pages or other files (e.g. images).
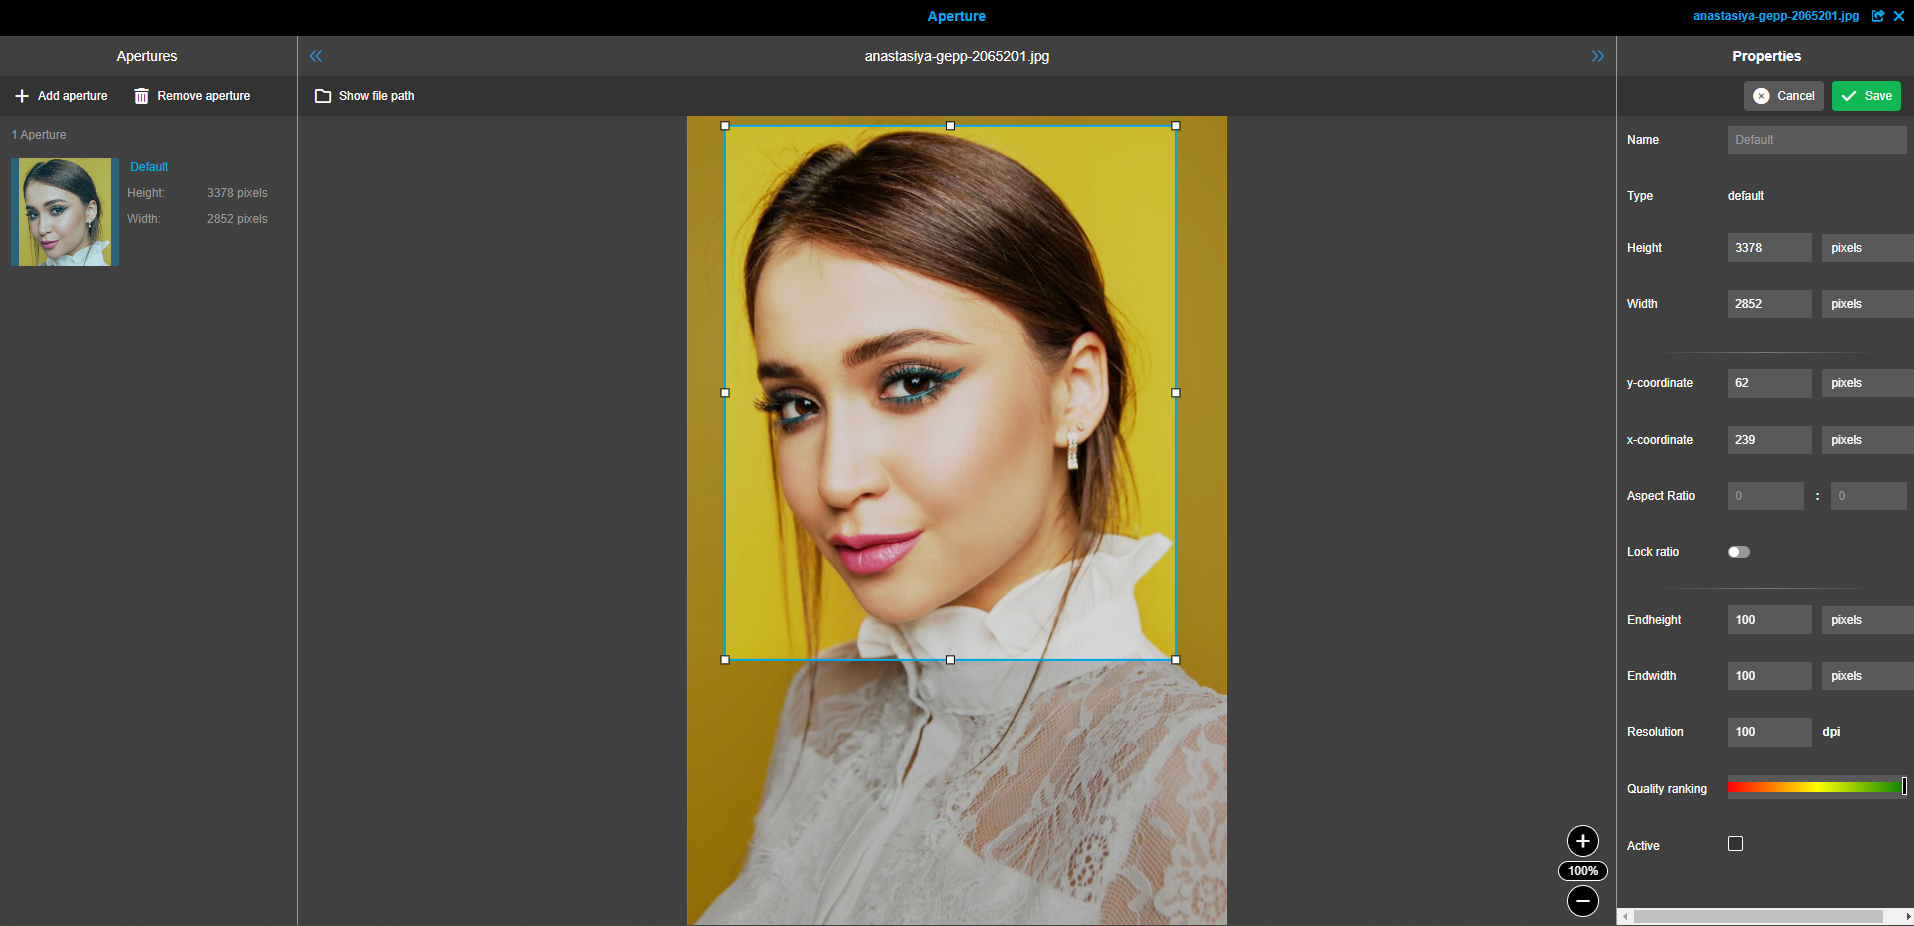
Aperture Tool
You can use the editor Aperture Tool to define image sections.
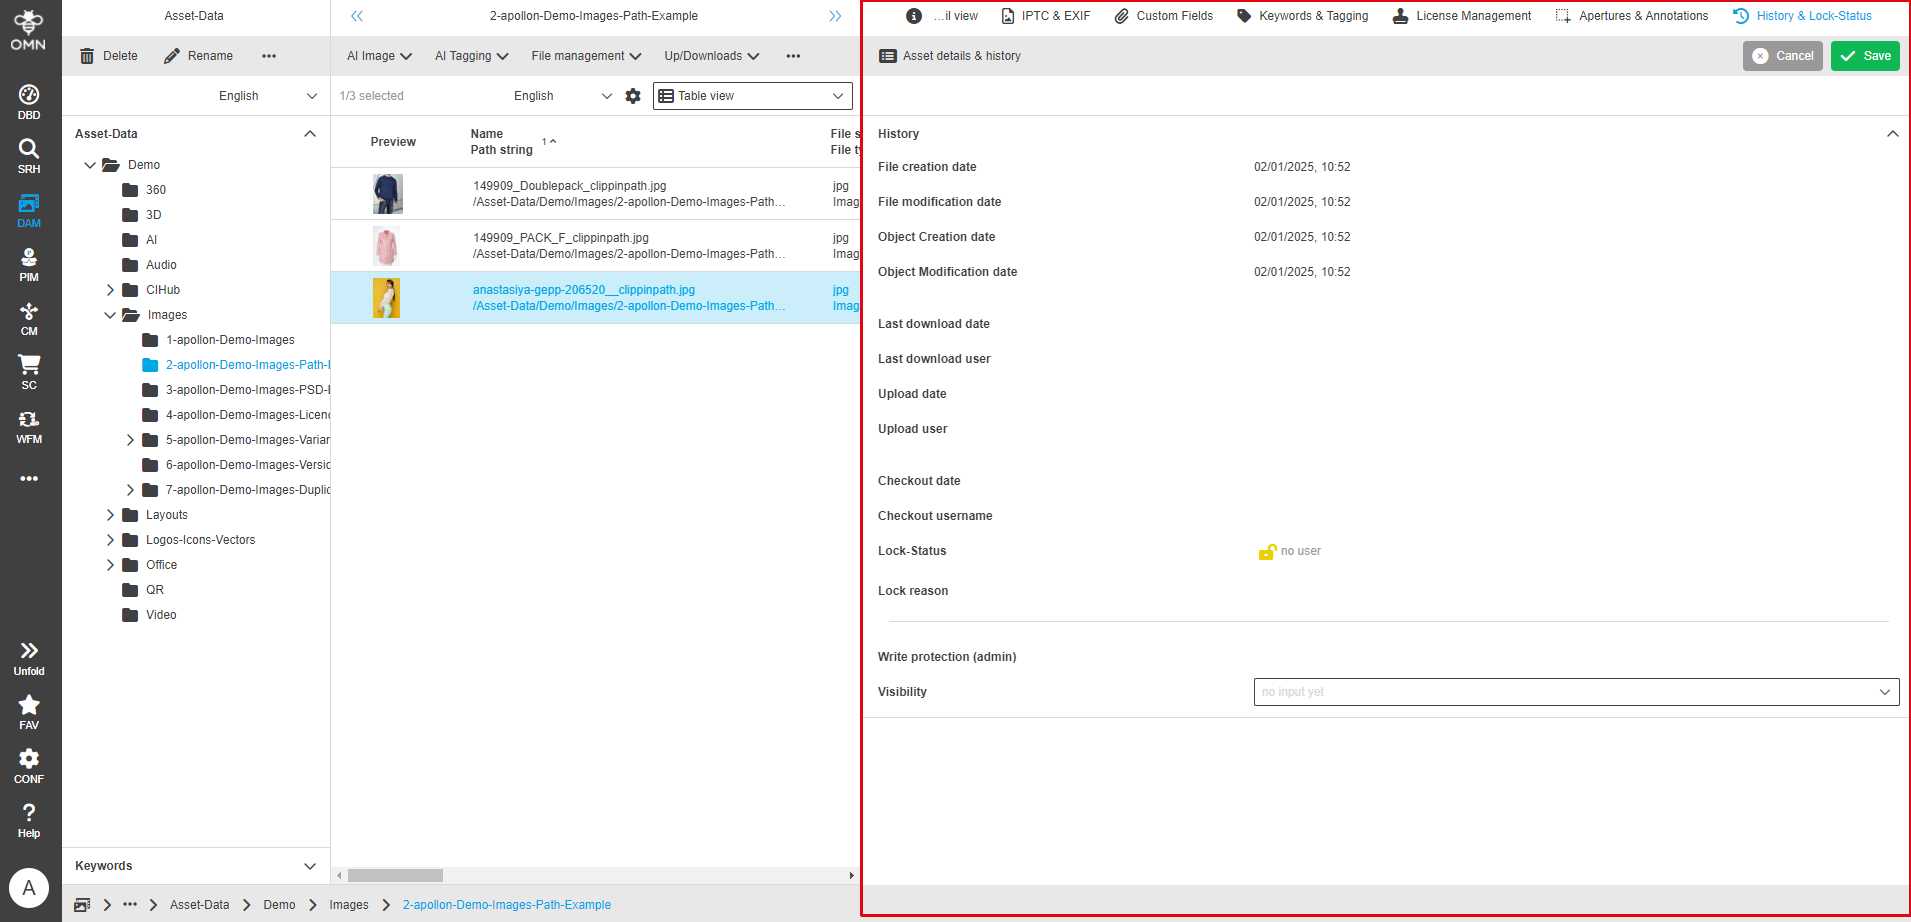
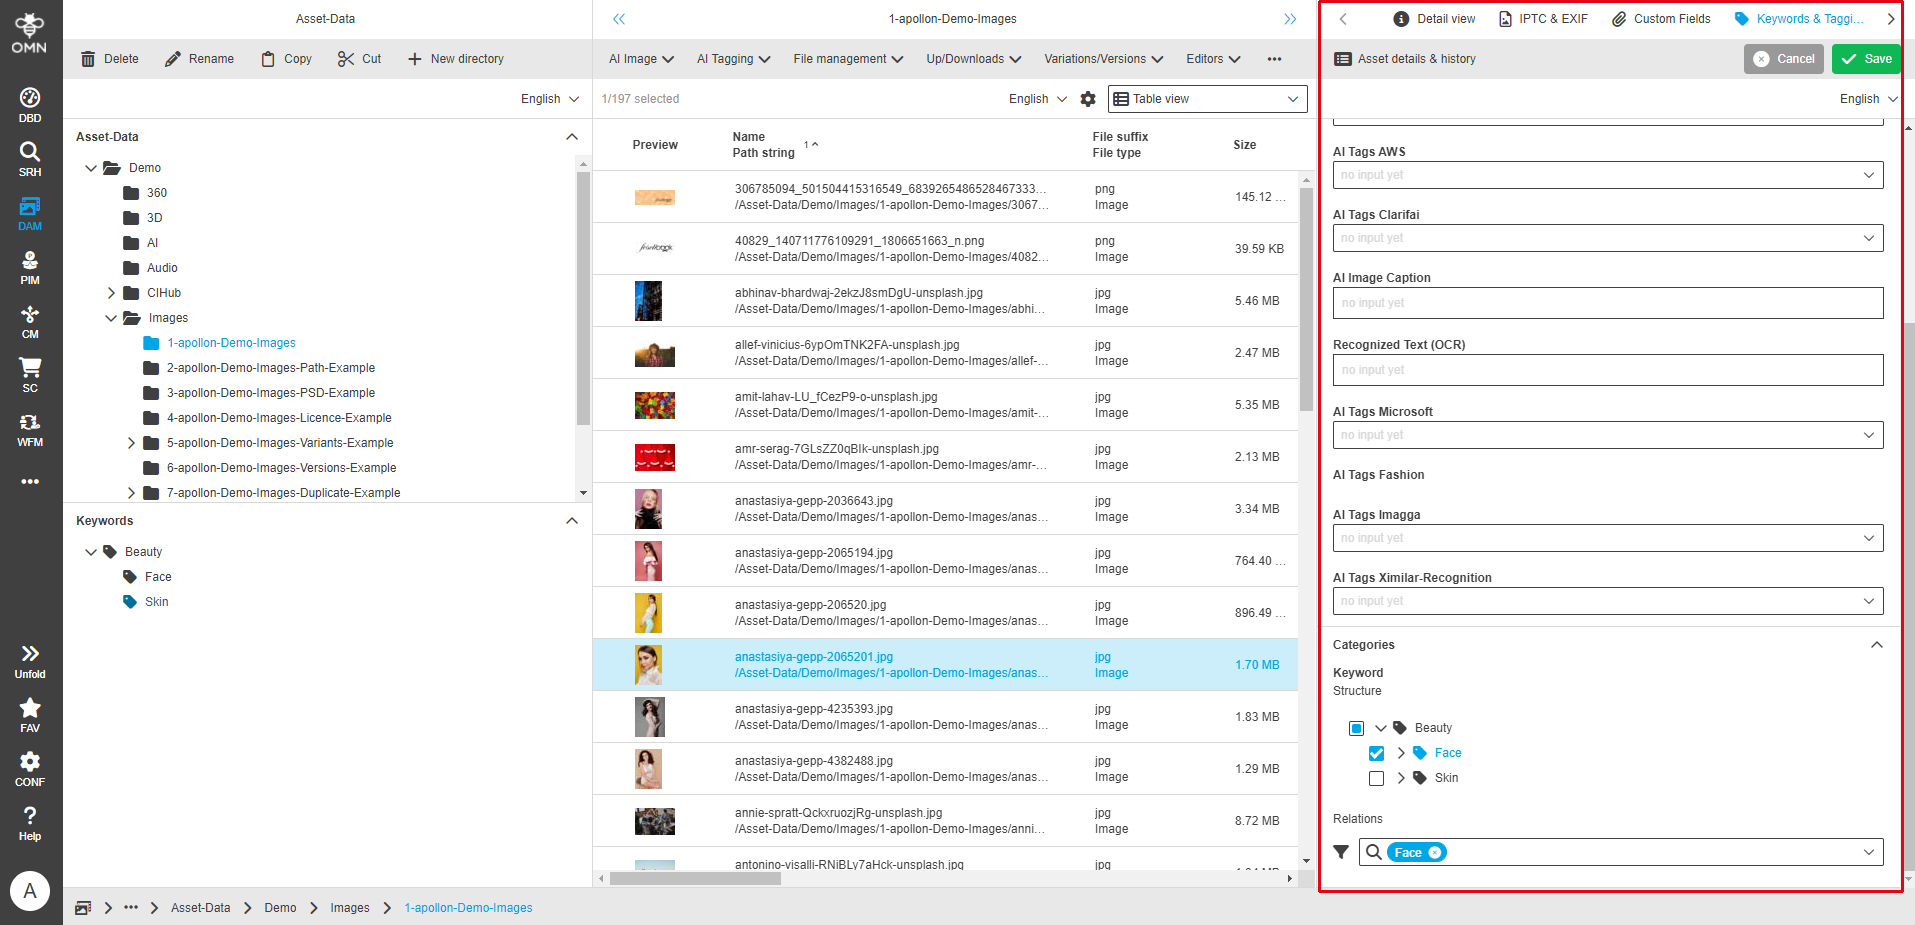
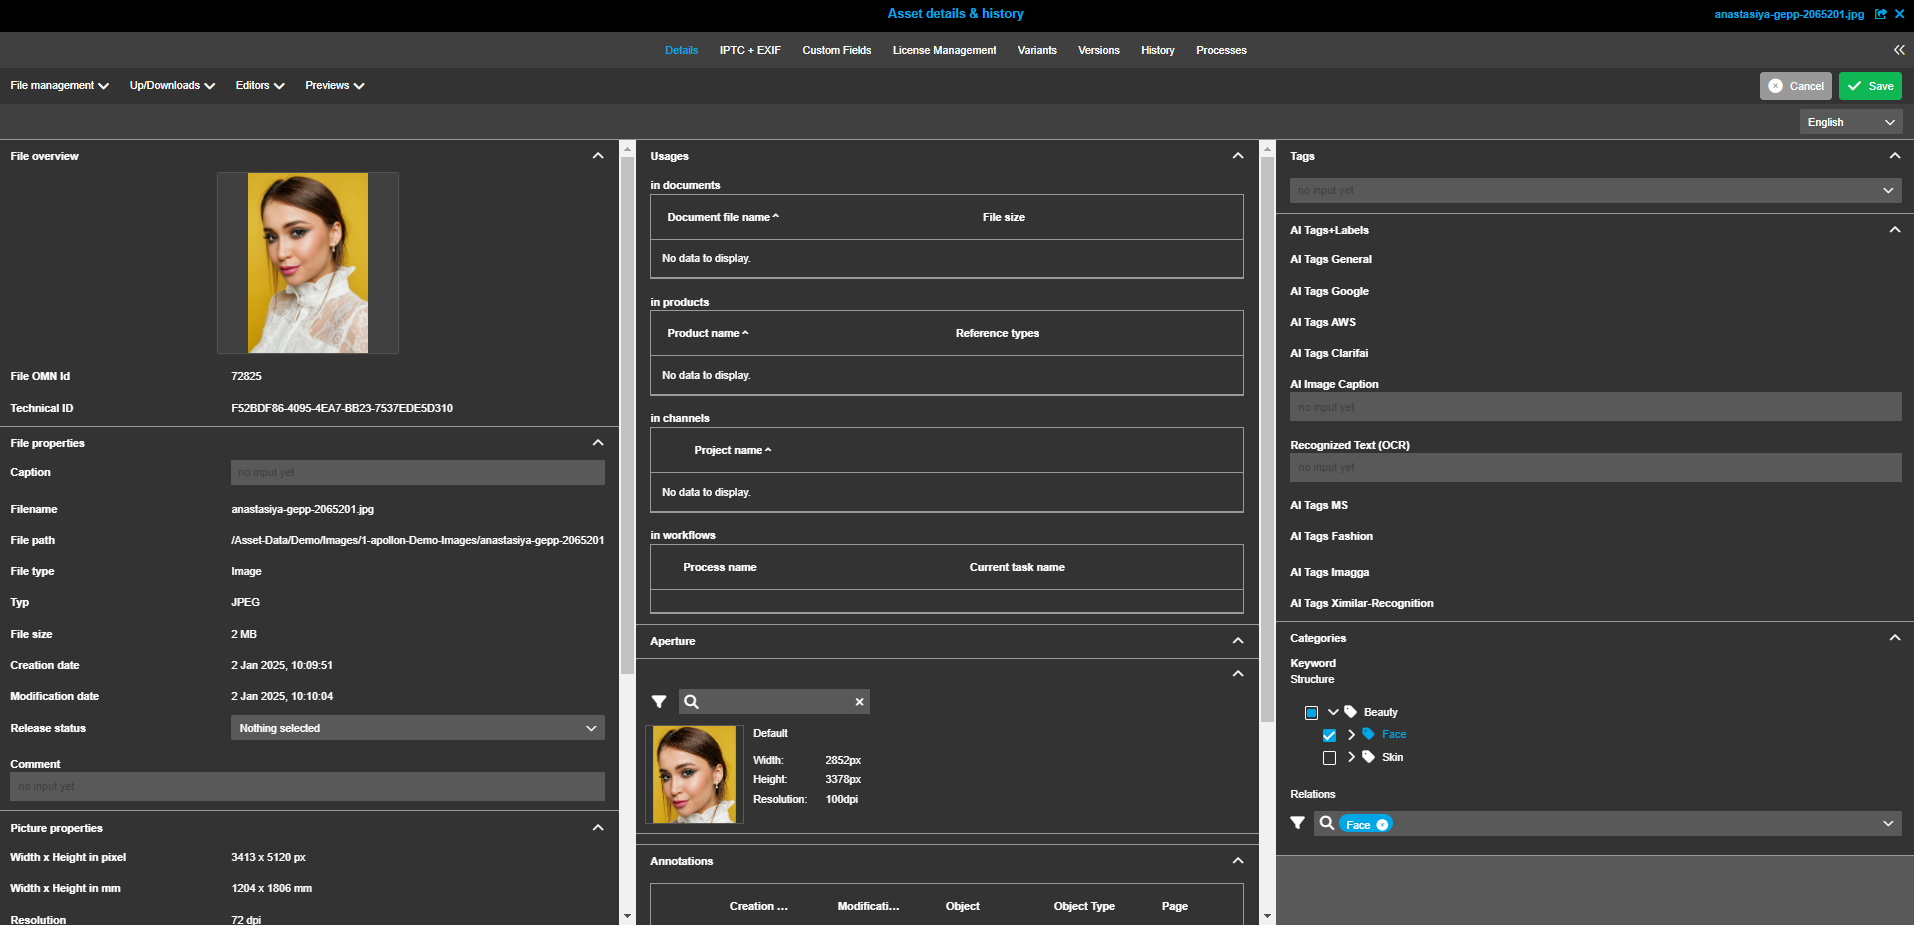
Asset View: Asset details & history
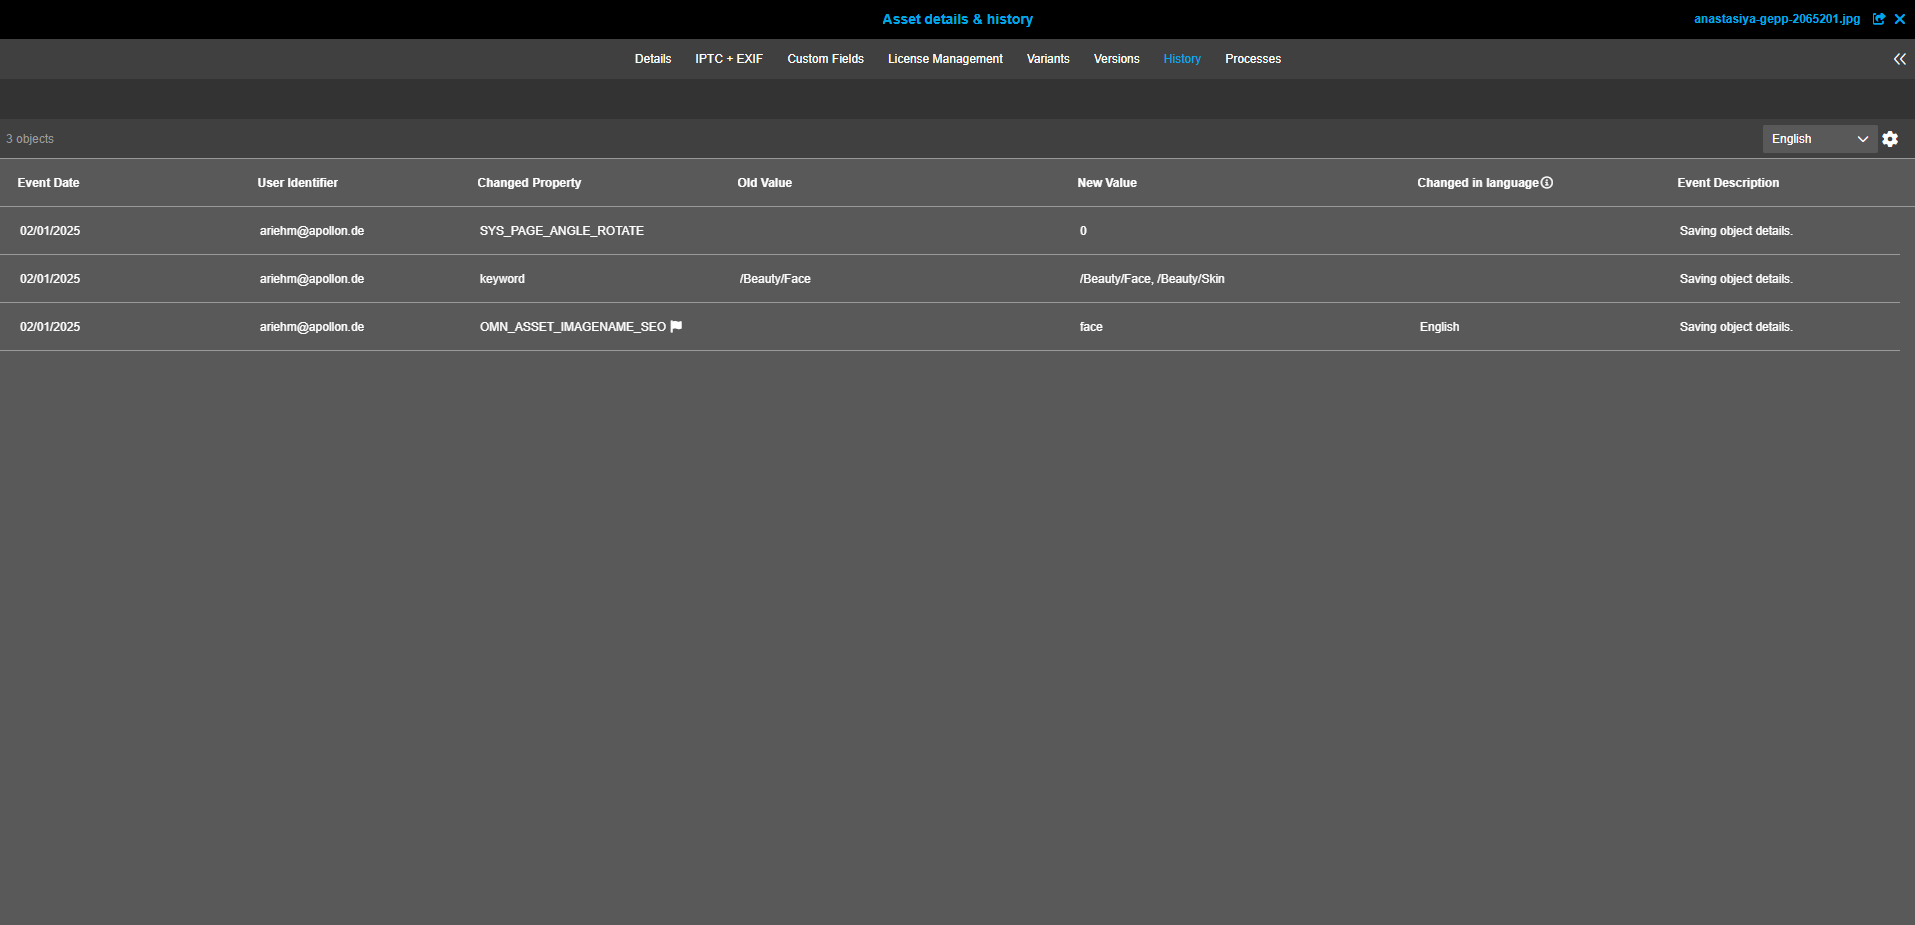
In the details panel of the editor Asset details & history (Asset view editor), you can view information about the selected asset and any changes that have been made.
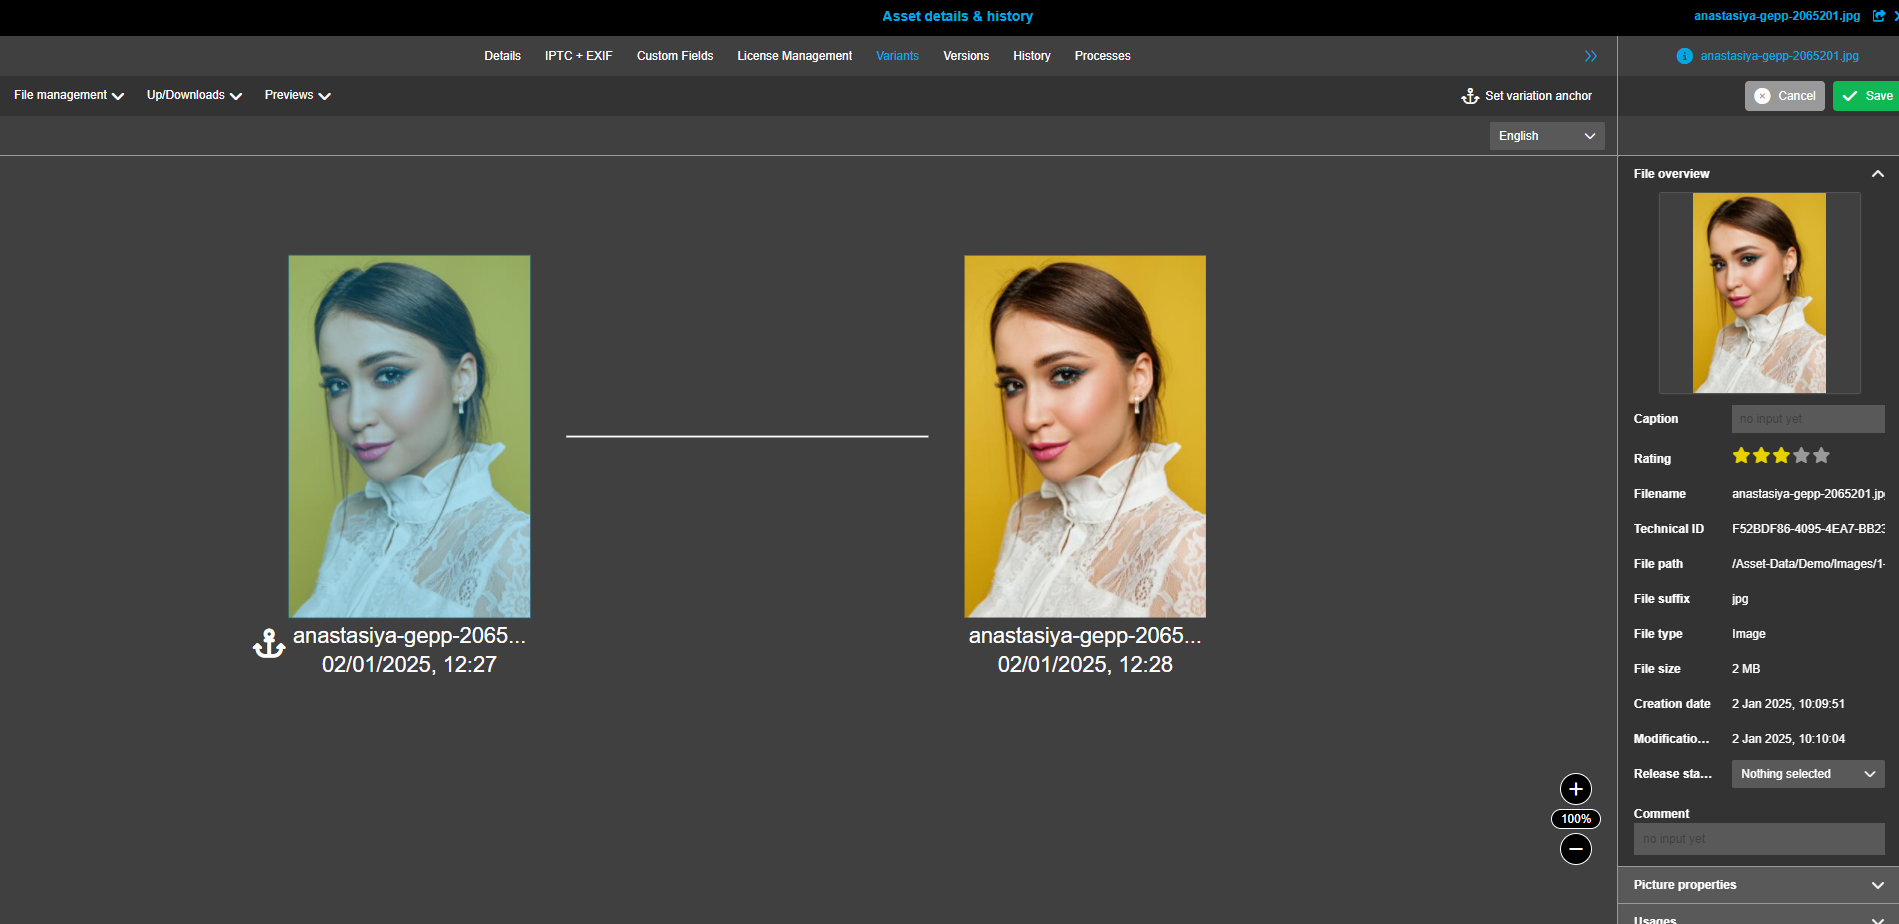
Variants
In the “Variants” tab of the Asset details & history you can view all variants of the selected asset.
Variants are separate files that are related to each other and usually have different file names.

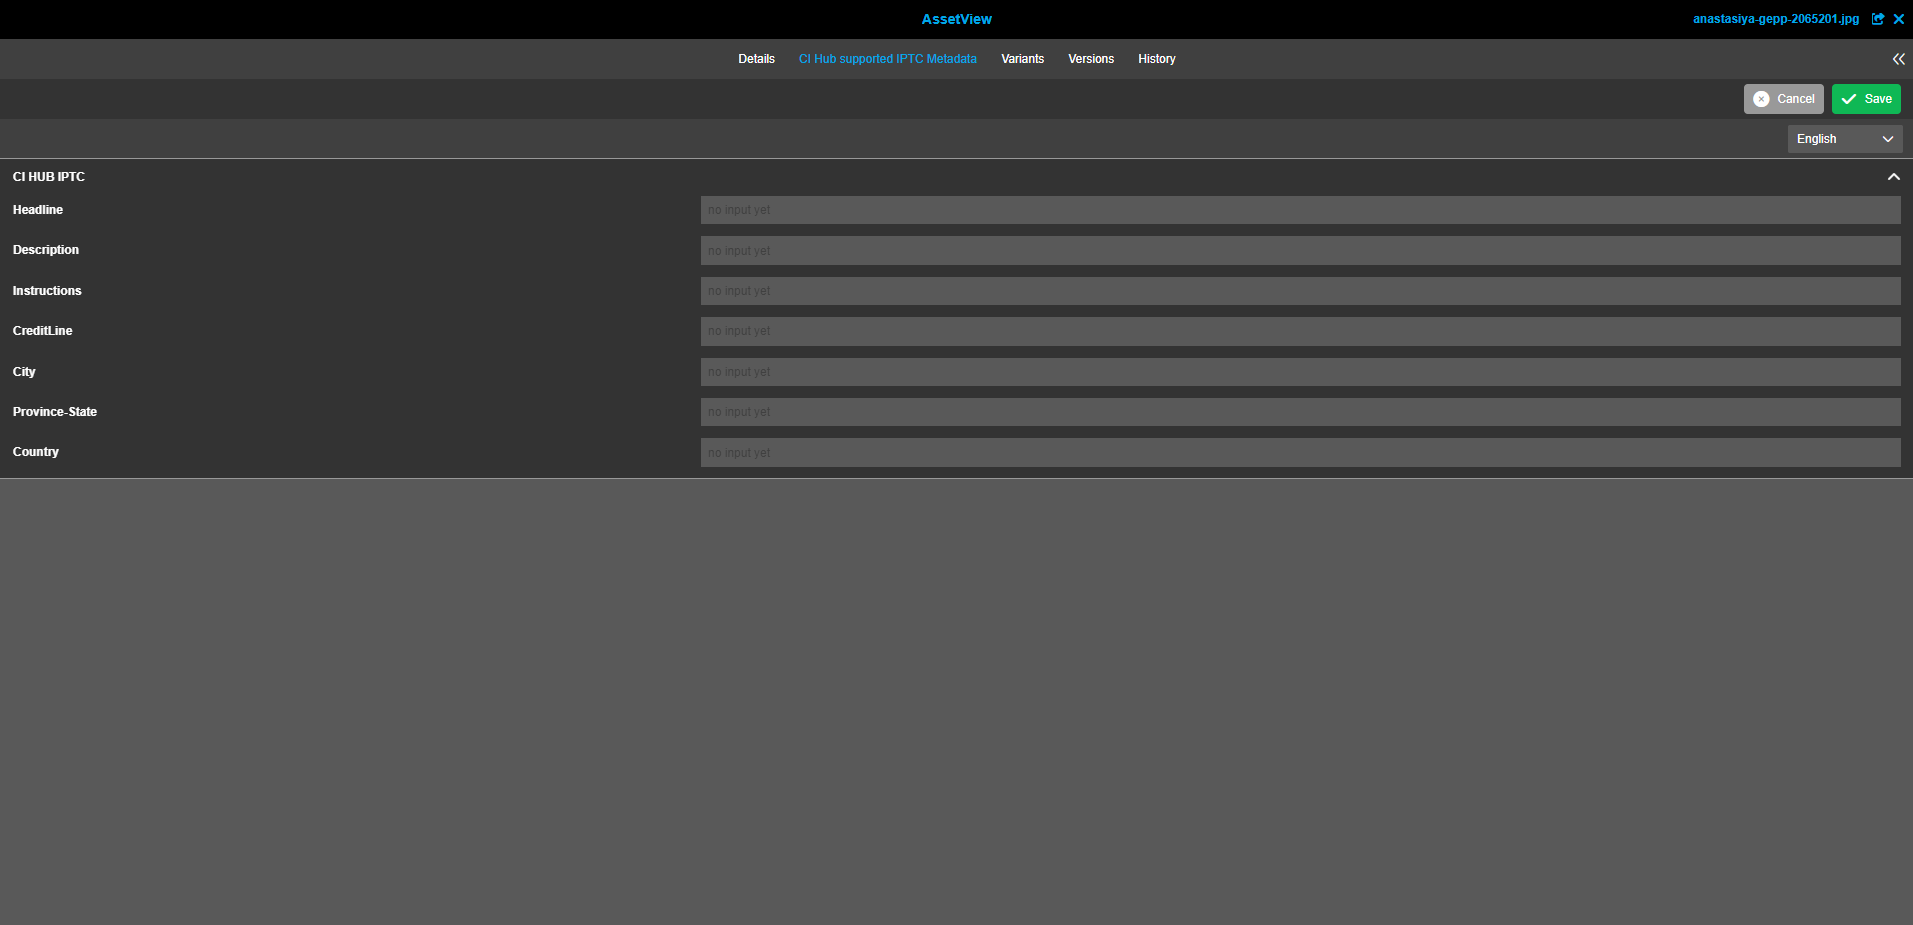
Asset View: CI HUB
The CI HUB Editor is another asset view specifically for the CI HUB context.
In the detail panel CI HUB you can view CI HUB information about the selected asset.
CI HUB facilitates the use of assets stored in OMN from desktop applications.
Read QR Code
You can use the Read QR Code function to check the content of QR codes directly.
As the QR codes can be read within the OMN, no external reader is required.
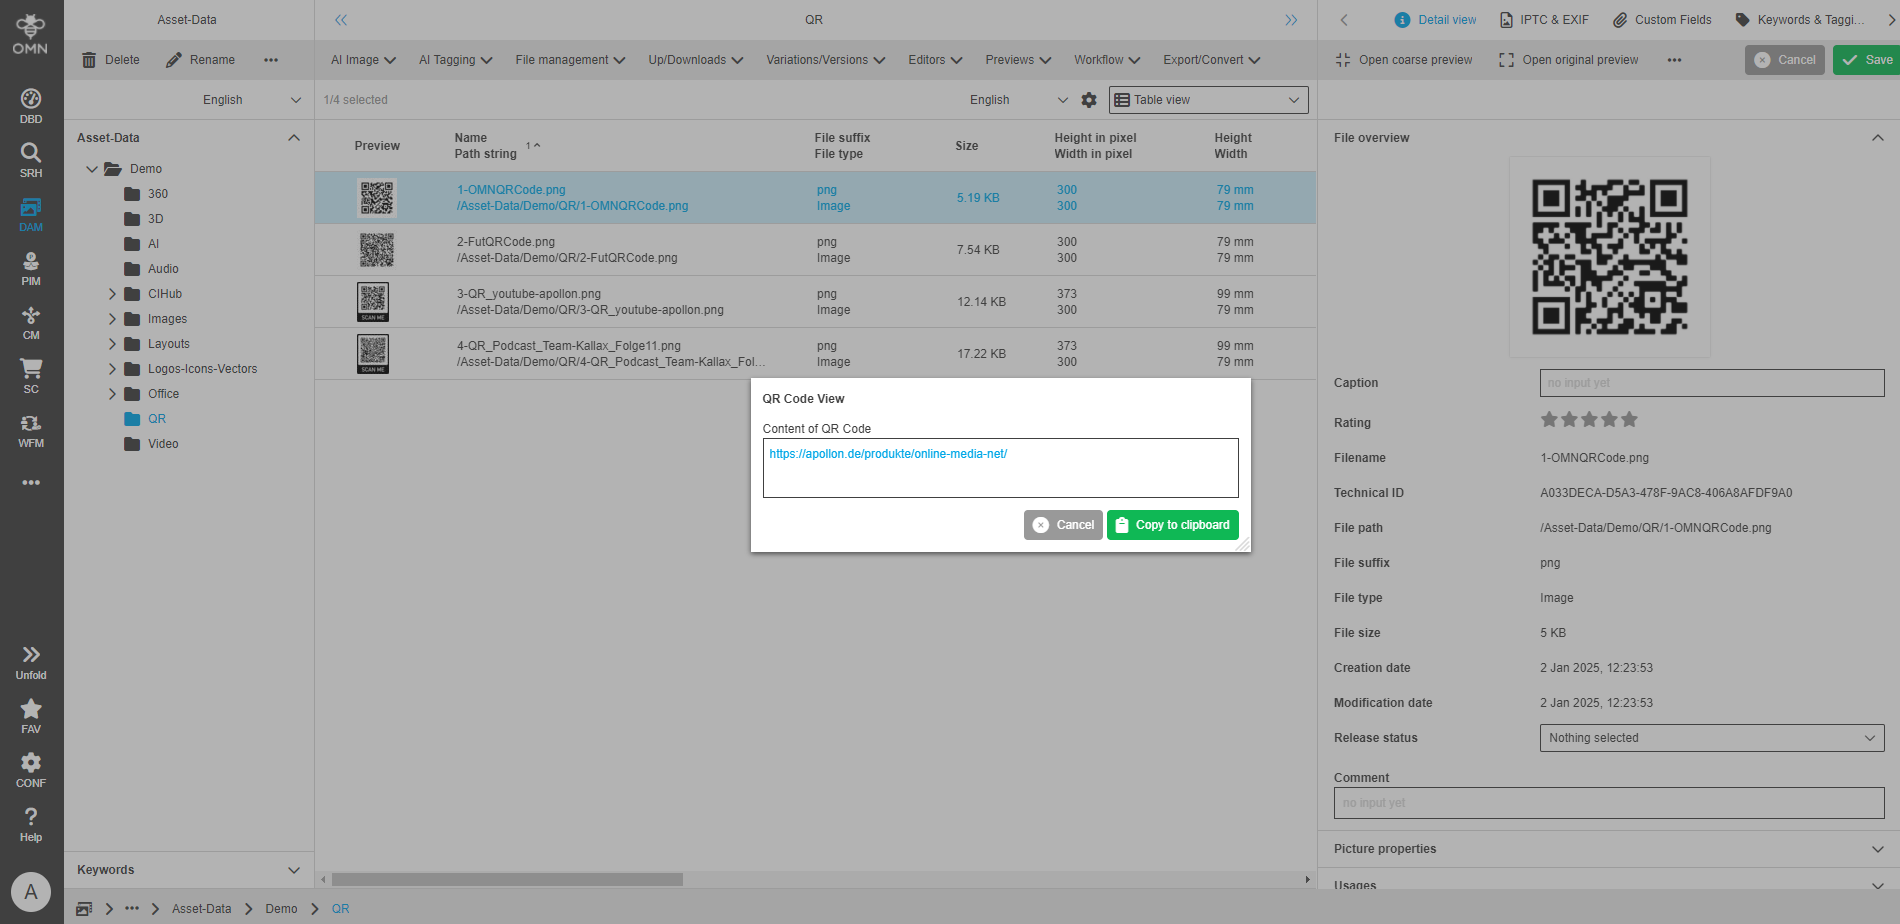
See also: QRCode View
Image Editor
With the Image Editor you can edit your image in various ways.
Among other things, you can crop images, replace backgrounds (if the image was previously cropped), adjust or scale the image size, …

Information and keywording areas
In the Accelerator Standard, predefined detailed areas are available in the right-hand view for displaying information and keywording.
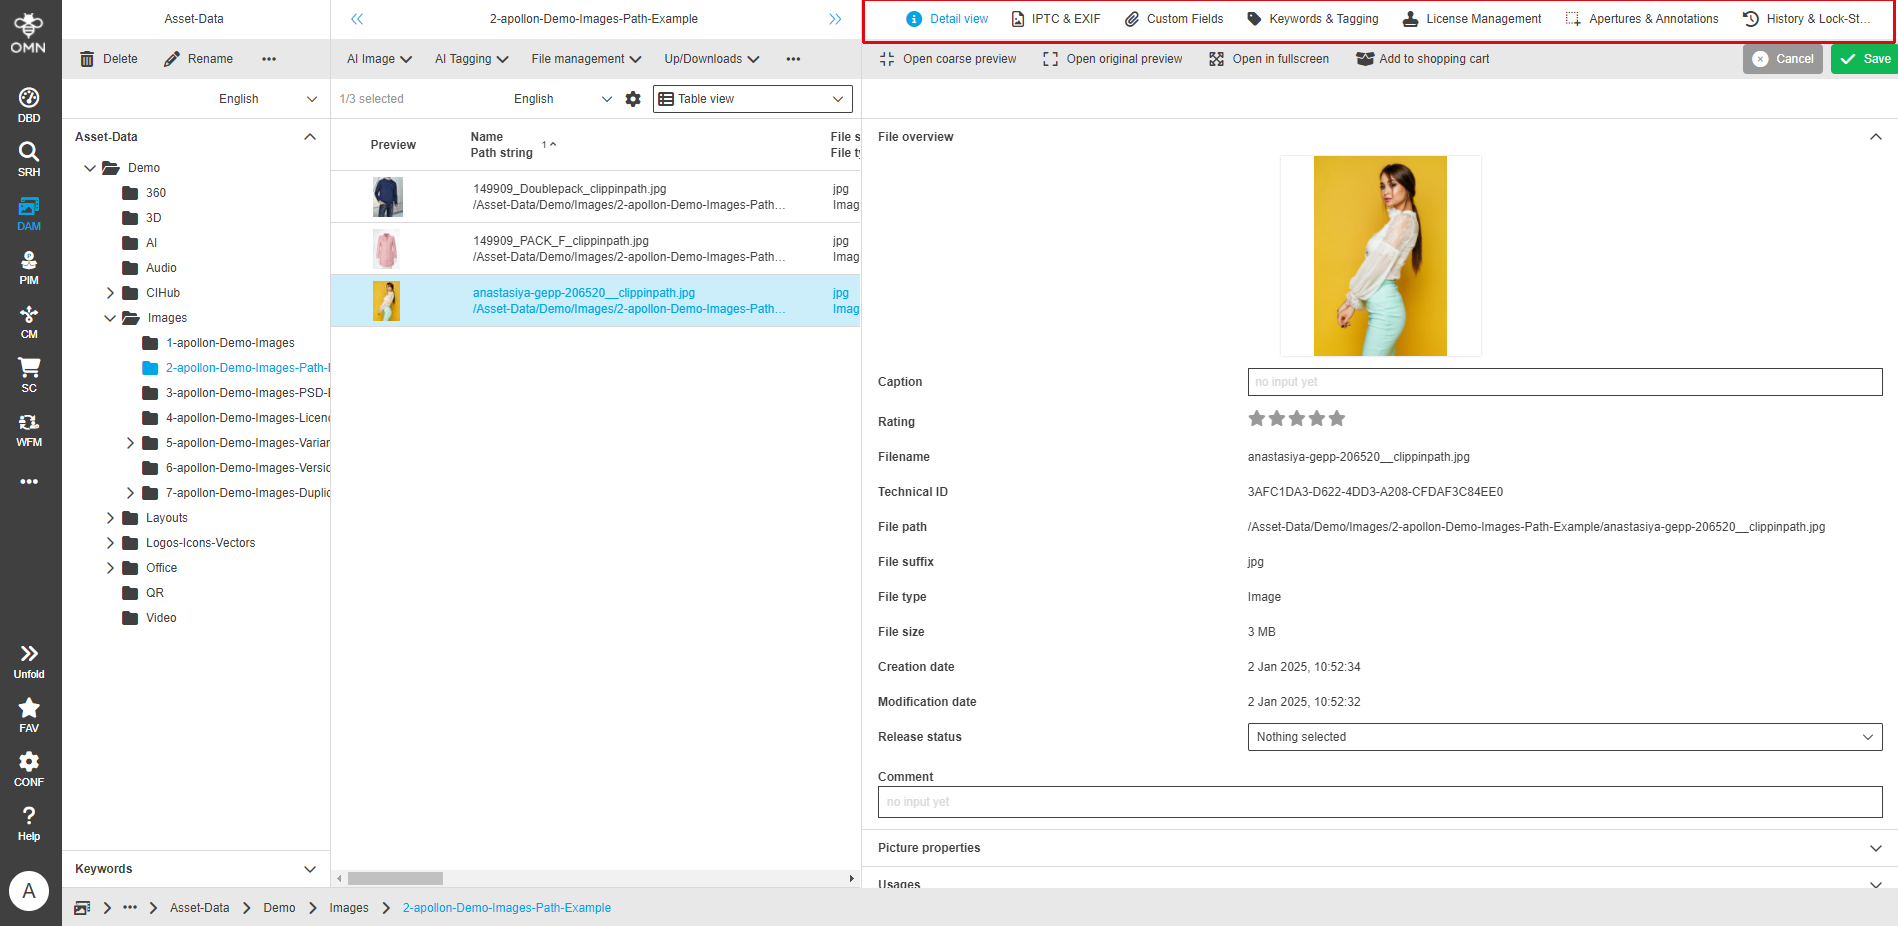
Detailed information
This area shows the most important general properties that are read from the file during import or update, e.g. size, format, creation date.
Depending on the file type, additional extended properties are displayed.
This area also contains the link area, which shows relationships to other data, e.g. products in the PIM.
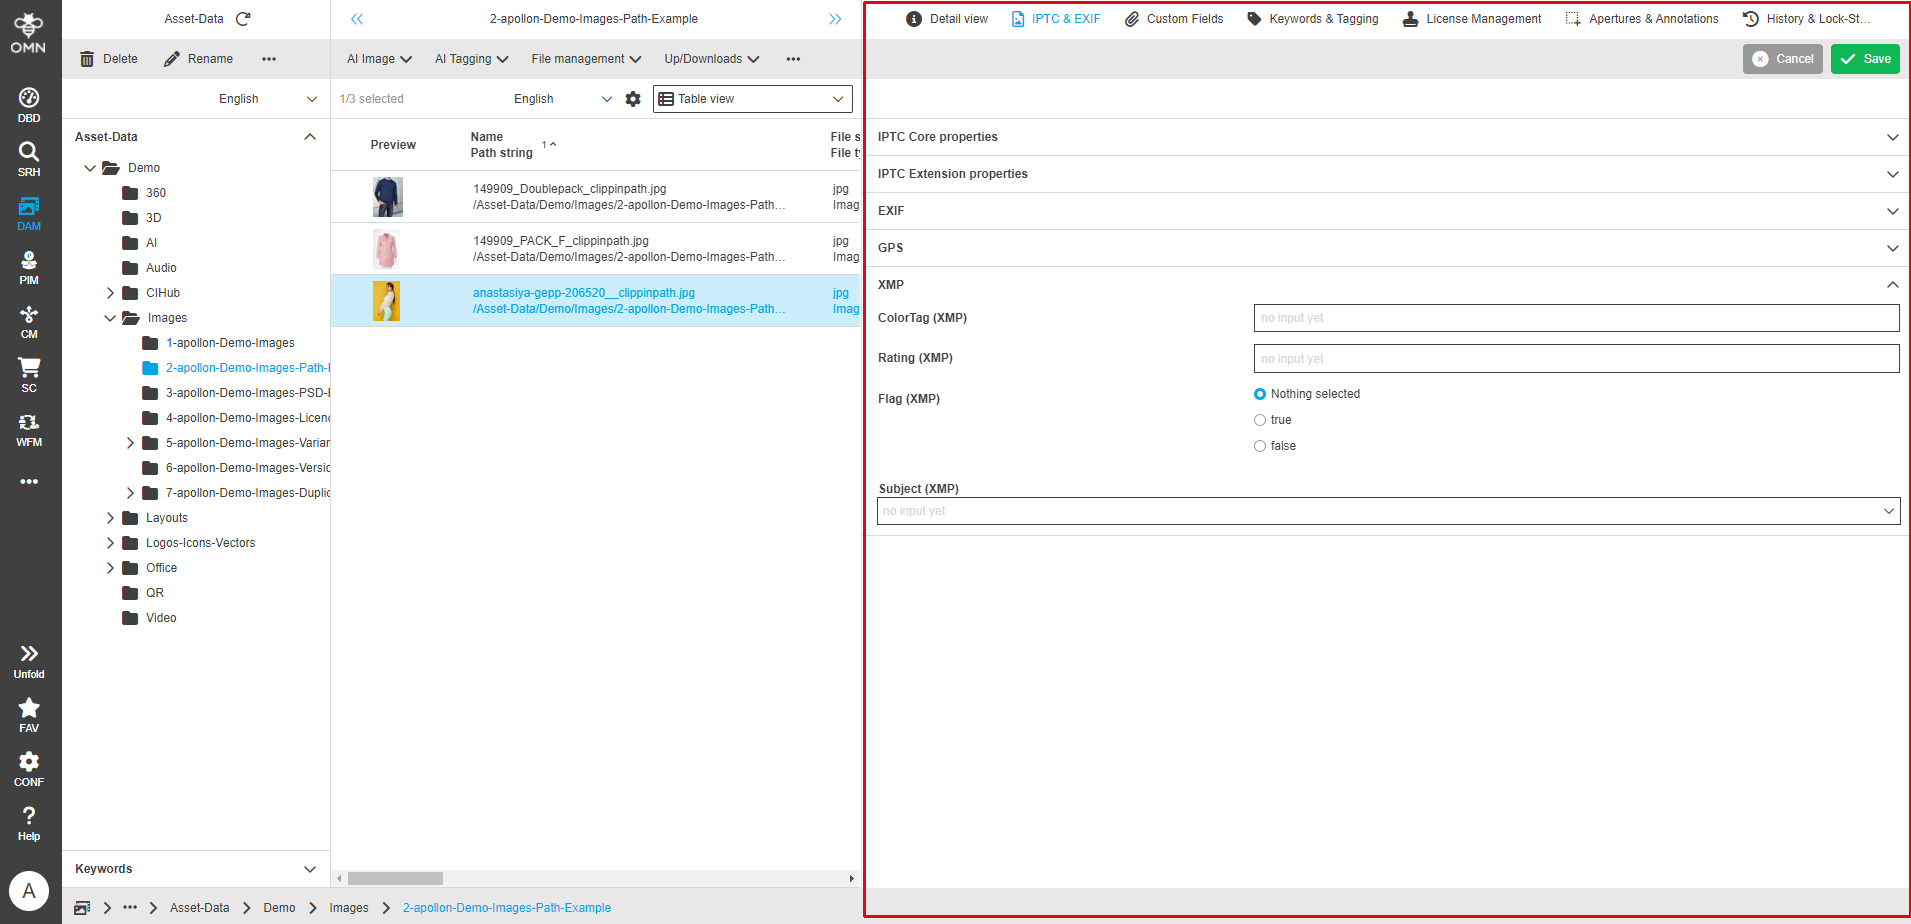
IPTC & EXIF
Metadata that is saved directly in the original file as so-called XMP data is saved in this area.
OMN supports common standards, such as IPTC and EXIF, and is organized into the following areas:
-
IPTC-Core properties
-
IPTC Extension properties
-
EXIF
-
GPS
-
XMP
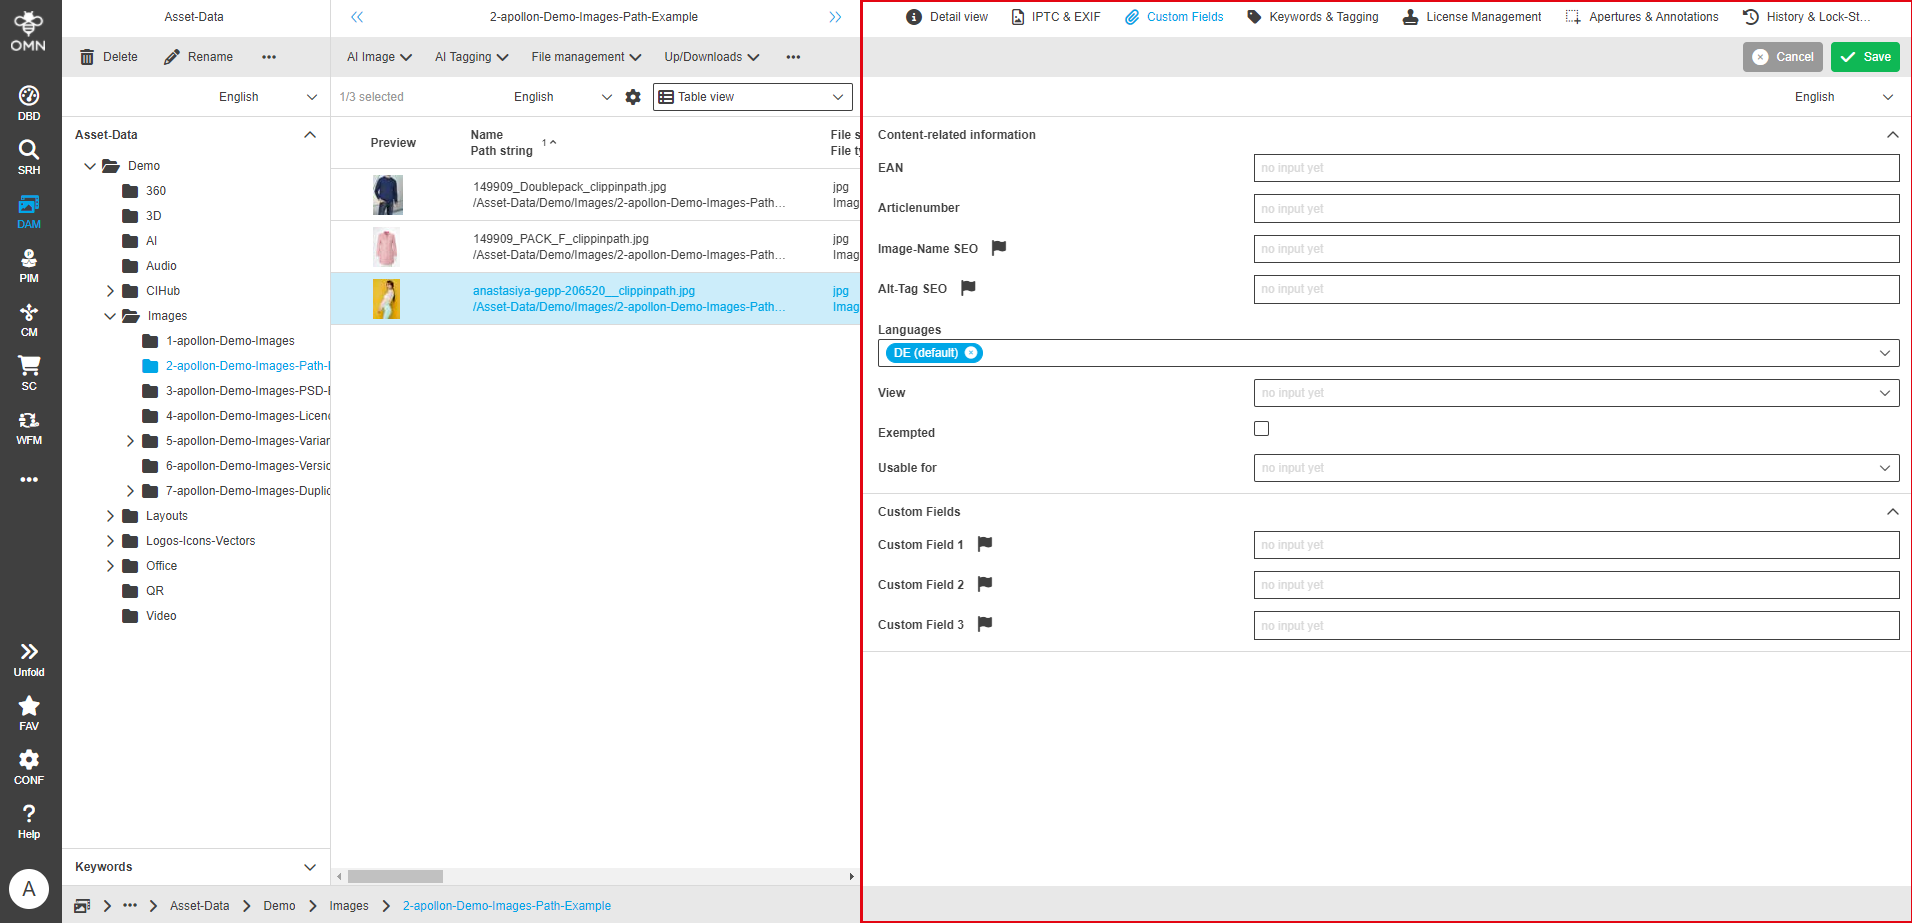
Custom fields
This area contains a set of user-defined fields that are predefined by Accelerator but can be changed by configuration.
This is primarily descriptive information that says something about the content of the file, e.g. article number, view, …
Keywords & Tagging
This data area is used to tag files. The area is divided into areas that can be filled by different AI services, as well as keywords.
See also Keyword structure (virtual structure).

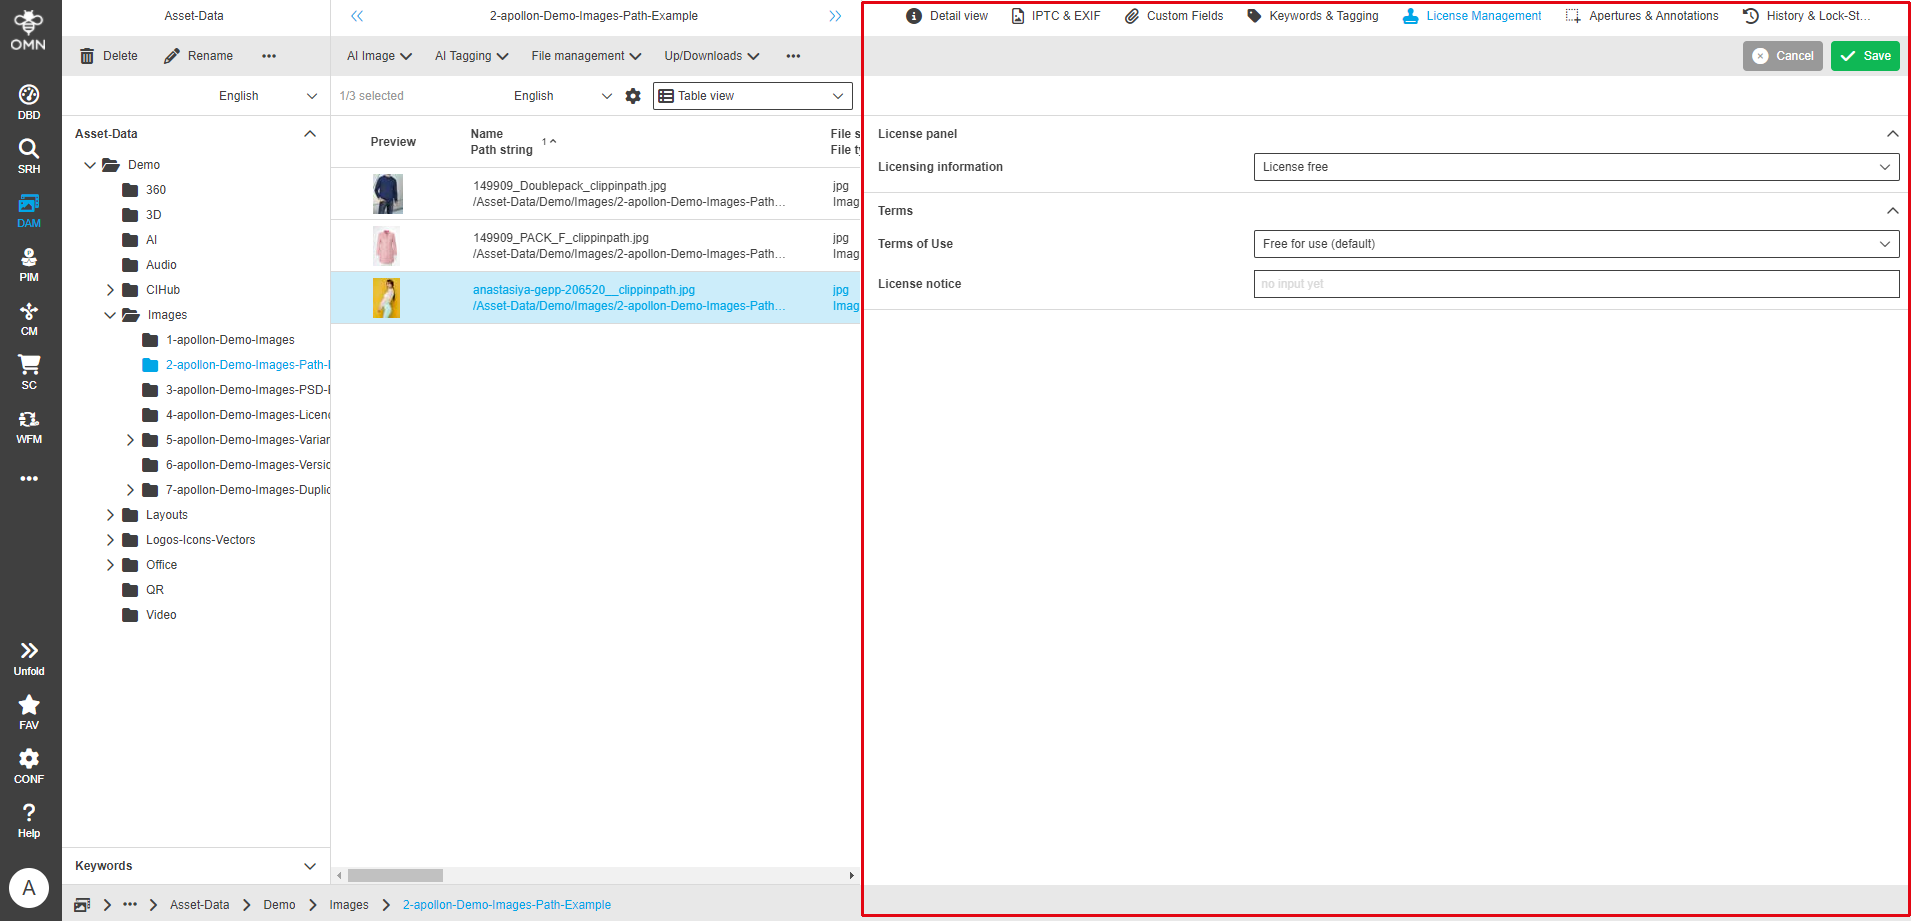
License management
The license management of the file can be stored in this area.
The entries are for viewing and searching purposes only and do not control any automatism.