Digiflow
Configuration of basic settings
-
A Data RNC and a user is already applied.
-
Mandator creation: Enter Identifier and click "Add mandator".
-
Mandator role: Security → Usable roles → Add → Role name: "admin" → Select User Name → Save Mandator roles
-
Logout-Button: Main Menu → Add → Item identifier: "Logout" → Page plug-in: Select LOGOUT-ACTIVITY System:
-
omn_mail.properties: Mail.ExternalURL= http\://host\:port
-
omn_client.properties: Client.WebClientURL= http\://host\:port = Configuration of Digiflow
Content plug-ins → SelectionClient → "C.SelectionClient" → Create new configuration
-
Configure like in picture below

Page plug-ins → ExternalLink → "P.ExternalLink.DSC" (Digiflow SyncClient)
-
Enter in URL-field the URL below with correct data
-
URL: http://<hostname>:<port>/webstart/digiflow.jsp?mandatorIdentifier=<mandatorIdentifier>;
Navigate to 'Main menu' → add a new main menu item → item identifier: "Download DSC" → select as Page plug-in 'P.ExternalLink.DSC' → Save main menu
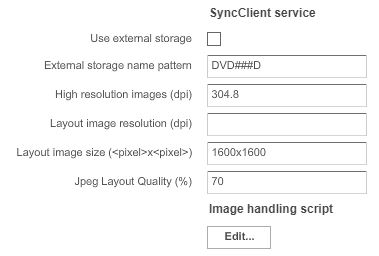
Navigate to Application modules → Digiflow
-
Common: enter Frontend-URL with a "/" at the end in both fields (OMN & Digiflow MAM URL) (i.e.: http://mm-omn-pjd-01:8070/client/Documentation/ )
-
SyncClient Specific: add a service description (i.e.: DocuDigiflow) and add 'attributes with pattern' for 'Naming Convention Configuration' like in picture below
-
Digiflow MAM Specific: add three data like in the picture below
-
Save configuration

Navigate to Application modules → Workflow (+) → Workflow Definitions
-
Create Workflow → "DFLPageBasedImg" (The exactly same name is required!) → Ok
-
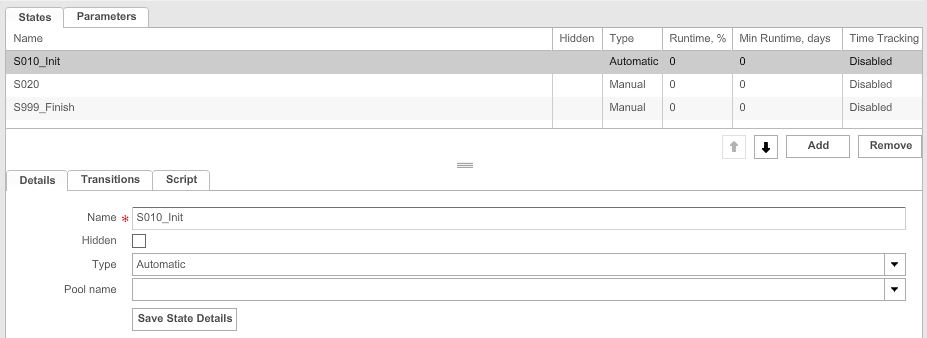
Add three states (picture below):
-
S010_Init: Change type to automatic and enter name (picture below)
-
S020: just enter name and let type manual
-
S999_Finish: just enter name and let type manual
-
Save State Details
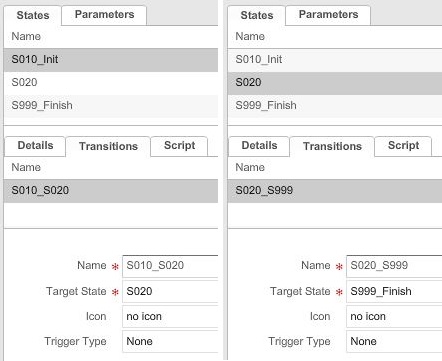
Add a transition for S010_Init and S020 (picture below) → Save transitions → Press Release
Page plug-ins → WFLStatus → "P.WFLStatus" → Create new configuration
-
Plugin configuration → add two labels:
-
Expression: Workflow type
-
Expression: Workflow Name
-
Enabled workflows → Check 'DFLPageBasedImg'
-
Save configuration
Navigate to 'Main menu' → add a new main menu item → item identifier: "Workflow" → select as Page plug-in 'P.WFLStatus' → Save main menu
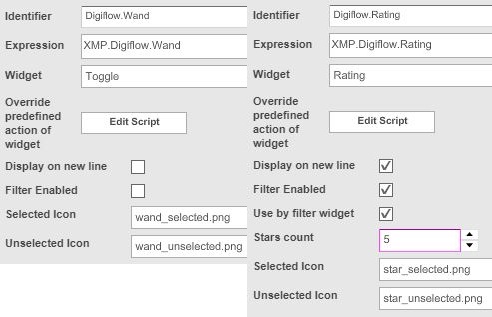
Navigate to C.SelectionClient → Add to table two objects like in picture below:
Hint: If the exception (Widgets with similar expression are already configured) appears after second adding, it could be ignored and executed anyway.
Permissions:
-
Add a second test user to OMN (Administration → Users and Groups → Create)
-
Change to your mandator → Security
-
Usable roles → Add/select a usable role → Check the new created user → Save
-
Permissions → ProjectTypes → Check 'Controlled by ACL' for 'Digiflow Node', 'Digiflow Page Node' and 'Digiflow Structure Node'
-
-
Save security permissions
-
Navigate to P.ProjectNavigation → Check "ACLProjectFunction" → Save configuration
-
Navigate to ProjectTypes → for all three Digiflow project types → Functions → Check 'ACLProjectFunction' → Save configuration = Configuration of MAM (Media Asset Management) & PM (Project Management)
Application modules → MAM → Select the Root node → Save configuration
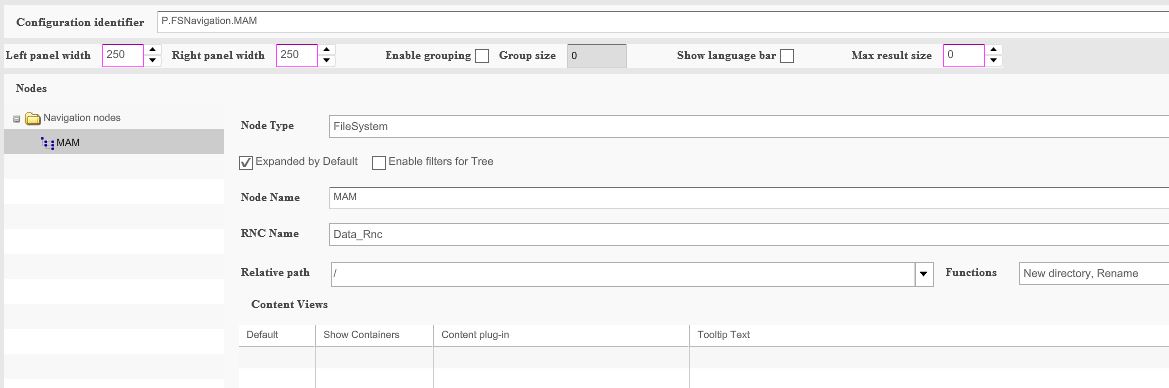
Page plug-ins → FSNavigation → "P.FSNavigation.MAM" → Create new configuration
Configure P.FSNavigation.MAM like in the picture below:
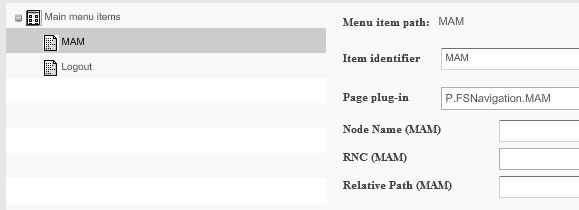
Main Menu → Add new main menu item like in the picture below
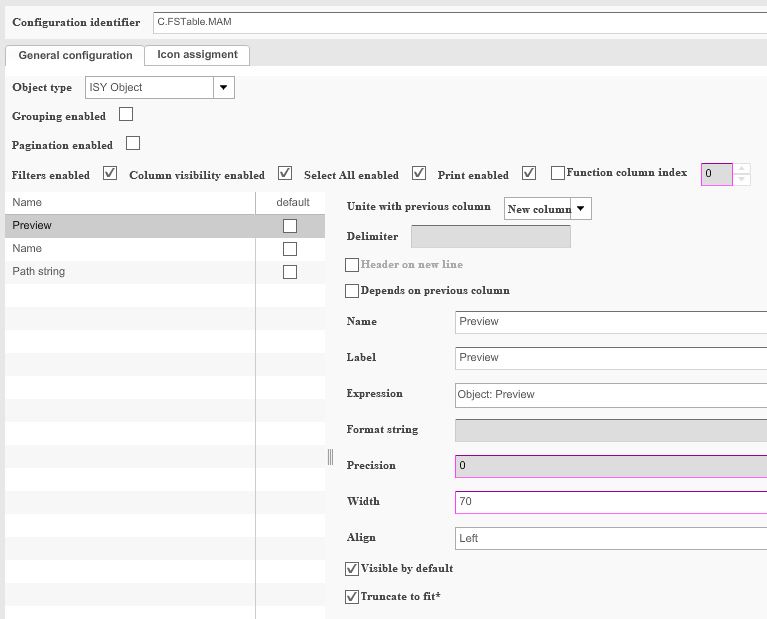
Content plug-ins → FSTable → "C.FSTable.MAM" → Create new configuration
-
Add → select as Expression 'Object: Preview' (in folder 'ISY Object') → adjust width to "70" (for example in picture below)
-
Add → select as Expression 'Object: Name' (in folder 'ISY Object') → adjust width to "200"
-
Add → select as Expression 'Object: Path string' (in folder 'ISY Object') → adjust width to "250"
-
Save configuration
Page plug-ins → P.FSNavigation.MAM → select navigation node 'MAM' → add to content views the content plug-in 'C.FSTable.MAM' → Save configuration
Page plug-ins → ProjectNavigation → "P.ProjectNavigation" → Create new configuration

-
Check functions like in picture above
-
Save configuration
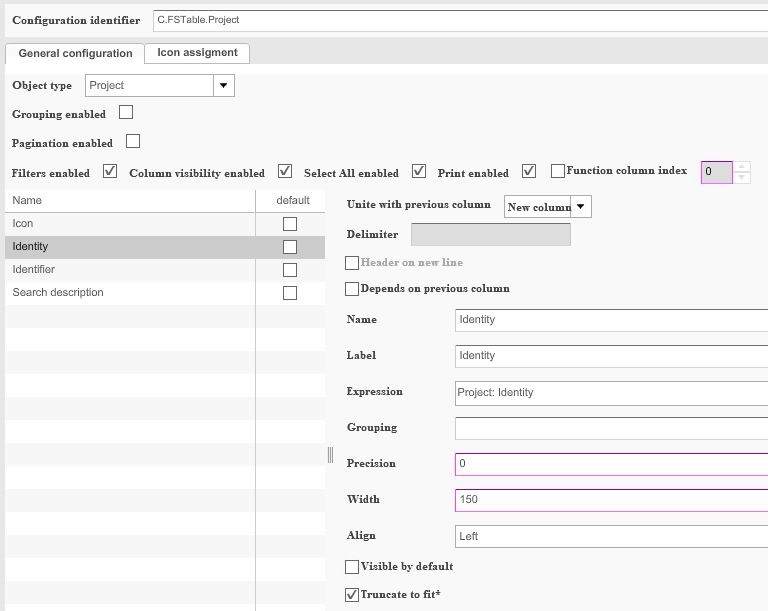
Content plug-ins → FSTable → "C.FSTable.Project" → Create new configuration
-
Select as Object type 'Project'
-
Add → select as Expression 'Project: Icon' → adjust width to "70"
-
Add → select as Expression 'Project: Identity' → adjust width to "150" → uncheck 'Visible by default' (for example in picture below)
-
Add → select as Expression 'Project: Identifier' → adjust width to "200"
-
Add → select as Expression 'Project: Search description' → adjust width to "200"
-
Save configuration
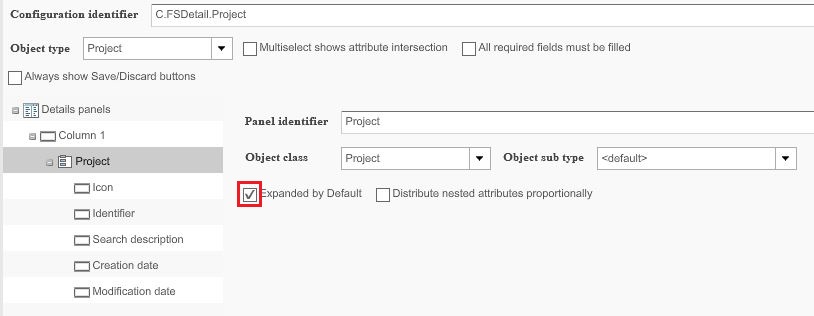
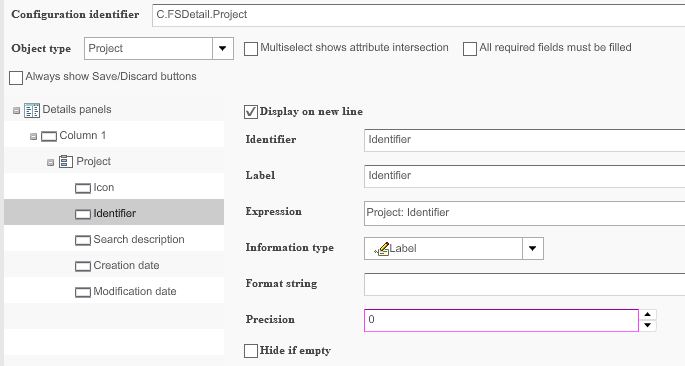
Content plug-ins → FSDetail → "C.FSDetail.Project" → Create new configuration
-
Select as Object type 'Project'
-
The structure should look like in pictures below:
-
Save
Content plug-ins → ProjectTableView → "C.ProjectTableView.Project" → Create new configuration
-
Select as table plugin 'C.FSTable.Project'
-
Select as details plugin 'C.FSDetail.Project'
-
Save configuration
Navigate to 'P.ProjectNavigation' → select as ProjectTable plug-in 'C.ProjectTableView.Project' → Save configuration
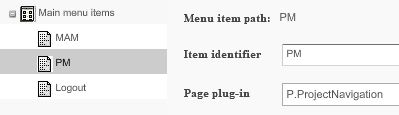
Navigate to 'Main menu' → add a new main menu item → item identifier: "PM" → select as Page plug-in 'P.ProjectNavigation' → Save configuration
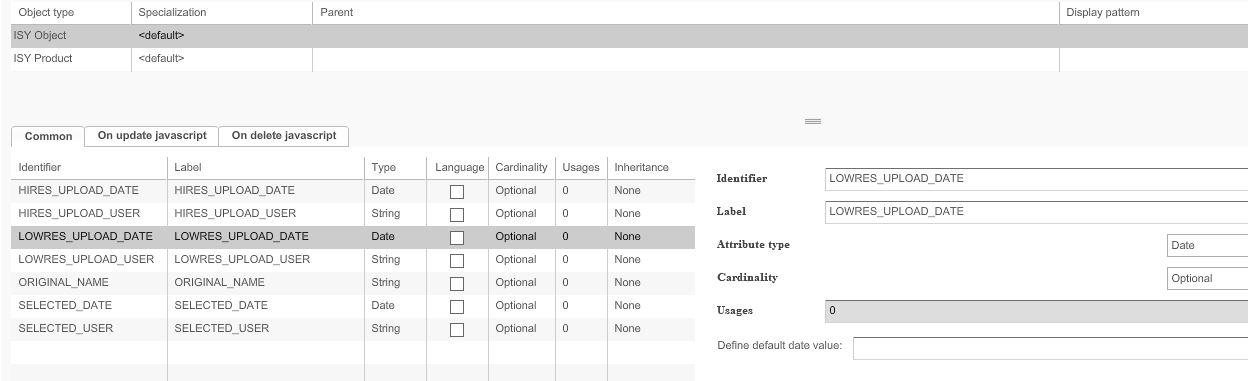
Navigate to Application modules → MAM → Metadata fields
-
Select 'ISY Object' and add the columns you can see in picture below with correct identifier, label and attribute type
-
Save configuration
-
After that you should see under 'ISY Product' the same table in gray
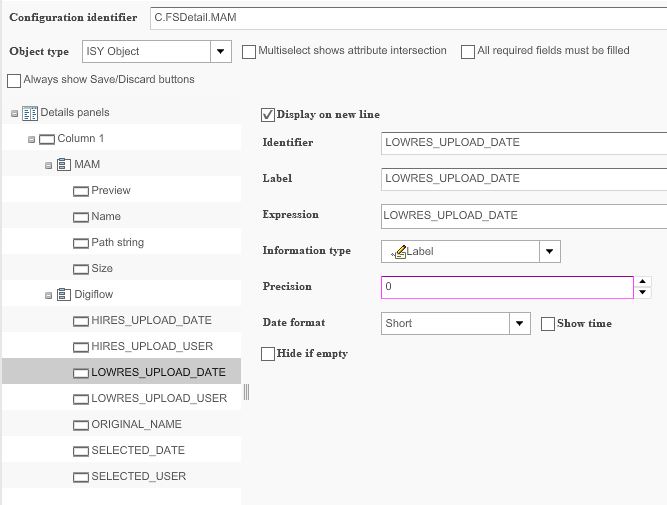
Content plug-ins → FSDetail → "C.FSDetail.MAM" → Create new configuration
-
Create the structure of the picture below
-
Check the box 'Expanded by Default' for MAM and Digiflow
-
Fill out for every row identifier, label, expression and information type
-
The expressions are: 'Object: Preview', 'Object: Name', 'Object: Path string', 'File: Size' for MAM. For Digiflow you can find the expressions under the file 'Metadata <default>'.
The information type is every time Label, except of Preview (previews widget).
Navigate to P.FSNavigation.MAM → Select navigation node 'MAM'
-
Add to content views the content plug-in 'C.FSDetail.MAM'
-
Select as panel position 'right'
-
Save configuration

Navigate to Application modules → Projects → Check 'Assign identifier automatically' → Add to 'Identifier pattern' a few letters → Save configuration
Navigate to Application modules → Projects → ProjectTypes
-
Create three new project types with the names: "Digiflow Node", "Digiflow Page Node" and "Digiflow Structure Node"
Navigate to ProjectTypes → all three Digiflow Nodes → Basic properties
-
Select for every type a different icon
-
The display pattern is "%search_description%" for all types
-
Uncheck 'Allow creation in root' in Digiflow Node
-
Uncheck 'Allow creation in root' and 'Allow linked folders' in Digiflow Page Node
-
Uncheck 'Allow linked folders' in Digiflow Structure Node
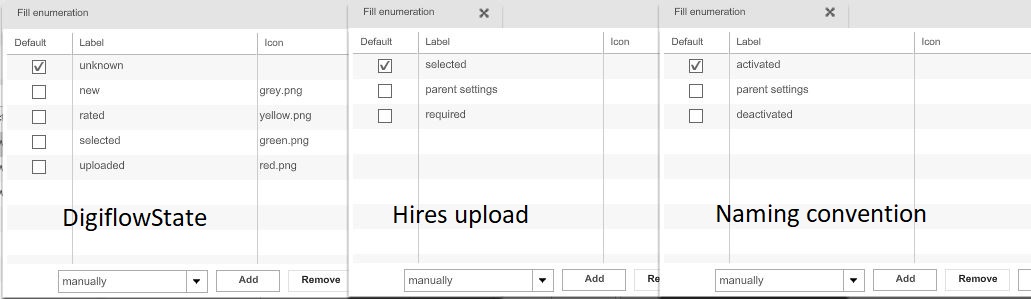
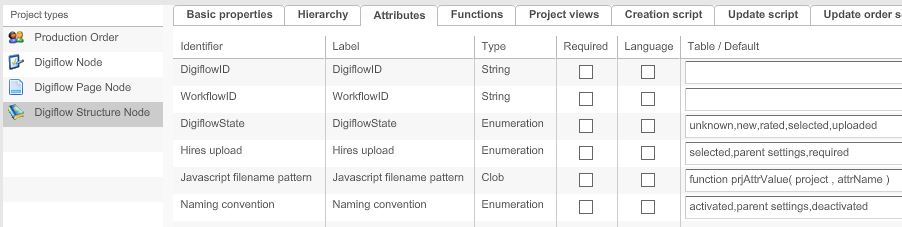
Navigate to ProjectTypes → all three Digiflow Nodes → Attributes
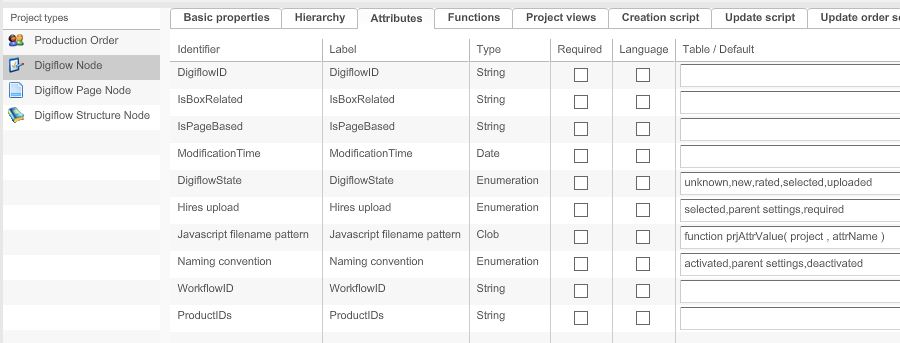
The column 'Table / Default' of DigiflowState, Hires upload and Naming convention have the following content:
Javascript filename pattern' has the following code in 'Table / Default':
function prjAttrValue( project , attrName )
{
var projectAttributes = project.getAttributes( );
for ( var i = 0 ; i < projectAttributes.size( ) ; i++ )
{
var attrIdentifier = projectAttributes.get( i ).getType( ).getIdentifier( );
if ( attrName.equalsIgnoreCase( attrIdentifier ) )
{
return projectAttributes.get( i ).getvString( );
}
}
}
function getName( projectsList )
{
var result = "";
for ( var i = projectsList.size( ) - 1 ; i >= 0 ; i-- )
{
var childDigiflowId = prjAttrValue( projectsList.get( i ) , "DigiflowID" ); //remove empty DigiflowID`s given by omn with '-' as value
if ( !childDigiflowId.equals( "-" ) )
{
result = result + childDigiflowId;
if ( i + 1 < projectsList.size( ) )
{
result = result + "_"
}
}
}
return result + "D_" + serialNumber + "." + fileExtention.toLowerCase( ); }
var name = getName( projectsList );
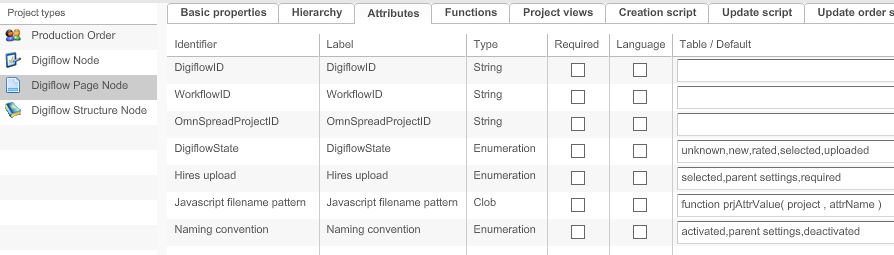
The column 'Table / Default' of DigiflowState, Hires upload, Javascript filename pattern and Naming convention have the same content as Digiflow Node.
The column 'Table / Default' of DigiflowState, Hires upload, Javascript filename pattern and Naming convention have the same content as Digiflow Node.
Navigate to ProjectTypes → all three Digiflow Nodes → Basic properties
-
Select as 'Project state icon enumeration' 'Digiflow State' for all three project types
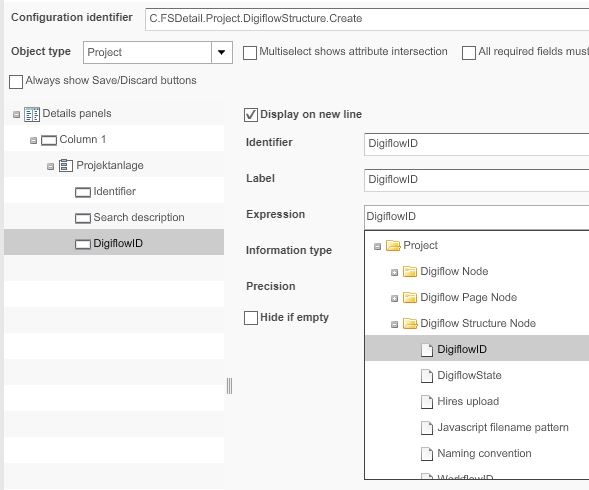
Content Plug-ins → FSDetail → "C.FSDetail.Project.DigiflowStructure.Create" → Create new configuration
-
Change object type to 'Project'
-
Create a structure like in the picture below
-
Check 'expanded by default' for 'Projektanlage'
-
Information type is for all 'String textfield'
Content Plug-ins → FSDetail → "C.FSDetail.Project.DigiflowPage.Create" → Create new configuration
Content Plug-ins → FSDetail → "C.FSDetail.Project.DigiflowNode.Create" → Create new configuration
These two FSDetails have the same configurations as 'C.FSDetail.Project.DigiflowStructure.Create'.
The single difference is the origin of the expression 'DigiflowID'.
'C.FSDetail.Project.DigiflowPage.Create' takes from directory 'Digiflow Page Node' and 'C.FSDetail.Project.DigiflowNode.Create' takes from directory 'Digiflow Node'.
Hint: you can copy the configuration of a FSDetail!
Navigate to Application Modules → ProjectTypes → all three Digiflow Nodes → Basic properties
-
Select the 'Creation plugin' for 'Digiflow Node', 'Digiflow Page Node' and 'Digiflow Structure Node'
Navigate to ProjectTypes → all three Digiflow Nodes → Creation script
-
Add the following script to 'Digiflow Node', 'Digiflow Page Node' and 'Digiflow Structure Node'
var cpFacade = entryFacade.lookupBean( "ClientProjectFacade" );
cpFacade.setMetaData( project.getIdentity( ) , "Hires upload" , "selected" );
cpFacade.setMetaData( project.getIdentity( ) , "DigiflowState" , "new" );
cpFacade.setMetaData( project.getIdentity( ) , "Naming convention" , "deactivated" );
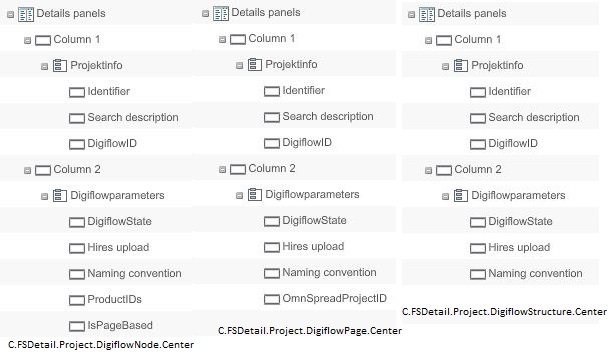
Content Plug-ins → FSDetail → "C.FSDetail.Project.DigiflowStructure.Center" → Create new configuration
Content Plug-ins → FSDetail → "C.FSDetail.Project.DigiflowPage.Center" → Create new configuration
Content Plug-ins → FSDetail → "C.FSDetail.Project.DigiflowNode.Center" → Create new configuration
Hint: you can copy the configuration of a FSDetail!
These three new FSDetail have the same configurations as 'C.FSDetail.Project.DigiflowStructure.Create', 'C.FSDetail.Project.DigiflowPage.Create' and 'C.FSDetail.Project.DigiflowNode.Create' except a few changes.
Changes to do for all three new FSDetail.Center:
-
Rename 'Projektanlage' to "Projektinfo"
-
Change information type of Identifier and Search description to 'Label'
-
Add a second column with the name "Digiflowparameters" and check 'Expanded by default'
-
Add to the new column the structure with Digiflow parameters of the correct directory (pictures below)
-
Information type is 'Dropdown list' for all, except for IsPageBased, ProductIDs and OmnSpreadProjectID it is 'String textfield'
Navigate to Application Modules → Projects → ProjectTypes → all three Digiflow Nodes → Project views
-
Add the correct FSDetail-Center with 'Tab name' "Projektinfos"
Navigate to ProjectTypes → all three Digiflow Nodes → Hierarchy
-
Digiflow Node: nothing
-
Digiflow Page Node: Check 'Subtypes' and 'Manually created' for 'Digiflow Node'
-
Digiflow Structure Node: Check 'Subtypes' and 'Manually created' for 'Digiflow Page Node' and 'Digiflow Structure Node'
Content plug-ins → ProjectAssetView → "C.ProjectAssetView" → Create new configuration
-
Select as 'Table plugin' 'C.FSTable.MAM'
-
Select as 'Details plugin' 'C.FSDetail.MAM'
-
Save configuration
Content plug-ins → ProjectFoldersView → "C.ProjectFoldersView" → Create new configuration
Navigate to Application Modules → Projects → ProjectTypes → all three Digiflow Nodes → Project views
-
Add to all three Digiflow Nodes the 'C.ProjectAssetView' and the 'C.ProjectFoldersView'
Navigate to Application Modules → Projects → ProjectTypes → 'Digiflow Structure Node' & 'Digiflow Page Node' → Functions
-
Check 'CreateSubProjectFunction' → save configuration