Mandator Configuration
OMN allows the creation and configuration of several so-called mandators.
Different Mandators settings are available for each created mandator.
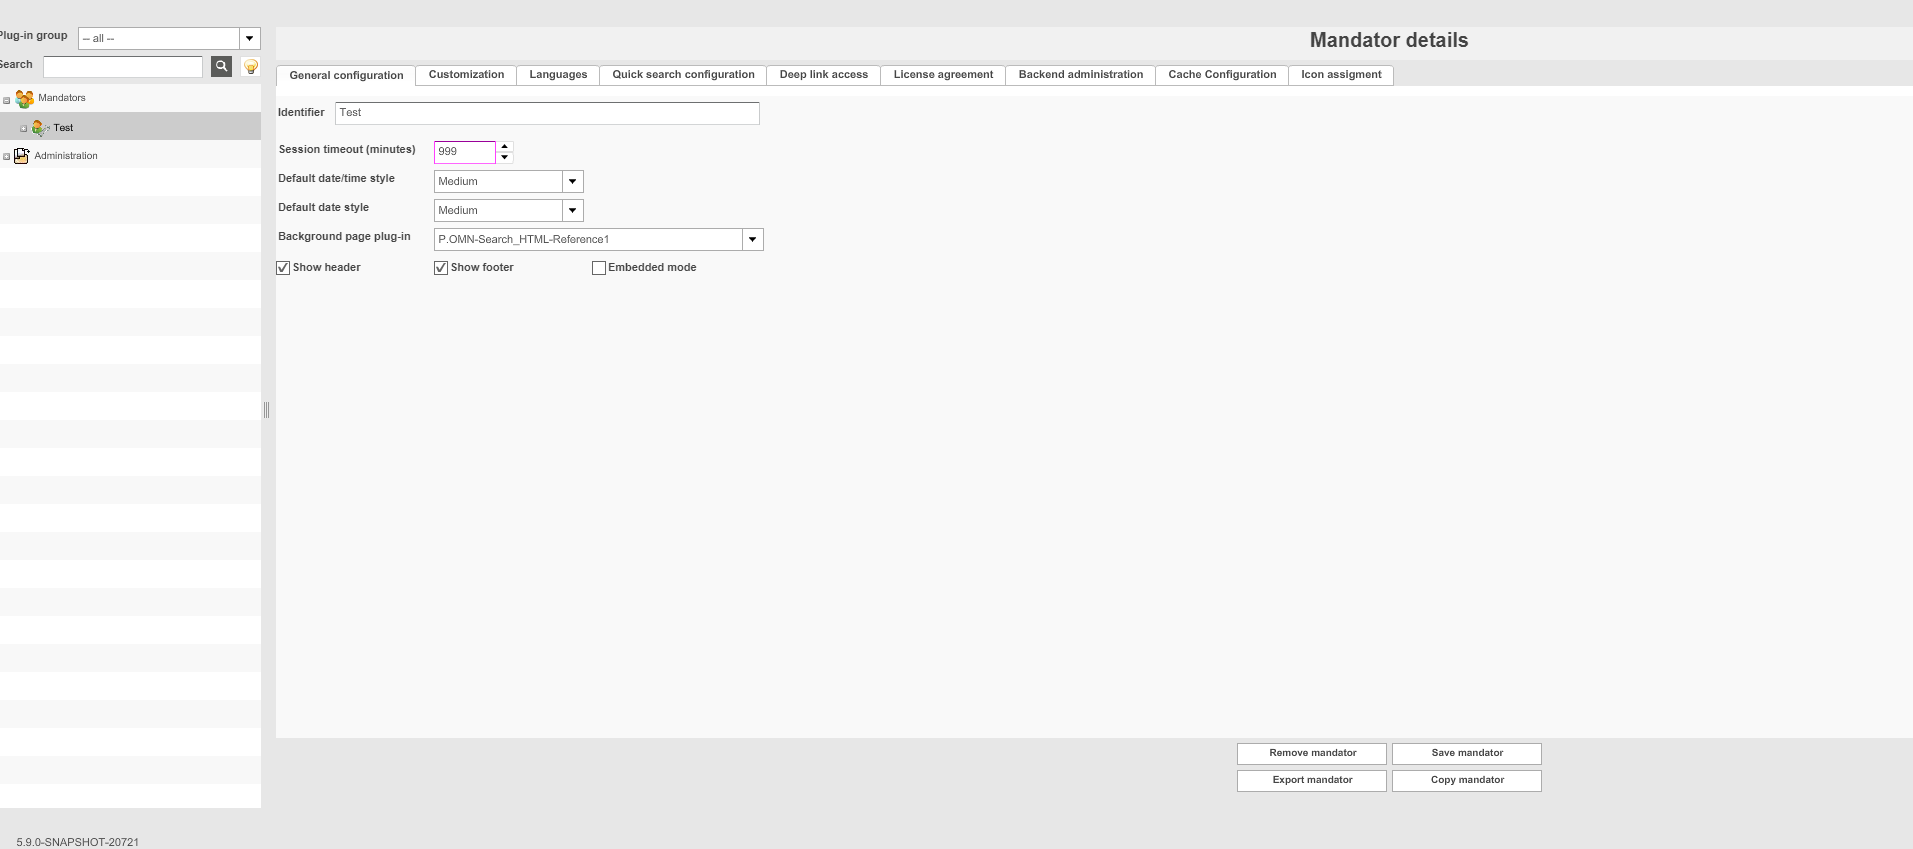
To change/edit settings, you should select the needed mandator in the left-hand navigation.You will see the following mandator details:
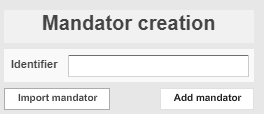
Mandator Creation
It is possible to create several application solutions based on OMN.
To achieve this, the administrator can create several mandators with different appearance and different functions.
-
Access the Mandator creation via Mandators
You have the following possibilities to create a mandator:
✓ Add a mandator - see "Adding a Mandator"
✓ Import a mandator from an XML file - see "Importing a Mandator"
✓ Copy an existing mandator - see "Copying a Mandator”
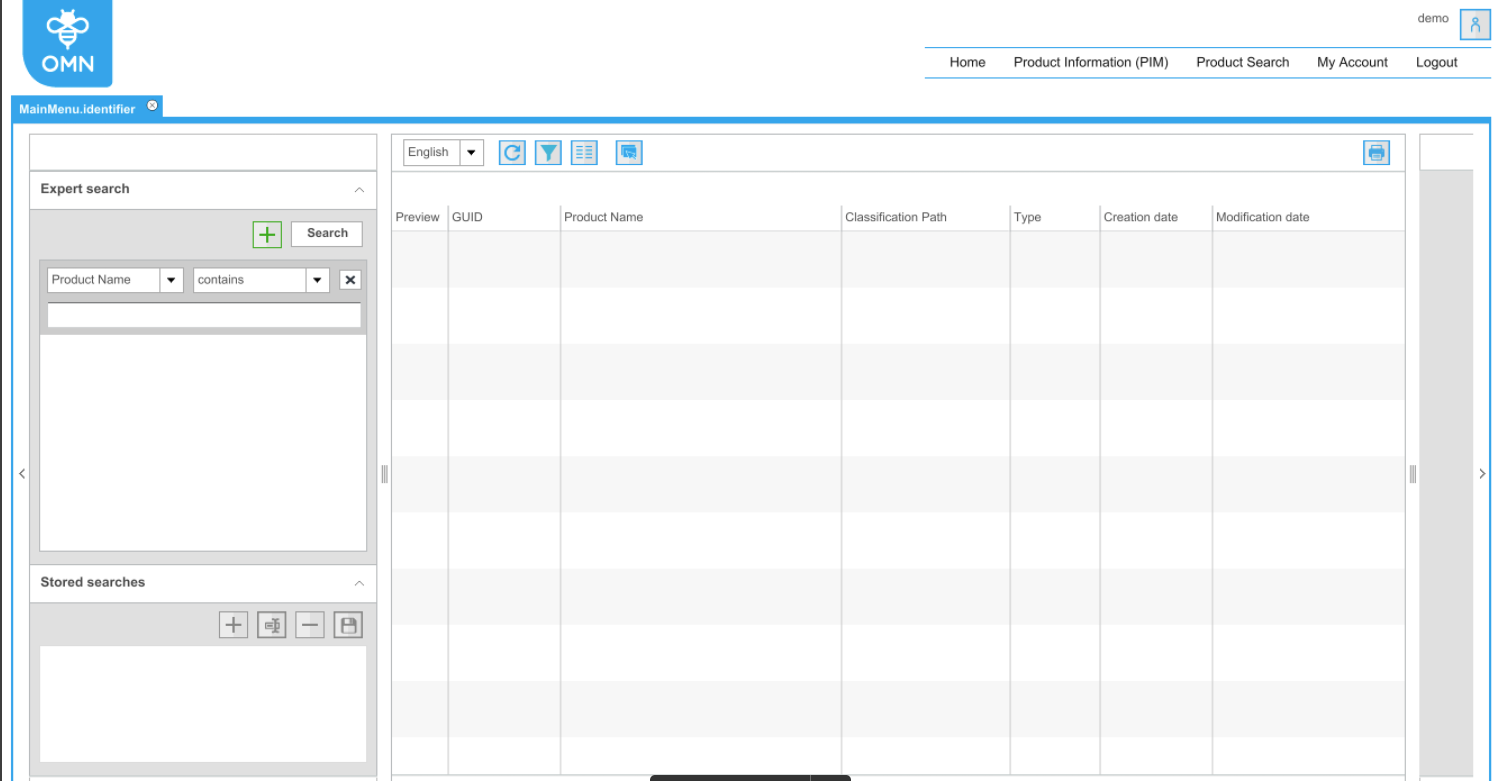
| As soon as the mandator is created, it is possible to open the Frontend application and to show the login screen.Using the standard configuration, this is possible by using the URL http://<yourservername>:8070/client/<mandatorName>; |
Adding a Mandator
1. Enter an Identifier for the new mandator.
2. Click Add mandator
The mandator is added to the system.
Importing a Mandator
1. Enter an Identifier for the new mandator
2. Click Import mandator
3. Choose the XML file you want to import
Importing a mandator is only possible, if a mandator has been exported previously.
|
Generally the mandator must include at least a ProjectType to work otherwise the import will fail. |
4. Click Import
The mandator is added to the system.
Mandator Details
-
Access the Mandator details via Mandators → <Mandator name>
Here is the overview of the Mandator details configuration areas:
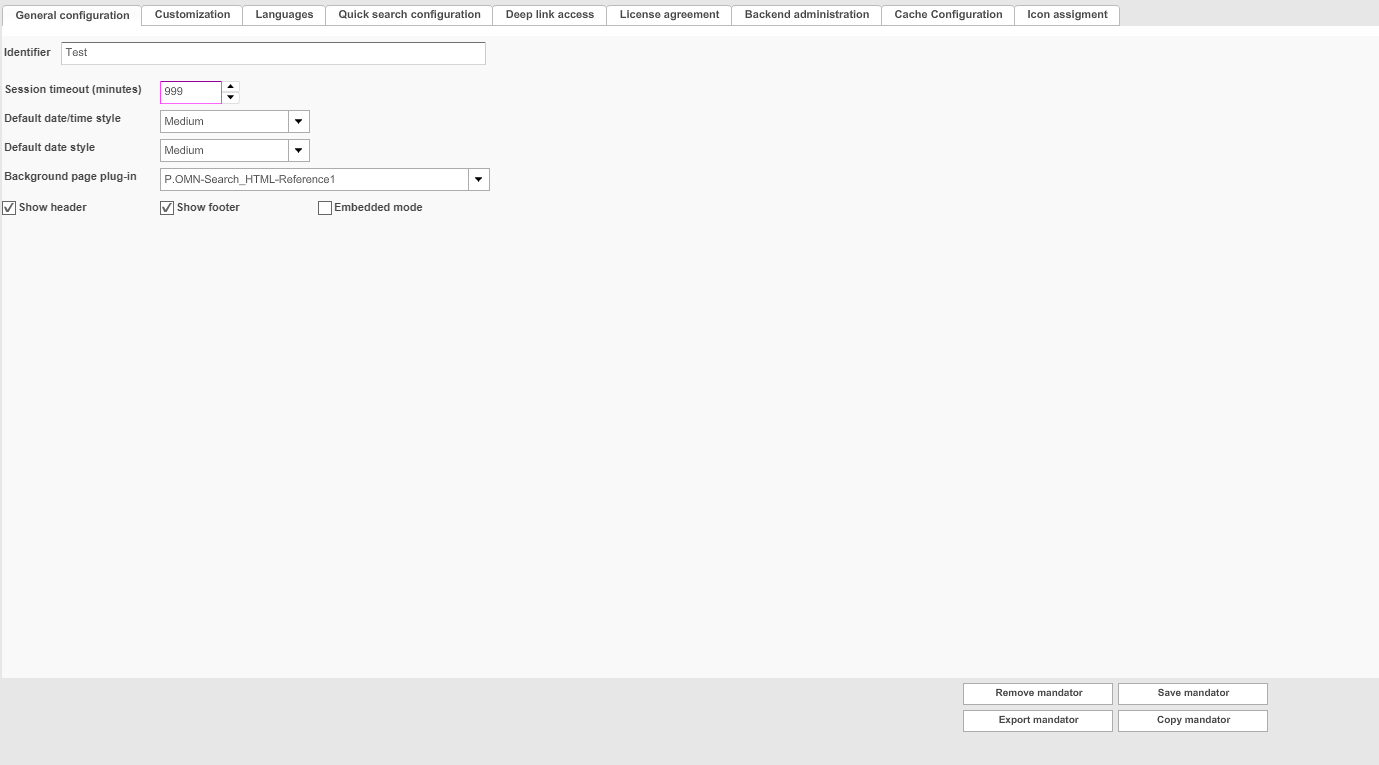
Available configuration sections
| Field | Description | Notice |
|---|---|---|
General configuration |
Defines global settings for the mandator |
|
Customization |
Customizes the Frontend appearance for the mandator |
see "Customization" |
Languages |
Defines the usage of languages for the Frontend and for the content |
see "Languages” |
Quick search configuration |
Defines the order of the configured quick searches |
|
Deep link access |
Defines the access to the system for a 3rd party |
|
License agreement |
Defines a disclaimer that must be accepted by the user before logging in to the system. |
|
Backend administration |
Defines administrators that shall be able to access the Backend of the current mandator |
|
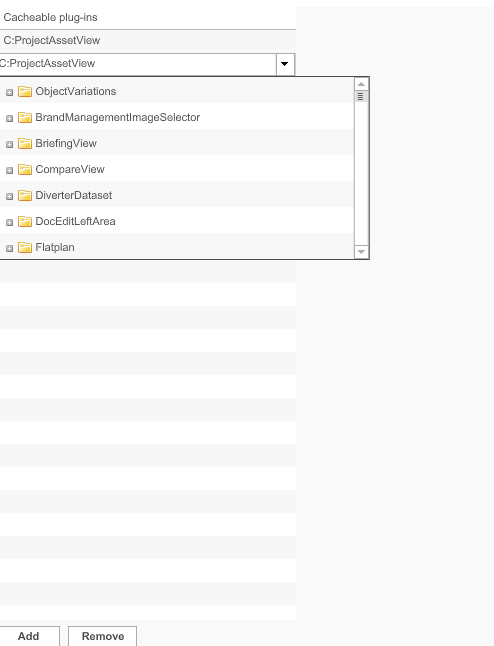
Cache configuration |
Description is coming soon |
|
Icon assignment |
Assigns icons for general functions |
|
Remove mandator |
Removes the mandator from the system |
|
Save mandator |
Saves all changes made to the mandator |
|
Export mandator |
Exports the mandator as an XML file |
|
Copy mandator |
Copies the mandator to create a new mandator |
Removing a Mandator
1. Click Remove mandator
A confirmation dialogue is opened.
2. To confirm the removal, click Yes
The mandator is removed from the system.
Saving a Mandator
-
To save all changes made to a mandator, click Save mandator.Now all changes are saved.
Exporting a Mandator
-
Click Export mandator
The mandator is exported and saved in an XML file.
| An exported mandator can be imported in the system again (see "Importing a Mandator") |
Copying a Mandator
-
Click Copy mandator
The mandator is copied and added to the system as a new mandator.
General Configuration
Defines global settings for the mandator.
-
Access the general configuration via Mandators → <Mandator name>
Make sure that you have at least one of the following plug-ins available:
✓ Page plug-in “WelcomePage”
✓ Page plug-in “FSNavigation”
✓ Page plug-in “OMN-Search”
Here you can see which options are available for general configuration of the mandator:
| Field | Description | Notice |
|---|---|---|
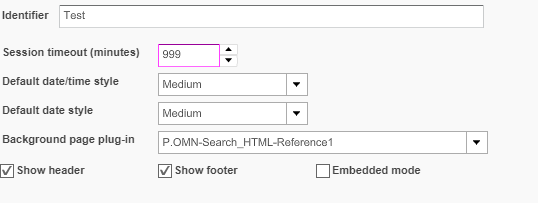
Identifier |
Name of the specific mandator |
Only characters ‘0-9’, ‘a-z’, ‘A-Z’ and ‘_’ are allowed |
Session timeout (minutes) |
Defines the session timeout for the mandator in minutes |
Default: 30 minutes |
Default date/time format |
Specifies a general date/time format for timestamps dis-played in the Frontend |
|
Default date format |
Specifies a general date/time format for dates displayed in the Frontend |
|
Background page plug-in |
This page plug-in is used as Default Plugin after login in case of user has not set individual default page |
The mandator is still functional, even if there is no background page plug-in available See also Default page. |
Show header |
>> Activate the checkbox to show the application header in the Frontend. |
The application header consists of the logo, the Shopping cart button (if configured), the main menu, the quick search (if configured), the user preferences and a user welcome string (if configured). |
Show footer |
>> Activate the checkbox to show the application footer in the Frontend |
The application footer contains the application version information, the copy right and the copyright label (if configured). |
Embedded mode |
>> Activate the checkbox to integrate shop systems in projects. |
Default: deactivated |
Customization
Customizes the Frontend appearance for the mandator.
Access the customization via Mandators → <Mandator name>
| Field | Description | Notice |
|---|---|---|
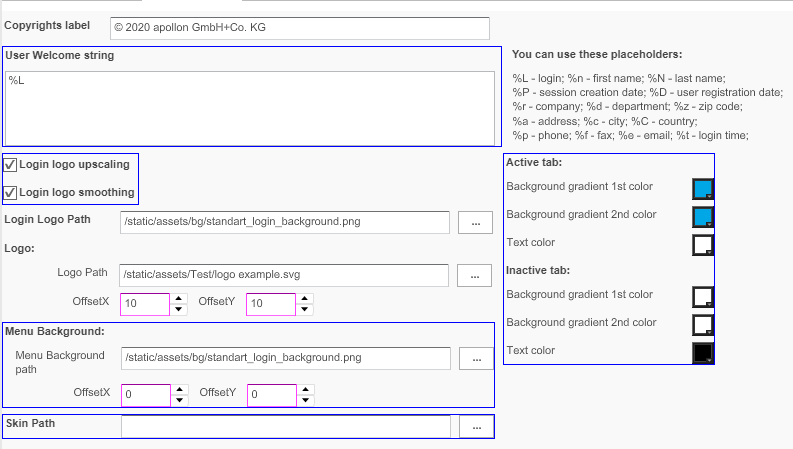
Copyrights label |
The copyrights label is part of the application footer in the Frontend (see "General Configuration") |
Information is shown in Usersettings – Information in HTML5 Frontend |
User Welcome string |
The user welcome string is part of the application header in the Frontend (see "General Configuration") |
Currently not supported for HTML5 Frontend |
Login logo upscaling |
>> Activate the checkbox so that the login logo adjusts according to the monitor used and the possible resolution |
No longer supported for HTML5 Frontend |
Login logo smoothing |
>> Activate the checkbox so that an upscaled log is smoothed |
No longer supported for HTML5 Frontend |
Login Logo Path |
The logo appears on the login page of the Frontend >> Enter the path to the logo image using the file chooser |
Usually, images are stored in <installation path>/ catalinabase/webapps/images/<mandator folder> |
Logo Path |
The logo appears in the sidebar of the Frontend and on Login Page >> Enter the path to the logo image using the file chooser |
Usually, images are stored in <installation path>/ catalinabase/webapps/images/<mandator folder> |
Offset |
The logo can be moved along the X- and Y-axis |
All values in pixels |
Menu Background path |
>> Enter the path to the image using the file chooser. |
Usually, images are stored in <installation path>/ catalinabase/webapps/images/<mandator folder> No longer supported for HTML5 Frontend |
Offset |
The image can be indented on the X- and Y-axis |
All values in pixels No longer supported for HTML5 Frontend |
Skin Path |
>> Enter the path to another swf skin using the file chooser |
Not longer supported for HTML5 Frontend |
Active tab / Inactive tab |
>> To color the tab background of active and inactive plug-ins click on the corresponding color button. The color picker opens. >> Choose the desired color. |
Not longer supported for HTML5 Frontend |
Languages
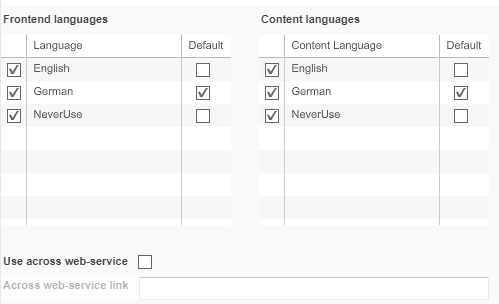
Languages are chosen for the whole system in the Administration area of the Backend.
In the language tab, you can:
-
enable/disable languages to the Frontend client
-
enable/disable content languages for metadata field values which are configured as
multilingual (also called language-dependent)
For both, the user can choose in the Frontend which language is set.
-
Access the language configuration via Mandators → <Mandator name>
| Field | Description | Notice |
|---|---|---|
Frontend languages |
>> Activate the left checkbox to allow a language in the Frontend >> Activate the right checkbox to set a language as default |
|
Content languages |
>> Activate the left checkbox to allow a language in the Content >> Activate the right checkbox to set a language as default |
|
Use across webservice |
>> Activate the checkbox to allow using the Across translation memory and terminology. >> Enter the link to the Across web-service |
Quick Search Configuration
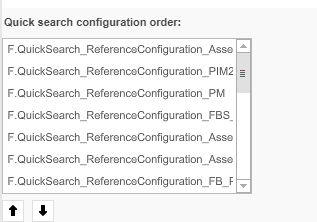
There may be several configurations for a quick search in the Frontend.In the quick search configuration, you can define the order of the different searches.
-
Access the quick search configuration via Mandators → <Mandator name>
Make sure that you have at least one of the following plug-ins available:
✓ Function plug-in “SimpleSearch”
| Field | Description | Notice |
|---|---|---|
Quick search configuration order |
Contains the identifiers of all configured quick searches. >> Select an identifier and use the Up/Down button to arrange the sort order for the Frontend |
No longer supported for HTML5 Frontend The configuration of available QuickSearches for new HTML5 Frontend is now part of OMN Page Plugin OMN-Search since OMN 5.5 |
Deep Link Access
Allows a 3rd party system access to a mandator.
-
Access the deep link access configuration via Mandators → <Mandator name>
What is a deep link ?
A deep link in OMN is a URL, which is helpful to build an external link.A foreign system like ERP could use such a link to navigate end user directly to an OMN page.
Authentication + Authorization
By using a deep link, the end user won’t need to enter his username and password.
It is so, because the authentication information is included in an encrypted parameter, which is a part of the deep link.
The authorization of such a user is based on the authenticated user account and should be pre-configured in OMN Administration Backend.
Possible Use-cases for working with deep link
How to generate a deeplink?
Basic configuration (for all use cases)
Activate and configure deep link in OMN backend (on the mandator level: Tab "Deep link access"):
| Because OMN will do a validation for each access via deep link, all configurations related to deep link must be saved into OMN DB via OMN backend configuration AND by the process to generate deep links. |
| Field | Description | Notice/ How to configure | Sample config | Sample parameter |
|---|---|---|---|---|
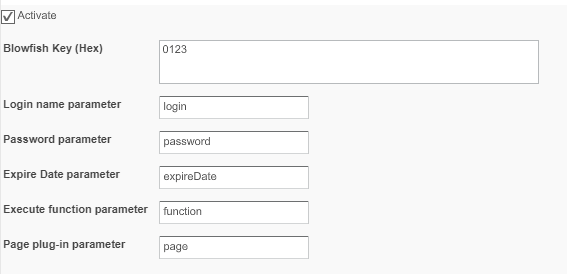
Activate |
>> Activate the checkbox to allow a 3rd party system access to a mandator |
As soon as the 3rd party licensee receives the link from OMN, he must encode the link, which contains the parameters for the login, password and expiration date, using Blowfish algorithm |
||
Blowfish Key (Hex) |
For entering the provided Blow-fish key in hex |
Needed to decode the link parameters >> Enter a hexadecimal encryption key with exactly 32 characters >> This key could be created manually Valid characters are 0-9 and A-F |
"E12BC921CF4A |
|
Login name parameter |
For entering the name of the login |
Enter the parameter’s name, not the parameter’s value |
"login" or "l" |
"demoUser" |
Password parameter |
For entering the password of the login |
Enter the parameter’s name, not the parameter’s value |
"password" or "p" |
"demoPassword" |
Expire Date parameter |
For entering the expiration date for the access |
The expiration date for the duration of the access is part of the link from OMN >> Enter the parameter’s name, not the parameter’s value >> Parameter values of this parameter should have the format long >> After this given date, the deep link will be expired and not work anymore |
"expireDate" or "e" |
"1508837486098" |
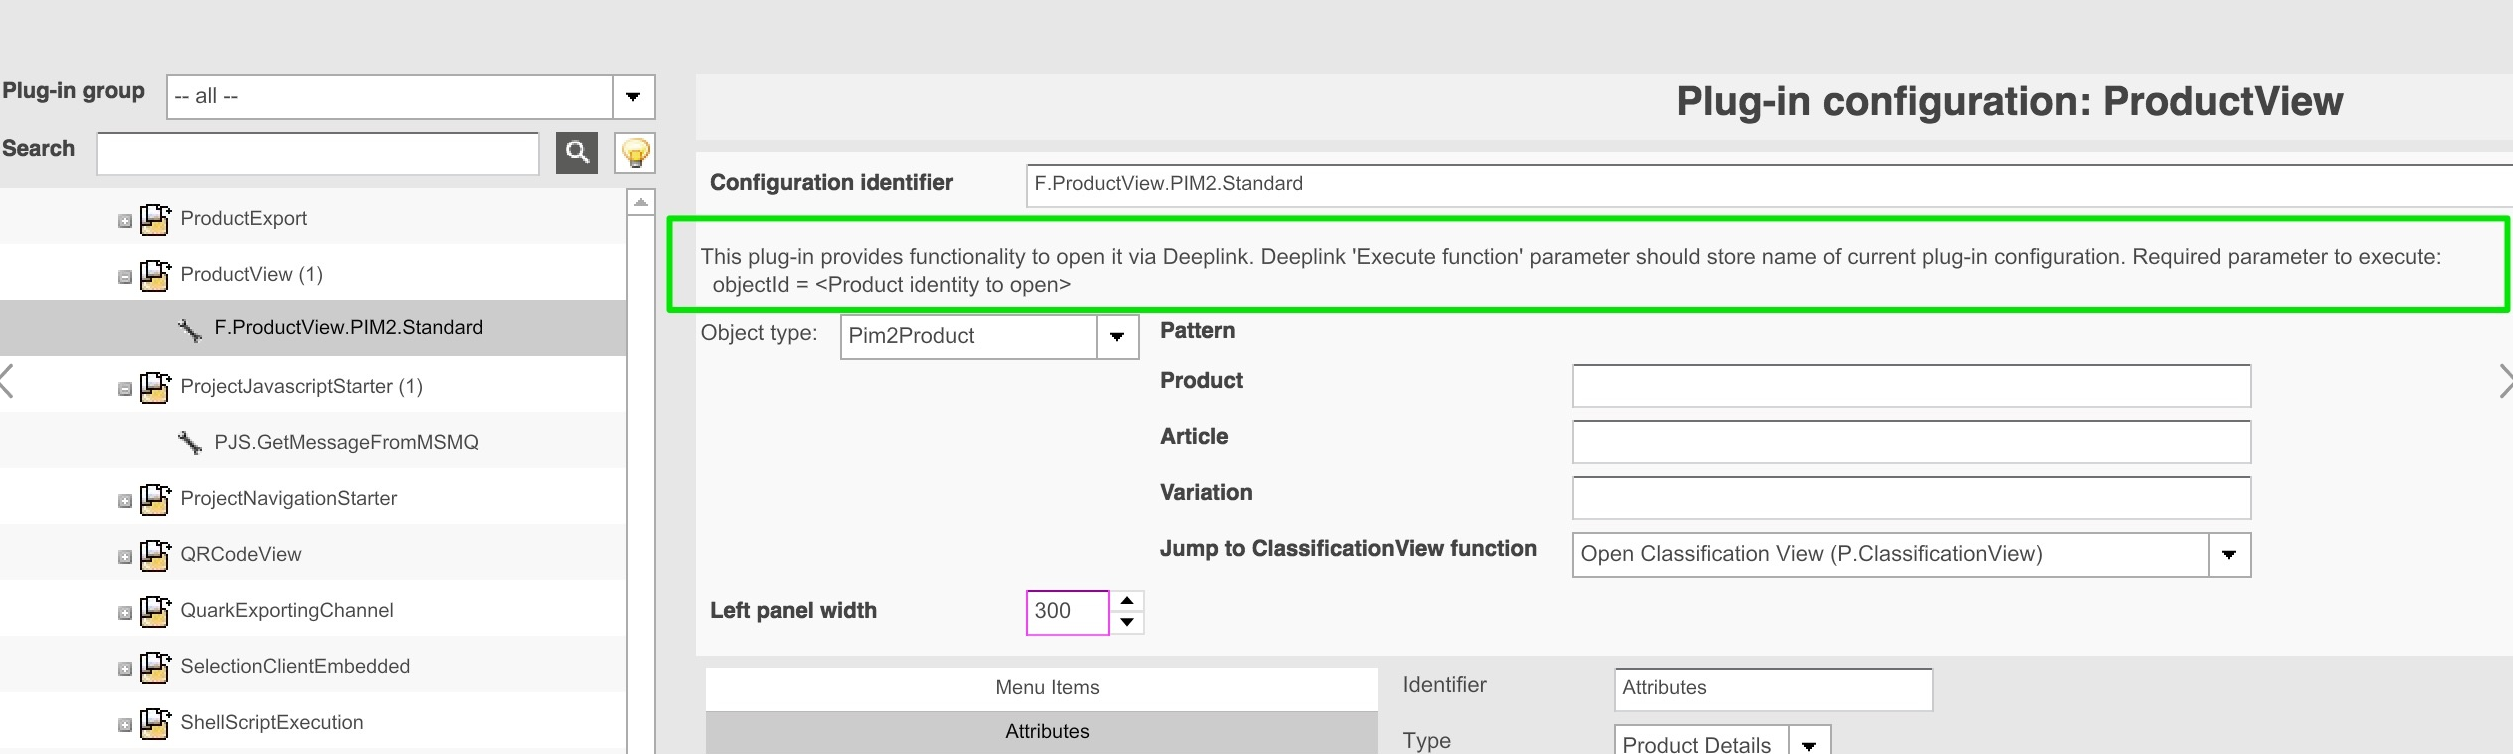
Execute function parameter |
For entering the function parameter |
Enter the parameter’s name, not the parameter’s value |
"function" |
"F.ProductView.PIM2.Standard" |
ObjectID |
Not configurable via OMN Admin Backend |
>> Some OMN Function Plug-In needs additional parameters >> The Function Plug-In ProductView for example needs an additional parameter "objectId" >> The parameter’s name is not configurable via OMN Admin Backend >> The parameter’s value is defined by Function Plug-Ins |
Parameter’s name is defined by Function Plug-Ins |
"60100" |
Page plug-in parameter |
For entering the name of the Plugin which should be opened |
Enter the parameter’s name, not the parameter’s value |
"page" |
"P.AdvancedSearch.PIM2.Standard" |
Write a JAVA/JS Program to generate a deep link, sample UnitTest to generate a link:
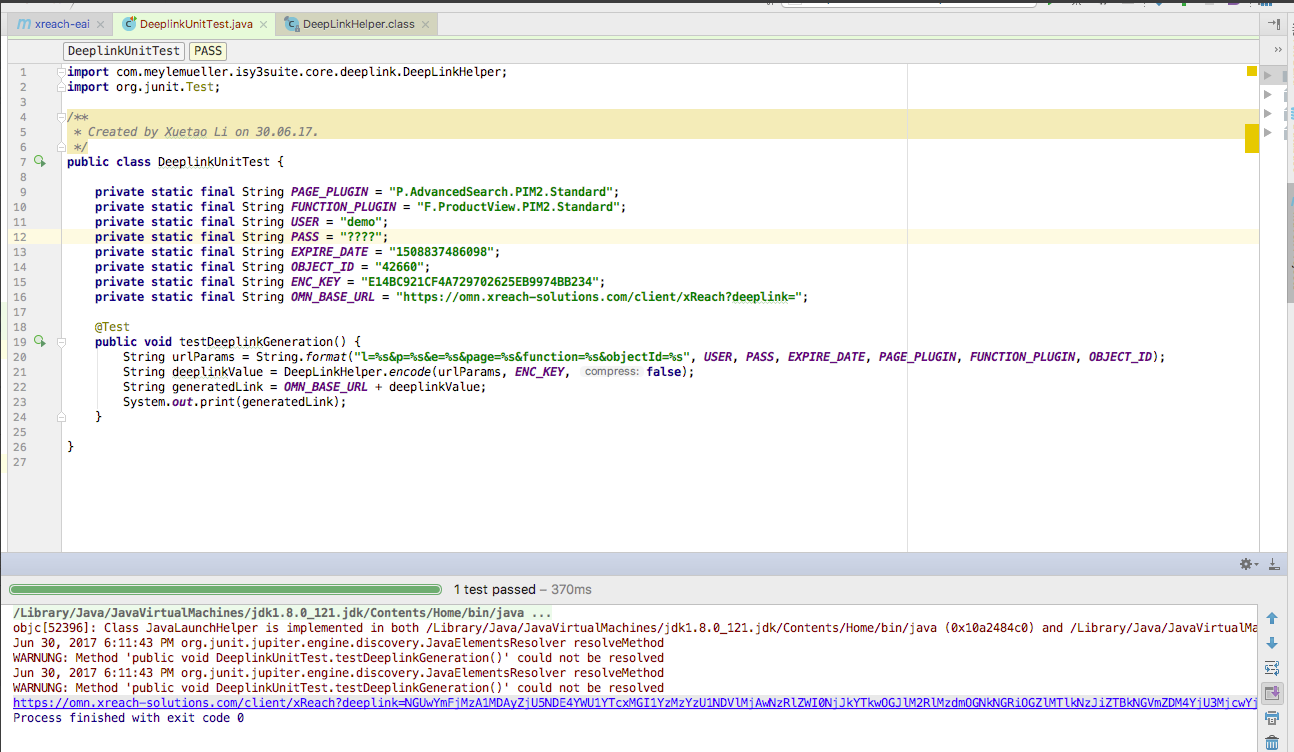
DeeplinkUnitTest.java
import com.meylemueller.isy3suite.core.deeplink.DeepLinkHelper;
import org.junit.Test;
/**
*Created by Xuetao Li on 30.06.17.*
*/
public class DeeplinkUnitTest {
private static final String PAGE_PLUGIN = "P.AdvancedSearch.PIM2.Standard";
private static final String FUNCTION_PLUGIN = "F.ProductView.PIM2.Standard";
private static final String USER = "myUser";
private static final String PASS = "myPass";
private static final String EXPIRE_DATE = "1508837486098";
private static final String OBJECT_ID = "42660";
private static final String ENC_KEY = "E14BC921CF4A729702625EB9974BB232";
private static final String OMN_BASE_URL = "https://omn.xreach-solutions.com/client/xReach?deeplink=
@Test
public void testDeeplinkGeneration() {
String urlParams = String.format("l=%s&p=%s&e=%s&page=%s&function=%s&objectId=%s", USER, PASS, EXPIRE_DATE, PAGE_PLUGIN, FUNCTION_PLUGIN, OBJECT_ID);
String deeplinkValue = DeepLinkHelper.encode(urlParams, ENC_KEY, false);
String generatedLink = OMN_BASE_URL + deeplinkValue;
System.out.print(generatedLink);
}
}
License Agreement
Integrates a disclaimer in the login dialogue of the Frontend.The license agreement must be accepted by the user before logging in to the system.
-
Access the license agreement via Mandators → <Mandator name>

| Field | Description | Notice |
|---|---|---|
Activate |
>> Activate the checkbox to activate the license agreement |
|
Link Name |
For entering the name of the link that shall appear in the login dialog. |
The link opens the corresponding file with the license agreement |
URL |
For entering the URL of the link containing license information |
Backend Administration
For defining administrators that shall be able to access the Backend of the current mandator.
These administrators can configure e.g. all available plug-ins for that mandator.
They do not have access to the System Configuration or to other mandators than the currently selected one.
-
Access the backend administration via Mandators → <Mandator name>
Make sure that you have the following prerequisites ready:
✓ At least one group is configured
✓ Mandator roles are configured - see "Configuring Usable Roles"
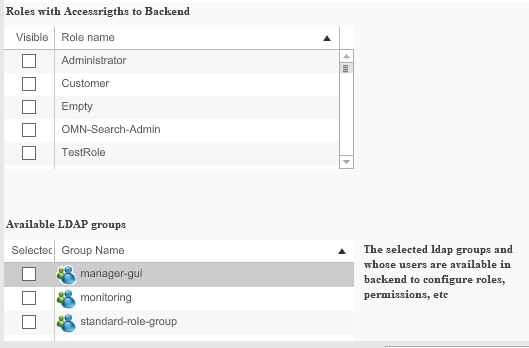
| Field | Description | Notice |
|---|---|---|
Roles with Access rights to Backend |
>> Activate the checkbox for the role whose assigned users/groups shall have access to the mandator Backend |
|
Available LDAP groups |
>> Activate the checkbox for groups for which the backend administrators shall be able to configure rules and permissions |